Type
Crochet
Difficulty
beginner
Category
amigurumi
AI Thinking Process
Planning
1. **Design Strategy**: Creating a beginner-friendly elephant using basic amigurumi shapes. The elephant will consist of a sphere for the head, oval for the body, cylinders for legs and trunk, and simple flat circles for ears. Using worsted weight yarn to create a 4-5" toy that's manageable for beginners. Will keep features simple with safety eyes and minimal assembly.
2. **Construction Plan**: Each piece worked separately in the round using continuous spiral technique (no joining). Body and head are stuffed shapes, trunk is a tapered cylinder, legs are simple cylinders, ears are flat circles. Assembly order: attach head to body, add trunk to head, attach legs to body, add ears last. This approach allows beginners to master one shape at a time.
3. **Quality Assurance**: Key concerns for beginners: maintaining tight tension for stuffing integrity, placing safety eyes before closing head, stuffing firmly but not overly (especially trunk which needs to bend naturally), proper leg placement for stability. Will include detailed assembly instructions with pin placement tips.
4. **Final Calculations**:
- Worsted weight, 4.0mm hook = ~4.5 sts per inch
- Body: increases to 30 sts = ~6.5" circumference = ~2" diameter
- Head: increases to 24 sts = ~5" circumference = ~1.6" diameter
- Trunk: starts at 9 sts, tapers to 6 sts = ~0.5" diameter
- Final elephant height: ~4-5 inches
Verification
[PRE-FLIGHT CHECKS]
1. **Completeness**: Pattern will include materials, gauge, abbreviations, instructions for all pieces (body, head, trunk, legs, ears, tail), assembly, and finishing. ✓
2. **Consistency**: Stitch counts verified - Body max 30 sts, Head max 24 sts, increases follow standard 6-st base pattern. All rounds counted and verified. ✓
3. **Constraints**: Beginner level confirmed - uses only sc, inc, dec, and magic ring. Worsted weight specified. Simple shapes from template adapted. ✓
4. **Safety**: All increase/decrease math follows 6-st increments. Verified each round's stitch count. Safety eyes mentioned with timing. ✓
Pattern
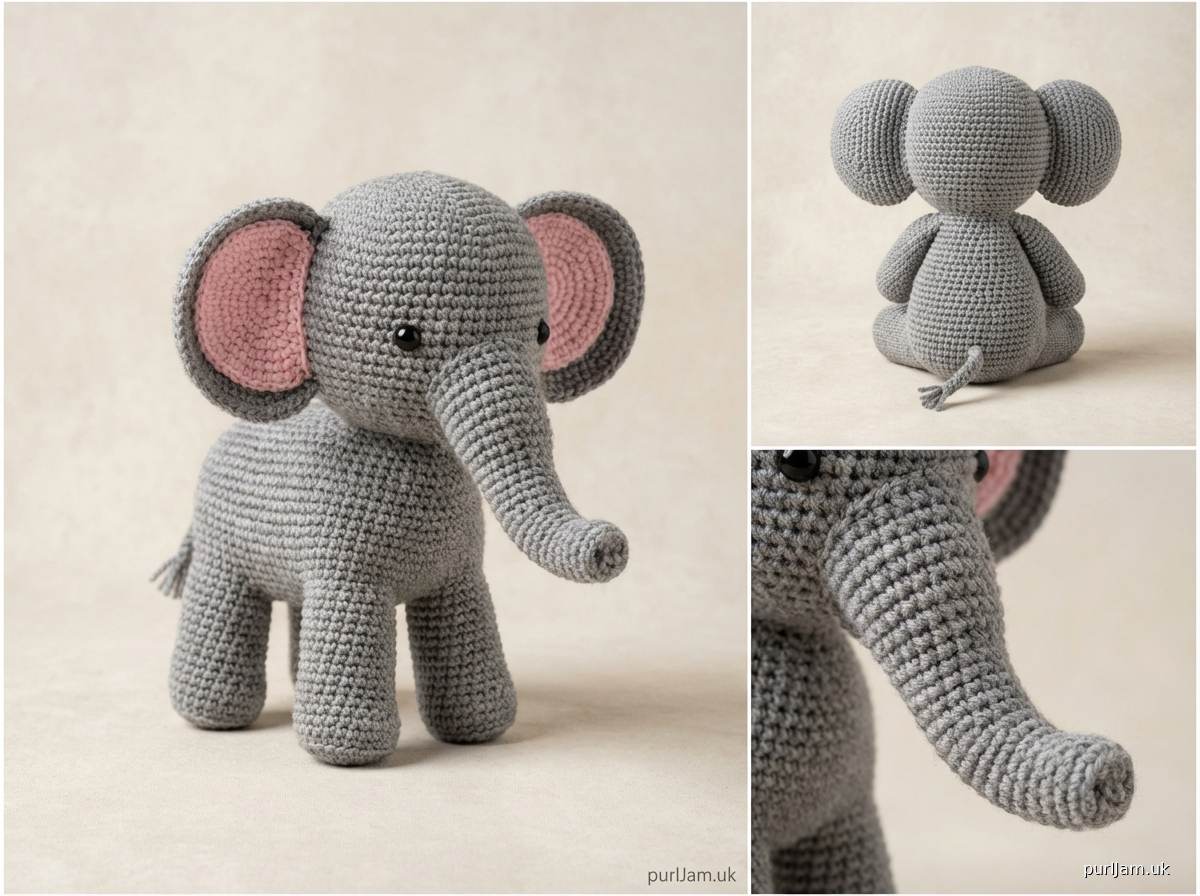
# Bella the Elephant
## Beginner-Friendly Amigurumi Pattern

A sweet little elephant perfect for beginners learning amigurumi! This pattern uses only basic stitches and simple shapes to create an adorable elephant friend. Finished size is approximately 4-5 inches tall.

---

## MATERIALS

**Yarn:**
- Worsted weight (4) yarn in your choice of color
  - Main Color (MC): approximately 100 yards (gray, blue, pink, or your choice)
  - Small amount of contrasting color for optional inner ears (pink or white)
- Suggested: Red Heart Super Saver, Bernat Super Value, Lion Brand Vanna's Choice

**Hook & Notions:**
- US G-6 (4.0mm) crochet hook (or size needed to obtain gauge)
- Yarn needle for sewing
- Stitch marker
- Fiberfill stuffing (polyester)
- Two 9mm or 12mm safety eyes
- Pins for assembly
- Optional: Embroidery thread for mouth details

---

## GAUGE

Gauge is flexible for amigurumi toys, but working tightly is essential.

**Approximate gauge:** 4.5 sts = 1 inch in single crochet

**Important:** Your stitches should be tight enough that stuffing doesn't show through. If you can see white stuffing between stitches, go down a hook size.

---

## ABBREVIATIONS

- ch = chain
- sc = single crochet
- inc = increase (2 sc in same stitch)
- dec = invisible decrease (insert hook in front loops of next 2 sts, yo, pull through both loops, yo, pull through 2 loops on hook)
- st(s) = stitch(es)
- rnd(s) = round(s)
- MC = main color
- [ ] = total stitch count at end of round

---

## PATTERN NOTES

- Work in continuous spiral rounds unless otherwise specified; do not join rounds
- Use a stitch marker to track the beginning of each round
- Stuff pieces firmly as you work, but leave neck openings unstuffed for easier assembly
- All pieces are worked in MC unless noted

---

## INSTRUCTIONS

### BODY

**Rnd 1:** 6 sc in magic ring [6]

**Rnd 2:** inc in each st around [12]
*Math check: 6 × 2 = 12 ✓*

**Rnd 3:** (sc, inc) around [18]
*Math check: 12 ÷ 2 = 6 repeats; 6 × 3 = 18 ✓*

**Rnd 4:** (2 sc, inc) around [24]
*Math check: 18 ÷ 3 = 6 repeats; 6 × 4 = 24 ✓*

**Rnd 5:** (3 sc, inc) around [30]
*Math check: 24 ÷ 4 = 6 repeats; 6 × 5 = 30 ✓*

**Rnds 6-12:** sc around [30]
*7 rounds even*

**Rnd 13:** (3 sc, dec) around [24]
*Math check: 30 ÷ 5 = 6 repeats; 6 × 4 = 24 ✓*

**Rnd 14:** (2 sc, dec) around [18]
*Math check: 24 ÷ 4 = 6 repeats; 6 × 3 = 18 ✓*

Begin stuffing body firmly.

**Rnd 15:** (sc, dec) around [12]
*Math check: 18 ÷ 3 = 6 repeats; 6 × 2 = 12 ✓*

**Rnd 16:** dec around [6]
*Math check: 12 ÷ 2 = 6 ✓*

Fasten off, leaving a long tail for sewing. Finish stuffing firmly. Use yarn needle to weave through remaining 6 sts and pull tight to close.

---

### HEAD

**Rnd 1:** 6 sc in magic ring [6]

**Rnd 2:** inc in each st around [12]
*Math check: 6 × 2 = 12 ✓*

**Rnd 3:** (sc, inc) around [18]
*Math check: 12 ÷ 2 = 6 repeats; 6 × 3 = 18 ✓*

**Rnd 4:** (2 sc, inc) around [24]
*Math check: 18 ÷ 3 = 6 repeats; 6 × 4 = 24 ✓*

**Rnds 5-9:** sc around [24]
*5 rounds even*

**Insert safety eyes** between Rnds 7 and 8, approximately 6-7 sts apart.

**Rnd 10:** (2 sc, dec) around [18]
*Math check: 24 ÷ 4 = 6 repeats; 6 × 3 = 18 ✓*

**Rnd 11:** (sc, dec) around [12]
*Math check: 18 ÷ 3 = 6 repeats; 6 × 2 = 12 ✓*

Begin stuffing head firmly.

**Rnd 12:** dec around [6]
*Math check: 12 ÷ 2 = 6 ✓*

Fasten off, leaving a long tail for sewing. Finish stuffing firmly. Use yarn needle to weave through remaining 6 sts and pull tight to close.

---

### TRUNK

**Rnd 1:** 6 sc in magic ring [6]

**Rnds 2-3:** sc around [6]

**Rnd 4:** (sc, inc) around [9]
*Math check: 6 ÷ 2 = 3 repeats; 3 × 3 = 9 ✓*

**Rnds 5-8:** sc around [9]
*4 rounds even*

Fasten off, leaving a long tail for sewing. Stuff trunk lightly (should be flexible, not stiff). The trunk will be sewn to the center front of the head, just below the eyes.

---

### LEGS (make 4)

**Rnd 1:** 6 sc in magic ring [6]

**Rnd 2:** inc in each st around [12]
*Math check: 6 × 2 = 12 ✓*

**Rnds 3-7:** sc around [12]
*5 rounds even*

Fasten off, leaving a long tail for sewing. Stuff firmly. Legs will be sewn to the bottom of the body.

---

### EARS (make 2)

**Rnd 1:** 6 sc in magic ring [6]

**Rnd 2:** inc in each st around [12]
*Math check: 6 × 2 = 12 ✓*

**Rnd 3:** (sc, inc) around [18]
*Math check: 12 ÷ 2 = 6 repeats; 6 × 3 = 18 ✓*

**Rnd 4:** (2 sc, inc) around [24]
*Math check: 18 ÷ 3 = 6 repeats; 6 × 4 = 24 ✓*

Fasten off, leaving a long tail for sewing. Do not stuff. Flatten the ear into a semi-circle shape.

**Optional inner ear detail:** Using contrasting color and yarn needle, embroider a smaller oval shape in the center of each ear, or crochet a small flat circle (6 sc in magic ring, inc around to 12 sts) and sew to ear center.

---

### TAIL

**Rnd 1:** 5 sc in magic ring [5]

**Rnds 2-4:** sc around [5]
*3 rounds even*

Fasten off, leaving a long tail for sewing. Do not stuff. The tail will curl naturally.

---

## ASSEMBLY

**Preparation:** Use pins to position pieces before sewing. This helps ensure proper placement.

**Step 1 - Attach Head to Body:**
Pin the head to the top of the body. Using the long tail from the head and yarn needle, whip stitch or mattress stitch the head securely to the body. Make sure the head is centered and facing forward.

**Step 2 - Attach Trunk:**
Pin the trunk to the center front of the head, positioned between and just below the eyes. The trunk should point slightly downward. Sew the trunk securely around the opening.

**Step 3 - Attach Legs:**
Position the four legs on the bottom of the body. Place the front two legs toward the front and the back two legs toward the back, ensuring the elephant can sit upright. Pin in place, then sew each leg securely to the body, stitching all around the opening.

**Step 4 - Attach Ears:**
Fold the bottom edge of each ear slightly to create a curved shape. Pin the ears to the sides of the head, positioned just behind the eyes. The ears should angle slightly backward. Sew the bottom curved edge of each ear to the head (about 1/3 of the ear circumference should be sewn down, leaving the top and sides free to create dimension).

**Step 5 - Attach Tail:**
Pin the tail to the center back of the body, near the bottom. Sew securely in place.

**Step 6 - Finishing Touches:**
- Weave in all remaining yarn ends
- Optional: Using embroidery thread or yarn, stitch a small curved line below the trunk for a smile
- Optional: Add toenails to feet using short straight stitches in contrasting color
- Give your elephant a final shape adjustment, bending the trunk and positioning the ears

---

## FINISHING

Weave in all loose ends securely. Trim excess yarn. Give your elephant a gentle brushing if any fuzz appears from handling.

---

## CARE INSTRUCTIONS

Hand wash gently in cool water if needed. Reshape while damp and air dry flat. If using safety eyes, the toy is not suitable for children under 3 years old.

---

## SIZE VARIATIONS

**Smaller Elephant (3-4"):**
- Use DK weight (3) yarn with a 3.5mm hook
- Reduce body max to 24 sts (stop increases at Rnd 4)
- Reduce head max to 18 sts (stop increases at Rnd 3)

**Larger Elephant (6-7"):**
- Use bulky weight (5) yarn with a 5.0mm hook
- Add one more increase round to body (36 sts) and head (30 sts)
- Work 2-3 more even rounds on body and head

---

## DESIGN NOTES

This elephant uses basic geometric shapes perfect for beginners: spheres for the head, an oval for the body, cylinders for the trunk and legs, and flat circles for the ears. The simple construction allows you to master each shape individually before assembly.

**Customization ideas:**
- Add a decorative blanket or saddle using surface slip stitch
- Create a baby elephant by using thinner yarn
- Make ears in a contrasting color
- Add a bow or flower embellishment
- Use textured yarn for a fuzzy appearance

---

## TROUBLESHOOTING

**Stuffing shows through stitches:** Your tension is too loose. Go down a hook size and/or crochet more tightly.

**Pieces are too large/small:** Adjust your hook size. Smaller hook = smaller piece; larger hook = larger piece.

**Head wobbles:** Make sure you've sewn the head securely all the way around. Add more stitches through both pieces.

**Elephant won't stand:** Stuff the legs more firmly and ensure they're positioned correctly. The legs should be at slight angles for stability.

**Trunk droops too much:** Add slightly more stuffing to help it hold its shape.

---

© 2024 Pattern Design. This pattern is for personal use only. Finished items may be sold in small quantities with credit. Please do not reproduce or distribute this pattern.

---

**Happy Crocheting!**

Your little elephant is ready to be loved! This project is perfect for learning amigurumi basics and makes a wonderful gift.
Disclaimer: This pattern was generated by AI and should be reviewed for accuracy before use. While we strive for quality, AI-generated content may contain errors. Please verify measurements, stitch counts, and instructions before beginning your project. Generated by purlJam.uk
Access your pattern anytime
Bookmark this page to access your pattern anytime