Type
Crochet
Difficulty
intermediate
Category
amigurumi
AI Thinking Process
Planning
Verification
Pattern
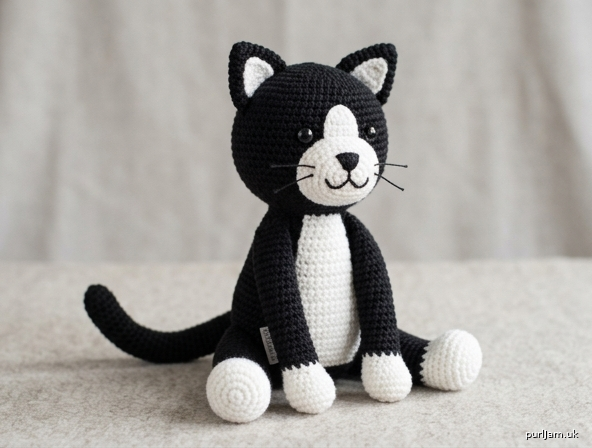
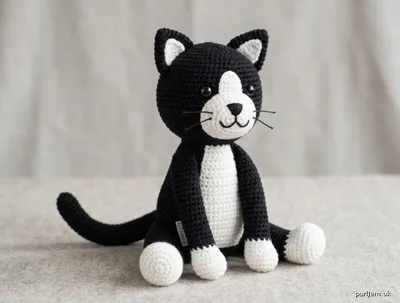
Black & White Tuxedo Cat Amigurumi
Intermediate Crochet Pattern (UK Terminology)
Finished size: Approximately 18 cm (7 in) tall when sitting
Yarn weight: Worsted / Aran (category 4)
Tension (gauge): 20 dc and 22 rounds = 10 cm (4 in) measured over dc in the round with 3.5 mm hook (or size needed to obtain a firm fabric). Work tightly so stuffing does not show.
Materials
- Worsted-weight yarn:
– Main colour (MC) Black: approx. 80 g
– Contrast colour (CC) White: approx. 30 g - Crochet hook: 3.5 mm (US E-4)
- Pair of 10 mm safety eyes
- Polyester fibre filling
- Yarn needle
- Stitch marker
- Black embroidery thread or thin black yarn for nose/mouth/whiskers (optional)
- Pins for assembly
Abbreviations (UK)
- ch – chain
- dc – double crochet (US single crochet)
- htr – half treble (US half double crochet)
- inc – increase (2 dc in same stitch)
- invdec – invisible decrease (insert hook in front loops only of next 2 sts, yarn over, pull through both loops, yarn over, pull through remaining 2 loops)
- MR – magic ring (adjustable ring)
- rnd(s) – round(s)
- st(s) – stitch(es)
- FLO – front loop only
- BLO – back loop only
- FO – fasten off
- [ ] – stitch count at end of round
- ( ) × n – repeat instructions in brackets n times
Work in continuous spirals unless stated. Do not join rounds. Place a stitch marker in the first stitch of each round and move it up as you go. Stuff firmly as directed, especially before decreases close the opening.
HEAD (make 1 in MC – black)
Rnd 1: 6 dc in MR. [6]
Rnd 2: inc in each st around. (6 increases → 6 + 6 = 12 ✓) [12]
Rnd 3: (1 dc, inc) around. (6 increases → 12 + 6 = 18 ✓) [18]
Rnd 4: (2 dc, inc) around. (6 increases → 18 + 6 = 24 ✓) [24]
Rnd 5: (3 dc, inc) around. (6 increases → 24 + 6 = 30 ✓) [30]
Rnd 6: (4 dc, inc) around. (6 increases → 30 + 6 = 36 ✓) [36]
Rnds 7–12: dc in each st around. (6 rounds even) [36]
Insert safety eyes between Rnds 10 and 11, approximately 7–8 sts apart, centred on the face.
Rnd 13: (4 dc, invdec) around. (6 decreases → 36 – 6 = 30 ✓) [30]
Rnd 14: (3 dc, invdec) around. (6 decreases → 30 – 6 = 24 ✓) [24]
Begin stuffing firmly and continue to stuff as you close.
Rnd 15: (2 dc, invdec) around. (6 decreases → 24 – 6 = 18 ✓) [18]
Rnd 16: (1 dc, invdec) around. (6 decreases → 18 – 6 = 12 ✓) [12]
Rnd 17: invdec around. (6 decreases → 12 – 6 = 6 ✓) [6]
FO, leaving a long tail. Thread tail through front loops of remaining 6 sts and pull tight to close. Weave in end.
MUZZLE (make 1 in CC – white)
Rnd 1: 6 dc in MR. [6]
Rnd 2: inc in each st around. [12]
Rnd 3: (1 dc, inc) around. [18]
Rnd 4: dc in each st around. [18]
FO, leaving a long tail for sewing. Lightly stuff. Sew to lower centre of face (covering lower portion of Rnds 11–15 of head), positioning so the top edge sits just below the eyes. Embroider a small inverted triangle nose in black at the top centre of the muzzle, then a vertical line down and a shallow “W” or curved mouth below it. Optional: add 2–3 short whiskers on each side with black thread.
EARS (make 2)
Worked in MC with CC inner detail.
Outer ear (MC):
Rnd 1: 4 dc in MR. [4]
Rnd 2: (1 dc, inc) twice. [6]
Rnd 3: (2 dc, inc) twice. [8]
Rnd 4: (3 dc, inc) twice. [10]
Rnd 5: dc in each st around. [10]
FO, leaving a long tail. Do not stuff; flatten into a rounded triangle.
Inner ear (CC – optional appliqué):
Ch 4.
Row 1: dc in 2nd ch from hook and next 2 ch. [3]
Row 2: ch 1, turn, dc2tog, 1 dc. [2]
Row 3: ch 1, turn, dc2tog. [1]
FO. Sew inner ear centred on outer ear. Sew finished ears to top of head over Rnds 4–8, spaced about 6–8 sts apart and angled slightly outward.
BODY (make 1)
Start with CC for belly, change to MC.
Rnd 1 (CC): 6 dc in MR. [6]
Rnd 2: inc in each st around. [12]
Rnd 3: (1 dc, inc) around. [18]
Rnd 4: (2 dc, inc) around. [24]
Rnd 5: (3 dc, inc) around. [30]
Rnd 6: (4 dc, inc) around. [36]
Rnd 7: (5 dc, inc) around. [42]
Rnds 8–9 (CC): dc in each st around. [42]
Change to MC at the end of Rnd 9.
Rnds 10–18 (MC): dc in each st around. (9 rounds even) [42]
Rnd 19: (5 dc, invdec) around. (6 decreases → 42 – 6 = 36 ✓) [36]
Rnd 20: dc in each st around. [36]
Rnd 21: (4 dc, invdec) around. (6 decreases → 36 – 6 = 30 ✓) [30]
Rnd 22: (3 dc, invdec) around. (6 decreases → 30 – 6 = 24 ✓) [24]
Stuff body very firmly, shaping a slightly oval sitting form (wider at the base).
Rnd 23: (2 dc, invdec) around. (6 decreases → 24 – 6 = 18 ✓) [18]
Rnd 24: (1 dc, invdec) around. (6 decreases → 18 – 6 = 12 ✓) [12]
FO, leaving a long tail for sewing to head. Add final stuffing through the opening if needed.
FRONT LEGS (make 2)
Begin with CC for paw, change to MC.
Rnd 1 (CC): 6 dc in MR. [6]
Rnd 2: inc in each st around. [12]
Rnd 3: dc in each st around. [12]
Change to MC.
Rnds 4–10 (MC): dc in each st around. (7 rounds) [12]
Lightly stuff lower half only (paw and lower leg); leave upper portion lightly filled or empty so the leg remains flexible for posing.
FO, leaving a long tail for sewing. Flatten the open edge.
HIND LEGS (make 2)
Begin with CC for paw, change to MC. Slightly shorter and thicker for a sitting pose.
Rnd 1 (CC): 6 dc in MR. [6]
Rnd 2: inc in each st around. [12]
Rnd 3: (1 dc, inc) around. [18]
Rnd 4: dc in each st around. [18]
Change to MC.
Rnd 5: (1 dc, invdec) around. [12]
Rnds 6–9 (MC): dc in each st around. (4 rounds) [12]
Stuff firmly in the paw and moderately through the leg.
FO, leaving a long tail. Flatten open edge.
TAIL (make 1 in MC)
Rnd 1: 6 dc in MR. [6]
Rnd 2: (1 dc, inc) around. [9]
Rnds 3–18: dc in each st around. (16 rounds) [9]
Stuff lightly as you go, keeping the tail flexible and slightly curved.
FO, leaving a long tail for sewing. Do not close the end; sew the open end to the body.
Assembly
- Head to body: Pin head to the open top of the body (Rnd 24). Add extra stuffing through the neck join if needed for a firm neck. Whip-stitch or ladder-stitch securely all around with the body yarn tail (or matching MC).
- Muzzle & face: Already attached and embroidered (see Head/Muzzle). Ensure eyes are locked and secure.
- Ears: Sew in place on top of head as described.
- Front legs: For a sitting pose, pin the flattened tops of the front legs to the upper front sides of the body (approximately Rnds 12–16), angled slightly forward and outward. Sew firmly.
- Hind legs: Pin the flattened tops to the lower sides of the body (near the base, Rnds 8–12), splayed outward and slightly backward so the cat sits stably on its bottom and hind paws. Sew securely. Adjust angle so the piece does not tip.
- Tail: Sew the open end to the lower back of the body (centred, about Rnd 10–12 height), curving the tail around one side or upward.
- Finishing: Weave in all ends. Gently shape the cat by rolling and squeezing. Check that all limbs and ears are firmly attached (tug test) — especially important if the toy will be given to a child.
Colour & Customisation Notes
- Classic tuxedo look: white muzzle, white chest/belly panel (already built into body start), white paw tips, optional white blaze on forehead (embroider or surface-crochet a few stitches in CC between the eyes and up toward the ears).
- For an all-black cat with only white muzzle/paws, simply start the body in MC and keep the white sections only on muzzle and leg tips.
- Optional collar: surface-crochet or sew a chain of CC or a contrasting colour around the neck.
Safety
- Safety eyes are recommended; if the cat is for a child under 3 years, embroider eyes with yarn instead.
- Secure every sewn part with multiple passes of yarn so nothing can be pulled loose.
- Use only new, clean polyester stuffing.
Care
Surface clean with a damp cloth. If necessary, hand-wash gently in cool water and air-dry thoroughly, reshaping while damp.
Enjoy your finished black-and-white tuxedo cat!
Disclaimer: This pattern was generated by AI and should be reviewed for accuracy before use. While we strive for quality, AI-generated content may contain errors. Please verify measurements, stitch counts, charts, and instructions before beginning your project. Generated by purlJam.uk
Love this pattern?
Save this pattern to your free PurlJam libraryAccess your pattern anytime
Bookmark this page to access your pattern anytime