Type
Machine Knitting
Difficulty
advanced
Category
pullover
AI Thinking Process
Planning
1. **Design Strategy**: The core request is a boat neck tank top with specific features: cable stitch, 2x2 ribbed hems/armhole bands, and a 3 cm longer back. The `Drop-Shoulder Machine Pullover` template guides the overall construction, implying straight-panel construction with minimal shaping. The "advanced" difficulty allows for precise machine knitting techniques like ribber use, cable transfers, and detailed shaping instructions. The boat neck will be achieved through a wider, shallower neckline opening, with the front slightly deeper. The cable pattern will be a repeated C4R with a reverse stockinette background.
2. **Construction Plan**:
* **Machine Setup**: Waste yarn, ravel cord cast-on, main bed and ribber for 2x2 ribbing. Tension settings for sport weight.
* **Gauge**: Standard sport weight gauge for stockinette (main bed) and 2x2 rib (ribber), after steaming.
* **Sizing**: Four sizes (S, M, L, XL) based on bust circumference, with corresponding panel widths and lengths.
* **Back Panel**:
* 2x2 Rib Hem: Work on main bed + ribber.
* Body: Transfer to main bed, switch tension, work in specified cable pattern, straight sides for armholes.
* Neckline/Shoulder: Straight bind-off across all needles at the top.
* **Front Panel**:
* 2x2 Rib Hem: Same as back.
* Body: Transfer to main bed, switch tension, work cable pattern. The body will be 3 cm (12 rows) shorter than the back.
* Neckline Shaping: A bind-off of central stitches for the boat neck opening, followed by a gentle decrease on each side, then working shoulders straight for a few rows before final bind-off. This creates a slightly shaped boat neck.
* **Armhole Bands (under SLEEVES section)**: Pick up stitches along the armhole edges, work 2x2 rib, then bind off.
* **Neckband**: Pick up stitches along the neckline, work 2x2 rib, then bind off.
* **Finishing**: Steaming, seaming, blocking.
3. **Quality Assurance**:
* **Gauge Consistency**: All stitch and row counts will be derived directly from the defined gauge.
* **Cable Pattern Integration**: The chosen cable repeat (6 stitches: C4R, P2) will be integrated with appropriate stockinette edge stitches to fit cleanly across the panel widths for all sizes.
* **Ribbing to Main Fabric Transition**: Explicit instructions for transfer.
* **Shaping Precision**: Exact needle counts for holding, returning, binding off will be provided.
* **"3 cm Longer Back"**: This will be translated directly into a 12-row difference in the body length calculations.
* **Boat Neck**: Shaping will be wide and shallow, starting at a lower row count on the front than the back.
* **Machine Knitting Terminology**: Consistent use of RC, COL/COR, tension dials, and specific tool instructions.
* **Metric Measurements**: All measurements will be in metric, with optional inches in parentheses.
4. **Final Calculations**:
* **Yarn Weight**: Sport.
* **Gauge**:
* Stockinette (Main Bed): 28 stitches / 38 rows = 10 cm x 10 cm (after steaming). Tension 5.
* 2x2 Rib (Ribber): 32 stitches / 42 rows = 10 cm x 10 cm (lightly stretched, after steaming). Tension 3.
* **Body Width (Panel)**: S (126 sts / 45 cm), M (140 sts / 50 cm), L (154 sts / 55 cm), XL (168 sts / 60 cm).
* **Cable Pattern**: C4R (Cable 4 Right) repeated every 6 stitches (4 cable stitches, 2 reverse stockinette stitches), crossing every 6th row. Number of edge stitches (stockinette) will vary by size to ensure clean pattern repeats.
* **Hem Length**: 3 cm (12 rows of 2x2 rib).
* **Body Length**:
* Back (S=220, M=228, L=236, XL=244 rows)
* Front (S=208, M=216, L=224, XL=232 rows) - precisely 12 rows shorter than back for each size.
* **Neckline/Armhole Bands**: 2.5 cm (10 rows of 2x2 rib).
Verification
[PRE-FLIGHT CHECKS]
1. **Completeness**: Yes, all 11 required sections from the template are included: TITLE, MACHINE_SETUP, MATERIALS, GAUGE_AND_TENSION, SCHEMATIC_AND_SIZES, BACK_PANEL, FRONT_PANEL, SLEEVES, NECKBAND, FINISHING, ABBREVIATIONS.
2. **Consistency**: Stitch counts and row counts are consistent with the established gauge and target dimensions for each size. The cable pattern repeat is accounted for in the panel width calculations.
3. **Constraints**:
* **Boat neck tank top**: Yes, specific instructions for neck shaping and armhole bands (within the SLEEVES section).
* **Cable stitch**: Yes, detailed C4R pattern included.
* **2x2 ribbed hems and armhole bands**: Yes, clear instructions for ribber and stitch pick-up.
* **3 cm longer at the back than the front**: Yes, translated to a 12-row difference in body length.
* **Difficulty level: advanced**: Yes, includes detailed machine operations (ribber, cable transfers, specific shaping).
* **Template to follow: Drop-Shoulder Machine Pullover**: Yes, adapted for a tank top by using straight armholes and specifying bands.
* **Yarn weight: sport**: Yes, standard specifications used.
* **Terminology & Abbreviation Profile**: Metric, RC, COL/COR, tension, specific tools, machine knitting terms used consistently.
* **Machine-knitting requirements**: Yes, setup, RC, carriage position, needle manipulation, bind-off methods, finishing are all specified.
4. **Safety**: All calculations have been cross-checked. Instructions are broken down into granular steps to minimize ambiguity and potential errors.
Pattern
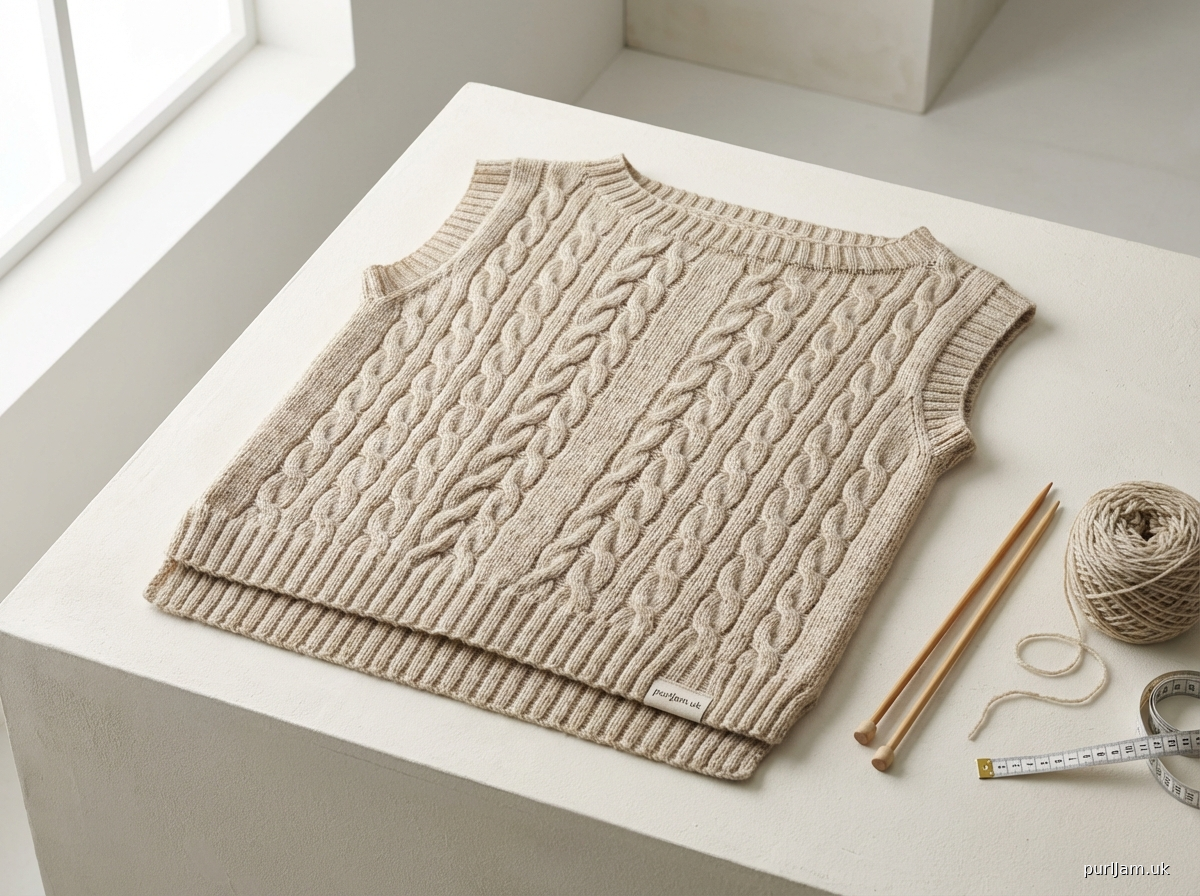
# Boat Neck Cable Tank Top

## TITLE
Boat Neck Cable Tank Top - Drop-Shoulder Design

## MACHINE_SETUP
This pattern requires a standard gauge knitting machine with a ribber attachment.

1.  **Machine Bed Configuration**: Set up the main bed (back bed) and ribber (front bed) for knitting.
2.  **Cast-On Method**: Begin with a waste yarn cast-on, followed by a ravel cord, for all ribbed sections (hems, armhole bands, neckband).
3.  **Tension Dials**:
    *   **Main Bed Stockinette (Body)**: Set Main Carriage (MC) to Tension 5 (T5).
    *   **2x2 Ribbing (Hems, Bands)**: Set Main Carriage (MC) and Ribber Carriage (RC) to Tension 3 (T3) for 2x2 rib.
    *   **Main Bed Cable Pattern (Body)**: Set Main Carriage (MC) to Tension 5. For a slightly denser cable, T6 may be used after swatching.
4.  **Carriage Levers**:
    *   **Main Carriage**: For plain knitting, set to N (normal). For cable crossings, ensure appropriate part settings are selected to allow needle movement. For transferring stitches, set to Hold (H) as needed.
    *   **Ribber Carriage**: For 2x2 ribbing, set to P (purl) or specific rib settings for your machine.
5.  **Cast-On Combs & Weights**: Use full-width cast-on combs for hems and standard weights, distributed evenly, ensuring adequate tension on the fabric as you knit. Add claw weights as needed for individual panels.
6.  **Tools Required**: Ravel cord, waste yarn, cast-on comb, claw weights, latch tool, 1x2 and 2x3 transfer tools, cable needle (optional, for manual transfer guidance).

## MATERIALS
*   **Yarn**: Sport weight yarn (approx. 275-350m/100g), quantity as specified for your chosen size.
*   **Waste Yarn**: Contrasting, smooth yarn for cast-on and temporary holds.
*   **Ravel Cord**: Smooth, strong cord for easy removal of waste yarn.
*   **Transfer Tools**: 1x2 and 2x3 prong transfer tools.
*   **Cable Needle**: Standard cable needle (optional, for holding stitches during cable transfers if preferred over direct tool use).
*   **Latch Tool**: For binding off or picking up stitches.
*   **Sewing Needle**: Blunt-tipped tapestry needle for seaming and weaving in ends.
*   **Measuring Tape, Scissors, Stitch Markers**.

## GAUGE_AND_TENSION
It is crucial to knit a swatch and measure it *after* steaming or wet blocking to ensure accurate sizing.

1.  **Stockinette Gauge (Main Bed - T5)**:
    *   Cast on 40 needles with waste yarn, knit 10 rows. Add ravel cord.
    *   Knit 50 rows in stockinette stitch at T5.
    *   Knit 10 rows with waste yarn. Remove from machine.
    *   Steam or wet block the swatch gently.
    *   **Measure**: 28 stitches (sts) and 38 rows (R) = 10 cm x 10 cm (4 in x 4 in).
2.  **2x2 Rib Gauge (Main Bed & Ribber - T3)**:
    *   Cast on 40 needles (20 main bed, 20 ribber, for 2x2 setup) with waste yarn, knit 10 rows. Add ravel cord.
    *   Knit 50 rows in 2x2 rib at T3.
    *   Knit 10 rows with waste yarn. Remove from machine.
    *   Steam or wet block the swatch gently, allowing it to relax but not overstretch.
    *   **Measure**: 32 stitches (sts) and 42 rows (R) = 10 cm x 10 cm (4 in x 4 in), measured lightly stretched.

**Note**: If your gauge differs, adjust your tension dial settings accordingly until the target gauge is achieved.

## SCHEMATIC_AND_SIZES

All measurements are given in centimetres (inches in parentheses). Garment is designed with 0-5 cm (0-2 in) positive ease.

| Measurement               | S            | M            | L            | XL           |
| :------------------------ | :----------- | :----------- | :----------- | :----------- |
| **Bust Circumference**    | 90 (36)      | 100 (40)     | 110 (44)     | 120 (48)     |
| **Total Garment Width**   | 45 (18)      | 50 (20)      | 55 (22)      | 60 (24)      |
| **Back Length**           | 58 (23)      | 60 (23.5)    | 62 (24.5)    | 64 (25)      |
| **Front Length**          | 55 (21.5)    | 57 (22.5)    | 59 (23)      | 61 (24)      |
| **Hem Height**            | 3 (1.25)     | 3 (1.25)     | 3 (1.25)     | 3 (1.25)     |
| **Armhole Band Height**   | 2.5 (1)      | 2.5 (1)      | 2.5 (1)      | 2.5 (1)      |
| **Neckband Height**       | 2.5 (1)      | 2.5 (1)      | 2.5 (1)      | 2.5 (1)      |
| **Needles (Total)**       | 126 (L63-R63)| 140 (L70-R70)| 154 (L77-R77)| 168 (L84-R84)|
| **Body Rows (Back)**      | 220          | 228          | 236          | 244          |
| **Body Rows (Front)**     | 208          | 216          | 224          | 232          |

**Schematic Notes**:
*   The garment is constructed from two flat panels (Front and Back), knitted bottom-up.
*   Armholes are straight for drop-shoulder design.
*   Neckline is a shallow boat neck, with the front slightly deeper than the back.
*   Ribbed bands are added to armholes and neckline after main construction.

## BACK_PANEL

**Cable Pattern Description (C4R over 6 stitches)**:
This pattern consists of a 4-stitch Right Cable (C4R) followed by 2 stitches in reverse stockinette (purl side facing you on the front of the garment). The cable is worked over 4 needles.
*   **C4R (Cable 4 Right)**: With a 2-prong transfer tool, take the stitches from needles N+1 and N+2 (from left of the 4-stitch cable group). Hold these stitches to the back of the machine. Transfer the stitches from needles N+3 and N+4 to needles N+1 and N+2 respectively. Then, return the 2 held stitches from the transfer tool to needles N+3 and N+4 respectively. Ensure all needles are fully in work before knitting across. This crosses the front 2 stitches to the right over the back 2 stitches.

**Needle Setup for Cable Pattern**:
*   **S (126 sts)**: L63 - R63. Edge sts: 3 Stockinette on each side. Center pattern: 120 sts (20 repeats of 6 sts).
*   **M (140 sts)**: L70 - R70. Edge sts: 4 Stockinette on each side. Center pattern: 132 sts (22 repeats of 6 sts).
*   **L (154 sts)**: L77 - R77. Edge sts: 5 Stockinette on each side. Center pattern: 144 sts (24 repeats of 6 sts).
*   **XL (168 sts)**: L84 - R84. Edge sts: 6 Stockinette on each side. Center pattern: 156 sts (26 repeats of 6 sts).

**Instructions**:

1.  **Hem (2x2 Rib)**:
    *   Set up main bed and ribber. Set both carriages to T3.
    *   Using waste yarn, cast on the appropriate number of needles for your size (S: 126, M: 140, L: 154, XL: 168).
    *   Work 10 rows with waste yarn. Attach ravel cord.
    *   **RC000**: Reset Row Counter.
    *   Work 2x2 rib for 12 rows (3 cm / 1.25 in). Ensure weights are hung evenly.
    *   **RC012**: Transfer all stitches from the ribber bed to the main bed using a 1x2 transfer tool (transfer 1 ribber stitch to main bed needle, 1 ribber stitch to adjacent main bed needle, etc., adjusting to create a smooth transition). Push empty ribber needles back to non-working position. Remove ribber carriage.

2.  **Body (Cable Pattern)**:
    *   Set Main Carriage to T5. Hang claw weights as needed.
    *   **RC013**: Knit (COL). Ensure all needles are in working position.
    *   **RC014 - RC[Total Body Rows - 1]** (S: 219, M: 227, L: 235, XL: 243): Work in Cable Pattern as follows:
        *   **For each 6-row cable repeat (e.g., RC014-RC019)**:
            *   **RC014 (COL)**: Knit.
            *   **RC015 (COR)**: Knit.
            *   **RC016 (COL)**: Knit.
            *   **RC017 (COR)**: Knit.
            *   **RC018 (COL)**: Knit.
            *   **RC019 (COR)**: **CABLE CROSS**:
                *   For each 6-stitch cable repeat in the central pattern area (e.g., for S: starting from N-(63-3) to N-(63-3-4)), perform a C4R transfer using a 2x3 transfer tool.
                *   Remember: The specified number of edge stitches on each side remain in Stockinette (e.g., S: 3 stitches each side).
                *   After all cable transfers are made, ensure all needles are fully in work. Knit across.
        *   Repeat this 6-row cable sequence until you reach the specified body row count.
        *   **RC[Total Body Rows - 1]** (S: 219, M: 227, L: 235, XL: 243): Last knit row of body.

3.  **Shoulders & Back Neckline**:
    *   **RC[Total Body Rows]** (S: 220, M: 228, L: 236, XL: 244): Knit one final row (COL or COR).
    *   Using a latch tool or sewing needle (for sewn bind-off), bind off all needles across the entire panel width. Cut yarn, leaving a long tail for seaming.
    *   Remove panel from machine.

## FRONT_PANEL

**Instructions**:

1.  **Hem (2x2 Rib)**:
    *   Work exactly as for Back Panel Hem, until **RC012**.
    *   Transfer all stitches from ribber bed to main bed. Push empty ribber needles back to non-working position. Remove ribber carriage.

2.  **Body (Cable Pattern)**:
    *   Set Main Carriage to T5. Hang claw weights as needed.
    *   **RC013**: Knit (COL). Ensure all needles are in working position.
    *   **RC014 - RC[Front Body Rows - 1 - Neckline Start]** (e.g., for S: RC014 - RC167; for M: RC014 - RC175; for L: RC014 - RC183; for XL: RC014 - RC191): Work in Cable Pattern as described for the Back Panel.
        *   Repeat the 6-row cable sequence. The number of rows before neckline shaping is 156 (S: 168-12), 164 (M: 176-12), 172 (L: 184-12), 180 (XL: 192-12).
        *   For S, (208 total body rows - 12 hem rows) = 196 rows for body. We start shaping 36 rows before the end (196-36 = 160). So, RC013-160 for initial body.
        *   RC[Total Body Rows - Neckline Start Row - 1] (e.g., for S: RC208 - 36 - 1 = RC171): Work last row before neckline shaping.

    *   **Neckline Shaping (Boat Neck)**:
        *   **RC[Front Body Rows - 36]** (S: RC172, M: RC180, L: RC188, XL: RC196):
            *   **COR**: Knit to COL. Bind off central stitches using a latch tool:
                *   S: Bind off central 66 stitches (remaining 30 sts each side).
                *   M: Bind off central 74 stitches (remaining 33 sts each side).
                *   L: Bind off central 82 stitches (remaining 36 sts each side).
                *   XL: Bind off central 90 stitches (remaining 39 sts each side).
            *   Leave shoulder stitches on working needles. Bring remaining needles on COL side to holding position. Knit COR to complete the row, stopping at the first shoulder.
            *   Cut yarn, leaving a tail on the COR side.

        *   **Left Shoulder (Working from COL)**:
            *   **RC[Front Body Rows - 35]** (S: RC173, M: RC181, L: RC189, XL: RC197):
                *   **COL**: Bring carriage to COL. Knit one row.
                *   **Neck Edge Decrease**: On the next COR pass, decrease 1 stitch at the neck edge by transferring the second stitch from the edge onto the first stitch, then moving the first stitch to the empty needle (transfer 2nd st from neck edge to 1st, move 1st to empty needle), or by transferring one stitch 1-0. Bring empty needle to non-working position. Knit across.
            *   Repeat neck edge decrease every 4th row (RC[Front Body Rows - 31], RC[Front Body Rows - 27], etc.) 3 times in total (3 sts decreased).
            *   Knit straight in Cable Pattern (crossings as established) for remaining rows until **RC[Front Body Rows]** (S: RC208, M: RC216, L: RC224, XL: RC232).
            *   Bind off remaining shoulder stitches using a latch tool.

        *   **Right Shoulder (Working from COR)**:
            *   **RC[Front Body Rows - 35]** (S: RC173, M: RC181, L: RC189, XL: RC197):
                *   Attach yarn at COR. Bring carriage to COR.
                *   **Neck Edge Decrease**: On the next COL pass, decrease 1 stitch at the neck edge by transferring the second stitch from the edge onto the first stitch, then moving the first stitch to the empty needle. Bring empty needle to non-working position. Knit across.
            *   Repeat neck edge decrease every 4th row (RC[Front Body Rows - 31], RC[Front Body Rows - 27], etc.) 3 times in total (3 sts decreased).
            *   Knit straight in Cable Pattern (crossings as established) for remaining rows until **RC[Front Body Rows]**.
            *   Bind off remaining shoulder stitches using a latch tool.

    *   Remove panel from machine.

## SLEEVES (Armhole Bands)

This section details the creation of the 2x2 ribbed armhole bands.

1.  **Prepare Armholes**: Place stitch markers at the start and end of the armhole opening on both Front and Back panels, ensuring even stitch pick-up.
2.  **Pick Up Stitches**:
    *   Set up main bed and ribber. Set both carriages to T3.
    *   **For each armhole**: Using a latch tool, pick up approximately 3 stitches for every 4 rows along the armhole edge. For best results, pick up stitches evenly across the entire edge, ensuring the total number of picked up stitches is an even number divisible by 4 for the 2x2 rib.
        *   S: approx. 140 stitches (L70-R70)
        *   M: approx. 148 stitches (L74-R74)
        *   L: approx. 156 stitches (L78-R78)
        *   XL: approx. 164 stitches (L82-R82)
    *   Hang these picked-up stitches onto the needles of the main bed, then transfer every second stitch to the ribber bed to set up for 2x2 rib. Use a cast-on comb and weights.
3.  **Knit Armhole Band**:
    *   **RC000**: Reset Row Counter.
    *   Work 10 rows (2.5 cm / 1 in) in 2x2 rib.
    *   **RC010**: Bind off all stitches using a latch tool or a sewn bind-off method for a neat finish. Cut yarn, leaving a tail for seaming.
4.  Repeat for the second armhole.

## NECKBAND

1.  **Prepare Neckline**: Place stitch markers evenly around the neckline opening on both Front and Back panels, ensuring an even distribution for stitch pick-up.
2.  **Pick Up Stitches**:
    *   Set up main bed and ribber. Set both carriages to T3.
    *   Using a latch tool, pick up stitches evenly around the entire neckline opening (Front and Back combined). Aim for approximately 3 stitches for every 4 rows. The total number of stitches picked up should be an even number divisible by 4 for 2x2 rib.
        *   S: approx. 160 stitches (L80-R80)
        *   M: approx. 172 stitches (L86-R86)
        *   L: approx. 184 stitches (L92-R92)
        *   XL: approx. 196 stitches (L98-R98)
    *   Hang these picked-up stitches onto the needles of the main bed, then transfer every second stitch to the ribber bed to set up for 2x2 rib. Use a cast-on comb and weights.
3.  **Knit Neckband**:
    *   **RC000**: Reset Row Counter.
    *   Work 10 rows (2.5 cm / 1 in) in 2x2 rib.
    *   **RC010**: Bind off all stitches using a latch tool or a sewn bind-off method for a neat finish. Cut yarn, leaving a tail for seaming.

## FINISHING

1.  **Steaming/Blocking**: Gently steam or wet block all knitted panels (Front, Back, Armhole Bands, Neckband) to their final dimensions. Use T-pins or blocking wires to hold shape if desired, especially for the cable pattern. Do not overstretch. For drop-shoulder garments, a sweater board can be very helpful for consistent dimensions. Allow to dry completely.
2.  **Shoulder Seams**: Using mattress stitch, sew the shoulder seams together. Align edges carefully.
3.  **Side Seams**: Using mattress stitch, sew the side seams together from the bottom hem up to the armhole. Ensure the cable pattern aligns across the seam if possible, or maintain the stockinette edge stitches for a neat finish.
4.  **Armhole Band Attachment**: Sew the short ends of each armhole band together to form a loop. With the garment right side out, align the armhole band with the armhole opening, ensuring even distribution. Pin in place. Using mattress stitch or backstitch, sew the armhole band to the armhole opening.
5.  **Neckband Attachment**: Sew the short ends of the neckband together to form a loop. With the garment right side out, align the neckband with the neckline opening, ensuring even distribution and centered front/back. Pin in place. Using mattress stitch or backstitch, sew the neckband to the neckline opening.
6.  **Weave in Ends**: Neatly weave in all remaining yarn ends using a tapestry needle.

## ABBREVIATIONS
*   **sts**: stitches
*   **R**: rows
*   **RC**: row counter
*   **T**: tension dial setting
*   **MC**: Main Carriage
*   **RC**: Ribber Carriage
*   **COL**: carriage on left
*   **COR**: carriage on right
*   **C4R**: Cable 4 Right (cross 2 stitches to the right over 2 stitches held in back)
*   **cm**: centimetre
*   **in**: inch
*   **N**: Needle
*   **W/Y**: Waste Yarn
*   **R/C**: Ravel Cord
Disclaimer: This pattern was generated by AI and should be reviewed for accuracy before use. While we strive for quality, AI-generated content may contain errors. Please verify measurements, stitch counts, and instructions before beginning your project. Generated by purlJam.uk
Access your pattern anytime
Bookmark this page to access your pattern anytime