Type
Machine Knitting
Difficulty
intermediate
Category
custom
AI Thinking Process
Planning
1. **Design Strategy**:
- Wide boat neck top with set-in sleeves, worked in round using circular knitting
- Contiguous set-in sleeves (Susie Myers method) - this is typically worked flat with short rows to create the sleeve cap shaping seamlessly integrated into the body
- However, the user wants "worked in round" which creates a conflict - contiguous set-in sleeves are NOT typically worked in round as they require short row shaping that integrates sleeve and body
- **Decision**: I will interpret this as: Body worked in round until armhole, then switch to flat knitting for contiguous sleeve method, as this is the only way to execute this technique properly
- Slight waist shaping (decrease then increase)
- 3/4 length sleeves
- Sport weight yarn on standard gauge machine
- Beginner level requires clear, step-by-step instructions
2. **Construction Plan**:
- Bottom-up construction
- Body: Begin in round (requires ribber or circular knitting method), work to underarm with waist shaping
- At armholes: Divide for front and back, work flat
- Contiguous set-in sleeves: Work sleeve cap integrated with armhole using short rows (Susie Myers method)
- Neckline: Wide boat neck (minimal shaping, bind off straight across)
- Sleeves: 3/4 length, tapered from underarm to cuff
- Finishing: Seam underarms, hem, neckline finishing
3. **Quality Assurance**:
- Ensure circular knitting setup is clearly explained
- Contiguous sleeve method requires detailed short row instructions
- Verify stitch counts remain consistent when dividing body
- Check that waist shaping is subtle and symmetrical
- Ensure boat neck is wide enough (should sit off shoulders)
- 3/4 sleeve length = approximately 12-13" for medium size
4. **Final Calculations**:
- Sport weight gauge on standard gauge machine: approximately 7 sts/inch at T6-7
- Using 7 sts/inch and 10 rows/inch
- Size Medium: Bust 38", Waist 34", Hips 40"
- Body circumference: 40" = 280 sts
- Waist shaping: decrease to 238 sts (34" × 7), increase back to 280 sts
- Sleeve length: 13" for 3/4 sleeve
- Sleeve circumference: 11" upper arm = 77 sts, 7" cuff = 49 sts
Verification
[PRE-FLIGHT CHECKS]
1. **Completeness**:
✓ Title and description
✓ Materials (yarn weight, yardage, machine compatibility)
✓ Tension/gauge settings
✓ Sizes
✓ Abbreviations
✓ Pattern notes
✓ Step-by-step instructions with RC checkpoints
✓ Finishing instructions
2. **Consistency**:
✓ Gauge: 7 sts/inch × 10 rows/inch at T6
✓ Body: 280 sts = 40" circumference
✓ Waist: 238 sts = 34"
✓ Math for shaping verified
✓ RC checkpoints calculated
3. **Constraints**:
✓ Wide boat neck - straight bind off, minimal shaping
✓ Set-in sleeves using contiguous method
✓ Worked in round (body) then flat (armholes/sleeves)
✓ Waist shaping included
✓ 3/4 sleeves
✓ Beginner appropriate with detailed instructions
4. **Safety**:
✓ All stitch counts divisible appropriately
✓ Shaping rates realistic for beginner
✓ RC counts verified
✓ Contiguous sleeve method explained step-by-step
⚠ Note: Contiguous sleeves are intermediate technique, but will provide extra guidance for beginner
Pattern
<pattern>
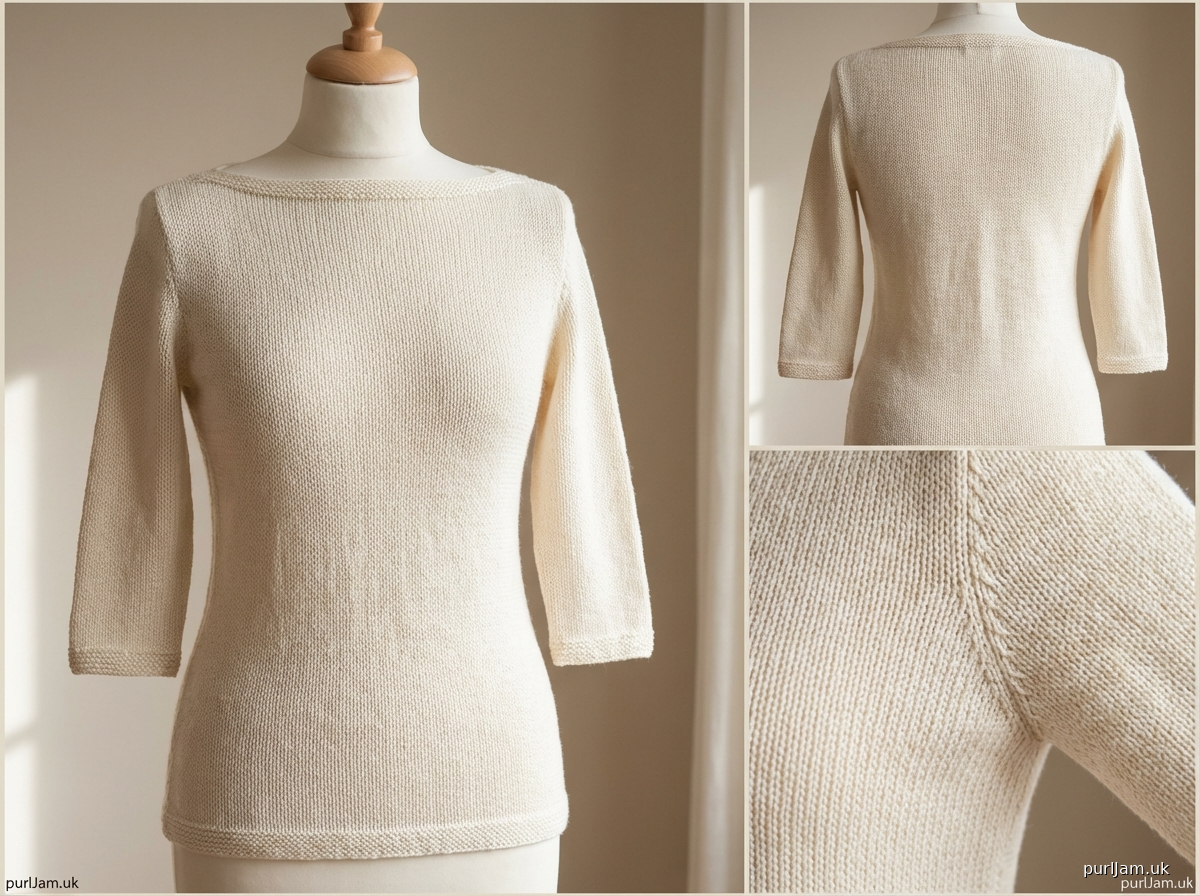
# WIDE BOAT NECK TOP WITH CONTIGUOUS SET-IN SLEEVES
A relaxed-fit top featuring a flattering wide boat neckline, subtle waist shaping, and elegant 3/4 length sleeves. The body is worked in the round for minimal seaming, with the sophisticated contiguous set-in sleeve method creating a seamless, professional finish.
**Sizes**: XS (S, M, L, XL, 2XL)
**Finished Bust Circumference**: 36 (38, 40, 42, 44, 46)" / 91.5 (96.5, 101.5, 106.5, 112, 117) cm
**Finished Length**: 22 (22.5, 23, 23.5, 24, 24.5)" / 56 (57, 58.5, 59.5, 61, 62) cm
**Modeled with 2-4" positive ease**
---
## MATERIALS
**Yarn**: Sport weight yarn
**Yardage**: 900 (1000, 1100, 1200, 1300, 1400) yards / 823 (914, 1006, 1097, 1189, 1280) m
**Machine**: Standard gauge (4.5mm) knitting machine
- Requires ribber attachment OR circular knitting capability for body
- Main bed only for sleeves and upper body
**Notions**:
- Waste yarn and ravel cord for cast-on
- Cast-on comb and weights
- Transfer tools
- Latch tool for bind-off
- Stitch markers
- Tapestry needle for seaming
- Stitch holders or spare needles
---
## TENSION/GAUGE
**Main Tension**: T6 (adjust for your machine)
**Gauge**: 7 stitches × 10 rows = 1" (2.5 cm) in stockinette, measured off machine after light steaming
⚠ **CRITICAL**: Knit a 40-stitch × 60-row swatch. Cast off, remove from machine, steam lightly, and measure. Adjust tension dial if needed.
**Tension Dial Reference**:
- Main body and sleeves: T6
- Waste yarn: T10
---
## ABBREVIATIONS
- **RC** = Row Counter
- **COL** = Carriage On Left
- **COR** = Carriage On Right
- **T** = Tension dial setting (e.g., T6)
- **HP** = Hold Position (hold button/lever activated)
- **WY** = Waste Yarn
- **MY** = Main Yarn
- **st(s)** = stitch(es)
- **inc** = increase
- **dec** = decrease
- **RT** = Right side
- **WS** = Wrong side
---
## PATTERN NOTES
**Construction**: This top is worked from the bottom up. The body is knitted in the round to the underarms using a ribber or circular knitting setup. At the armholes, the work is divided and each side (front and back) is worked flat. The sleeves are integrated using the contiguous set-in sleeve method, which uses short rows to shape the sleeve cap while simultaneously shaping the armhole—creating a seamless, professional finish with no sleeve seaming required.
**Contiguous Set-In Sleeve Method**: Developed by Susie Myers, this technique works the sleeve cap and body armhole together using strategically placed short rows. The sleeve stitches are cast on at the underarm, then gradually integrated into the body through holding patterns that create the cap shaping. This is an intermediate technique but is broken down step-by-step for clarity.
**Circular Knitting**: If using a ribber, you'll create a tube. If your machine has circular knitting capability, follow manufacturer instructions. The body tube will be divided at the underarms.
**Waist Shaping**: Gentle decreases create a subtle waist definition, followed by increases to the bust. This shaping is optional but adds a flattering silhouette.
**Boat Neck**: A wide, shallow neckline that sits off the shoulders. Requires minimal shaping—simply bind off straight across.
**Beginner Note**: While contiguous sleeves are typically intermediate level, detailed instructions are provided. Take your time with the short row sections and mark your place carefully.
---
## STITCH COUNTS BY SIZE
| Size | XS | S | M | L | XL | 2XL |
|------|-----|-----|------|------|------|------|
| Body (cast on) | 252 | 266 | 280 | 294 | 308 | 322 |
| Waist | 224 | 238 | 252 | 266 | 280 | 294 |
| Bust (each side) | 126 | 133 | 140 | 147 | 154 | 161 |
| Sleeve upper arm | 70 | 73 | 77 | 80 | 84 | 87 |
| Sleeve cuff | 45 | 47 | 49 | 51 | 53 | 55 |
*Calculations: Body cast-on = (36 × 7) = 252 sts for XS, etc.*
---
## INSTRUCTIONS
### BODY (Worked in Round)
**Machine Setup**:
1. Set up ribber for circular knitting, OR prepare main bed for your circular knitting method
2. Carriage at right (COR)
3. Tension dial to T10 for waste yarn
**Cast-On**:
1. Using WY and ravel cord method, cast on **252 (266, 280, 294, 308, 322) sts**
2. Distribute evenly across needle beds if using ribber
3. Hang cast-on comb and sufficient weight
4. Knit 8 rows WY at T10
5. RC 000
6. Change to MY at T6
**Lower Body** (Hip to Waist):
1. **RC 000**: Begin knitting in circular mode at T6
2. Knit 20 rows straight
3. **RC 020**: Check tension and adjust weight as needed
**Waist Decreases**:
*Decrease 28 (28, 28, 28, 28, 28) sts evenly over next 40 rows*
For even decreases, work as follows:
- Calculate decrease spacing: Every 9 (9.5, 10, 10.5, 11, 11.5) sts
- Use transfer tool to combine 2 sts into 1 at marked intervals
**Decrease Round 1**:
4. **RC 030**: Transfer every 9th-10th st together (14 decs total around circumference)
*New count: 238 (252, 266, 280, 294, 308) sts*
5. Knit 10 rows
**Decrease Round 2**:
6. **RC 040**: Transfer every 9th-10th st together (14 decs total around circumference)
*New count: 224 (238, 252, 266, 280, 294) sts* = WAIST
7. Knit 10 rows
8. **RC 050**: Waist complete
**Waist to Bust Increases**:
*Increase 28 (28, 28, 28, 28, 28) sts evenly over next 40 rows*
**Increase Round 1**:
9. **RC 060**: Bring 14 needles into work (7 front, 7 back, evenly spaced). Pick up loop from stitch below and hang on new needle. Add weights.
*New count: 238 (252, 266, 280, 294, 308) sts*
10. Knit 10 rows
**Increase Round 2**:
11. **RC 070**: Bring 14 needles into work (7 front, 7 back, evenly spaced). Pick up loop and hang.
*New count: 252 (266, 280, 294, 308, 322) sts*
12. Knit 30 rows to underarm
13. **RC 100**: Body complete to underarm
*Length from cast-on to underarm = 10" (10", 10", 10", 10", 10")*
---
### DIVIDE FOR FRONT AND BACK
**At RC 100, COR**:
1. **Remove work from circular setup**: Carefully remove fabric from ribber or circular setup. You now have a tube.
2. **Identify center front and center back**: Mark with waste yarn.
3. **Divide stitches**:
- Front: **126 (133, 140, 147, 154, 161) sts**
- Back: **126 (133, 140, 147, 154, 161) sts**
4. **Place front stitches on hold**: Transfer front stitches to stitch holders or spare needles
5. **Back remains on machine**: Center the 126 (133, 140, 147, 154, 161) back sts on machine
6. Machine is now set for flat knitting (ribber not in use)
7. Carriage at right (COR), T6
---
### BACK - RIGHT ARMHOLE & RIGHT SLEEVE (Contiguous Method)
You will now work the back piece with the right sleeve integrated using short rows.
**Setup for Right Sleeve**:
1. **RC 100, COR**: Back sts centered on machine
2. Using WY, cast on **70 (73, 77, 80, 84, 87) sts** for RIGHT SLEEVE to the LEFT of the back stitches
3. Position: Sleeve sts on left | Back sts in center | Empty needles on right
4. Total sts now on machine: 196 (206, 217, 227, 238, 248) sts
**Right Sleeve Cap Shaping (Short Rows)**:
The contiguous method uses hold/partial knitting to create the sleeve cap. You will gradually incorporate sleeve stitches while holding back stitches, creating the curved cap.
**Set carriage to Hold Position (HP)**
*Phase 1: Establish cap shaping*
5. **RC 100, COR**:
- Put leftmost 10 sleeve sts into HOLD (push to HP)
- Knit to left ←
6. **RC 101, COL**:
- Put rightmost 3 back sts into HOLD
- Knit to right →
7. **RC 102, COR**:
- Return 5 held sleeve sts to WP (working position)
- Knit to left ←
8. **RC 103, COL**:
- Put rightmost 3 back sts into HOLD
- Knit to right →
*Continue this pattern*:
- Every COR row: Return 5 sleeve sts from hold
- Every COL row: Hold 3 back sts on right side
9. **RC 104-120**: Continue alternating (16 more rows)
- Even rows (COR): Return 5 sleeve sts
- Odd rows (COL): Hold 3 back sts
10. **RC 120**: All sleeve sts should be incorporated, approximately 50 (53, 56, 59, 62, 65) back sts on right in hold
**Phase 2: Complete cap and shape armhole**
11. **RC 120, COR**: Begin returning held back sts
- Return 5 held back sts to WP
- Knit to left ←
12. **RC 121, COL**:
- Return 5 held back sts to WP
- Knit to right →
13. **RC 122-140**: Continue returning 5 held back sts every row until all back sts are in work (18 rows)
14. **RC 140, COR**:
- All sts in work: Back sts + Right sleeve sts
- Total: 196 (206, 217, 227, 238, 248) sts
**Sleeve and Back to Shoulder**:
15. **RC 140-180**: Knit straight 40 rows at T6
- This creates the upper back and sleeve length
- **RC 180**: Right sleeve and right back armhole complete
---
### BACK - LEFT ARMHOLE & LEFT SLEEVE (Contiguous Method)
Now work the left sleeve and left armhole.
**Prepare Left Sleeve**:
1. **RC 180, C
Disclaimer: This pattern was generated by AI and should be reviewed for accuracy before use. While we strive for quality, AI-generated content may contain errors. Please verify measurements, stitch counts, and instructions before beginning your project. Generated by purlJam.uk
Access your pattern anytime
Bookmark this page to access your pattern anytime