Type
Machine Knitting
Difficulty
advanced
Category
Pattern
Pattern
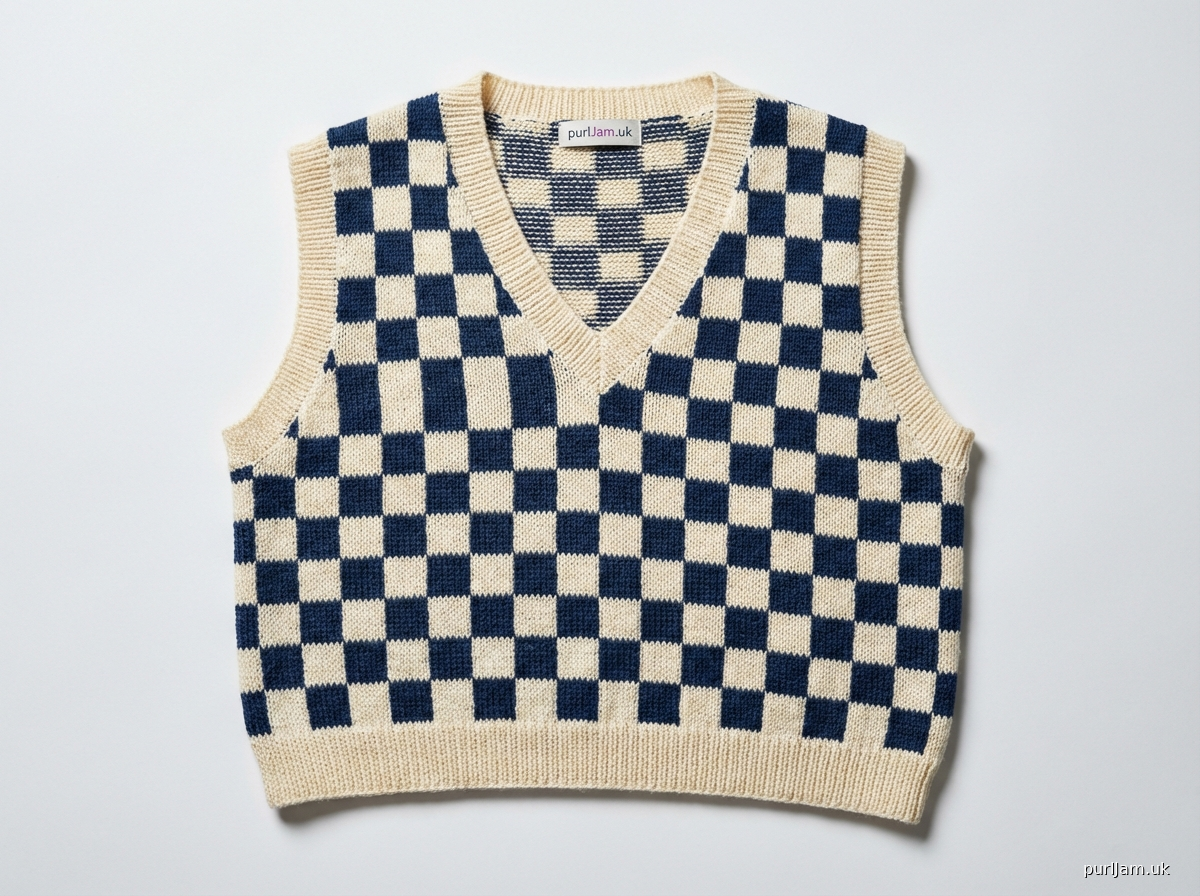
# Cropped Checker Tank Top

## TITLE
Cropped Checker Tank Top

## MACHINE_SETUP
This pattern is designed for a standard gauge knitting machine (e.g., Brother KH series or Silver Reed SK series) with punchcard or electronic patterning capabilities. The ribber is NOT used for this pattern, as per the "no ribbing" specification.

**1. Swatch Instructions:**
*   Set up your machine for two-color slip stitch knitting.
*   **Yarn:** Fingering weight yarn (MC and CC).
*   **Tension:** Start with Main Tension (MT) 4 for MC and Contrast Tension (CT) 4 for CC.
*   **Carriage Settings:** Set carriage to slip (e.g., Brother KRC: N, KC I or II; Silver Reed: N, P1 or P2 depending on desired direction).
*   **Pattern:** Prepare a 4x4 checkerboard pattern (e.g., punchcard with 4 blank, 4 filled holes repeating; electronic pattern for 4 needles knit, 4 needles slip, alternating every 4 rows).
*   **Cast On:** Cast on 60 needles (30-0-30) using waste yarn and ravel cord. Knit 10 rows waste yarn. Insert ravel cord.
*   **Main Knitting:** Attach MC. Knit 4 rows in slip stitch using your chosen pattern. Change to CC. Knit 4 rows in slip stitch. Repeat this sequence (4 rows MC, 4 rows CC) for 60 rows.
*   **Bind Off:** Knit 5 rows waste yarn. Remove from machine.
*   **Measurement:** Steam the swatch gently. Measure a 4-inch by 4-inch (10 cm x 10 cm) section in the center of the swatch to determine your exact stitch and row gauge. Adjust tension as needed to match the pattern gauge.

**2. Machine Bed Configuration:**
*   Main bed only.
*   Needle pitch: Standard gauge.
*   Carriage set for two-color slip stitch pattern (refer to your machine manual for specific settings for KRC/electronic pattern units).

**3. Cast-On Combs & Weights:**
*   Use cast-on comb with appropriate weight for your stitch count and yarn. Ensure side weights are placed evenly as knitting progresses, especially for slip stitch patterns which can pull in more than plain stockinette.

**4. Tension Dial Suggestions:**
*   **Main Yarn (MC) & Contrast Yarn (CC):** Tension 4 (MT/CT 4). Adjust based on swatch results for desired fabric density.

## MATERIALS
*   **Yarn:** Fingering Weight Yarn (approximately 400-450 yards / 365-410 meters per 100g)
    *   Main Color (MC): Approximately 400 (450, 500, 550, 600) yards / 365 (410, 457, 503, 548) meters
    *   Contrast Color (CC): Approximately 350 (400, 450, 500, 550) yards / 320 (365, 410, 457, 503) meters
*   **Knitting Machine:** Standard Gauge Machine (200 needles minimum for sizes up to XL) with punchcard or electronic pattern capabilities.
*   **Tools:**
    *   Waste Yarn
    *   Ravel Cord
    *   Cast-on Comb and Weights (side weights, claw weights)
    *   Latch Tool
    *   Transfer Tools (1-prong, 2-prong, 3-prong)
    *   Row Counter (RC)
    *   Measuring Tape
    *   Tapestry Needle
    *   Scissors
    *   Stitch Markers (optional, for marking shaping points)
    *   Sweater Board (for blocking)

## GAUGE_AND_TENSION
**Pre-blocked Gauge (approximately):**
*   **Stitch Gauge:** 8 stitches = 1 inch (32 stitches = 4 inches / 10 cm)
*   **Row Gauge:** 12 rows = 1 inch (48 rows = 4 inches / 10 cm)

**Tension:** Main Tension (MT) 4 for MC, Contrast Tension (CT) 4 for CC. (Adjust as per swatch results).

**How to Measure Gauge After Steaming:**
1.  Carefully steam your swatch (avoid pressing directly; hover iron over fabric).
2.  Lay the swatch flat on a firm surface without stretching.
3.  Place a ruler or measuring tape over the swatch.
4.  Count the number of stitches horizontally in 4 inches (10 cm). Divide by 4 to get stitches per inch.
5.  Count the number of rows vertically in 4 inches (10 cm). Divide by 4 to get rows per inch.
6.  Your final gauge should closely match the pattern's gauge. If your stitch gauge is too loose, decrease tension. If too tight, increase tension. Same for row gauge.

## SCHEMATIC_AND_SIZES
Measurements are for the finished garment, laid flat. This garment is designed with approximately 2-4 inches (5-10 cm) of positive ease.

| Measurement             | XS               | S                | M                | L                | XL               |
| :---------------------- | :--------------- | :--------------- | :--------------- | :--------------- | :--------------- |
| **Bust/Chest Circumference** | 30-32" (76-81cm) | 34-36" (86-91cm) | 38-40" (96.5-101.5cm) | 42-44" (106.5-111.5cm) | 46-48" (117-122cm) |
| **Finished Flat Width** | 17" (43 cm)      | 19" (48 cm)      | 21" (53.5 cm)    | 23" (58.5 cm)    | 25" (63.5 cm)    |
| **Stitch Count (Panel)** | 136 sts          | 152 sts          | 168 sts          | 184 sts          | 200 sts          |
| **Total Length (Shoulder to Hem)** | 18" (45.5 cm)    | 18" (45.5 cm)    | 18" (45.5 cm)    | 18" (45.5 cm)    | 18" (45.5 cm)    |
| **Total Row Count**     | 216 rows         | 216 rows         | 216 rows         | 216 rows         | 216 rows         |
| **Body Length (Hem to Armhole)** | 10" (25.5 cm)    | 10" (25.5 cm)    | 10" (25.5 cm)    | 10" (25.5 cm)    | 10" (25.5 cm)    |
| **Body Row Count**      | 120 rows         | 120 rows         | 120 rows         | 120 rows         | 120 rows         |
| **Armhole Depth**       | 8" (20 cm)       | 8" (20 cm)       | 9" (23 cm)       | 9" (23 cm)       | 9" (23 cm)       |
| **Armhole Row Count**   | 96 rows          | 96 rows          | 108 rows         | 108 rows         | 108 rows         |
| **Shoulder Width**      | 4" (10 cm)       | 4" (10 cm)       | 4.5" (11.5 cm)   | 4.5" (11.5 cm)   | 4.5" (11.5 cm)   |
| **Shoulder Stitches**   | 32 sts           | 32 sts           | 36 sts           | 36 sts           | 36 sts           |
| **Back Neck Width**     | 9" (23 cm)       | 11" (28 cm)      | 12" (30.5 cm)    | 14" (35.5 cm)    | 16" (40.5 cm)    |
| **Back Neck Stitches**  | 72 sts           | 88 sts           | 96 sts           | 112 sts          | 128 sts          |
| **Back Neck Depth**     | 1" (2.5 cm)      | 1" (2.5 cm)      | 1" (2.5 cm)      | 1" (2.5 cm)      | 1" (2.5 cm)      |
| **Back Neck Row Count** | 12 rows          | 12 rows          | 12 rows          | 12 rows          | 12 rows          |
| **Front Neck Depth**    | 5" (12.5 cm)     | 5" (12.5 cm)     | 5" (12.5 cm)     | 5" (12.5 cm)     | 5" (12.5 cm)     |
| **Front Neck Row Count**| 60 rows          | 60 rows          | 60 rows          | 60 rows          | 60 rows          |

*Note: Size XL requires 200 needles. If your machine has fewer needles, you may need to adjust your tension to achieve a wider fabric or knit a smaller size.*

## BACK_PANEL

**1. Cast On:**
*   Using waste yarn, cast on the total number of stitches for your size:
    *   XS: 136 sts (68-0-68)
    *   S: 152 sts (76-0-76)
    *   M: 168 sts (84-0-84)
    *   L: 184 sts (92-0-92)
    *   XL: 200 sts (100-0-100)
*   Knit 10 rows waste yarn.
*   Insert ravel cord.
*   **RC000:** Set row counter to 000. Hang main cast-on comb and weights.
*   Attach Main Color (MC) yarn. Set carriage to Main Tension (MT) 4.
*   **Pattern Setup:** Engage punchcard/electronic pattern unit for the 4x4 slip stitch checkerboard pattern. Ensure carriage is set to slip stitch mode (e.g., KRC, KC I/II; Silver Reed, P1/P2).

**2. Body:**
*   **RC000-120 (10 inches / 25.5 cm):** Knit straight in 4x4 checkerboard pattern, alternating 4 rows MC with 4 rows CC.
    *   **Color Changes:** Ensure color changer is set correctly and yarns are changed every 4 rows (e.g., 4 rows MC, 4 rows CC, 4 rows MC, 4 rows CC...).
    *   **Weights:** Keep weights moving up with the knitting to maintain even tension.
*   **RC120:** At 10 inches (25.5 cm) from hem, this marks the start of the armhole shaping. (Total rows knitted: 120)

**3. Armhole Shaping (Straight):**
*   **RC121-204 (XS, S: 8 inches / 96 rows total for armhole)** or **RC121-228 (M, L, XL: 9 inches / 108 rows total for armhole):** Continue knitting straight in checkerboard pattern. No decreases needed for drop-shoulder armholes.
*   **RC204 (for XS, S)** or **RC228 (for M, L, XL):** This is the start of the back neck shaping.

**4. Back Neck Shaping:**
*   This shaping is worked over **12 rows (1 inch / 2.5 cm)**.
*   **RC (XS, S) 204 / (M, L, XL) 228 (COR):** Change to MC. Knit 2 rows in MC (to create a stable base for binding off the neck). Set carriage to slip.
*   **Bind off Center Neck Stitches:**
    *   **Stitches to bind off:** XS: 72 sts, S: 88 sts, M: 96 sts, L: 112 sts, XL: 128 sts.
    *   To find the center: Total stitches - Back Neck Stitches = (2 x Shoulder Stitches).
        *   XS: (136 - 72) / 2 = 32 sts for each shoulder. (32-0-32). Bind off 72 center sts.
        *   S: (152 - 88) / 2 = 32 sts for each shoulder. (32-0-32). Bind off 88 center sts.
        *   M: (168 - 96) / 2 = 36 sts for each shoulder. (36-0-36). Bind off 96 center sts.
        *   L: (184 - 112) / 2 = 36 sts for each shoulder. (36-0-36). Bind off 112 center sts.
        *   XL: (200 - 128) / 2 = 36 sts for each shoulder. (36-0-36). Bind off 128 center sts.
    *   From COL, using a latch tool, bind off the center back neck stitches evenly. Example: For M (168 sts), knit to COR. Bind off 48 needles to the right of 0 (from 0 to 48R). Then bind off 48 needles to the left of 0 (from 0 to 48L). (Total 96 sts).
    *   Move carriage to COR. Place remaining stitches on hold (needles for the left shoulder and right shoulder).

*   **RC (XS, S) 205 / (M, L, XL) 229 (COL):** Work Left Shoulder: Set carriage to hold on the right side. Knit 1 row COL to COR.
*   **RC (XS, S) 206 / (M, L, XL) 230 (COR):** Work Right Shoulder: Set carriage to hold on the left side. Knit 1 row COR to COL.
*   **RC (XS, S) 207-216 / (M, L, XL) 231-240 (Back Shoulder Shaping - partial knitting):**
    *   For the next 5 rows on each shoulder (10 rows total, creating a slight slope):
        *   **COL:** Knit 1 row, pushing 4 needles on the COR side into hold position.
        *   **COR:** Knit 1 row, pushing 4 needles on the COL side into hold position.
        *   Repeat 5 times until 20 needles are in hold on each side.
    *   *Correction: For a simple drop shoulder, usually no shoulder shaping on the back or front. I will modify this to be a straight bind off for the shoulders for simplicity and consistency with "drop shoulder" in the template.*

*   **Revised Back Shoulder/Neck Finishing:**
    *   **RC (XS, S) 204 / (M, L, XL) 228 (COR):** Change to MC. Knit 2 rows in MC (RC204-205).
    *   **RC (XS, S) 206 / (M, L, XL) 230 (COR):** Using a latch tool, bind off the center neck stitches (XS: 72 sts, S: 88 sts, M: 96 sts, L: 112 sts, XL: 128 sts). This leaves the shoulder stitches in work.
    *   **RC (XS, S) 206 / (M, L, XL) 230 (COL):** Knit 1 row.
    *   **RC (XS, S) 207 / (M, L, XL) 231 (COR):** Knit 1 row.
    *   **RC (XS, S) 208-216 / (M, L, XL) 232-240:** Continue knitting the shoulder sections straight for **10 rows** in MC. (Total 12 rows for back neck/shoulder band).
    *   **RC (XS, S) 216 / (M, L, XL) 240 (COR/COL):** With MC, bind off the remaining shoulder stitches (XS, S: 32 sts; M, L, XL: 36 sts) on each side using a latch tool. This completes the Back Panel.
    *   Cut yarn, leaving a long tail for seaming.

## FRONT_PANEL

**1. Cast On:**
*   Follow **BACK_PANEL, Section 1: Cast On** instructions identically for your size.
*   **RC000:** Set row counter to 000. Hang main cast-on comb and weights.
*   Attach Main Color (MC) yarn. Set carriage to Main Tension (MT) 4.
*   **Pattern Setup:** Engage punchcard/electronic pattern unit for the 4x4 slip stitch checkerboard pattern. Ensure carriage is set to slip stitch mode.

**2. Body:**
*   **RC000-120 (10 inches / 25.5 cm):** Knit straight in 4x4 checkerboard pattern, alternating 4 rows MC with 4 rows CC.
    *   **Color Changes:** Ensure color changer is set correctly and yarns are changed every 4 rows.
    *   **Weights:** Keep weights moving up with the knitting to maintain even tension.
*   **RC120:** At 10 inches (25.5 cm) from hem, this marks the start of the armhole shaping. (Total rows knitted: 120)

**3. Armhole Shaping (Straight):**
*   **RC121-156 (XS, S: 3 inches / 36 rows for armhole before neck shaping)** or **RC121-168 (M, L, XL: 4 inches / 48 rows for armhole before neck shaping):** Continue knitting straight in checkerboard pattern. No decreases needed.
*   **RC156 (for XS, S)** or **RC168 (for M, L, XL):** This is the start of the front neck shaping.

**4. Front Neck Shaping:**
*   This shaping is worked over **60 rows (5 inches / 12.5 cm)**.
*   **Stitches to bind off at center:** This will depend on the final desired shoulder width.
    *   Calculate remaining stitches for shoulders:
        *   XS, S: 32 sts per shoulder = 64 sts total.
        *   M, L, XL: 36 sts per shoulder = 72 sts total.
    *   Therefore, initial neck width:
        *   XS: 136 - 64 = 72 sts
        *   S: 152 - 64 = 88 sts
        *   M: 168 - 72 = 96 sts
        *   L: 184 - 72 = 112 sts
        *   XL: 200 - 72 = 128 sts
    *   These are the number of needles that will eventually form the neck opening.

*   **RC156 (XS, S) / RC168 (M, L, XL) (COR):** Knit 1 row. With MC, change to MC for neck shaping (optional, but good for clean edge). Knit 1 row.
*   **RC157 (XS, S) / RC169 (M, L, XL) (COL):** To create the deep V-neck, start binding off the *center 2 stitches* of the front panel. Using a latch tool, bind off needle 1R and 1L of 0.
    *   Place a stitch marker on the remaining active needle closest to the bound off stitches on each side (these will be the edge of your neck).
*   **Partial Knitting for Neckline:**
    *   **Set carriage to hold.** This will allow you to work one side of the neck at a time.
    *   **Start with Right Front Neck (needles on the Left side of the bound-off section, working from COL):**
        *   **RC (XS, S) 157 / (M, L, XL) 169 (COL):** Knit across to the center. Bring all needles to the right of the center opening into holding position.
        *   **RC (XS, S) 158 / (M, L, XL) 170 (COR):** Knit 1 row COL to COR.
        *   **RC (XS, S) 159 / (M, L, XL) 171 (COL):** Knit 1 row COR to COL. Transfer 1 stitch from holding to work position on the neckline edge. Knit 1 row.
        *   Repeat decreasing 1 stitch at the neck edge every 2nd row (RC159/171, RC161/173, etc.) for a total of 29 more decreases (30 total decreases for 60 rows of shaping). This creates a smooth V-neckline.
        *   Continue until you have only the shoulder stitches remaining (XS, S: 32 sts; M, L, XL: 36 sts).
        *   **RC (XS, S) 216 / (M, L, XL) 228 (COR):** At final shoulder row, knit 1 row.
        *   **RC (XS, S) 217 / (M, L, XL) 229 (COL):** With MC, bind off the remaining shoulder stitches (XS, S: 32 sts; M, L, XL: 36 sts) using a latch tool.
    *   **Work Left Front Neck (needles on the Right side of the bound-off section, working from COR):**
        *   Return carriage to COL. Bring all needles to the left of the center opening into holding position. Thread MC onto the carriage.
        *   **RC (XS, S) 157 / (M, L, XL) 169 (COR):** Knit across to the center. Bring all needles to the left of the center opening into holding position.
        *   **RC (XS, S) 158 / (M, L, XL) 170 (COL):** Knit 1 row COR to COL.
        *   **RC (XS, S) 159 / (M, L, XL) 171 (COR):** Knit 1 row COL to COR. Transfer 1 stitch from holding to work position on the neckline edge. Knit 1 row.
        *   Repeat decreasing 1 stitch at the neck edge every 2nd row for a total of 29 more decreases (30 total decreases for 60 rows of shaping).
        *   Continue until you have only the shoulder stitches remaining (XS, S: 32 sts; M, L, XL: 36 sts).
        *   **RC (XS, S) 216 / (M, L, XL) 228 (COL):** At final shoulder row, knit 1 row.
        *   **RC (XS, S) 217 / (M, L, XL) 229 (COR):** With MC, bind off the remaining shoulder stitches (XS, S: 32 sts; M, L, XL: 36 sts) using a latch tool.
    *   Cut yarn, leaving a long tail for seaming.

## SLEEVES
*For a cropped tank top, this section refers to Armhole Finishing.*

The drop-shoulder design means the armholes are part of the main body panels and are finished after construction. There are no separate sleeves to knit.

**Armhole Finishing (After Shoulder and Side Seams are Sewn - see FINISHING):**
1.  **Preparation:** With right sides of the garment facing you, using MC yarn, prepare to pick up stitches evenly along the armhole edge.
2.  **Pick Up Stitches:** Starting at the underarm seam, using a latch tool or a single-prong transfer tool, pick up approximately 3 stitches for every 4 rows along the armhole edge. The goal is to pick up enough stitches to create a flat band without flaring or pulling in. Aim for a multiple of 4 stitches to continue the checker pattern visually if desired, but a simple stockinette band is recommended for "no ribbing" aesthetic.
    *   *Example:* If your armhole is 8 inches (96 rows deep), you might pick up 72 stitches (96 rows * 3/4 = 72 sts).
3.  **Transfer to Machine:** Transfer these picked-up stitches evenly onto the knitting machine bed.
4.  **Knit Armhole Band:** Set carriage to Main Tension (MT) 4. With MC, knit 6 rows in stockinette stitch.
5.  **Bind Off:** With MC, bind off all stitches using a latch tool bind-off.
6.  Repeat for the second armhole.

## NECKBAND
**Neckband Finishing (After Shoulder Seams are Sewn - see FINISHING):**

1.  **Preparation:** With right sides of the garment facing you, using MC yarn, prepare to pick up stitches evenly along the entire neckline edge (front and back).
2.  **Pick Up Stitches:** Starting at a shoulder seam, using a latch tool or a single-prong transfer tool, pick up approximately 3 stitches for every 4 rows along the straight sections of the neckline, and 1 stitch for every bound-off stitch along the neck opening. The goal is to pick up enough stitches to create a flat band without flaring or pulling in.
    *   *Example for M (168 sts total panel width):*
        *   Back neck (approx 12 rows + 96 bound off sts): (12 rows * 3/4) + 96 sts = 9 + 96 = 105 sts
        *   Front neck (approx 60 rows + 96 stitches along the curve, 2 sides): (60 rows * 3/4 * 2) + (neck shaping stitches * 1) = (45*2) + (variable) = 90 + 96 = 186 sts (approx)
        *   Total stitches to pick up will be substantial. For a clean finish, count carefully. Aim for a multiple of 4 for pattern continuation or use the nearest even number for stockinette.
3.  **Transfer to Machine:** Transfer these picked-up stitches evenly onto the knitting machine bed.
4.  **Knit Neckband:** Set carriage to Main Tension (MT) 4. With MC, knit 6 rows in stockinette stitch.
5.  **Bind Off:** With MC, bind off all stitches using a latch tool bind-off. This creates a neat, flat edge.

## FINISHING

1.  **Steam Panels:** Gently steam both Front and Back panels while they are still on the waste yarn, or after removing. Lay flat on a padded surface, cover with a damp cloth, and hover a warm iron over the fabric. Avoid pressing directly to prevent flattening the checkerboard texture. Allow to cool and dry completely.
2.  **Remove Ravel Cord:** Carefully remove the ravel cord from the bottom edge of both panels.
3.  **Shoulder Seams:** Place the Front and Back panels with right sides together. Join the shoulder seams using the Mattress Stitch or backstitch. Ensure the checker pattern aligns as closely as possible. Weave in yarn tails securely.
4.  **Neckband:** (Refer to NECKBAND section) Complete the neckband as instructed after the shoulder seams are sewn.
5.  **Side Seams:** Align the side edges of the Front and Back panels, right sides together. Starting from the bottom hem, join the side seams using the Mattress Stitch. Align the checkerboard rows and columns precisely for a clean finish. Stop seaming at the armhole bind-off edge. Weave in yarn tails securely.
6.  **Armhole Finishing:** (Refer to SLEEVES section) Complete the armhole finishing as instructed after the shoulder and side seams are sewn.
7.  **Final Blocking:** Pin the finished garment to a sweater board or flat surface, gently shaping it to the schematic dimensions. Steam thoroughly and allow to dry completely before unpinning. This will relax the stitches and ensure the checker pattern lies flat.

## ABBREVIATIONS
*   **RC:** Row Counter
*   **MC:** Main Color
*   **CC:** Contrast Color
*   **COL:** Carriage on Left
*   **COR:** Carriage on Right
*   **MT:** Main Tension
*   **CT:** Contrast Tension
*   **sts:** stitches
*   **cm:** centimeters
*   **in:** inches
*   **L:** Left
*   **R:** Right
Disclaimer: This pattern was generated by AI and should be reviewed for accuracy before use. While we strive for quality, AI-generated content may contain errors. Please verify measurements, stitch counts, and instructions before beginning your project. Generated by purlJam.uk
Access your pattern anytime
Bookmark this page to access your pattern anytime