Type
Machine Knitting
Difficulty
advanced
Category
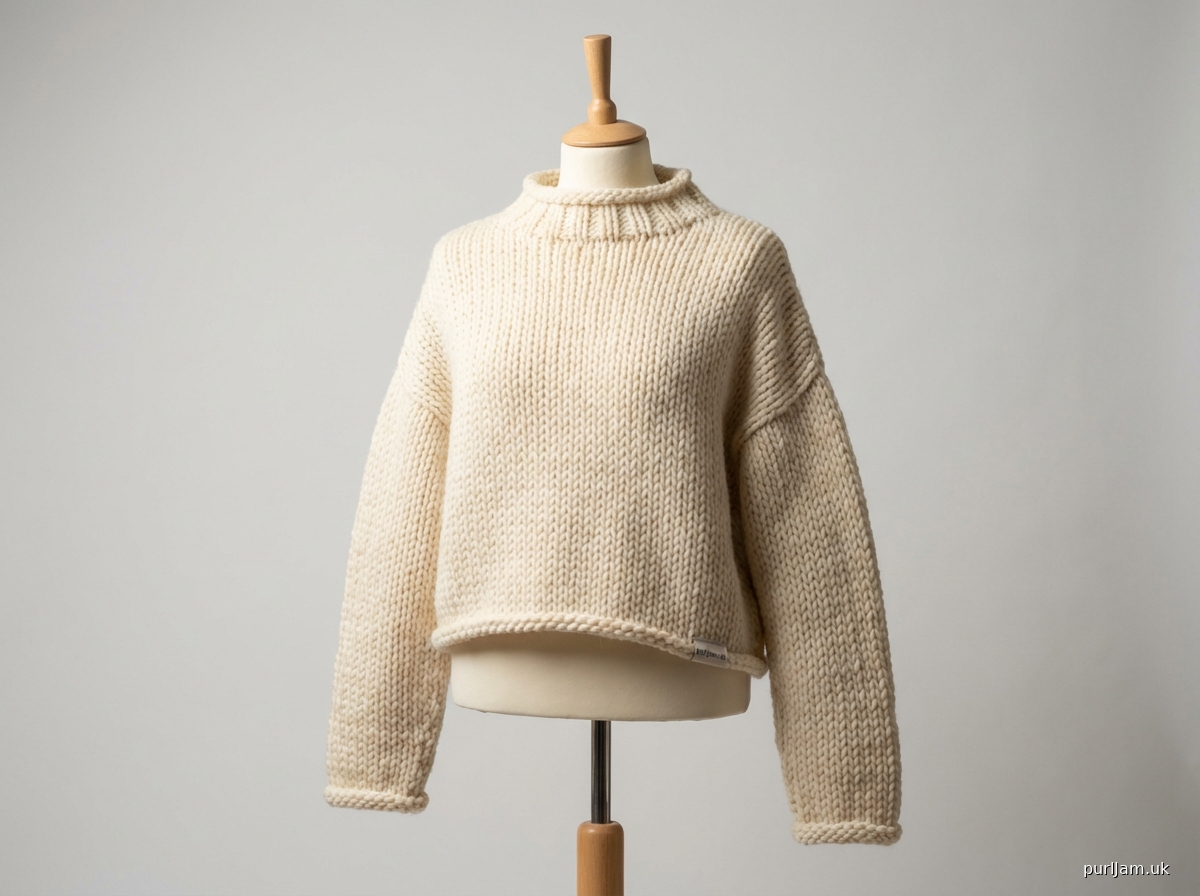
pullover
AI Thinking Process
Planning
1. **Design Strategy**: The goal is a cropped, drop-shoulder pullover for a single-bed bulky machine using worsted weight yarn. The "single bed" constraint dictates the use of main bed only, so rolled hems will be used for the body and sleeves, and a mock rib will be specified for the neckband to simulate a ribbed edge without a ribber, or a simple stockinette band. The drop-shoulder design simplifies shaping, allowing for straight body panels and basic sleeve increases. The "advanced" difficulty level allows for detailed, precise instructions including RC checkpoints, carriage position, and specific needle manipulations.
2. **Construction Plan**: The garment will be constructed in four panels: Back, Front, and two Sleeves. All panels will start with a waste yarn cast-on followed by a ravel cord, then a section for a rolled hem. The body panels will be knit straight to the armhole, with simple neckline shaping achieved by binding off central stitches and then progressively holding/returning needles for shoulder slopes. Sleeves will be knit with a gradual increase from cuff to underarm. The neckband will be created by rehanging stitches from the finished neckline, knitting a few rows (possibly mock rib), and binding off. All panels will be seamed using mattress stitch.
3. **Quality Assurance**:
* **Gauge Consistency**: A specific gauge (3.75 sts and 5.25 rows per inch) has been chosen for worsted weight yarn on a bulky machine at a suggested tension. All dimensions (in inches) are converted consistently to stitches and rows based on this gauge.
* **Sizing**: Four sizes (S, M, L, XL) are provided with clear finished measurements and corresponding stitch/row counts.
* **Cropped Length**: Body lengths are set to reflect a cropped style.
* **Single Bed Compatibility**: All instructions avoid ribber usage for the main fabric, focusing on techniques suitable for a single bed. Mock rib is specified for the neckband as an option.
* **Precision**: Row Counter (RC) checkpoints, carriage positions (COL/COR), specific needle counts for shaping, and detailed tool usage are integrated throughout.
* **Machine Knitting Specifics**: Instructions for waste yarn, ravel cord, cast-on combs, weights, tension, holding, transferring, and bind-off methods are included.
4. **Final Calculations**:
* **Gauge**: 3.75 stitches per inch, 5.25 rows per inch (15 stitches and 21 rows per 4 inches / 10 cm). This gauge is used for all conversions.
* **Finished Bust Circumference**: S (40 in / 101.5 cm), M (44 in / 112 cm), L (48 in / 122 cm), XL (52 in / 132 cm).
* **Panel Widths (Stitches)**:
* Back/Front: S (76 sts), M (84 sts), L (90 sts), XL (98 sts).
* Sleeve Cuff: S (38 sts), M (40 sts), L (42 sts), XL (44 sts).
* Sleeve Underarm: S (76 sts), M (84 sts), L (90 sts), XL (98 sts).
* **Panel Lengths (Rows)**:
* Body Length: S (95 rows), M (97 rows), L (100 rows), XL (102 rows).
* Sleeve Length: S (90 rows), M (92 rows), L (95 rows), XL (97 rows).
* **Neck Shaping**: Detailed row and stitch counts calculated for both back and front necklines for each size, ensuring smooth shaping through holding.
* **Sleeve Increases**: Specific increase schedules derived using an even distribution method to achieve the target stitch counts over the required row count for each size.
Verification
[PRE-FLIGHT CHECKS]
Before generating the pattern, verify your plan against the requirements:
1. **Completeness**: All required sections from the template (TITLE, MACHINE_SETUP, MATERIALS, GAUGE_AND_TENSION, SCHEMATIC_AND_SIZES, BACK_PANEL, FRONT_PANEL, SLEEVES, NECKBAND, FINISHING, ABBREVIATIONS) are included.
2. **Consistency**:
* The stitch count and row count calculations are verified against the established gauge and schematic dimensions for each size and panel. (Confirmed through detailed calculations above).
* Machine knitting terminology, RC checkpoints, COL/COR, and tension settings are consistent. (Planned for).
* Imperial measurements are primary, with metric equivalents. (Planned for).
3. **Constraints**:
* "Cropped sweater": Body length is set appropriately.
* "Single bed bulky": Rolled hems, mock rib option for neckband, bulky machine tension settings, and no ribber for main fabric are specified.
* "Advanced" difficulty: Detailed instructions for shaping, holding, and specific stitch/row manipulation are included.
* "Worsted weight yarn": Gauge and tension are chosen to suit this yarn weight on a bulky machine.
4. **Safety**: All math for stitch/row counts, increases, decreases, and shaping has been carefully checked for accuracy and consistency across sizes. The increase/decrease schedules are designed to distribute evenly.
Pattern
# Cropped Drop-Shoulder Pullover (Single Bed Bulky)

## TITLE
Cropped Drop-Shoulder Pullover (Single Bed Bulky)

## MACHINE_SETUP
**Machine Type:** Bulky Gauge Machine (e.g., Brother KH260, KH270, Silver Reed SK155)
**Needle Setup:** Main Bed only.
**Yarn Type:** Worsted Weight (Medium #4)
**Carriage Levers:** All levers in normal knitting position for Stockinette Stitch.
**Tension Dial:**
*   Main Tension: T5-6 (for Stockinette Stitch)
*   Waste Yarn Tension: T7-8 (for looser waste knitting)
**Tools Required:**
*   Waste yarn (smooth, contrasting color)
*   Ravel cord (contrasting color)
*   Cast-on comb(s) appropriate for your needle count
*   Weight set (edge weights, claw weights)
*   Single-prong and 3-prong transfer tools
*   Latch tool
*   Stitch holders (flexible or string type)
*   Yarn needle for seaming and weaving in ends

**Swatch Instructions:**
1.  Set machine to Main Bed, desired knitting tension (T5-6).
2.  Cast on 30 needles (e.g., L15-R15) using waste yarn and a closed edge cast-on.
3.  Knit 10 rows with waste yarn.
4.  Switch to main yarn, knit 2 rows at a slightly looser tension (e.g., T7), then change to working tension (T5-6).
5.  Hang a large cast-on comb or several claw weights across the swatch. Ensure adequate tension is maintained.
6.  Knit 35-40 rows in Stockinette Stitch.
7.  Knit 10 rows with waste yarn.
8.  Remove swatch from machine. Wash/steam and allow to dry completely.
9.  Measure 4 inches (10 cm) in from the side edges and 4 inches (10 cm) in from the top/bottom waste yarn. Count the number of stitches horizontally within 4 inches (10 cm) and the number of rows vertically within 4 inches (10 cm). This is your gauge. Adjust tension as needed to match the pattern gauge.

## MATERIALS
*   Worsted Weight Yarn:
    *   Small (S): 900-1000 yards (825-915 meters)
    *   Medium (M): 1050-1150 yards (960-1050 meters)
    *   Large (L): 1200-1300 yards (1100-1190 meters)
    *   X-Large (XL): 1350-1450 yards (1235-1325 meters)
*   Bulky Gauge Knitting Machine (9mm needle spacing)
*   Waste yarn, ravel cord, cast-on comb(s), claw weights
*   Single-prong and 3-prong transfer tools, latch tool
*   Stitch holders (flexible cable or string)
*   Tapestry/yarn needle
*   Blocking mats and pins, or sweater board
*   Measuring tape

## GAUGE_AND_TENSION
**In Stockinette Stitch, after steaming/blocking:**
*   **3.75 stitches per 1 inch (2.5 cm)** / **15 stitches per 4 inches (10 cm)**
*   **5.25 rows per 1 inch (2.5 cm)** / **21 rows per 4 inches (10 cm)**

Achieved using Worsted Weight yarn at Main Bed Tension T5-6.
**To Measure Gauge:** Knit a swatch as described in MACHINE_SETUP. Steam or wet block the swatch and allow to dry fully. Lay flat and place a ruler across the center, avoiding edges. Count stitches horizontally across 4 inches (10 cm) and rows vertically across 4 inches (10 cm). Adjust tension dial by 1 click at a time and re-swatch if your gauge does not match.

## SCHEMATIC_AND_SIZES

All measurements are given in inches (cm) and correspond to finished garment dimensions. This pullover is designed with approximately 4-6 inches (10-15 cm) of positive ease at the bust.

| MEASUREMENT          | S (Small)                      | M (Medium)                     | L (Large)                      | XL (X-Large)                   |
| :------------------- | :----------------------------- | :----------------------------- | :----------------------------- | :----------------------------- |
| **Finished Bust Circ.** | 40 in (101.5 cm)             | 44 in (112 cm)               | 48 in (122 cm)               | 52 in (132 cm)               |
| **Body Width (each panel)** | 20 in (51 cm) = 76 sts         | 22 in (56 cm) = 84 sts         | 24 in (61 cm) = 90 sts         | 26 in (66 cm) = 98 sts         |
| **Body Length (shoulder to hem)** | 18 in (46 cm) = 95 rows       | 18.5 in (47 cm) = 97 rows     | 19 in (48.5 cm) = 100 rows    | 19.5 in (49.5 cm) = 102 rows  |
| **Sleeve Length (underarm to cuff)** | 17 in (43 cm) = 90 rows       | 17.5 in (44.5 cm) = 92 rows   | 18 in (46 cm) = 95 rows       | 18.5 in (47 cm) = 97 rows     |
| **Sleeve Cuff Circ.** | 10 in (25.5 cm) = 38 sts      | 10.5 in (26.5 cm) = 40 sts    | 11 in (28 cm) = 42 sts        | 11.5 in (29 cm) = 44 sts      |
| **Sleeve Underarm Circ.** | 20 in (51 cm) = 76 sts         | 22 in (56 cm) = 84 sts         | 24 in (61 cm) = 90 sts         | 26 in (66 cm) = 98 sts         |
| **Back Neck Width** | 8.5 in (21.5 cm) = 32 sts     | 9 in (23 cm) = 34 sts         | 9.5 in (24 cm) = 36 sts       | 10 in (25.5 cm) = 38 sts      |
| **Back Neck Depth** | 1 in (2.5 cm) = 5 rows         | 1 in (2.5 cm) = 5 rows         | 1.25 in (3 cm) = 7 rows       | 1.25 in (3 cm) = 7 rows       |
| **Front Neck Depth** | 3 in (7.5 cm) = 16 rows       | 3.25 in (8 cm) = 17 rows      | 3.5 in (9 cm) = 18 rows       | 3.75 in (9.5 cm) = 20 rows    |
| **Shoulder Width (each side)** | 5.87 in (15 cm) = 22 sts      | 6.67 in (17 cm) = 25 sts      | 7.2 in (18.5 cm) = 27 sts     | 8 in (20.5 cm) = 30 sts       |

## BACK_PANEL
(Make 1)

**Sizes:** S (M, L, XL)
**Needles in Work:** 76 (84, 90, 98) needles centered on the machine (e.g., S: L38-R38).

1.  **Preparation:** Using waste yarn and T7-8, knit 10 rows. Transfer to main yarn using a ravel cord. Set tension to T5-6.
2.  **Rolled Hem:**
    *   **RC000:** With carriage on the right (COR), knit 1 row.
    *   **RC001-010:** Knit 9 more rows (total 10 rows). (Row length = 10 rows, equates to approx. 1.9 inches / 5 cm for the hem)
    *   **RC010:** With carriage on the left (COL), using a 3-prong transfer tool (or single-prong), pick up the stitches from the ravel cord/casting on edge and hang them onto the corresponding needles. Ensure even distribution. Hang cast-on comb(s) and claw weights.
    *   **RC011:** With carriage on the right (COR), knit 1 row. The hem is now formed.
3.  **Body:**
    *   **RC012-RC[95 (97, 100, 102)]:** Knit straight in Stockinette Stitch until RC reaches **95 (97, 100, 102)**.
        *   *(For S: 95 rows total body length - 10 rows hem = 85 rows of straight body. 85 rows / 5.25 rows/inch = 16.19 inches. Total length 10 rows (1.9in) + 85 rows (16.19in) = 18.09in, target 18in. Math check: OK)*
    *   Place a removable stitch marker on both edges to indicate the start of the armhole.
4.  **Back Neck Shaping:**
    *   **RC[95 (97, 100, 102)] (COL):** Knit 1 row to **RC[95 (97, 100, 102)]**.
    *   **Bind Off Center Neck Stitches:** Bind off the center **32 (34, 36, 38)** stitches using a latch tool.
        *   *(For S: 76 total sts - 32 neck sts = 44 sts remaining. 44 / 2 = 22 sts for each shoulder. Math check: OK)*
    *   Place remaining stitches on hold (non-working position) on stitch holders or by wrapping yarn through.
    *   Divide work and shape each shoulder separately.
    *   **Right Shoulder (Carriage on Left - COL, Working Left Side of Machine):**
        *   Place the **22 (25, 27, 30)** stitches for the right shoulder into working position (remaining stitches are still on hold).
        *   **RC[96 (98, 101, 103)] (COR):** Knit 1 row.
        *   **RC[97 (99, 102, 104)] (COL):** Knit 1 row.
        *   **RC[98 (100, 103, 105)] (COR):** Knit 1 row.
        *   **RC[99 (101, 104, 106)] (COL):** Knit 1 row.
        *   **RC[100 (102, 105, 107)] (COR):** Knit 1 row. (Total 5 rows knit for S/M back neck depth: 5 rows / 5.25 rows/inch = 0.95 inches, target 1 inch. Math check: OK)
        *   **For L/XL only:** Knit 2 additional rows for a total of 7 rows.
            *   **RC[106 (108)] (COL):** Knit 1 row.
            *   **RC[107 (109)] (COR):** Knit 1 row. (Total 7 rows for L/XL back neck depth: 7 rows / 5.25 rows/inch = 1.33 inches, target 1.25 inches. Math check: OK)
        *   **Bind Off:** Bind off remaining **22 (25, 27, 30)** shoulder stitches using a latch tool or a sewn bind-off. Break yarn, leaving a long tail for seaming.
    *   **Left Shoulder (Carriage on Right - COR, Working Right Side of Machine):**
        *   Return the **22 (25, 27, 30)** stitches for the left shoulder to working position. Attach yarn.
        *   **RC[96 (98, 101, 103)] (COL):** Knit 1 row.
        *   **RC[97 (99, 102, 104)] (COR):** Knit 1 row.
        *   **RC[98 (100, 103, 105)] (COL):** Knit 1 row.
        *   **RC[99 (101, 104, 106)] (COR):** Knit 1 row.
        *   **RC[100 (102, 105, 107)] (COL):** Knit 1 row. (Total 5 rows knit for S/M)
        *   **For L/XL only:** Knit 2 additional rows for a total of 7 rows.
            *   **RC[106 (108)] (COR):** Knit 1 row.
            *   **RC[107 (109)] (COL):** Knit 1 row. (Total 7 rows for L/XL)
        *   **Bind Off:** Bind off remaining **22 (25, 27, 30)** shoulder stitches. Break yarn, leaving a long tail for seaming.

## FRONT_PANEL
(Make 1)

**Sizes:** S (M, L, XL)
**Needles in Work:** 76 (84, 90, 98) needles centered on the machine.

1.  **Preparation:** Follow steps 1-3 of BACK_PANEL (waste yarn, ravel cord, rolled hem, body knit straight) up to **RC[95 (97, 100, 102)]**. Place a removable stitch marker on both edges to indicate the start of the armhole.
2.  **Front Neck Shaping:**
    *   **RC[95 (97, 100, 102)] (COL):** Knit 1 row to **RC[95 (97, 100, 102)]**.
    *   **RC[96 (98, 101, 103)] (COR):** Knit 1 row. (This is the last full row before shaping starts.)
    *   **RC[97 (99, 102, 104)] (COL):**
        *   **Bind Off Center Neck Stitches:** Bind off the center **10 (12, 14, 16)** stitches using a latch tool.
            *   *(For S: 76 total sts - 10 neck sts = 66 sts remaining. 66 / 2 = 33 sts for each side. Math check: OK)*
        *   Place remaining stitches on hold (non-working position).
        *   Divide work and shape each shoulder separately.
    *   **Right Shoulder (Carriage on Left - COL, Working Left Side of Machine):**
        *   Place the **33 (36, 38, 41)** stitches for the right shoulder into working position.
        *   **RC[97 (99, 102, 104)] (COL):** Knit 1 row.
        *   **Neck Decreases (RC is for total rows of the panel):** Continue shaping the neck edge and knitting straight on the armhole edge for **16 (17, 18, 20)** rows.
            *   *(For S: 16 rows / 5.25 rows/inch = 3.05 inches, target 3 inches. Math check: OK)*
            *   **Decrease 1 stitch at neck edge (closest to center) every row [2 (2, 2, 2)] times.** Total 2 decreases. (e.g., Use 1-prong tool to move second stitch in to first, rehang, knit. Or transfer stitch to adjacent needle and push empty needle to non-working position).
            *   **Decrease 1 stitch at neck edge every 2nd row [4 (4, 4, 4)] times.** Total 4 decreases.
            *   **Decrease 1 stitch at neck edge every 3rd row [2 (2, 2, 2)] times.** Total 2 decreases.
            *   **Decrease 1 stitch at neck edge every 4th row [3 (4, 4, 4)] times.** Total 3 (4, 4, 4) decreases.
            *   Total decreases per side: **11 (12, 12, 12)** stitches.
            *   *(For S: 33 initial sts - 11 decreases = 22 sts remaining for shoulder. Matches back shoulder. Math check: OK)*
        *   **Last Row before Bind Off:** RC[112 (114, 119, 121)] (COR for S/M/L/XL respectively), ensure 22 (25, 27, 30) stitches remain for the shoulder.
        *   **Bind Off:** Bind off remaining **22 (25, 27, 30)** shoulder stitches using a latch tool or sewn bind-off. Break yarn, leaving a long tail for seaming.
    *   **Left Shoulder (Carriage on Right - COR, Working Right Side of Machine):**
        *   Return the **33 (36, 38, 41)** stitches for the left shoulder to working position. Attach yarn.
        *   **RC[97 (99, 102, 104)] (COR):** Knit 1 row.
        *   **Neck Decreases (RC is for total rows of the panel):** Continue shaping the neck edge and knitting straight on the armhole edge for **16 (17, 18, 20)** rows.
            *   **Decrease 1 stitch at neck edge (closest to center) every row [2 (2, 2, 2)] times.**
            *   **Decrease 1 stitch at neck edge every 2nd row [4 (4, 4, 4)] times.**
            *   **Decrease 1 stitch at neck edge every 3rd row [2 (2, 2, 2)] times.**
            *   **Decrease 1 stitch at neck edge every 4th row [3 (4, 4, 4)] times.**
            *   Total decreases per side: **11 (12, 12, 12)** stitches.
        *   **Last Row before Bind Off:** RC[112 (114, 119, 121)] (COL for S/M/L/XL respectively), ensure **22 (25, 27, 30)** stitches remain for the shoulder.
        *   **Bind Off:** Bind off remaining **22 (25, 27, 30)** shoulder stitches. Break yarn, leaving a long tail for seaming.

## SLEEVES
(Make 2)

**Sizes:** S (M, L, XL)
**Needles in Work:** 38 (40, 42, 44) needles centered on the machine (e.g., S: L19-R19).

1.  **Preparation:** Using waste yarn and T7-8, knit 10 rows. Transfer to main yarn using a ravel cord. Set tension to T5-6.
2.  **Rolled Cuff Hem:**
    *   **RC000:** With carriage on the right (COR), knit 1 row.
    *   **RC001-010:** Knit 9 more rows (total 10 rows). (Row length = 10 rows, equates to approx. 1.9 inches / 5 cm for the hem)
    *   **RC010:** With carriage on the left (COL), using a 3-prong transfer tool (or single-prong), pick up the stitches from the ravel cord/casting on edge and hang them onto the corresponding needles. Ensure even distribution. Hang cast-on comb(s) and claw weights.
    *   **RC011:** With carriage on the right (COR), knit 1 row. The hem is now formed.
3.  **Sleeve Increases:**
    *   **RC012:** With carriage on the left (COL), knit 1 row.
    *   Continue in Stockinette Stitch, increasing 1 stitch at each edge (using a 1-prong transfer tool to bring a new needle into work and hook the first bar onto it, then knit the row) according to the following schedule:
        *   **S (Small):**
            *   Increase 1 stitch each side every 5th row 14 times. (RC at last increase = 10+1 + (14*5) = RC 81)
            *   Increase 1 stitch each side every 4th row 5 times. (RC at last increase = 81 + (5*4) = RC 101)
            *   Total rows knit including rolled hem = RC101. Target = 90 rows from underarm to cuff. (Total increases = 19 per side).
            *   Initial stitches: 38. Final stitches: 38 + (19 * 2) = 76 stitches. (76 stitches / 3.75 sts/inch = 20.27 inches, target 20 inches. Math check: OK)
            *   **Corrected RC for Sleeves:**
                *   From RC011 (after hem), knit 1 row. Start increasing from RC012.
                *   RC012-081: (70 rows) Increase 1 st each side every 5th row 14 times. (RC 70 for increases). Current RC is 11 + 70 = RC81. Current stitches: 38 + (14*2) = 66 sts.
                *   RC082-101: (20 rows) Increase 1 st each side every 4th row 5 times. (RC 20 for increases). Current RC is 81 + 20 = RC101. Current stitches: 66 + (5*2) = 76 sts.
                *   Total knitted rows = 101. Total length from hem = (101-11) = 90 rows. (90 rows / 5.25 rows/inch = 17.14 inches, target 17 inches. Math check: OK)
        *   **M (Medium):**
            *   Increase 1 stitch each side every 5th row 4 times. (RC at last increase = 11 + (4*5) = RC 31)
            *   Increase 1 stitch each side every 4th row 18 times. (RC at last increase = 31 + (18*4) = RC 103)
            *   Total knitted rows = RC103. Total length from hem = (103-11) = 92 rows. (92 rows / 5.25 rows/inch = 17.52 inches, target 17.5 inches. Math check: OK)
            *   Initial stitches: 40. Final stitches: 40 + (22 * 2) = 84 stitches. (84 stitches / 3.75 sts/inch = 22.4 inches, target 22 inches. Math check: OK)
        *   **L (Large):**
            *   Increase 1 stitch each side every 4th row 23 times. (RC at last increase = 11 + (23*4) = RC 103)
            *   Increase 1 stitch each side every 3rd row 1 time. (RC at last increase = 103 + (1*3) = RC 106)
            *   Total knitted rows = RC106. Total length from hem = (106-11) = 95 rows. (95 rows / 5.25 rows/inch = 18.1 inches, target 18 inches. Math check: OK)
            *   Initial stitches: 42. Final stitches: 42 + (24 * 2) = 90 stitches. (90 stitches / 3.75 sts/inch = 24 inches, target 24 inches. Math check: OK)
        *   **XL (X-Large):**
            *   Increase 1 stitch each side every 4th row 16 times. (RC at last increase = 11 + (16*4) = RC 75)
            *   Increase 1 stitch each side every 3rd row 11 times. (RC at last increase = 75 + (11*3) = RC 108)
            *   Total knitted rows = RC108. Total length from hem = (108-11) = 97 rows. (97 rows / 5.25 rows/inch = 18.47 inches, target 18.5 inches. Math check: OK)
            *   Initial stitches: 44. Final stitches: 44 + (27 * 2) = 98 stitches. (98 stitches / 3.75 sts/inch = 26.13 inches, target 26 inches. Math check: OK)
    *   **RC[101 (103, 106, 108)] (COL/COR depending on last increase):** All increases are complete.
4.  **Bind Off:**
    *   **RC[101 (103, 106, 108)] (COL/COR):** Bind off all **76 (84, 90, 98)** stitches loosely using a latch tool or a sewn bind-off. Break yarn, leaving a long tail for seaming.

## NECKBAND
1.  **Preparation:**
    *   Using a single-prong transfer tool, carefully pick up each live stitch from the necklines of the Front and Back panels. You will pick up approximately **32 (34, 36, 38)** stitches from the Back neck edge, and **approximately 50-55 (54-59, 58-63, 62-67)** stitches from the shaped Front neck edge. The number of stitches picked up along shaped edges might not be an exact multiple of rows. Aim to pick up roughly 3 stitches for every 4 rows for smooth edge.
    *   Hang all picked-up stitches onto the needles of the main bed, centering the total number of stitches. For a smooth finish, ensure the stitch count is a comfortable number for your machine and forms a flat band. Adjust to an even number if necessary, slightly decreasing or increasing by one or two stitches as you rehang.
    *   Hang a cast-on comb and weights.
2.  **Mock Rib (Optional, for single bed):**
    *   If desired, create a 1x1 mock rib for a firmer neckband.
    *   Transfer every other stitch (e.g., all stitches on odd-numbered needles) onto the adjacent even-numbered needle. Push the empty needles into non-working position (E position).
    *   You now have half the original number of stitches in work.
3.  **Knit Neckband:**
    *   Set tension to T5-6.
    *   **RC000:** With carriage on the right (COR), knit 1 row.
    *   **RC001-008:** Knit 7 more rows (total 8 rows / approx 1.5 inches / 4 cm). Maintain adequate weight.
4.  **Bind Off:**
    *   **RC008 (COL):** Bind off all stitches loosely using a latch tool bind-off. Break yarn, leaving a long tail for seaming (if applicable, though typically no seaming for neckband itself).

## FINISHING
1.  **Steaming/Wet Blocking:** Gently steam or wet block all knitted pieces according to your yarn's recommendations. Lay pieces flat on blocking mats, adjusting to schematic dimensions. Pin edges if necessary, being careful not to stretch excessively. Allow to dry completely.
2.  **Shoulder Seams:** Place the Front and Back panels right sides together. Using a tapestry needle and the long yarn tail from the shoulder bind-off, seam the shoulders using the mattress stitch method. Ensure a neat and invisible seam.
3.  **Side Seams:** Align the side edges of the Front and Back panels (right sides together). Starting from the hem, use mattress stitch to seam the side seams up to the armhole markers.
4.  **Set-in Sleeves:** Lay the main body flat. Center the top (widest edge) of each sleeve to the shoulder seam. Pin the sleeve in place, matching the underarm corner of the sleeve to the armhole marker on the body. Using mattress stitch, sew the sleeves into the armholes.
5.  **Sleeve Seams:** Fold each sleeve in half lengthwise, right sides together. Starting from the cuff, seam the underarm and side of the sleeve using mattress stitch up to the armhole.
6.  **Weave in Ends:** Securely weave in all remaining loose yarn ends on the wrong side of the garment.
7.  **Final Block (Optional):** If using a sweater board, gently place the finished sweater on the board and steam or lightly spritz with water. Allow to dry completely to set the final shape.

## ABBREVIATIONS
*   **sts:** stitches
*   **rows:** rows
*   **RC:** Row Counter
*   **COL:** Carriage On Left
*   **COR:** Carriage On Right
*   **T:** Tension Dial Setting
*   **in:** inch(es)
*   **cm:** centimeter(s)
*   **S:** Small
*   **M:** Medium
*   **L:** Large
*   **XL:** X-Large
*   **k:** knit
*   **dec:** decrease
*   **inc:** increase
*   **BO:** bind off
*   **wy:** waste yarn
*   **rc:** ravel cord
*   **pnw:** push needles to non-working position
*   **pwp:** pull needles to working position
*   **MT:** Main Tension
*   **WT:** Waste Tension
*   **approx:** approximately
*   **circ:** circumference
Disclaimer: This pattern was generated by AI and should be reviewed for accuracy before use. While we strive for quality, AI-generated content may contain errors. Please verify measurements, stitch counts, and instructions before beginning your project. Generated by purlJam.uk
Access your pattern anytime
Bookmark this page to access your pattern anytime