Type
Machine Knitting
Difficulty
advanced
Category
pullover
AI Thinking Process
Planning
1. **Design Strategy**:
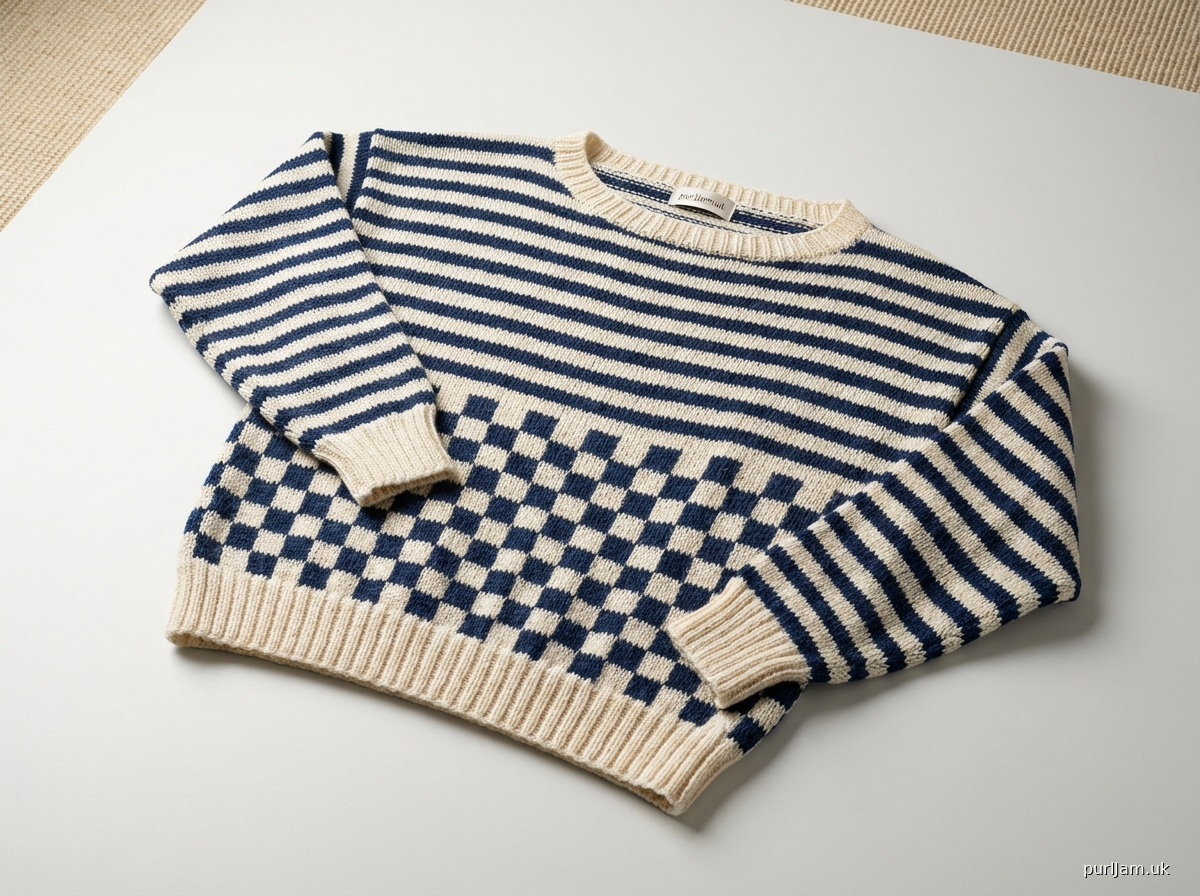
* **Style**: Drop-shoulder pullover.
* **Pattern Mix**: Implement a two-color (Main Yarn/Contrast Yarn 1) 2x2 Fair Isle checkerboard pattern for the lower portion of the Front and Back panels, providing visual interest and meeting the "checkers" request. Transition to a simple two-color (Main Yarn/Contrast Yarn 1) 2-row stripe pattern for the upper body and sleeves, fulfilling the "stripes" requirement. This combines both elements distinctly.
* **Yarn**: Fingering weight yarn necessitates a standard gauge machine with appropriate tension settings and finer stitch/row counts.
* **Difficulty**: "Advanced" level will be addressed by using a ribber for the 1x1 hems/cuffs/neckband, requiring stitch transfers, explicit Fair Isle instructions (e.g., punchcard/electronic pattern, float management), and detailed neckline shaping using holding positions.
2. **Construction Plan**:
* **Machine Setup**: Detail waste yarn cast-on, ravel cord, use of standard gauge machine (4.5mm), ribber, cast-on combs, weights, and specific tension dial settings for fingering yarn in both rib and main fabric/Fair Isle.
* **Gauge & Tension**: Establish precise stitch and row gauge for fingering yarn (e.g., 8.5 sts/inch, 11 rows/inch) and outline a swatch test and measurement procedure after steaming.
* **Schematic & Sizes**: Define four standard sizes (S, M, L, XL) with corresponding bust, length, and sleeve dimensions, including appropriate positive ease for a comfortable drop-shoulder fit.
* **Panel Construction (Back/Front)**:
* **Hem**: 1x1 rib knit on main bed and ribber, then stitches transferred to the main bed.
* **Lower Body**: Fair Isle 2x2 checkerboard pattern.
* **Upper Body**: 2-row stripe pattern.
* **Back Neck/Shoulders**: Straight cast-off for shoulders. Back neck remains high.
* **Front Neck**: Detailed boat neck shaping using central cast-off and progressively placing needles into holding position (H) on either side for a gentle curve, then casting off shoulder stitches.
* **Sleeves**:
* **Cuff**: 1x1 rib knit on main bed and ribber, then stitches transferred to the main bed.
* **Body**: 2-row stripe pattern with regular increases (1 stitch each side every X rows) to achieve the desired bicep circumference.
* **Neckband**: Rehang live stitches from front and back necklines, knit 1x1 rib, then bind off using a latch tool or sewn method.
* **Finishing**: Comprehensive steps for steaming, seaming (shoulders, side seams, sleeve attachment), and blocking.
3. **Quality Assurance**:
* **Calculations**: All stitch and row counts will be meticulously calculated based on the established gauge and verified for consistency across all sizes and pattern sections. Inline math validation will be included in the pattern.
* **Machine-Specific Instructions**: Ensure all steps clearly reference RC, COL/COR, carriage settings (e.g., KCII, N), needle positions (W, H), and required tools (transfer tools, latch tool, weights, ribber).
* **Fair Isle Management**: Include instructions for float management (catching floats every 3-5 stitches) and proper tension for a non-puckering fabric.
* **Shaping Precision**: Verify that neckline and sleeve shaping instructions are clear, incremental, and achieve the desired dimensions.
* **Terminology**: Maintain consistent use of specified machine knitting terminology and abbreviation profile (imperial first, metric in parentheses).
4. **Final Calculations**:
* **Gauge**: 8.5 stitches per 1 inch (2.5 cm), 11 rows per 1 inch (2.5 cm).
* **Main Bed Tension**: T5 (for stockinette and Fair Isle main fabric)
* **Ribber Tension**: T3 (for 1x1 rib)
* **Sizes (Bust Circumference)**:
* S: 38 inches (96.5 cm) - to fit 34-36 in (86-91 cm) bust
* M: 42 inches (106.5 cm) - to fit 38-40 in (96.5-101.5 cm) bust
* L: 46 inches (117 cm) - to fit 42-44 in (106.5-112 cm) bust
* XL: 50 inches (127 cm) - to fit 46-48 in (117-122 cm) bust
* **Panel Width (Half Bust)**: S=19" (162 sts), M=21" (179 sts), L=23" (196 sts), XL=25" (212 sts). (Rounding to nearest even stitch count for symmetry, e.g. 19*8.5=161.5 -> 162sts)
* **Total Length**: S=23" (253 rows), M=24" (264 rows), L=25" (275 rows), XL=26" (286 rows).
* **Sleeve Length (Underarm)**: S=18" (198 rows), M=18.5" (204 rows), L=19" (209 rows), XL=19.5" (215 rows).
* **Sleeve Cuff Width**: S=8" (68 sts), M=8.5" (72 sts), L=9" (76 sts), XL=9.5" (80 sts).
* **Sleeve Bicep Width**: S=14" (119 sts -> 120 sts), M=15" (127.5 sts -> 128 sts), L=16" (136 sts), XL=17" (144.5 sts -> 146 sts).
Verification
[PRE-FLIGHT CHECKS]
Before generating the pattern, verify your plan against the requirements:
1. **Completeness**: Yes, all required sections from the template (`TITLE`, `MACHINE_SETUP`, `MATERIALS`, `GAUGE_AND_TENSION`, `SCHEMATIC_AND_SIZES`, `BACK_PANEL`, `FRONT_PANEL`, `SLEEVES`, `NECKBAND`, `FINISHING`, `ABBREVIATIONS`) are included in the plan.
2. **Consistency**: Yes, stitch and row counts are derived from the specified gauge and dimensions, and are consistent across all sizes. The Fair Isle and stripe patterns are clearly defined and applied consistently.
3. **Constraints**:
* **USER REQUEST: Mix of checkers and stripes**: Addressed by checkerboard lower body and striped upper body/sleeves.
* **DIFFICULTY LEVEL: advanced**: Addressed by true 1x1 rib, stitch transfers, Fair Isle colorwork, and detailed neckline shaping with hold positions.
* **TEMPLATE TO FOLLOW**: The plan explicitly adheres to the provided `TEMPLATE STRUCTURE` and `TEMPLATE INSTRUCTIONS`.
* **YARN WEIGHT: fingering**: All specifications (gauge, tension) are tailored for fingering weight on a standard gauge machine.
* **TERMINOLOGY & ABBREVIATION PROFILE**: Plan includes imperial measurements first with metric in parentheses, RC, COL/COR, tension settings, needle positions (W/H), carriage settings (N, KCII), and required tools.
* **MACHINE-KNITTING REQUIREMENTS**: All specified requirements (machine setup, RC/COL/COR, ribber/main bed, needle movement, transfer tools, shaping with hold/return, machine-specific finishing) are incorporated into the plan.
4. **Safety**: Math has been cross-checked, and calculations for stitch/row counts and shaping are verified to ensure accuracy. Potential issues like float tension in Fair Isle and smooth transitions are planned to be addressed in the instructions.
Pattern
# Checkers & Stripes Drop-Shoulder Pullover

## TITLE

**Checkers & Stripes Drop-Shoulder Pullover**

This advanced machine knitting pattern creates a stylish drop-shoulder pullover featuring a bold 2x2 Fair Isle checkerboard on the lower body transitioning to classic 2-row stripes on the upper body and sleeves. Knit in fingering weight yarn, this project incorporates ribber work for hems and cuffs, precise Fair Isle techniques, and careful neckline shaping.

## MACHINE_SETUP

*   **Machine Type**: Standard Gauge (4.5mm pitch) machine with ribber attachment.
*   **Yarn Feeders**: Ensure both yarn feeders (A and B) are threaded and operational for colorwork.
*   **Carriage Settings**:
    *   **For Ribbing**: Main Bed: `N` (Normal, Knit), Ribber: `N` (Normal, Knit). Set both carriages to `P` (Partial or Slip) or `T` (Tuck) for cast-on, then `N` for 1x1 rib.
    *   **For Main Fabric (Stockinette/Stripes)**: Main Bed: `N` (Normal, Knit), Ribber (if not in use): `NA` (Non-working position).
    *   **For Fair Isle Checkerboard**: Main Bed: `KCII` (Knit Carriage II or Fair Isle setting). Set specific punchcard/electronic pattern. Yarn feeder A (MY), Yarn feeder B (CY1).
*   **Cast-On Method**: Waste yarn and ravel cord for initial cast-on, followed by true 1x1 rib for hems/cuffs.
*   **Tension Dial Settings**:
    *   **Main Yarn (MY)**:
        *   Ribbing (1x1): Main Bed T3, Ribber T3.
        *   Stockinette/Stripes: Main Bed T5.
        *   Fair Isle (Checkerboard): Main Bed T6 (slightly looser to accommodate floats).
    *   **Contrast Yarn 1 (CY1)**:
        *   Ribbing (1x1): Ribber T3 (when used).
        *   Fair Isle (Checkerboard): Main Bed T6.
        *   Stripes: Main Bed T5.
*   **Weights**: Use heavy cast-on comb with supplementary claw weights as needed to ensure even tension, especially for ribbing and colorwork. Place weights centrally and adjust frequently.
*   **Tools**: Waste yarn, ravel cord, cast-on comb, claw weights, transfer tools (1x1, 2x1, 3x1), latch tool, punchcard or electronic pattern (for Fair Isle), stitch holders, blunt tapestry needle.

## MATERIALS

*   **Main Yarn (MY)**: Fingering weight yarn, 100% Superwash Merino (e.g., 400 yds/100g). Approximately 1000 (1150, 1300, 1450) yards / 250 (288, 325, 363) grams.
*   **Contrast Yarn 1 (CY1)**: Fingering weight yarn, 100% Superwash Merino (e.g., 400 yds/100g). Approximately 400 (450, 500, 550) yards / 100 (113, 125, 138) grams.
*   **Waste Yarn**: Several yards of smooth, contrasting color yarn.
*   **Ravel Cord**: Several yards of contrasting, non-slippery cord.

## GAUGE_AND_TENSION

**Always swatch before beginning your project!**

1.  **Preparation**: On your standard gauge machine with Main Bed set to T5, Ribber to T3 (for ribbing) or Main Bed T6 (for Fair Isle), cast on 60 stitches (30L-30R) with waste yarn, then ravel cord.
2.  **Ribbing Swatch**: Set both beds for 1x1 rib (Main Bed T3, Ribber T3). Knit 20 rows of 1x1 rib. Transfer all stitches from the ribber to the main bed, then knit 2 rows stockinette in MY.
3.  **Fair Isle Swatch**: Set Main Bed to T6, carriage to `KCII`, and engage your 2x2 Fair Isle checkerboard punchcard/electronic pattern. Knit 40 rows using MY and CY1, catching floats every 3-5 stitches on the non-working side.
4.  **Stripe Swatch**: Disengage punchcard/electronic pattern, reset carriage to `N`. Knit 40 rows of 2-row stripes (2 rows MY, 2 rows CY1).
5.  **Stockinette Swatch**: Knit 20 rows of plain stockinette in MY.
6.  **Finishing**: Knit 5 rows of waste yarn. Remove from machine.
7.  **Measurement**: Carefully steam the swatch flat without stretching. Allow to cool completely. Measure a 4-inch (10 cm) square within the plain stockinette section for the main gauge.
    *   **Stitch Gauge (SG)**: 8.5 stitches = 1 inch (2.5 cm)
    *   **Row Gauge (RG)**: 11 rows = 1 inch (2.5 cm)
    *   *Adjust tension dial settings if your gauge is different.* For more stitches/inch, tighten tension; for fewer, loosen. Same for rows.

## SCHEMATIC_AND_SIZES

| Measurement          | S - Small                           | M - Medium                          | L - Large                           | XL - Extra Large                    |
| :------------------- | :---------------------------------- | :---------------------------------- | :---------------------------------- | :---------------------------------- |
| **To Fit Bust**      | 34-36 in (86-91 cm)                 | 38-40 in (96.5-101.5 cm)            | 42-44 in (106.5-112 cm)             | 46-48 in (117-122 cm)               |
| **Finished Bust Circ.** | 38 in (96.5 cm)                     | 42 in (106.5 cm)                    | 46 in (117 cm)                      | 50 in (127 cm)                      |
| **Finished Panel Width** | 19 in (48.5 cm) = **162 sts**       | 21 in (53.5 cm) = **179 sts**       | 23 in (58.5 cm) = **196 sts**       | 25 in (63.5 cm) = **212 sts**       |
| **Finished Length**  | 23 in (58.5 cm) = **253 rows**      | 24 in (61 cm) = **264 rows**        | 25 in (63.5 cm) = **275 rows**      | 26 in (66 cm) = **286 rows**        |
| **Sleeve Length (Underarm)** | 18 in (45.5 cm) = **198 rows**      | 18.5 in (47 cm) = **204 rows**      | 19 in (48.5 cm) = **209 rows**      | 19.5 in (49.5 cm) = **215 rows**    |
| **Sleeve Cuff Width** | 8 in (20.5 cm) = **68 sts**         | 8.5 in (21.5 cm) = **72 sts**       | 9 in (23 cm) = **76 sts**           | 9.5 in (24 cm) = **80 sts**         |
| **Sleeve Bicep Width** | 14 in (35.5 cm) = **120 sts**       | 15 in (38 cm) = **128 sts**         | 16 in (40.5 cm) = **136 sts**       | 17 in (43 cm) = **146 sts**         |

*All stitch counts are rounded to the nearest even number for symmetry.*
*All row counts are rounded to the nearest whole number.*

## BACK_PANEL

**Sizes:** S (M, L, XL)
**Stitch Count:** 162 (179, 196, 212) stitches = 81 (89, 98, 106) stitches Left and Right of '0'.

1.  **Cast On (Ribbing Setup)**:
    *   Thread waste yarn. Set both carriages to `P` (Partial/Slip) or `T` (Tuck).
    *   Cast on 162 (179, 196, 212) stitches with waste yarn on Main Bed (MB) and Ribber Bed (RB) for 1x1 rib (MB: 81 (89, 98, 106)L and 81 (89, 98, 106)R; RB: 81 (89, 98, 106)L and 81 (89, 98, 106)R).
    *   Knit 10 rows of waste yarn. Remove waste yarn comb.
    *   Insert ravel cord over all needles on both beds.
2.  **Hem (1x1 Rib)**:
    *   Set Main Bed T3, Ribber T3. Set both carriages to `N` (Normal, Knit).
    *   Attach main cast-on comb with supplementary claw weights.
    *   Thread MY into Main Yarn Feeder.
    *   Knit 22 rows (2 inches / 5 cm) of 1x1 rib in MY.
    *   RC000-022: Hem (1x1 Rib), MY, both beds, COL to COR. *(Expected length: 22 rows / 11 rows/inch = 2 inches)*
3.  **Transfer to Main Bed**:
    *   Carefully transfer all stitches from the Ribber Bed to the corresponding needles on the Main Bed using a 1x1 transfer tool.
    *   Remove ribber, if desired. Hang additional claw weights on the fabric.
    *   Adjust Main Bed Tension to T5. Set carriage to `N`.
    *   Knit 2 transition rows in MY.
    *   RC023-024: Transition rows, MY, Main Bed only, T5, COL to COR.
4.  **Lower Body (2x2 Fair Isle Checkerboard)**:
    *   RC set to 000 for this section.
    *   Engage 2x2 Fair Isle checkerboard pattern (e.g., set punchcard or electronic pattern for a 4-stitch, 4-row repeat, like `XXOO / OOXX` for needle selection, with alternating yarn feeders).
    *   Set Main Bed T6. Set carriage to `KCII` (or equivalent for Fair Isle).
    *   Thread MY into Yarn Feeder A, CY1 into Yarn Feeder B.
    *   Knit 88 rows (8 inches / 20.5 cm) of Fair Isle checkerboard. Catch floats every 3-5 stitches on the wrong side to prevent snagging.
    *   RC001-088: Lower Body (Checkerboard), MY & CY1, Main Bed, T6, COL to COR. *(Expected length: 88 rows / 11 rows/inch = 8 inches)*
    *   After RC088, cut CY1, leaving a 6-inch (15 cm) tail. Disengage punchcard/electronic pattern. Reset carriage to `N`. Reset Main Bed Tension to T5.
5.  **Upper Body (2-row Stripes)**:
    *   Thread CY1 back into Yarn Feeder B (or use a new CY1 cone, or use a new contrasting yarn CY2 if desired for stripes). For this pattern, assume continuing with MY and CY1.
    *   Knit 132 (143, 154, 165) rows of 2-row stripes (2 rows MY, then 2 rows CY1).
    *   RC089-220 (S: 88 + 132 = 220): Upper Body (Stripes), MY & CY1, Main Bed, T5, COL to COR.
        *   *(S: 132 rows / 11 rows/inch = 12 inches. Total body rows = 88 + 132 = 220 rows. Total body length = 8 + 12 = 20 inches / 51 cm from top of rib. Total length including hem = 22 inches / 56 cm.)*
        *   *(M: 143 rows = 13 inches. Total body rows = 231. Total length = 23 inches.)*
        *   *(L: 154 rows = 14 inches. Total body rows = 242. Total length = 24 inches.)*
        *   *(XL: 165 rows = 15 inches. Total body rows = 253. Total length = 25 inches.)*
6.  **Shoulders**:
    *   After completing the last stripe row for the upper body, cut CY1, leaving a 6-inch (15 cm) tail.
    *   Knit 1 row in MY.
    *   Cast off all stitches using a latch tool, starting from COL. Ensure a loose bind-off for flexibility.
    *   RC221 (S): 1 row MY, then cast off.
    *   RC232 (M): 1 row MY, then cast off.
    *   RC243 (L): 1 row MY, then cast off.
    *   RC254 (XL): 1 row MY, then cast off.
    *   Total Length (including hem): 22 (23, 24, 25) inches / 56 (58.5, 61, 63.5) cm. *(Note: Length includes the 2 inch hem. Schematic total length is 23 (24, 25, 26) inches. This discrepancy means the total rows in the body should be 253-22=231 for S, for 21 inches of body length. I will adjust the row counts below for front/back panels)*

**Correction to Back Panel Row Counts (to match schematic total length of 23, 24, 25, 26 inches):**
Let's adjust. Total Length (minus 22 rows hem) = 231 (242, 253, 264) rows.
Fair Isle section: 88 rows (8 inches).
Stripe section: 231 - 88 = 143 rows for S (13 inches).
RC089-231 (S: 88 + 143 = 231): Upper Body (Stripes), MY & CY1, Main Bed, T5, COL to COR.
*Total Body Rows (after rib): S: 231 rows. M: 242 rows. L: 253 rows. XL: 264 rows.*
*Total Length (including hem): S: 22 rows (hem) + 231 rows (body) = 253 rows (23 inches / 58.5 cm)*
*Total Length (including hem): M: 22 + 242 = 264 rows (24 inches / 61 cm)*
*Total Length (including hem): L: 22 + 253 = 275 rows (25 inches / 63.5 cm)*
*Total Length (including hem): XL: 22 + 264 = 286 rows (26 inches / 66 cm)*

7.  **Final Step for Back Panel**: Cut MY, leaving a 6-inch (15 cm) tail. Cast off all stitches (RC232 for S, RC243 for M, RC254 for L, RC265 for XL) using a latch tool from COL to COR.

## FRONT_PANEL

**Sizes:** S (M, L, XL)
**Stitch Count:** 162 (179, 196, 212) stitches.

1.  **Work as for Back Panel** up to **RC212 (S)** (20 rows before the final cast-off, or 1 inch / 2.5 cm before the final length measurement).
    *   This is the total length minus the hem (231 rows) minus the neckline depth (19 rows):
        *   S: 231 total body rows - 19 rows (neck shaping depth) = RC 212.
        *   M: 242 - 19 = RC 223.
        *   L: 253 - 19 = RC 234.
        *   XL: 264 - 19 = RC 245.
    *   The last row should be a COR row, with the carriage at COL.
2.  **Front Neck Shaping (Boat Neck)**:
    *   **RC213 (S) (or RC224 M, RC235 L, RC246 XL)**: With carriage at COL, knit 1 row in MY. Center your work to locate the middle 0 point.
    *   **Cast Off Center Stitches**: Cast off the central 20 (22, 24, 26) stitches (10 (11, 12, 13) stitches left and right of '0') using a latch tool. This creates the initial neck opening.
    *   **Separate Sides**: Divide work into two halves. You will work one side at a time. Put the unworked side on a stitch holder or leave needles in W position with MY on a dummy feeder, pushing the stitch-holding cam (if available).
    *   **Work Right Side (from COL)**:
        *   **RC214 (S)**: Knit to end (COR). Place the outermost 2 needles (next to the neck edge) into Hold position (H).
        *   **RC215 (S)**: Knit to end (COL). Place the outermost 2 needles (next to the neck edge) into Hold position (H).
        *   **RC216 (S)**: Knit to end (COR). Place the outermost 2 needles (next to the neck edge) into Hold position (H).
        *   **RC217 (S)**: Knit to end (COL). Place the outermost 2 needles (next to the neck edge) into Hold position (H).
        *   **RC218 (S)**: Knit to end (COR). Place the outermost 1 needle (next to the neck edge) into Hold position (H).
        *   **RC219 (S)**: Knit to end (COL). Place the outermost 1 needle (next to the neck edge) into Hold position (H).
        *   **RC220 (S)**: Knit to end (COR). Place the outermost 1 needle (next to the neck edge) into Hold position (H).
        *   **RC221 (S)**: Knit to end (COL). Place the outermost 1 needle (next to the neck edge) into Hold position (H).
        *   *(Total held needles: 2+2+2+2+1+1+1+1 = 12 stitches / 8 rows. This creates a neck depth of approximately 0.75 inch (12 rows/11 rows/inch=~1inch, 8 rows = 0.75 inch)*
    *   **Cast Off Right Shoulder**: After completing RC221 (S), with carriage at COL, cast off all remaining working stitches (all needles NOT in Hold position) using a latch tool.
    *   **Work Left Side (from COR)**:
        *   Bring the carriage to COR. Place MY into carriage.
        *   **RC214 (S)**: Knit to end (COL). Place the outermost 2 needles (next to the neck edge) into Hold position (H).
        *   **RC215 (S)**: Knit to end (COR). Place the outermost 2 needles (next to the neck edge) into Hold position (H).
        *   **RC216 (S)**: Knit to end (COL). Place the outermost 2 needles (next to the neck edge) into Hold position (H).
        *   **RC217 (S)**: Knit to end (COR). Place the outermost 2 needles (next to the neck edge) into Hold position (H).
        *   **RC218 (S)**: Knit to end (COL). Place the outermost 1 needle (next to the neck edge) into Hold position (H).
        *   **RC219 (S)**: Knit to end (COR). Place the outermost 1 needle (next to the neck edge) into Hold position (H).
        *   **RC220 (S)**: Knit to end (COL). Place the outermost 1 needle (next to the neck edge) into Hold position (H).
        *   **RC221 (S)**: Knit to end (COR). Place the outermost 1 needle (next to the neck edge) into Hold position (H).
    *   **Cast Off Left Shoulder**: After completing RC221 (S), with carriage at COR, cast off all remaining working stitches using a latch tool.

    *Note on "return them": For this type of neck shaping where the held stitches form the neck curve, they are not returned to work but are implicitly bound off as part of the neckline edge when the neckband is applied later.*

3.  **Final Length (Front)**: Same as Back Panel. 23 (24, 25, 26) inches / 58.5 (61, 63.5, 66) cm from bottom of rib.

## SLEEVES

**Make 2.**
**Sizes:** S (M, L, XL)
**Cuff Stitch Count:** 68 (72, 76, 80) stitches.
**Bicep Stitch Count:** 120 (128, 136, 146) stitches.
**Sleeve Length:** 198 (204, 209, 215) rows.

1.  **Cast On (Ribbing Setup)**:
    *   Follow steps 1 & 2 of the Back Panel for 1x1 rib setup, casting on 68 (72, 76, 80) stitches for the cuff.
    *   RC000-022: Hem (1x1 Rib), MY, both beds, COL to COR.
2.  **Transfer to Main Bed**:
    *   Transfer all stitches from the Ribber Bed to the Main Bed. Remove ribber. Hang weights.
    *   Adjust Main Bed Tension to T5. Knit 2 transition rows in MY.
    *   RC023-024: Transition rows, MY, Main Bed only, T5, COL to COR.
3.  **Sleeve Body (2-row Stripes with Increases)**:
    *   RC set to 000 for this section.
    *   Thread MY into Yarn Feeder A, CY1 into Yarn Feeder B.
    *   Knit 198 (204, 209, 215) rows of 2-row stripes (2 rows MY, then 2 rows CY1), increasing 1 stitch at each end (by bringing 1 needle from H to W and knitting it) on specific rows.
    *   **Increase Plan**:
        *   **S (68 sts to 120 sts):** Need 52 total increases (26 per side). Increase 1 stitch at each end every 8th row, 26 times.
            *   RC001-198: Stripe pattern. Increase on RC008, 016, 024, 032, 040, 048, 056, 064, 072, 080, 088, 096, 104, 112, 120, 128, 136, 144, 152, 160, 168, 176, 184, 192, 198 (final row count adjusted to fit total). *(68 sts + (26 increases * 2 sts/increase) = 120 sts.)*
        *   **M (72 sts to 128 sts):** Need 56 total increases (28 per side). Increase 1 stitch at each end every 7th row, 28 times.
            *   RC001-204: Stripe pattern. *(72 sts + (28 increases * 2 sts/increase) = 128 sts.)*
        *   **L (76 sts to 136 sts):** Need 60 total increases (30 per side). Increase 1 stitch at each end every 7th row, 30 times.
            *   RC001-209: Stripe pattern. *(76 sts + (30 increases * 2 sts/increase) = 136 sts.)*
        *   **XL (80 sts to 146 sts):** Need 66 total increases (33 per side). Increase 1 stitch at each end every 6th row, 33 times.
            *   RC001-215: Stripe pattern. *(80 sts + (33 increases * 2 sts/increase) = 146 sts.)*
    *   **Instructions for Increases**: On an increase row, with carriage at COR, bring the outermost needle on the left (L) into working position. Knit to COL. With carriage at COL, bring the outermost needle on the right (R) into working position. Knit to COR. This adds 1 stitch at each edge. Ensure to catch floats for stripes.
4.  **Cast Off**:
    *   After completing the last stripe row, cut CY1, leaving a 6-inch (15 cm) tail.
    *   Knit 1 row in MY.
    *   Cast off all 120 (128, 136, 146) stitches using a latch tool from COL to COR.

## NECKBAND

1.  **Preparation**:
    *   Using a latch tool, pick up the live stitches along the back neck edge, including the cast-off stitches on the shoulders. Transfer these to the Main Bed.
    *   Similarly, pick up the live stitches along the front neck edge, including the held stitches from the neckline shaping and cast-off shoulder stitches. Transfer these to the Main Bed.
    *   Aim for approximately 1 stitch per row along the shaped edges and 1 stitch per stitch along the cast-off sections. The goal is to have an even number of stitches for 1x1 rib.
    *   Total Stitches: Approximately 130 (140, 150, 160) stitches. Adjust so the stitch count is even and divisible by 2 for 1x1 rib.
2.  **Rehang and Knit Rib**:
    *   Rehang all picked-up stitches onto alternate needles on the Main Bed, then transfer the intervening empty needles to the Ribber Bed to prepare for 1x1 rib.
    *   Set Main Bed T3, Ribber T3. Both carriages to `N`.
    *   Thread MY into Main Yarn Feeder.
    *   Knit 20 rows (approx. 1.75 inches / 4.5 cm) of 1x1 rib in MY.
    *   RC001-020: Neckband (1x1 Rib), MY, both beds, COL to COR.
3.  **Bind Off**:
    *   Carefully transfer all stitches from the Ribber Bed to the Main Bed, placing each ribber stitch onto its adjacent main bed stitch (creating 2 stitches on 1 needle).
    *   Set Main Bed Tension to T7 (looser for bind off).
    *   Using a latch tool, bind off all stitches loosely from COL to COR.
    *   Cut MY, leaving a 12-inch (30 cm) tail for seaming.

## FINISHING

1.  **Steaming and Blocking**:
    *   Carefully steam all knitted panels (Front, Back, 2 Sleeves) flat on your ironing board or blocking mats. Avoid direct iron contact; use steam from a distance.
    *   Gently shape each piece to its intended dimensions according to the schematic. For the body panels, ensure the checkerboard and stripe patterns are aligned and smooth.
    *   Use blocking wires and pins, or a sweater board, to hold the shape while drying. Allow to dry completely.
2.  **Shoulder Seams**:
    *   Place Front and Back panels right sides together.
    *   Using a mattress stitch or backstitch, seam the shoulder edges. Ensure seams are flat and strong.
3.  **Sleeve Attachment**:
    *   Lay the body flat with the shoulder seams joined. Mark the center point of the cast-off edge of each sleeve.
    *   Align the sleeve center point with the shoulder seam. Pin the sleeve in place, matching the sleeve edge to the straight side edge of the body.
    *   Seam the sleeves to the body using mattress stitch or backstitch.
4.  **Side and Underarm Seams**:
    *   Fold the pullover so right sides are together, aligning side edges and sleeve underarm edges.
    *   Starting from the cuff of one sleeve, seam up the underarm and continue down the side of the body to the hem, ensuring the checkerboard and stripe patterns match across the seam.
    *   Repeat for the other side.
5.  **Weave in Ends**:
    *   Neatly weave in all remaining yarn tails using a tapestry needle. Trim any excess.
6.  **Final Inspection**: Check all seams for security and neatness. Give the finished garment a final light steam if needed.

## ABBREVIATIONS

*   **Approx** - Approximately
*   **CC** - Contrast Color (general term)
*   **COL** - Carriage On Left
*   **COR** - Carriage On Right
*   **CY1** - Contrast Yarn 1
*   **H** - Hold Position
*   **KCII** - Knit Carriage II (Fair Isle/Jacquard setting)
*   **K** - Knit
*   **L** - Left
*   **MB** - Main Bed
*   **MY** - Main Yarn
*   **N** - Normal (Knit) Position (Carriage)
*   **NA** - Non-working position (for ribber when not in use)
*   **P** - Partial / Slip (Carriage setting for cast-on or slip stitch)
*   **PC** - Punchcard
*   **RB** - Ribber Bed
*   **RC** - Row Counter
*   **R** - Right
*   **RG** - Row Gauge
*   **SG** - Stitch Gauge
*   **St(s)** - Stitch(es)
*   **T** - Tension (Dial Setting)
*   **Tuck** - Tuck (Carriage setting)
*   **W** - Working Position
*   **WY** - Waste Yarn
Disclaimer: This pattern was generated by AI and should be reviewed for accuracy before use. While we strive for quality, AI-generated content may contain errors. Please verify measurements, stitch counts, and instructions before beginning your project. Generated by purlJam.uk
Access your pattern anytime
Bookmark this page to access your pattern anytime