Type
Crochet
Difficulty
beginner
Category
amigurumi
AI Thinking Process
Planning
Verification
Pattern
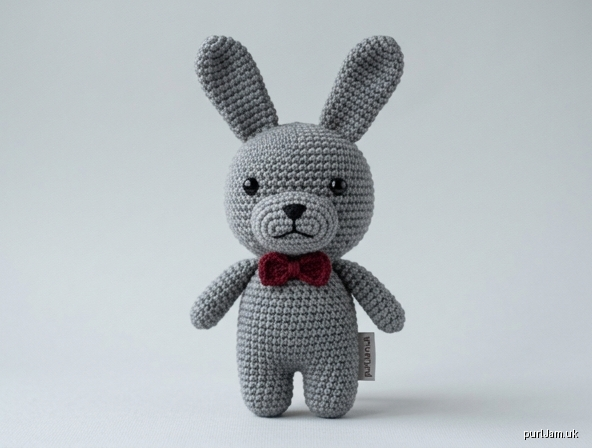
Bon (Walten Files) — Foam-Style Crochet Plush
Skill level: Beginner
Finished size: About 5–6 in (13–15 cm) tall, not including ears, in worsted weight yarn.
A simple, blocky mascot toy using basic amigurumi shapes: sphere head, cylinder body, cone ears. Worked tightly so the surface looks like foam.
Materials
- Worsted (4) yarn
- Main color (MC): medium gray — about 60 yd (55 m)
- Contrast (CC): black — small amount for face, nose, and details
- Optional: white for chest patch or teeth; dark red or burgundy for a small bow
- Hook: US E-4 / 3.5 mm (go down 1–2 sizes from the yarn label for a dense fabric)
- Polyester fiberfill
- Yarn needle
- Stitch marker
- Optional: 6–8 mm safety eyes (or embroider eyes)
Gauge
5 sc and 5 rnds = 1 in (2.5 cm) in sc in the round, unstuffed.
Gauge is for size, not drape. Work tightly so stuffing does not show.
Abbreviations (US)
ch — chain
sc — single crochet
inc — 2 sc in same st
dec — invisible decrease (sc2tog through front loops)
st(s) — stitch(es)
rnd(s) — round(s)
sl st — slip stitch
FO — fasten off
MR — magic ring
Work in continuous spirals unless noted. Mark the first st of each rnd.
Head (sphere — MC)
Rnd 1: 6 sc in MR. [6]
Rnd 2: inc in each st. [12] (6 inc → 6 + 6 = 12 ✓)
Rnd 3: (sc, inc) around. [18] (6 inc → 12 + 6 = 18 ✓)
Rnd 4: (2 sc, inc) around. [24] (6 inc → 18 + 6 = 24 ✓)
Rnds 5–9: sc around. [24] (5 rnds)
If using safety eyes, place them between Rnds 6 and 7, about 5–6 sts apart, slightly toward the front.
Rnd 10: (2 sc, dec) around. [18] (6 dec → 24 − 6 = 18 ✓)
Stuff firmly.
Rnd 11: (sc, dec) around. [12] (6 dec → 18 − 6 = 12 ✓)
Rnd 12: dec around. [6] (6 dec → 12 − 6 = 6 ✓)
FO, leaving a long tail. Weave through remaining 6 sts, pull closed, hide tail.
Body (short cylinder — MC)
Rnd 1: 6 sc in MR. [6]
Rnd 2: inc in each st. [12]
Rnd 3: (sc, inc) around. [18]
Rnd 4: (2 sc, inc) around. [24]
Rnd 5: (3 sc, inc) around. [30] (6 inc → 24 + 6 = 30 ✓)
Rnds 6–14: sc around. [30] (9 rnds)
Stuff firmly as you go, keeping a slightly flattened “foam” look rather than a ball.
Rnd 15: (3 sc, dec) around. [24] (6 dec → 30 − 6 = 24 ✓)
Rnd 16: (2 sc, dec) around. [18]
FO, leaving a long tail for sewing. Stuff the top firmly. Do not close the hole; sew this opening to the head.
Ears (make 2 — tall cones — MC)
Rnd 1: 4 sc in MR. [4]
Rnd 2: (sc, inc) around. [6] (2 inc → 4 + 2 = 6 ✓)
Rnd 3: sc around. [6]
Rnd 4: (2 sc, inc) around. [8]
Rnd 5: sc around. [8]
Rnd 6: (3 sc, inc) around. [10]
Rnds 7–12: sc around. [10] (6 rnds)
Do not stuff, or stuff very lightly at the base only so ears stay tall and slightly floppy. FO, leaving a tail for sewing. Flatten the open end.
Snout (small oval bump — MC)
Ch 4.
Rnd 1: 2 sc in 2nd ch from hook, sc in next ch, 3 sc in last ch; working other side of ch, sc in next ch, sc in last (same as start). [8]
Rnd 2: inc, sc 2, inc 3, sc 2. [12] (4 inc → 8 + 4 = 12 ✓)
Rnd 3: sc around. [12]
FO, leaving a tail. Stuff lightly.
Arms (make 2 — small tubes — MC)
Rnd 1: 6 sc in MR. [6]
Rnds 2–6: sc around. [6]
Lightly stuff. FO, leaving a tail. Flatten open end.
Legs (make 2 — short tubes — MC)
Rnd 1: 6 sc in MR. [6]
Rnd 2: inc in each st. [12]
Rnds 3–5: sc around. [12]
Stuff. FO, leaving a tail.
Optional bow (CC or burgundy)
Ch 8, sc in 2nd ch from hook and across. [7]
Work 2 more rows of sc. FO. Pinch the center and wrap yarn tightly around the middle 4–5 times. Tie off. Sew under the snout.
Assembly
- Pin head onto the open top of the body (Rnd 16 of body to the underside of the head). Sew all around with the body tail. Add a little extra stuffing at the neck before closing.
- Sew snout to the lower front of the head, centered between the eyes.
- Sew ears to the top of the head, slightly toward the back, about 2–3 sts apart. They should stand up.
- Sew arms to the sides of the body, just below the neck, pointing slightly forward.
- Sew legs to the bottom of the body so the toy can sit.
- Face (CC black yarn):
- If not using safety eyes: satin-stitch two ovals or French knots for eyes.
- Small inverted triangle or oval nose on the snout.
- Straight or slightly frowning mouth under the snout (Bon often has a simple, slightly grim line).
- Optional: two small white stitches for teeth.
- Optional white oval on the chest, sewn or embroidered.
- Weave in all ends. Shape by squeezing — the dense sc fabric should look like foam.
Finishing notes
- Work invisible decreases so the gray surface stays smooth.
- Stuff firmly for a mascot/foam look, not a floppy animal.
- For a taller Bon, add 2–4 even rnds on the body (keep [30]).
- This is a fan-made toy inspired by Bon from The Walten Files; not an official product.
Disclaimer: This pattern was generated by AI and should be reviewed for accuracy before use. While we strive for quality, AI-generated content may contain errors. Please verify measurements, stitch counts, charts, and instructions before beginning your project. Generated by purlJam.uk
Love this pattern?
Save this pattern to your free PurlJam libraryAccess your pattern anytime
Bookmark this page to access your pattern anytime