Type
Crochet
Difficulty
intermediate
Category
custom
AI Thinking Process
Planning
Verification
Pattern
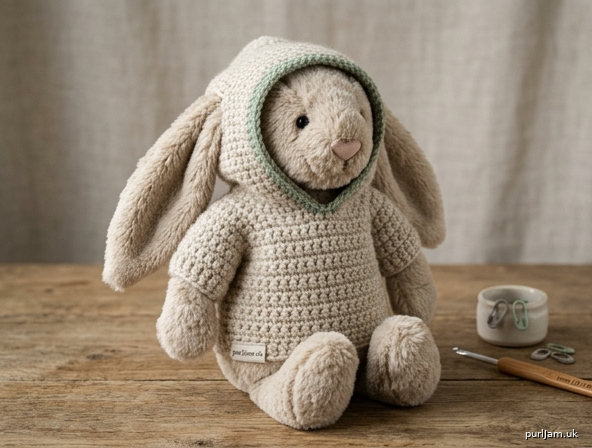
Bunny Snuggle Hoodie
A cozy short-sleeve pullover hoodie for a Medium Jellycat Bunny (approx. 12 in / 30 cm tall)
A quick, beginner-friendly hoodie worked almost entirely in single crochet. The body is made bottom-up in the round, split at the underarms to shape a wide, easy-to-dress neckline, then finished with short sleeves and a snuggly folded hood. No buttons or closures—it pulls right over your bunny's head.
Materials
- Yarn: Worsted weight (Category 4), approx. 80–100 yds (73–91 m) main color (MC). A small scrap in a contrast color (CC) is optional for hood trim.
- Hook: US H-8 / 5 mm
- Notions: Tapestry/yarn needle, stitch marker, scissors, a few locking stitch markers.
Gauge
16 sc × 18 rows = 4 in (10 cm) in single crochet. Check: 1 in = 4 sc across, 4.5 rows tall. Gauge is not critical for a toy garment, but staying close keeps the fit snug.
Size
Fits a Medium Jellycat Bunny (~12 in / 30 cm tall).
- Finished chest circumference: 9 in (23 cm) → 36 sc around (36 ÷ 4 = 9 in ✓)
- Body length (hem to underarm): ~4 in
- Total length (hem to shoulder): ~4.5 in
Abbreviations (US terms)
- ch = chain
- sc = single crochet
- sc2tog = single crochet 2 together (decrease)
- st(s) = stitch(es)
- sl st = slip stitch
- rnd = round
- RS/WS = right side / wrong side
- BLO = back loop only
- rep = repeat
Pattern Notes
- The body is worked in joined rounds: join each round with a sl st to the first sc, ch 1 to begin the next round. The ch 1 does NOT count as a stitch.
- After the underarm split, the front and back are worked flat in rows. Turning ch 1 does NOT count as a stitch.
- Work in both loops unless BLO is specified.
- Stitch counts are given in parentheses at the end of each round/row.
- The neckline is intentionally wide so the hoodie slips easily over the toy's head.
INSTRUCTIONS
BODY (worked bottom-up, in joined rounds)
Foundation: Ch 36, being careful not to twist, join with a sl st to the first ch to form a ring.
Rnd 1: Ch 1, work 1 sc in each ch around, join with sl st to first sc. (36 sc)
Rnds 2–14: Ch 1, sc in each st around, join with sl st to first sc. (36 sc each rnd)
At the end of Rnd 14 the body measures approximately 3.5 in (14 rnds ÷ 4.5 rows/in ≈ 3.1 in, plus the foundation ≈ 3.5 in). Fasten off.
Tip: Try the tube on your bunny now. It should reach from the hem up to the underarms. Add or remove rounds in pairs if needed.
SPLIT FOR FRONT & BACK
We now divide the 36 sts into two equal halves (36 ÷ 2 = 18 + 18 ✓) and work each flat.
Reattach yarn at any stitch to begin the BACK.
Back
Row 1 (RS): Ch 1, sc in the same st and in the next 17 sts. Turn. (18 sc) Leave the remaining 18 sts unworked—these become the Front.
Rows 2–5: Ch 1, sc in each st across. Turn. (18 sc each row)
At the end of Row 5 the back measures about 1 in above the split. Fasten off.
Front
With RS facing, rejoin yarn to the first unworked st next to the Back.
Row 1 (RS): Ch 1, sc in same st and in the next 17 sts. Turn. (18 sc)
Rows 2–5: Ch 1, sc in each st across. Turn. (18 sc each row)
Fasten off after Row 5.
SHOULDER SEAMS
Lay the piece flat with RS together. Seam the outer 5 sts of each shoulder, leaving the center 8 sts open for the neck.
- Left shoulder: seam 5 sts. ✓
- Neck opening: 8 sts. ✓
- Right shoulder: seam 5 sts. ✓
- Check: 5 + 8 + 5 = 18 sts across each half ✓
Use a tapestry needle and a whipstitch through both layers. Weave in ends.
Tip: The 8-st (≈2 in) center gap plus the hood opening makes a wide neckline that slips easily over the bunny's head.
SLEEVES (make 2, worked in joined rounds)
The armhole depth is 5 rows (5 ÷ 4.5 ≈ 1.1 in) on each side of the split, giving an armhole opening of about 2.2 in around. We pick up 20 sts evenly around each armhole (10 along the front edge, 10 along the back edge = 20 ✓).
Setup: With RS facing, join MC at the underarm. Ch 1, then work 20 sc evenly around the armhole opening. Join with sl st to first sc. (20 sc)
Rnds 1–2: Ch 1, sc in each st around, join. (20 sc each rnd)
Rnd 3 (light taper): Ch 1, sc in each of first 8 sts, sc2tog, sc in each of next 8 sts, sc2tog, join. (18 sc) Check: 8 + 2(decreased from 4) + 8 → 8 + 1 + 8 + 1 = 18 ✓
Rnd 4: Ch 1, sc in each st around, join. (18 sc)
Cuff — Rnd 5 (BLO): Ch 1, working in back loops only, sc in each st around, join. (18 sc) Fasten off. The BLO round makes a subtle cuff ridge.
Repeat for the second sleeve. Each sleeve measures about 1.5 in long.
HOOD (picked up around the neckline)
We pick up 24 sts around the neck opening: 8 sts across each shoulder-to-shoulder front, 8 sts across the back, and 4 sts at each shoulder edge is not needed—simply space 24 sts evenly around the full neck edge (front + back + shoulders). Aim for even spacing all the way around.
Setup Row (RS): With MC, join at the right front neck edge. Ch 1, work 24 sc evenly around the neck opening. Turn. (24 sc) Work the hood flat in rows, turning at each end—do not join into a round.
Rows 1–14: Ch 1, sc in each st across. Turn. (24 sc each row)
At the end of Row 14 the hood measures about 3 in tall (14 ÷ 4.5 ≈ 3.1 in) — deep enough to fold over the bunny's ears or sit softly at the back.
Shape the top — Row 15: Ch 1, [sc in next 2 sts, sc2tog] 6 times. Turn. (18 sc) Check: 6 groups × (2 + decrease) → 6 × 3 = 18 ✓
Row 16: Ch 1, [sc in next st, sc2tog] 6 times. Turn. (12 sc) Check: 6 × 2 = 12 ✓
Row 17: Ch 1, [sc2tog] 6 times. Turn. (6 sc) Check: 6 ÷ 2 = 6 sts remain from 12 sts (6 decreases) ✓
Fasten off, leaving a 10 in (25 cm) tail.
Close the hood top
Fold the hood so the last row's two edges meet. Using the long tail and a tapestry needle, whipstitch the top seam closed from the crown down the back of the hood for a smooth, rounded shape. Weave in the tail.
FINISHING
- Optional hood trim: With CC and RS facing, join at one front edge of the hood opening. Ch 1, work an even row of sc all the way around the front hood opening. Fasten off and weave in ends.
- Weave in all remaining ends with the tapestry needle.
- Gently block by misting with water and shaping over your bunny (or a towel). Let dry.
- Dress your bunny: Slip the hoodie over the head first (wide neck), guide the arms through the sleeves, then settle the hem at the hips.
Finished Measurements Summary
- Chest: 9 in (36 sc ÷ 4 = 9 in ✓)
- Body length to shoulder: ~4.5 in
- Sleeve length: ~1.5 in
- Hood depth: ~3 in
Enjoy your snuggly bunny hoodie! 🐰
Disclaimer: This pattern was generated by AI and should be reviewed for accuracy before use. While we strive for quality, AI-generated content may contain errors. Please verify measurements, stitch counts, and instructions before beginning your project. Generated by purlJam.uk
Love this pattern?
Save this pattern to your free PurlJam libraryAccess your pattern anytime
Bookmark this page to access your pattern anytime