Type
Knitting
Difficulty
intermediate
Category
amigurumi
AI Thinking Process
Planning
Verification
Pattern
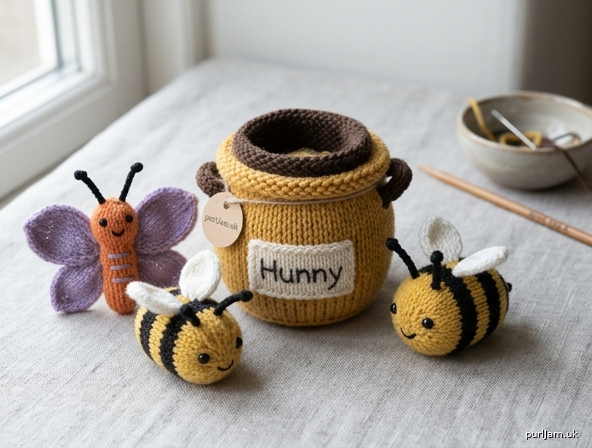
Busy Bees, Butterfly & Hunny Pot Knitted Amigurumi Set
A beginner-friendly knitted soft-toy set worked in the round. Make a pair of cheerful bees, one fluttery butterfly, and a classic hunny pot—perfect for play or display. All pieces use simple stockinette, basic increases and decreases, and mattress-stitch assembly.
Materials
- Yarn: Worsted weight (approx. 50 g / 100 yd total)
- Bee: 15 yd yellow (MC), 10 yd black (CC), scrap white for wings
- Butterfly: 15 yd preferred body color (e.g., purple or orange), 10 yd contrasting wing color, scrap black for body stripes/antennae
- Hunny pot: 30 yd golden yellow or tan (MC), 10 yd dark brown (CC for rim/label)
- Small amounts of black, white, and pink embroidery floss or yarn for faces and details
- Needles: US 4 / 3.5 mm DPNs (or circular for Magic Loop)—1–2 sizes smaller than yarn label for a tight fabric
- Notions: Polyester fiberfill stuffing (approx. 1 oz / 30 g total), tapestry needle, stitch marker, scissors, optional 6 mm safety eyes (4 for bees + 2 for butterfly)
- Finished sizes (approx.):
- Bee: 2¾" long × 1½" wide
- Butterfly: 2½" wingspan × 2" long
- Hunny pot: 3" tall × 2½" diameter
Gauge
5.5 sts and 7 rounds = 1" in stockinette stitch in the round (tight, even fabric is more important than exact gauge so stuffing does not show).
Abbreviations (US)
- CO: cast on
- k: knit
- p: purl
- kfb: knit into front and back (1 st increased)
- k2tog: knit 2 together (1 st decreased)
- st(s): stitch(es)
- rnd(s): round(s)
- PM: place marker
- SM: slip marker
- BO: bind off
- RS: right side
- WS: wrong side
Pattern Notes
- Work all pieces in stockinette (knit every round) unless noted.
- Use a tight gauge so stuffing stays hidden. Stuff firmly but do not stretch stitches.
- Safety eyes (if used) must be inserted before closing the head/body. For child safety under 3 years, embroider eyes instead.
- Weave all ends securely inside the stuffed pieces.
- Magic Loop or DPNs both work; mark beginning of round.
- Inline stitch counts are confirmed after each shaping step.
BEES (make 2)
Body & Head (worked as one piece, yellow and black)
With yellow (MC), CO 6 sts. Join to work in the round, being careful not to twist; PM for beg of rnd.
Rnd 1: Kfb around. (12 sts) Rnd 2: *K1, kfb; rep from * around. (18 sts) Rnds 3–4: Knit. Switch to black (CC). Rnds 5–6: Knit. Switch to yellow. Rnds 7–8: Knit. Switch to black. Rnds 9–10: Knit. Switch to yellow. Rnd 11: Knit. Rnd 12 (begin head): *K1, k2tog; rep from * around. (12 sts) Rnds 13–14: Knit. Insert safety eyes (if using) between Rnds 13–14, about 4 sts apart. Rnd 15: *K2tog; rep from * around. (6 sts) Stuff body and head firmly. Cut yarn, thread tail through remaining 6 sts, pull tight, and fasten off securely. Weave end inside.
Wings (make 2 per bee, white)
CO 6 sts. Row 1 (RS): Knit. Row 2: Purl. Row 3: K1, kfb, k2, kfb, k1. (8 sts) Rows 4–6: Work in stockinette (k on RS, p on WS). Row 7: K1, k2tog, k2, k2tog, k1. (6 sts) Row 8: Purl. BO all sts. Weave in ends, leaving a long tail for sewing.
Antennae (make 2 per bee, black)
CO 3 sts. Work i-cord for 1". BO. (Or simply braid three 4" yarn strands and knot ends.)
Bee Assembly
- Pin wings to top of body (centered over black stripe section) and sew securely with mattress stitch or whipstitch using white tail.
- Attach antennae to top of head, spaced evenly.
- With black yarn or floss, embroider a small smiling mouth below eyes.
- Optional: add pink cheek dots with embroidery floss.
- Weave all ends inside body.
BUTTERFLY
Body
With body color, CO 6 sts. Join, PM.
Rnd 1: Kfb around. (12 sts) Rnds 2–10: Knit. Rnd 11: *K2tog; rep from * around. (6 sts) Lightly stuff. Cut yarn, thread through remaining sts, pull tight, fasten off.
Wings (make 2 lower + 2 upper)
Lower wings (make 2 in wing color): CO 8 sts. Rows 1–4: Stockinette (start with knit row). Row 5: K1, k2tog, k2, k2tog, k1. (6 sts) Row 6: Purl. Row 7: K1, k2tog, k2tog, k1. (4 sts) BO.
Upper wings (make 2 in wing color, slightly larger): CO 10 sts. Rows 1–6: Stockinette. Row 7: K1, k2tog, k4, k2tog, k1. (8 sts) Row 8: Purl. Row 9: K1, k2tog, k2, k2tog, k1. (6 sts) Row 10: Purl. BO.
Antennae (make 2)
Same as bee antennae (black i-cord or braided yarn, 1¼" long).
Butterfly Assembly
- Place body horizontally. Sew upper wings near the “head” end (one on each side), lower wings just behind them, angling slightly outward for a natural look. Use matching yarn and mattress/whipstitch; catch only the edge stitches so wings stay flat and open.
- Attach antennae to head end.
- Embroider two small black eyes and optional body stripes with contrasting yarn.
- Weave ends inside body. Do not over-stuff wings—they should remain flat.
HUNNY POT
Pot (worked from bottom up)
With golden yellow (MC), CO 8 sts. Join, PM.
Rnd 1: Kfb around. (16 sts) Rnd 2: *K1, kfb; rep from * around. (24 sts) Rnd 3: *K2, kfb; rep from * around. (32 sts) Rnds 4–14: Knit. (piece measures approx. 2" tall) Rnd 15 (ridge for rim): Purl. Rnd 16: Knit. Rnd 17: *K2, k2tog; rep from * around. (24 sts) Rnd 18: Knit. Switch to dark brown (CC) for rim. Rnds 19–21: Knit. BO loosely knitwise. Stuff pot firmly up to the purl ridge, leaving the rim unstuffed so it stands open. Weave in ends.
Optional Label / “Hunny” Banner
With dark brown or cream scrap, CO 12 sts. Work 4 rows stockinette. BO. Embroider “Hunny” or a simple bee icon with black floss. Sew banner to front of pot just below the rim using whipstitch.
Pot Handles (optional, make 2)
With MC, CO 4 sts. Work i-cord for 1½". BO. Sew ends of each handle to opposite sides of the rim.
Finishing the Set
- Arrange bees and butterfly around or on the hunny pot.
- Check that all seams are secure and ends are buried.
- Spot-clean only; do not machine wash.
Tips for Success
- Count stitches at the end of every shaping round (confirmed counts shown).
- Stuff little and often—use the blunt end of a pencil or chopstick for tiny pieces.
- Mattress stitch gives nearly invisible seams on stockinette.
- If you prefer all embroidered faces, omit safety eyes entirely.
Enjoy your sweet little knitted trio—buzz, flutter, and dip into the hunny!
Disclaimer: This pattern was generated by AI and should be reviewed for accuracy before use. While we strive for quality, AI-generated content may contain errors. Please verify measurements, stitch counts, and instructions before beginning your project. Generated by purlJam.uk
Love this pattern?
Save this pattern to your free PurlJam libraryAccess your pattern anytime
Bookmark this page to access your pattern anytime