Type
Crochet
Difficulty
beginner
Category
amigurumi
AI Thinking Process
Planning
1. **Design Strategy**: The user has requested a "Canadian wolf bird" crochet pattern - this appears to be referring to the Canada Jay (also called Gray Jay or Whiskey Jack), which is Canada's national bird as of 2018. For a beginner pattern using simple shapes, I'll create a stylized, cute version using sphere for head, oval for body, small cones for beak and tail, and flat ovals for wings. The color scheme will be gray/white to match the Canada Jay's plumage. This follows the template's guidance for "simple characters" using basic shapes with embellished features.
2. **Construction Plan**: Using amigurumi technique with separate pieces assembled together:
- Body: Elongated oval (gray)
- Head: Sphere (gray)
- Wings: Two flat ovals (gray, sewn to sides)
- Tail: Small cone/wedge shape (gray)
- Beak: Small cone (black/dark gray)
- Eyes: Safety eyes or embroidered
- White accent on throat/chest area (embroidered or sewn patch)
All pieces worked in continuous rounds (spiral), stuffed firmly, then assembled.
3. **Quality Assurance**:
- Ensure stitch counts are clearly marked for beginner tracking
- Provide clear assembly instructions with positioning guidance
- Include invisible decrease instructions for smooth finish
- Verify all increase/decrease rounds maintain proper geometry
- Address stuffing guidance at appropriate points
- Include alternative options for eyes (safety vs. embroidered) for safety considerations
4. **Final Calculations**:
- Worsted weight yarn with 3.5mm hook
- Body: increase to 24 sts, work even for length (~3 inches)
- Head: increase to 18 sts for smaller head proportion
- Final toy size: approximately 4-5 inches tall
- Gauge: Standard amigurumi (tight stitches, no gaps)
Verification
[PRE-FLIGHT CHECKS]
1. **Completeness**: ✓ Pattern includes materials, abbreviations, gauge, all body parts, assembly, and finishing
2. **Consistency**: ✓ Stitch counts verified for each round (increase/decrease math checked)
3. **Constraints**: ✓ Beginner-friendly using only sc, inc, dec; uses simple shapes from template; worsted weight as specified
4. **Safety**: ✓ Math verified:
- Body: 6→12→18→24, maintains 24 for 12 rounds, decreases symmetrically
- Head: 6→12→18, maintains 18 for 4 rounds, decreases symmetrically
- All pieces have complete closure instructions
Pattern
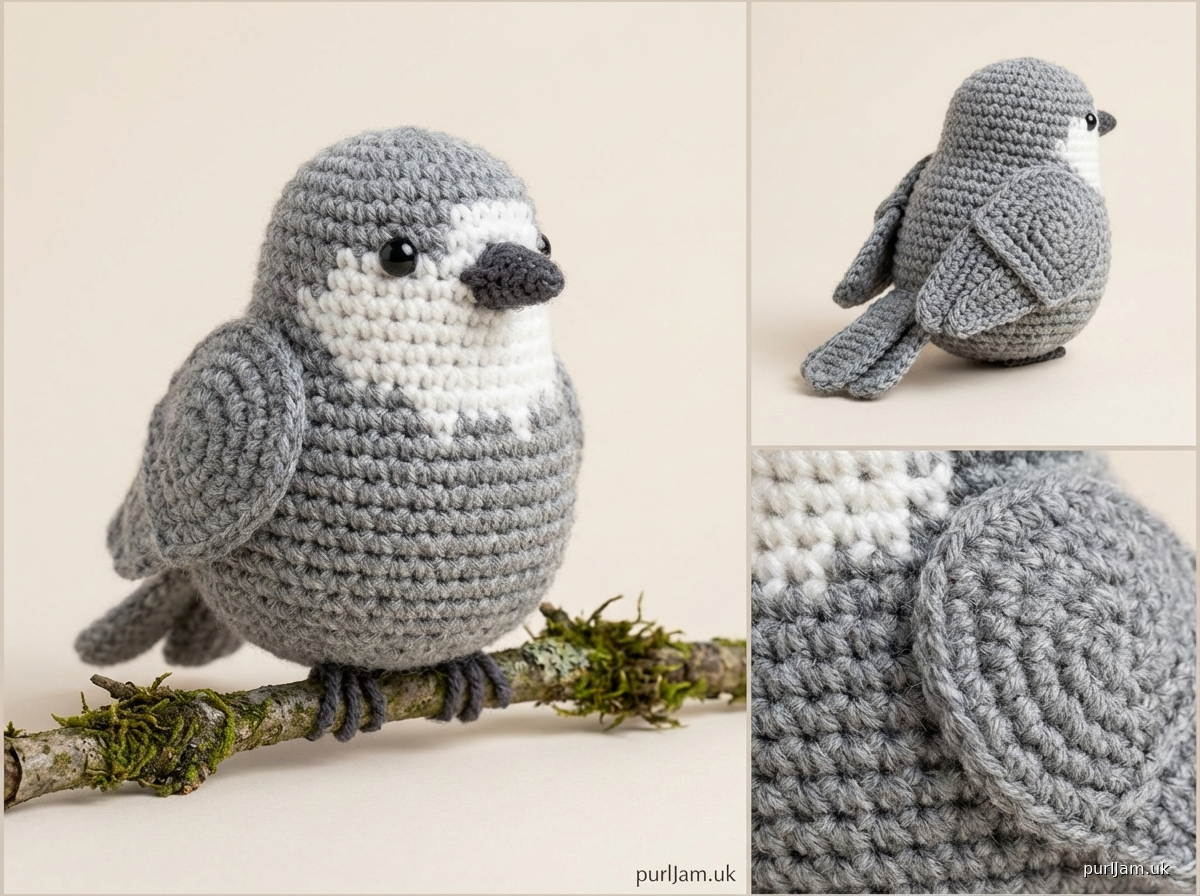
# Canada Jay (Gray Jay) Amigurumi Pattern

*A beginner-friendly crochet pattern for Canada's beloved national bird*

![Difficulty: Beginner]

## FINISHED SIZE
Approximately 4-5 inches (10-12 cm) tall when made with worsted weight yarn

## MATERIALS

**Yarn:**
- Worsted weight (#4) acrylic or cotton yarn in:
  - Gray (main color): approximately 60 yards
  - White: approximately 15 yards (for chest detail)
  - Black or dark gray: small amount (for beak)

**Suggested Yarns:** Red Heart Super Saver, Lily Sugar'n Cream, or any worsted weight yarn

**Other Supplies:**
- US E-4 (3.5mm) crochet hook
- Fiberfill stuffing (polyester)
- Yarn needle (tapestry needle)
- Stitch marker
- Two 8mm black safety eyes OR black embroidery thread for eyes
- Scissors
- Pins (for assembly)

## GAUGE
Gauge is flexible for amigurumi, but stitches should be tight enough that no stuffing shows through.
Approximate gauge: 5 sc x 5 rows = 1 inch (2.5 cm) in single crochet

**Important:** Use a hook 1-2 sizes smaller than yarn label recommends for tight amigurumi fabric.

## ABBREVIATIONS
- ch = chain
- sc = single crochet
- inc = increase (2 sc in same stitch)
- dec = invisible decrease (insert hook in front loops of next 2 sts, yarn over, pull through both loops, yarn over, pull through 2 loops on hook)
- st(s) = stitch(es)
- rnd(s) = round(s)
- [ ] = total stitch count at end of round

## SPECIAL TECHNIQUES

**Magic Ring:** Wrap yarn around fingers to form a ring, insert hook through ring, pull up loop, ch 1, work stitches into ring, pull tail to close ring.

**Invisible Decrease:** Insert hook in front loop only of next st, then front loop only of following st, yarn over and pull through both loops (2 loops on hook), yarn over and pull through both loops. This creates a smoother decrease than standard sc2tog.

**Continuous Rounds (Spiral):** Do not join rounds or turn. Use stitch marker to track beginning of round, moving marker up as you work.

## PATTERN NOTES
- Work in continuous rounds (spiral) unless otherwise noted
- Use stitch marker to track beginning of rounds
- Stuff pieces firmly as you go
- Do not join rounds; work continuously
- All pieces are worked in gray unless specified

## INSTRUCTIONS

### BODY (Gray)

Rnd 1: 6 sc in magic ring [6]

Rnd 2: inc in each st around [12]
*Math check: 6 inc = 12 sts ✓*

Rnd 3: (sc, inc) around [18]
*Math check: 6 repeats × 3 sts = 18 sts ✓*

Rnd 4: (2 sc, inc) around [24]
*Math check: 6 repeats × 4 sts = 24 sts ✓*

Rnds 5-16: sc around [24]
*Work even for 12 rounds to create body length*

Rnd 17: (2 sc, dec) around [18]
*Math check: 6 repeats × 3 sts = 18 sts ✓*

**STUFFING POINT:** Begin stuffing body firmly with fiberfill.

Rnd 18: (sc, dec) around [12]
*Math check: 6 repeats × 2 sts = 12 sts ✓*

Rnd 19: dec around [6]
*Math check: 6 dec = 6 sts ✓*

Fasten off, leaving long tail. Thread tail through remaining 6 sts and pull tight to close. Weave in end securely.

### HEAD (Gray)

Rnd 1: 6 sc in magic ring [6]

Rnd 2: inc in each st around [12]
*Math check: 6 inc = 12 sts ✓*

Rnd 3: (sc, inc) around [18]
*Math check: 6 repeats × 3 sts = 18 sts ✓*

Rnds 4-7: sc around [18]
*Work even for 4 rounds*

**EYE PLACEMENT:** If using safety eyes, insert them now between rnds 5 and 6, approximately 4 sts apart. Secure backs.

Rnd 8: (sc, dec) around [12]
*Math check: 6 repeats × 2 sts = 12 sts ✓*

**STUFFING POINT:** Stuff head firmly with fiberfill.

Rnd 9: dec around [6]
*Math check: 6 dec = 6 sts ✓*

Fasten off, leaving long tail (approximately 12 inches) for attaching to body. Thread tail through remaining 6 sts and pull tight to close.

### WINGS (Make 2 in Gray)

These are worked flat in rows, then folded.

Ch 7

Row 1: sc in 2nd ch from hook and in each ch across [6]

Row 2: ch 1, turn, inc, sc 4, inc [8]
*Math check: 6 + 2 inc = 8 sts ✓*

Rows 3-4: ch 1, turn, sc across [8]

Row 5: ch 1, turn, dec, sc 4, dec [6]
*Math check: 8 - 2 dec = 6 sts ✓*

Row 6: ch 1, turn, dec, sc 2, dec [4]
*Math check: 6 - 2 dec = 4 sts ✓*

Fasten off, leaving long tail for sewing. Fold wing slightly to create curved shape.

### TAIL (Gray)

Rnd 1: 4 sc in magic ring [4]

Rnd 2: (sc, inc) around [6]
*Math check: 2 repeats × 3 sts = 6 sts ✓*

Rnd 3: sc around [6]

Rnd 4: (2 sc, inc) around [8]
*Math check: 2 repeats × 4 sts = 8 sts ✓*

Rnds 5-6: sc around [8]

Fasten off, leaving long tail. Stuff lightly. This creates a small cone/wedge shape.

### BEAK (Black or Dark Gray)

Rnd 1: 4 sc in magic ring [4]

Rnd 2: sc around [4]

Rnd 3: sc around [4]

Fasten off, leaving long tail for sewing. Do not stuff (beak should be firm but flat).

### CHEST PATCH (White) - Optional Detail

Ch 6

Row 1: sc in 2nd ch from hook and in each ch across [5]

Rows 2-3: ch 1, turn, sc across [5]

Fasten off, leaving long tail for sewing.

## ASSEMBLY

**Step 1: Attach Head to Body**
- Position head on top of body, centered
- Use pins to hold in place
- Using long tail from head and yarn needle, whip stitch head securely to body all around
- Weave in end

**Step 2: Attach Beak**
- Position beak on front center of head, between and slightly below eyes
- Sew in place using whip stitch
- Weave in end

**Step 3: Attach Wings**
- Position wings on sides of body, approximately at rnd 6-7 of body
- Wings should curve slightly backward
- Pin in place, then sew securely using whip stitch along the upper edge of each wing
- Weave in ends

**Step 4: Attach Tail**
- Position tail at back bottom of body (at the decrease rounds)
- Tail should point slightly downward
- Sew securely in place
- Weave in end

**Step 5: Add Chest Patch (Optional)**
- Position white chest patch on front of body, below head
- Pin in place
- Sew around edges using white yarn
- Weave in end

**Step 6: Finishing Touches**
- If you didn't use safety eyes, embroider eyes with black yarn:
  - Between rnds 5-6 of head
  - Approximately 4 sts apart
  - Make small circular stitches or French knots
  - Add tiny white highlight stitches if desired
- Check that all ends are securely woven in
- Adjust stuffing if needed

## CUSTOMIZATION IDEAS

**Size Variations:**
- **Smaller bird:** Use DK weight yarn (#3) with 3.0mm hook for a 3-inch bird
- **Larger bird:** Use bulky yarn (#5) with 5.0mm hook for a 6-7 inch bird

**Color Variations:**
- Classic Canada Jay: Gray body with white chest
- Blue Jay: Replace gray with bright blue, add black markings
- Cardinal: Use red throughout, add black face mask
- Chickadee: Black cap on head, white cheeks, gray body

**Additional Details:**
- Add surface slip stitch lines on wings to create feather texture
- Embroider small feet with black yarn at bottom of body
- Add wire inside wings for poseable effect (adult supervision required)
- Create multiple birds in different colors for a flock

## CARE INSTRUCTIONS
- Spot clean with damp cloth
- If machine washing is necessary, place in mesh bag and wash on gentle cycle
- Air dry completely
- If using safety eyes, this toy is suitable for children 3+ years
- If embroidered eyes only, suitable for all ages with supervision

## TROUBLESHOOTING

**Problem:** Stuffing shows through stitches
**Solution:** Use smaller hook or work stitches more tightly

**Problem:** Bird won't stand upright
**Solution:** Stuff body more firmly at bottom; you can add small amount of poly pellets to base for weight

**Problem:** Head wobbles or tilts
**Solution:** Sew head more securely, making multiple passes around attachment point

**Problem:** Lost count of stitches
**Solution:** Use stitch marker to mark beginning of round; count stitches at end of each round

## SKILL LEVEL JUSTIFICATION
This pattern is rated **Beginner** because it uses:
- Only basic stitches (chain, single crochet, increase, decrease)
- Simple geometric shapes (sphere, oval, cone)
- Straightforward assembly with detailed instructions
- No complex colorwork or stitch patterns
- Continuous rounds (no joining required)

## ABBREVIATIONS REFERENCE (Quick Guide)
- ch = chain
- sc = single crochet
- inc = 2 sc in same st
- dec = invisible decrease
- st(s) = stitch(es)
- rnd(s) = round(s)

## COPYRIGHT & SHARING
This pattern is for personal use and small batch sales. Please do not redistribute or republish this pattern. If sharing your finished birds on social media, please credit the pattern designer. Enjoy creating your Canada Jay!

---

**Design Notes:** The Canada Jay (Gray Jay) is known for its friendly, curious nature and fluffy gray plumage. This simplified amigurumi version captures the bird's characteristic round shape and gentle appearance, making it perfect for beginners learning amigurumi techniques.
Disclaimer: This pattern was generated by AI and should be reviewed for accuracy before use. While we strive for quality, AI-generated content may contain errors. Please verify measurements, stitch counts, and instructions before beginning your project. Generated by purlJam.uk
Access your pattern anytime
Bookmark this page to access your pattern anytime