Type
Crochet
Difficulty
intermediate
Category
amigurumi
AI Thinking Process
Planning
Verification
Pattern
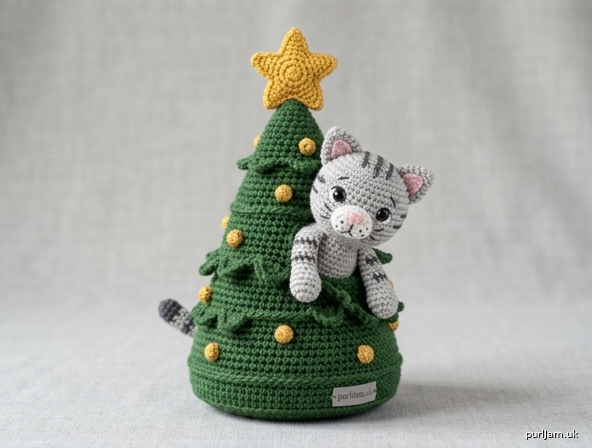
Cat in a Christmas Tree
Advanced Amigurumi Scene
Finished Size: Approximately 8.5" (21.5 cm) tall × 5" (12.5 cm) wide at base
Gauge: 5 sc and 5 rnds = 1" (2.5 cm) with yarn held single and tight tension (adjust hook if needed so stuffing does not show)
Skill Level: Advanced
Materials
- Worsted weight yarn (US #4):
- Main Color (MC, tree): Forest green – 90 yd (82 m)
- Contrast A (cat body): Light gray or cream – 55 yd (50 m)
- Contrast B (tabby stripes/muzzle): Darker gray or brown – 15 yd (14 m)
- Contrast C (star & ornaments): Gold or yellow – 12 yd (11 m)
- Small amounts of pink (nose/inner ear), black or dark brown (embroidery), white (optional eye highlights)
- Size E-4 (3.5 mm) crochet hook (or size needed to obtain gauge)
- 9 mm safety eyes (1 pair) – or embroider eyes if gift is for child under 3
- Polyester fiberfill stuffing
- Yarn needle, stitch markers, scissors, pins
- Optional: small amount of cardboard or plastic canvas circle (2.5" / 6.5 cm diameter) for tree base stability
Abbreviations (US terms)
mr = magic ring
sc = single crochet
inc = 2 sc in same stitch
dec = sc2tog (invisible decrease preferred)
blo = back loop only
flo = front loop only
ch = chain
sl st = slip stitch
bobble = [yo, insert hook, yo, pull up loop, yo, draw through 2 loops] 4 times in same st, yo, draw through all 5 loops on hook
st(s) = stitch(es)
rnd(s) = round(s)
FO = fasten off
Work in continuous spirals unless noted. Mark first st of each rnd. Stuff firmly as you go.
CAT
Head (Contrast A)
Rnd 1: 6 sc in mr (6)
Rnd 2: inc around (12)
Rnd 3: [sc, inc] around (18)
Rnd 4: [2 sc, inc] around (24)
Rnd 5: [3 sc, inc] around (30)
Rnd 6: [4 sc, inc] around (36)
Rnds 7–12: sc around (36) — 6 rnds
Rnd 13: [4 sc, dec] around (30)
Rnd 14: [3 sc, dec] around (24)
Insert 9 mm safety eyes between Rnds 9–10, 7 sts apart, centered.
Begin stuffing firmly.
Rnd 15: [2 sc, dec] around (18)
Rnd 16: [sc, dec] around (12)
Rnd 17: dec around (6)
FO, weave tail through front loops of remaining 6 sts and pull closed. Weave in end.
Muzzle (Contrast A or small scrap of white)
Rnd 1: 6 sc in mr (6)
Rnd 2: inc around (12)
Rnd 3: sc around (12)
FO, leave long tail for sewing. Lightly stuff. Sew to lower center of face covering Rnds 11–14. Embroider pink nose (small inverted triangle) and black mouth/whisker dots with straight stitches.
Ears (make 2 – Contrast A)
Rnd 1: 4 sc in mr (4)
Rnd 2: [sc, inc] around (6)
Rnd 3: [2 sc, inc] around (8)
Rnd 4: [3 sc, inc] around (10)
Rnd 5: sc around (10)
FO, leave tail. Do not stuff. Flatten. Optional: embroider or surface-sl-st a small pink triangle on inner ear. Sew ears to head over Rnds 3–6, slightly angled outward, 4 sts apart at inner edges.
Body (Contrast A)
Rnd 1: 6 sc in mr (6)
Rnd 2: inc around (12)
Rnd 3: [sc, inc] around (18)
Rnd 4: [2 sc, inc] around (24)
Rnd 5: [3 sc, inc] around (30)
Rnds 6–12: sc around (30) — 7 rnds
Rnd 13: [3 sc, dec] around (24)
Rnds 14–15: sc around (24)
Rnd 16: [2 sc, dec] around (18)
Stuff firmly.
Rnd 17: [sc, dec] around (12)
FO, leave long tail. Finish stuffing. Sew open end of body to underside of head, centering face forward.
Arms (make 2 – Contrast A)
Rnd 1: 6 sc in mr (6)
Rnd 2: [sc, inc] around (9)
Rnds 3–8: sc around (9) — 6 rnds
Lightly stuff lower half only.
FO, leave tail. Flatten open end and sew to sides of body at Rnd 5–6, angled slightly forward so cat can “hold” tree branches later if desired.
Legs (make 2 – Contrast A)
Rnd 1: 6 sc in mr (6)
Rnd 2: inc around (12)
Rnds 3–4: sc around (12)
Rnd 5: [2 sc, dec] around (9)
Rnds 6–9: sc around (9) — 4 rnds
Stuff firmly. FO, leave tail. Sew legs to bottom front of body so cat sits in a crouched/perched pose (toes pointing slightly outward).
Tail (Contrast A with optional Contrast B stripes)
Rnd 1: 6 sc in mr (6)
Rnds 2–14: sc around (6), changing to Contrast B for 2-rnd stripes every 3–4 rnds if desired
Stuff lightly. FO, leave tail. Curve the tail and sew to lower back of body so it wraps partially around or hangs beside the tree later.
Optional Tabby Markings
With Contrast B, embroider or surface-crochet thin stripes on forehead, cheeks, and back before final assembly.
CHRISTMAS TREE
Tree Cone (MC)
Stuff firmly and continuously after Rnd 8; insert cardboard base circle after Rnd 12 if using.
Rnd 1: 6 sc in mr (6)
Rnd 2: inc around (12)
Rnd 3: [sc, inc] around (18)
Rnd 4: [2 sc, inc] around (24)
Rnd 5: [3 sc, inc] around (30)
Rnd 6: [4 sc, inc] around (36)
Rnd 7: [5 sc, inc] around (42)
Rnd 8: [6 sc, inc] around (48)
Rnds 9–11: sc around (48) — 3 rnds
Rnd 12: [6 sc, dec] around (42)
Rnds 13–14: sc around (42)
Rnd 15: [5 sc, dec] around (36)
Rnds 16–17: sc around (36)
Rnd 18: [4 sc, dec] around (30)
Rnds 19–20: sc around (30)
Rnd 21: [3 sc, dec] around (24)
Rnds 22–23: sc around (24)
Rnd 24: [2 sc, dec] around (18)
Rnds 25–26: sc around (18)
Rnd 27: [sc, dec] around (12)
Rnd 28: sc around (12)
Rnd 29: dec around (6)
FO, weave closed. Shape into a straight cone while stuffing.
Branch Texture & Ornaments (optional advanced detail)
With MC, surface-sl-st gentle upward spirals or short horizontal “bough” lines around the cone.
Bobble ornaments: join Contrast C with sl st to any st on tree, ch 1, bobble in same st, sl st in next st, FO. Weave ends inside. Place 8–12 bobbles randomly.
Star Topper (Contrast C)
Rnd 1: 5 sc in mr (5)
Rnd 2: inc around (10)
Make 5 points: *ch 4, sl st in 2nd ch from hook, sc in next ch, hdc in last ch, skip next sc of rnd, sl st in following sc; repeat from * 4 more times.
FO, leave tail. Lightly stiffen if desired. Sew securely to tip of tree.
ASSEMBLY & FINISHING
- Weave in all remaining ends on individual pieces.
- Pose cat in a seated/crouched position. Pin cat against the front-middle of the tree (roughly spanning tree Rnds 12–22) so head, upper body, and front paws emerge as if the cat is climbing out or perched in the branches. Tail may wrap around the side or hang free.
- Using matching yarn and ladder stitch or whipstitch, sew cat body and legs firmly to the tree surface. Anchor arms so one or both paws rest on the tree. Ensure all attachments are tight—no gaps for stuffing to escape.
- Double-check safety eyes are locked. Embroider any final facial details (eyebrows, whiskers).
- Optional: add a small crocheted or ribbon bow at the neck, or tiny surface-crochet “gifts” at the base.
- Shape the finished piece so the tree stands upright and the cat faces forward.
Care
Spot clean only. Do not machine wash. Keep out of reach of pets and very young children if safety eyes are used.
Enjoy your festive Cat in a Christmas Tree!
Disclaimer: This pattern was generated by AI and should be reviewed for accuracy before use. While we strive for quality, AI-generated content may contain errors. Please verify measurements, stitch counts, charts, and instructions before beginning your project. Generated by purlJam.uk
Love this pattern?
Save this pattern to your free PurlJam libraryAccess your pattern anytime
Bookmark this page to access your pattern anytime