Type
Crochet
Difficulty
beginner
Category
amigurumi
AI Thinking Process
Planning
Verification
Pattern
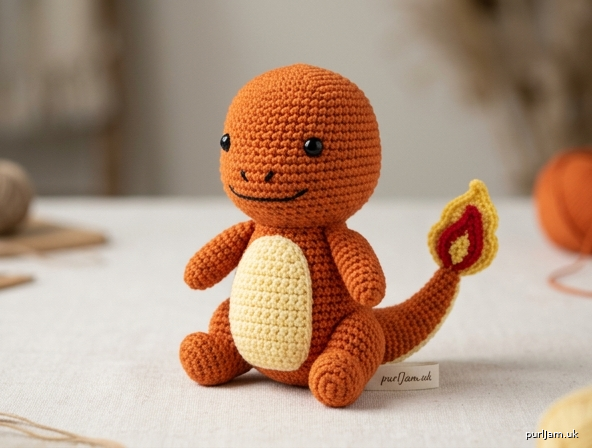
Charmander Crochet Pattern
Simple Shapes Amigurumi – Beginner
A cute, simplified Charmander plush made from basic spheres, ovals, cylinders, and a cone. Perfect first character project!
Finished Size: Approx. 5–6 inches (13–15 cm) tall when made with worsted yarn and recommended hook.
Difficulty: Beginner
Materials
- Worsted weight (4) yarn:
- Orange (main body) – approx. 50 yd (46 m)
- Light yellow or cream (belly) – approx. 10 yd (9 m)
- Yellow (flame outer) – approx. 5 yd (5 m)
- Red or bright orange (flame inner) – approx. 3 yd (3 m)
- Small amount of black (eyes/mouth embroidery) or 6 mm black safety eyes
- US F-5 (3.75 mm) crochet hook (or size needed for tight stitches; go down 1–2 sizes from yarn label)
- Polyester fiberfill stuffing
- Yarn needle
- Stitch marker
- Scissors
- Optional: pins for assembly, blush/pink embroidery for cheeks
Gauge: 5 sc = 1 inch (2.5 cm) in continuous rounds. Exact gauge is not critical, but work tightly so stuffing does not show.
Abbreviations (US Terms)
- ch – chain
- sc – single crochet
- inc – increase (2 sc in same stitch)
- dec – invisible decrease (sc2tog through front loops)
- rnd(s) – round(s)
- st(s) – stitch(es)
- sl st – slip stitch
- MR – magic ring (or ch 2 and work into first ch)
- FO – fasten off
- [ ] – total stitch count at end of round
- ( ) – work instructions in parentheses as a set
Notes
- Work in continuous spiral rounds unless stated. Do not join or turn.
- Place stitch marker in first stitch of each round and move up.
- Stuff firmly as you go, especially before closing openings.
- Use invisible decrease for a smoother look.
- Color changes: finish last yarn-over of previous stitch with new color.
Pattern Pieces
Head (Orange) – Sphere
Rnd 1: 6 sc in MR. [6] Rnd 2: inc in each st around. [12] Rnd 3: (sc, inc) around. [18] Rnd 4: (2 sc, inc) around. [24] Rnds 5–8: sc in each st around. [24] (4 rounds) Rnd 9: (2 sc, dec) around. [18] Insert safety eyes between Rnds 6–7, about 4–5 sts apart (or embroider later). Stuff head firmly. Rnd 10: (sc, dec) around. [12] Rnd 11: dec around. [6] FO, leaving a long tail. Thread tail through front loops of remaining 6 sts and pull tight to close. Weave in end. (6 decreases → 12 − 6 = 6 ✓)
Body (Orange) – Oval / Elongated Sphere
Rnd 1: 6 sc in MR. [6] Rnd 2: inc in each st around. [12] Rnd 3: (sc, inc) around. [18] Rnd 4: (2 sc, inc) around. [24] Rnd 5: (3 sc, inc) around. [30] Rnds 6–11: sc in each st around. [30] (6 rounds) Rnd 12: (3 sc, dec) around. [24] Rnd 13: (2 sc, dec) around. [18] Stuff body firmly, shaping slightly taller than wide. Rnd 14: (sc, dec) around. [12] Rnd 15: dec around. [6] FO, leaving a long tail for sewing. Close hole as for head. (Final close: 6 sts ✓)
Belly Patch (Cream/Light Yellow) – Flat Oval
Ch 6. Rnd 1: sc in 2nd ch from hook, sc in next 3 ch, 3 sc in last ch; rotate to work opposite side of ch: sc in next 3 ch, 2 sc in last ch. [12] Rnd 2: inc, sc in next 3 sts, inc in next 3 sts, sc in next 3 sts, inc in next 2 sts. [18] Rnd 3: sc, inc, sc in next 4 sts, (sc, inc) 3 times, sc in next 4 sts, (sc, inc) twice. [24] Sl st in next st. FO, leaving long tail for sewing. (Optional: stop after Rnd 2 for a smaller belly.)
Arms (Make 2 – Orange) – Small Cylinder
Rnd 1: 6 sc in MR. [6] Rnd 2: (sc, inc) around. [9] Rnds 3–6: sc in each st around. [9] (4 rounds) Lightly stuff. FO, leaving long tail for sewing. Flatten opening slightly.
Legs (Make 2 – Orange) – Small Cylinder
Rnd 1: 6 sc in MR. [6] Rnd 2: (sc, inc) around. [9] Rnds 3–5: sc in each st around. [9] (3 rounds) Stuff lightly. FO, leaving long tail for sewing. Flatten opening.
Tail (Orange) – Tapered Cone
Rnd 1: 4 sc in MR. [4] Rnd 2: (sc, inc) around. [6] Rnd 3: sc around. [6] Rnd 4: (2 sc, inc) around. [8] Rnd 5: sc around. [8] Rnd 6: (3 sc, inc) around. [10] Rnds 7–9: sc around. [10] (3 rounds) Rnd 10: (4 sc, inc) around. [12] Rnds 11–12: sc around. [12] Lightly stuff, keeping the tip firm but not overstuffed. FO, leaving long tail for sewing to body. Do not close; sew open end to lower back of body.
Flame – Outer Layer (Yellow) – Flat Flame Shape
Ch 7. Row 1: sc in 2nd ch from hook and in each ch across. [6] Row 2: ch 1, turn; sc, hdc, dc, dc, hdc, sc. [6] Row 3: ch 1, turn; sc, hdc, 2 dc in next st, 2 dc in next st, hdc, sc. [8] Row 4: ch 1, turn; sc, hdc, dc, 2 dc in next 2 sts, dc, hdc, sc. [10] FO, leaving tail for sewing. (Increases create wider base ✓)
Flame – Inner Layer (Red or Bright Orange)
Ch 5. Row 1: sc in 2nd ch from hook and each ch across. [4] Row 2: ch 1, turn; sc, hdc, hdc, sc. [4] Row 3: ch 1, turn; sc, 2 hdc in next 2 sts, sc. [6] FO, leaving tail. Stack centered on yellow flame and sew or whipstitch together at base only so tips stay free and dimensional.
Assembly
- Belly: Pin cream belly patch to front center of body (covering roughly Rnds 6–12). Sew neatly with matching yarn.
- Head to Body: Pin head on top of body. Sew securely all around, adding a tiny bit more stuffing in the neck join if needed for a firm pose.
- Legs: Pin legs to bottom front of body, angled slightly outward. Sew firmly.
- Arms: Pin arms to upper sides of body (just below head join). Sew in place. Angle slightly forward for a friendly look.
- Tail: Pin open end of tail to lower back of body, centered and angled upward. Sew securely. Curve the tail slightly to one side if desired by stitching a gentle bend.
- Flame: Sew the layered flame (red on yellow) to the tip of the tail. Catch only the base so the flame tips stick up freely. Weave ends inside tail.
- Face (if not using safety eyes):
- Eyes: With black yarn or embroidery floss, make two small French knots or satin-stitch ovals between head Rnds 6–7, ~4–5 sts apart.
- Pupils/highlights (optional): tiny white stitches.
- Mouth: small curved embroidered smile or “w” shape in black a few rounds below eyes.
- Nostrils (optional): two tiny straight stitches.
- Cheeks (optional): light pink yarn, small straight or satin stitches under eyes.
- Weave in all remaining ends securely inside the toy.
Finishing Touches
- Gently roll and shape the body and head between your hands for a smooth round look.
- If any stuffing shows, add a few extra surface sc or tighten with matching yarn.
- For a keychain version: scale down by stopping head/body increases earlier (max 18 sts) and attach a jump ring + keychain finding at the top of the head.
- Spot clean only; do not machine wash.
Stitch Count Quick Reference (validation)
| Piece | Max sts | Key rounds |
|---|---|---|
| Head | 24 | 6→12→18→24; dec 24→18→12→6 |
| Body | 30 | 6→12→18→24→30; dec 30→24→18→12→6 |
| Arms/Legs | 9 | 6→9 |
| Tail | 12 | 4→6→8→10→12 |
| Belly | 24 | worked flat around chain |
All increase/decrease rounds use even distribution and checked arithmetic (examples: (2 sc, inc) × 6 = 24; (3 sc, dec) × 6 = 24 → 18 after next dec round, etc.).
Enjoy your beginner Charmander! Snag-free stitches and firm stuffing will give the cleanest Pokémon look. Happy crocheting!
Disclaimer: This pattern was generated by AI and should be reviewed for accuracy before use. While we strive for quality, AI-generated content may contain errors. Please verify measurements, stitch counts, charts, and instructions before beginning your project. Generated by purlJam.uk
Love this pattern?
Save this pattern to your free PurlJam libraryAccess your pattern anytime
Bookmark this page to access your pattern anytime