Type
Machine Knitting
Difficulty
intermediate
Category
custom
AI Thinking Process
Planning
Verification
Pattern
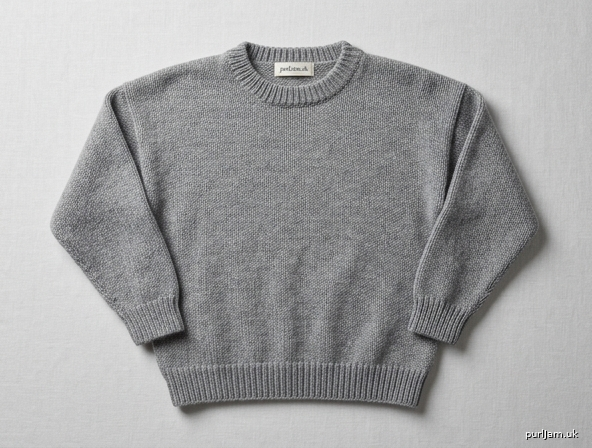
Child’s Drop-Shoulder Crewneck Pullover
Machine-knit flat panels for Brother & Silver Reed bulky (9 mm) and mid-gauge (6.5–7 mm) machines
A relaxed-fit child’s pullover in stocking stitch with 1×1 rib welts. Drop shoulders give easy movement and room to grow. Knit as four flat pieces, seam, then rehang the neckband on the machine. Intermediate: waste-yarn cast-on, fully fashioned increases, holding for the front neck, and a rehung rib neckband.
Sizes
2 (4, 6, 8) years
Figures are finished garment measurements after light steaming. Choose by finished chest (the pullover is designed with ~7–13 cm / 3–5" ease).
| 2 | 4 | 6 | 8 | |
|---|---|---|---|---|
| To fit chest | 53 cm (21") | 58 cm (23") | 63 cm (25") | 67 cm (26½") |
| Finished chest | 60 cm (23½") | 67 cm (26¼") | 73 cm (28¾") | 80 cm (31½") |
| Length (shoulder to hem) | 36 cm (14¼") | 41 cm (16¼") | 44 cm (17¼") | 47 cm (18½") |
| Sleeve length to underarm | 23 cm (9") | 28 cm (11") | 33 cm (13") | 37 cm (14½") |
| Upper sleeve, flat width | 26.5 cm (10½") | 30 cm (11¾") | 33.5 cm (13¼") | 35.5 cm (14") |
Materials
- Yarn: Worsted weight (approx. 9–10 wpi; typical 200–220 m / 100 g). 350 (450, 550, 650) m / 380 (490, 600, 710) yd — about 175 (225, 275, 325) g.
- Waste yarn: Smooth, contrasting, same or slightly finer weight, ~20 m, plus ravel cord.
- Notions: Tapestry needle, scissors, blocking surface, steam iron. Optional: 2 stitch markers or contrast yarn scraps to mark underarms.
Do not use this yarn on a 4.5 mm standard-gauge machine — it will strain the needles and carriage.
Machine, tools & tension
Intended machines: 9 mm bulky — Brother KH260 / KH270 / KH230; Silver Reed SK155 / SK160 / SK120.
Also: 6.5–7 mm mid-gauge (Brother KH360, Silver Reed SK860, LK150) after matching gauge.
Required tools (used in the instructions): cast-on comb, claw weights (move them up every 20–30 rows), 1×2 and 1×3 transfer tools, latch tool, ravel cord. Ribber attachment is optional but recommended for true 1×1 rib.
Punchcard / electronic: Not required. Stocking stitch only. Electronic machines: remain in stocking (no pattern, KC off / N).
Tension dial (bulky 9 mm, worsted):
- Waste yarn: T6
- 1×1 rib (main bed mock rib or ribber): T4 (ribber: T4/4)
- Main fabric (stocking stitch): T7
- Neckband rib: T5 (ribber: T5/5)
Mid-gauge knitters: start around T8–T10 and match the gauge below, not the dial number.
Gauge
18 sts and 24 rows = 10 cm / 4" in stocking stitch on the main bed at T7, measured after steaming, unstretched.
Swatch at least 40 sts × 60 rows. If you have fewer than 18 sts / 10 cm the garment will be larger; more stitches, smaller. Recalculate or change tension before casting on. Row gauge affects length — adjust row counts if your row gauge differs.
Abbreviations & machine terms
| Term | Meaning |
|---|---|
| MB | Main bed |
| RB | Ribber bed |
| WP / NWP / HP | Working / non-working / holding position |
| COR / COL | Carriage on right / left |
| RC | Row counter |
| RC000 | Reset row counter to 000 |
| T | Tension dial |
| SSS | Stocking stitch (stockinette; knit every carriage pass on MB) |
| EON | Every other needle |
| WY | Waste yarn |
| FF | Fully fashioned (edge stitch transferred) |
| 1×1 rib | Alternate knit/purl columns |
Pattern notes
- Instructions are for all needles in WP unless a mock-rib EON set-up is specified.
- Odd-numbered RC = COL; even-numbered RC = COR, assuming you begin COR at RC000.
- Always hang the cast-on comb and claw weights before the first main-yarn row; move weights up frequently so the side stitches do not flare — flared selvedges make a messy mattress-stitch seam.
- Two rib methods are given. Use the same method on every piece.
- Fully fashioned sleeve increases: with a 1×2 transfer tool, move the two end stitches out by one needle, then fill the empty needle by picking up the adjacent bar (no hole).
- Do not bind off the neck tightly. Children must get the pullover over their head.
- Numbers are given 2 (4, 6, 8). Highlight your size before you start.
BACK
Machine set-up
- Carriage COR, Russell/slide levers on N (normal / stocking), cam buttons released, KC off.
- Bring 54 (60, 66, 72) needles to WP, centred on the bed. All other needles NWP.
Cast-on (waste + ravel cord)
- With WY at T6, e-wrap or weave-cast the working needles. Hang cast-on comb and two claw weights.
- Knit 8–10 rows WY. COR.
- Knit 1 row ravel cord. COR. RC000.
Hem rib
Option A — with ribber (preferred):
- Set RB to 1×1 pitch, T4/4. Transfer alternate sts to RB for 1×1 rib (both beds, every other needle each bed).
- Knit 12 rows 1×1 rib. RC 012, COR.
- Transfer all RB stitches to MB. Remove ribber or drop it. T7. RC000.
Option B — no ribber (mock rib):
- After ravel cord, push every other needle to NWP (EON remaining in WP — 27 (30, 33, 36) needles). T4.
- Knit 20 rows EON (mock 1×1). RC 020, COR.
- Bring empty needles to WP. With a transfer tool, pick up the adjacent bar onto each empty needle so there are no holes. 54 (60, 66, 72) needles in WP. T7. RC000.
Body
COR, T7, all 54 (60, 66, 72) needles WP, SSS.
Knit 76 (88, 96, 104) rows.
Checkpoints: RC 044 (052, 058, 062) = underarm — tie a scrap of contrast yarn on each end stitch (you will match the sleeve here). Continue to RC 076 (088, 096, 104), COR.
Length check: 76 rows ÷ 2.4 = 31.7 cm + ~4 cm rib ≈ 36 cm overall ✓
(88 rows = 36.7 + 4 ≈ 41 cm ✓; 96 rows = 40 + 4 ≈ 44 cm ✓; 104 rows = 43.3 + 4 ≈ 47 cm ✓)
Back neck and shoulders
Needles are numbered left to right as you face the machine. Remaining stitches: 54 (60, 66, 72).
Back neck = centre 18 (20, 22, 24) sts. Each shoulder = 18 (20, 22, 24) sts
(54 − 18 = 36, 36 ÷ 2 = 18 ✓; 60 − 20 = 40, 40 ÷ 2 = 20 ✓; 66 − 22 = 44, 44 ÷ 2 = 22 ✓; 72 − 24 = 48, 48 ÷ 2 = 24 ✓).
- COR. Set carriage to Hold (holding cam / Part on the side you will hold, or both-side hold depending on machine — Brother: both Part buttons; Silver Reed: holding cam).
- Bring the left shoulder 18 (20, 22, 24) needles and the centre 18 (20, 22, 24) neck needles to HP. Right shoulder only remains in WP.
- Knit 1 row (to the left, across the right shoulder only). COL. Knit 1 row back. COR. RC 078 (090, 098, 106).
- Break yarn leaving 30 cm. Knit the right-shoulder stitches onto WY for 6–8 rows and take them off the machine (or bind off loosely with a latch tool if you prefer seamed shoulders).
- Return the left-shoulder needles from HP to WP (UWP then the next pass takes them). Leave centre neck in HP.
- Rejoin yarn COR at the neck edge of the left shoulder. Knit 2 rows SSS. Break yarn. Take left shoulder off on WY as before.
- Return centre 18 (20, 22, 24) neck needles to WP. Knit them onto WY for 8–10 rows and take off. (You will pick these up for the neckband.)
Set back aside.
FRONT
Work exactly as Back through the hem rib and into the body, same needle count 54 (60, 66, 72), T7, RC000 after rib.
Knit to RC 060 (070, 078, 084), COR.
(76 − 60 = 16 neck rows ✓; 88 − 70 = 18 ✓; 96 − 78 = 18 ✓; 104 − 84 = 20 ✓)
Divide for crew neck
Centre front neck on hold = 8 (10, 10, 12) sts.
Each side starts with 23 (25, 28, 30) sts
((54 − 8) ÷ 2 = 23 ✓; (60 − 10) ÷ 2 = 25 ✓; (66 − 10) ÷ 2 = 28 ✓; (72 − 12) ÷ 2 = 30 ✓).
- COR. Carriage to Hold.
- Bring all needles left of the right-front group to HP — that is: left front + centre 8 (10, 10, 12). Right-front 23 (25, 28, 30) needles remain in WP.
- Work the right neck (as worn; the group at the right of the bed):
Right neck shaping — decrease 1 st at the neck edge (left end of this group, nearest the held centre) every 2 rows 5 (5, 6, 6) times as follows:
- COL after the first pass. At the neck edge, FF decrease: with a 1×2 tool, transfer the end neck stitch onto its neighbour (1 st decreased). Push the empty needle to NWP.
- Knit 1 row. Knit 1 row. Repeat the decrease on the next COL neck-edge pass.
After 5 (5, 6, 6) decreases: 18 (20, 22, 24) sts remain
(23 − 5 = 18 ✓; 25 − 5 = 20 ✓; 28 − 6 = 22 ✓; 30 − 6 = 24 ✓).
Shaping used 10 (10, 12, 12) rows. Knit even until this side reaches RC 076 (088, 096, 104) — that is 6 (8, 6, 8) further rows. COR.
Take these 18 (20, 22, 24) shoulder stitches off on WY. Break yarn.
- Return centre 8 (10, 10, 12) needles to WP, knit them onto WY, take off. These join the neckband pick-up.
- Return left-front 23 (25, 28, 30) needles from HP to WP. Rejoin yarn at the neck edge, COL (or knit 1 row to position COR then begin). Mirror the neck decreases: 1 st at the neck edge every 2 rows 5 (5, 6, 6) times, then even to RC 076 (088, 096, 104). Take remaining 18 (20, 22, 24) shoulder sts off on WY.
Front and back shoulders now match (18 / 20 / 22 / 24 sts each side ✓).
SLEEVES (make 2 alike)
Set-up
- COR. Bring 28 (30, 32, 34) needles to WP, centred. Comb + weights.
Cast-on and cuff
Waste yarn + ravel cord as for the Back.
Ribber: 1×1 rib T4/4 for 12 rows, transfer all sts to MB, T7, RC000.
No ribber: EON mock rib T4 for 20 rows, fill empty needles, T7, RC000.
28 (30, 32, 34) needles in WP.
Sleeve shaping (T7, SSS)
Increase 1 st each end (FF: move two end sts out one needle, fill the empty needle from the bar) on the following rows:
- Size 2: every 4th row 10 times — RC 004, 008, 012, 016, 020, 024, 028, 032, 036, 040.
28 + (10 × 2) = 48 sts ✓. Then knit even to RC 046, COR. - Size 4: every 4th row 12 times — RC 004 through 048.
30 + (12 × 2) = 54 sts ✓. Then knit even to RC 058, COR. - Size 6: every 5th row 14 times — RC 005, 010, …, 070.
32 + (14 × 2) = 60 sts ✓. End at RC 070, COR (last increase is the last row). - Size 8: every 5th row 15 times — RC 005 through 075.
34 + (15 × 2) = 64 sts ✓. Then knit even to RC 080, COR.
Move claw weights up as the piece grows; add a third weight at centre once the sleeve is wider than ~40 sts.
Cast off all 48 (54, 60, 64) sts loosely around the gate pegs, or latch-tool bind off one full tension looser than T7. Fasten off.
Sleeve top width: 48 ÷ 1.8 = 26.7 cm, which equals front + back armhole depth (13.3 + 13.3) for drop-shoulder seaming ✓
(54 sts = 30 cm ✓; 60 sts = 33.3 cm vs 31.7 cm armhole — ease 1.6 cm ✓; 64 sts = 35.6 cm vs 35 cm ✓).
NECKBAND (rehung on the machine)
Join both shoulders first (see Finishing, step 1) so the neck is a closed ring.
- With the wrong side of the garment facing you (right side against the needle bed), pick up and rehang the entire neck opening onto MB:
- Back neck WY sts: 18 (20, 22, 24)
- Left front slope: pick up 12 (14, 14, 15) sts (about 3 sts per 4 rows)
- Front centre WY sts: 8 (10, 10, 12)
- Right front slope: 12 (14, 14, 15)
- Plus 2 (2, 3, 3) extra sts, one at each shoulder seam, to close gaps
Total 52 (60, 63, 69) before adjustment. Add or skip 2–4 pick-ups so you have an even count of 54 (62, 66, 72) needles in WP (required for 1×1 rib) ✓.
- Hang weights evenly. T5. COR. RC000.
- Ribber: set 1×1, T5/5, knit 10 rows. COR.
No ribber: knit 12 rows SSS at T5 (this becomes a folded mock-hem band), or latch-up 1×1 rib with the latch tool after knitting 10 rows EON at T4 then filling needles. - Bind off very loosely around the gate pegs, or use a latch-tool chain bind-off on a spare needle 2 tensions looser. If the band will not stretch to at least the child’s head circumference (~48–54 cm), undo and bind off looser.
Remove from the machine. On a folded stocking band only: fold to the inside and stitch the live/bound edge down with mattress or backstitch, covering the pick-up row.
Finishing
- Shoulders. Unpick WY. With right sides together, rehang one back shoulder and the matching front shoulder, back-to-back on the same needles (one st from each piece per needle). Latch-tool bind off through both loops (machine-made 3-needle join). Repeat the other shoulder. Alternative: mattress-stitch the live shoulder sts.
- Set in the drop sleeves. Fold a sleeve in half to find the centre of the bind-off edge; pin that centre to the shoulder seam. Pin each sleeve corner to the underarm contrast-yarn markers on front and back (RC 044 / 052 / 058 / 062). The sleeve top edge spans the entire armhole (front depth + back depth). Mattress-stitch, easing in the size-6 extra 1.6 cm evenly.
- Side and sleeve seams. Mattress-stitch from hem rib to underarm, then continue along the sleeve to the cuff, matching rib to rib ( purl columns to purl columns on 1×1). Repeat the other side.
- Ends. Weave in all tails on the wrong side.
- Block. Pin to the finished measurements. Steam the stocking-stitch areas from the wrong side, hovering the iron — do not flatten the rib. Allow to dry fully. Do not press the rib welts.
Schematic (measurements)
        30 (33.3, 36.7, 40) cm
     |------------------------|
     |         neck           |
     |   10 (11, 12, 13) cm   |
     |--------|      |--------|  shoulder
     |                        |
     |        BACK/FRONT      |  36 (41, 44, 47) cm long
     |                        |
     |                        |
     |------------------------|  hem

        sleeve flat 26.5 (30, 33.5, 35.5) cm at top
             /--------------\
            /                \
           /                  \  23 (28, 33, 37) cm
          /____________________\  cuff 15.5 (16.7, 17.8, 18.9) cm
Quick RC checklist
| Piece | After rib, RC000 | Key RC | End RC | Stitches at end |
|---|---|---|---|---|
| Back | T7 SSS | Underarm 44 (52, 58, 62) | 76 (88, 96, 104) | 18+18+24 neck split |
| Front | T7 SSS | Neck split 60 (70, 78, 84) | 76 (88, 96, 104) | 18 (20, 22, 24) each shoulder |
| Sleeve | T7 SSS | Incs as listed | 46 (58, 70, 80) | 48 (54, 60, 64) |
Knit a tension swatch, confirm 18 sts × 24 rows = 10 cm, and the finished chest will be 60 (67, 73, 80) cm.
Disclaimer: This pattern was generated by AI and should be reviewed for accuracy before use. While we strive for quality, AI-generated content may contain errors. Please verify measurements, stitch counts, charts, and instructions before beginning your project. Generated by purlJam.uk
Love this pattern?
Save this pattern to your free PurlJam libraryAccess your pattern anytime
Bookmark this page to access your pattern anytime