Type
Machine Knitting
Difficulty
advanced
Category
pullover
AI Thinking Process
Planning
Verification
Pattern
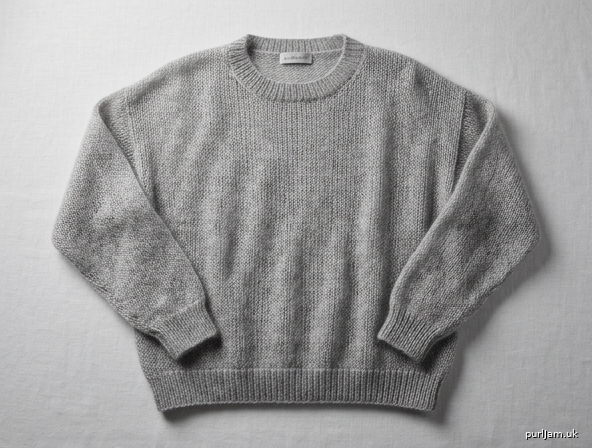
Spiderweb Mohair Drop-Shoulder Pullover
(Seamless-finish double-bed machine version)
MACHINE_SETUP
- Machine: Any standard- or mid-gauge double-bed machine with ribber.
- Beds: Main bed (MB) for stockinette body; both beds for 1×1 rib hems and neckband.
- Cast-on: Waste yarn + ravel cord method. Hang cast-on comb and 2–3 claw weights evenly after first 4–6 rows; add more weights as fabric grows. Move weights up every 30–40 rows.
- Carriages: Both carriages locked for rib; MB only (ribber dropped or out of work) for stockinette. Set both part buttons or use circular settings only if you prefer tubular cast-on practice; otherwise knit flat.
- Tension dial (TD): Rib T4–5; main spiderweb fabric T8–10 (loose — fabric should look open and airy). Always knit a swatch.
- Tools required: Transfer tool, latch tool, decker comb (optional), ravel cord, waste yarn, claw weights, cast-on comb, garter bar or scrap knitting for holding.
- Punchcard/electronics: None — plain stockinette.
- Beginner tip: Practice the open tension on waste yarn first; mohair is sticky — keep the carriage moving steadily and never force it.
MATERIALS
- Yarn: Worsted-weight mohair or mohair-blend (approx. 150–180 yd / 100 g). Approx. 900 (1000, 1100, 1200) yd.
- Waste yarn and ravel cord.
- Matching sewing needle for mattress stitch.
- Optional: sweater board or blocking wires.
GAUGE_AND_TENSION
- Stockinette (spiderweb fabric) after steaming: 4 sts = 1″ (10 cm) and 6 rows = 1″ (10 cm) at TD 8–10.
- 1×1 rib: approx. 5 sts = 1″ at TD 4–5.
- Always steam the swatch lightly from the wrong side (hover iron, no pressure) before measuring — mohair opens dramatically. If you obtain fewer than 4 sts/in, go tighter or use smaller needles; more than 4 sts/in, loosen tension.
SCHEMATIC_AND_SIZES
Finished bust: 40 (44, 48, 52)″ / 102 (112, 122, 132) cm
Body length: 24″ / 61 cm
Armhole depth: 8″ / 20 cm
Sleeve length to underarm: 18″ / 46 cm
Upper arm: 16 (17, 18, 19)″ / 41 (43, 46, 48) cm
Neck width: 7 (7.5, 8, 8.5)″ / 18 (19, 20, 22) cm
Ease: generous drop-shoulder oversized fit.
Back/Front width each: 20 (22, 24, 26)″ = 80 (88, 96, 104) sts
(80 sts ÷ 4 sts/in = 20″ ✓; 104 sts ÷ 4 = 26″ ✓)
BACK_PANEL
- Ribber in work. Cast on 80 (88, 96, 104) sts over both beds in 1×1 rib with waste yarn. Knit several rows waste, one row ravel cord. COR.
- Change to main yarn. TD 4–5. RC000. Knit 12 rows 1×1 rib (2″ hem).
- Transfer all ribber sts to MB. Drop ribber or put out of work. TD 8–10 (spiderweb tension). Hang extra weights.
- RC000. Knit straight to RC144 (24″ total length from cast-on).
(144 rows ÷ 6 rows/in = 24″ ✓) - Shoulder & neck shaping (beginner square drop):
- COR. Place center 28 (30, 32, 34) sts on waste yarn or garter bar for neck.
- Working right shoulder only (26 (29, 32, 35) sts): knit 2 rows. Bind off loosely with latch tool.
- Rejoin yarn at left shoulder, knit 2 rows, bind off loosely.
RC now 146. Remove on waste if preferred for later shoulder join.
FRONT_PANEL
Work exactly as Back through RC126 (21″ — 3″ below back neck).
(126 rows ÷ 6 = 21″ ✓)
Neck shaping (RC126, COR):
- Place center 16 (18, 20, 22) sts on waste yarn.
- Right neck: at neck edge put 2 sts into hold every 2 rows, 3 times (6 sts held), then 1 st into hold every 2 rows, 3 times (3 sts held). 9 sts total moved to hold each side.
(16 + 9 + 9 = 34; remaining each shoulder 26 (29, 32, 35) sts ✓ for size S: 80 – 28 neck = 52 / 2 = 26 ✓) - Continue until RC144. Knit 2 extra rows on shoulder sts only if needed to match back. Bind off loosely or leave on waste for machine join.
- Left neck: mirror (return carriage, hold opposite side identically).
SLEEVES
(make 2)
- Ribber in work. Cast on 40 (42, 44, 46) sts 1×1 rib. Waste + ravel cord. TD 4–5. RC000. Knit 12 rows rib (2″ cuff).
- Transfer all sts to MB. Ribber out. TD 8–10. RC000.
- Increase for sleeve: every 6 rows, bring 1 empty needle into work each side (2 sts increased).
Work until you have increased 12 (13, 14, 15) times each side → 64 (68, 72, 76) sts.
(40 + 12+12 = 64 ✓; 46 + 15+15 = 76 ✓)
Rows used: 12 × 6 = 72 rows = 12″. - Continue straight to RC108 (18″ total from cast-on).
(108 ÷ 6 = 18″ ✓) - Bind off loosely with latch tool or leave live on waste yarn for set-in attachment.
NECKBAND
- With wrong side facing, rehang entire neckline onto MB needles: back neck 28 (30, 32, 34) sts + front neck curve approx. 34 (36, 38, 40) sts (pick up every row along the shaped edges) = approx. 62 (66, 70, 74) sts. Distribute evenly; use transfer tool to adjust.
- Hang ribber needles for 1×1 rib (or knit 1×1 on MB alone if preferred). TD 4–5.
- RC000. Knit 10–12 rows 1×1 rib.
- Bind off very loosely with latch tool around both beds, or use sewn bind-off for maximum stretch. Remove from machine.
FINISHING
- Steam all pieces lightly from WS (hover iron). Never press mohair flat.
- Shoulder joins (machine “seamless” method): Rehang back and front shoulder sts right sides together onto the same needles (one st from each piece per needle). TD 10. Knit one loose row and latch-tool bind off. Repeat other shoulder. No seam bulk.
- Side and sleeve seams: mattress stitch (nearly invisible on open mohair). Match RC stripes or row counts carefully.
- Set in sleeves: mattress stitch sleeve cap edge to armhole, matching center shoulder to sleeve top and underarms.
- Optional: steam again on a sweater board or pad out with towels to finished measurements. Let dry completely.
- Weave in ends with tapestry needle, burying them in the fuzzy mohair.
ABBREVIATIONS
MB = main bed
RC = row counter
COR / COL = carriage on right / left
TD = tension dial
sts = stitches
hold = holding position (needles out of work)
1×1 rib = alternate needles main bed / ribber
latch-tool bind-off = chain bind-off with latch tool
rehang = place live stitches back onto needles
Disclaimer: This pattern was generated by AI and should be reviewed for accuracy before use. While we strive for quality, AI-generated content may contain errors. Please verify measurements, stitch counts, and instructions before beginning your project. Generated by purlJam.uk
Love this pattern?
Save this pattern to your free PurlJam libraryAccess your pattern anytime
Bookmark this page to access your pattern anytime