Type
Knitting
Difficulty
intermediate
Category
hat
AI Thinking Process
Planning
Verification
Pattern
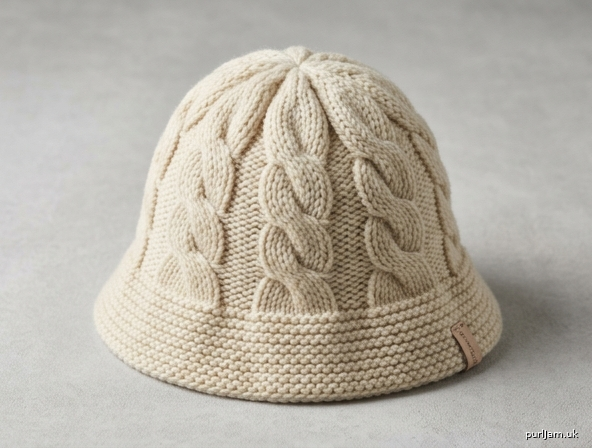
Chunky Cable Winter Bucket Hat
A cozy adult bucket hat in bulky yarn: six easy cable panels, a flared garter brim, and a crown that keeps cabling until the very top. Written for a first cable project — only one cable (C6F), worked in the round, seamless.
Skill Level: Beginner (first cables)
Size
Adult — one size
To fit head circumference: 21–24 in (53.5–61 cm)
Finished measurements (blocked):
- Band circumference: 22½ in (57 cm)
- Brim depth: 2½ in (6.5 cm)
- Brim outer circumference: approx 30 in (76 cm)
- Depth, top of crown to brim junction: 8½ in (21.5 cm)
- Total height including brim: 11 in (28 cm)
The band is meant to sit with a relaxed bucket-hat fit (little to no negative ease). The cabled fabric has stretch; wool blends will relax into the head with wear.
Yarn
Bulky weight (CYC 5)
200 yd / 183 m (allow a little extra if you lengthen the band)
Wool or a wool blend is best for warmth and crisp cables. Smooth, lightly spun yarns show the cables more clearly than highly textured or fuzzy yarns.
Typical requirement: 2 skeins of a 100 g bulky yarn (most put up at 100–140 yd / 91–128 m per skein).
Needles
- US 10.5 / 6.5 mm, 16 in (40 cm) circular needle
- US 10.5 / 6.5 mm double-pointed needles (DPNs), set of 4 or 5
or a second circular for magic loop when the crown gets small
A 24 in (60 cm) circular in the same size is optional for the wider brim rounds.
Notions
- Stitch marker (beginning of round)
- Cable needle
- Tapestry needle
- Optional: 24–26 in (61–66 cm) millinery wire or plastic brim wire, for a stiffer brim
Gauge
Blocked, in the round
- 13 stitches and 18 rounds = 4 in (10 cm) in reverse stockinette stitch
- One 14-st Cable Pattern repeat = 3¾ in (9.5 cm) wide
6 repeats = 22½ in (57 cm) band circumference
Work a circular swatch (or a flat swatch purling every WS row to mimic reverse stockinette). If you have too many stitches per 4 in, go up a needle size; too few, go down. Cable fabric pulls inward — trust the cable-panel measurement for fit.
Abbreviations (US)
| Abbr. | Meaning |
|---|---|
| cn | cable needle |
| CO | cast on |
| C6F | cable 6 front (see Special Stitches) |
| k | knit |
| k2tog | knit 2 stitches together (right-leaning decrease) |
| p | purl |
| p2tog | purl 2 stitches together |
| pm | place marker |
| rep | repeat |
| rnd(s) | round(s) |
| ssk | slip, slip, knit (left-leaning decrease; see Special Stitches) |
| st(s) | stitch(es) |
| * * | repeat instructions between asterisks |
Special Stitches
C6F (cable 6 front) — your only cable
- Slip the next 3 stitches purlwise onto the cable needle.
- Let the cable needle hang in front of the work.
- Knit the next 3 stitches from the left needle.
- Knit the 3 stitches from the cable needle.
That’s it: six knit stitches have changed places. The panel now slants left. On bulky yarn the stitches are large — take them one at a time and don’t yank the working yarn. A spare DPN can stand in for a cable needle.
ssk
Slip 1 stitch knitwise, slip 1 stitch knitwise, insert the left needle into the fronts of those 2 stitches from left to right, and knit them together.
Garter stitch in the round
Knit 1 round, purl 1 round. Repeat. This makes ridges and will not curl — ideal for a brim.
Reverse stockinette in the round
Purl every round. The purl “valleys” between cables are reverse stockinette.
Pattern Notes
- The hat is worked in the round from the brim up.
- Place a marker at the beginning of the round and slip it every round.
- Count stitches after every cable round and every decrease round. A cable round does not change the stitch count.
- When the fabric starts to stretch on the 16 in needle (around 60 sts), switch to DPNs or magic loop. Divide the 6 panels evenly — 2 panels per needle on 3 DPNs works well.
- Length is given in inches; round counts are a guide at the stated gauge. When in doubt, measure.
Cable Pattern
14-stitch repeat; 6 repeats around = 84 sts.
Written
Rnds 1–7: *K6, p8; rep from * around.
Rnd 8: *C6F, p8; rep from * around. (84 sts ✓)
Repeat Rnds 1–8 for pattern.
Chart
Worked in the round. Read every row from right to left. Work the 14-st repeat 6 times per round.
        14 13 12 11 10  9  8  7   6  5  4  3  2  1
Rnd 8    –  –  –  –  –  –  –  –   [    C6F     ]
Rnd 7    –  –  –  –  –  –  –  –   k  k  k  k  k  k
Rnd 6    –  –  –  –  –  –  –  –   k  k  k  k  k  k
Rnd 5    –  –  –  –  –  –  –  –   k  k  k  k  k  k
Rnd 4    –  –  –  –  –  –  –  –   k  k  k  k  k  k
Rnd 3    –  –  –  –  –  –  –  –   k  k  k  k  k  k
Rnd 2    –  –  –  –  –  –  –  –   k  k  k  k  k  k
Rnd 1    –  –  –  –  –  –  –  –   k  k  k  k  k  k
Key
k knit
– purl
C6F cable 6 front (sts 1–6)
Hat
Brim
Using long-tail cast-on and the circular needle, CO 108 sts. Place marker and join to work in the round, being careful not to twist.
Garter ridge sequence: odd rounds knit, even rounds purl. Decrease rounds are knit rounds so the decreases stay neat.
Rnds 1–6: Work 6 rounds garter stitch (k 1 rnd, p 1 rnd, three times).
Piece measures about 1¼ in (3 cm).
Rnd 7 (dec): *K7, k2tog; rep from * around.
(12 decreases → 108 − 12 = 96 sts ✓)
Rnds 8–10: Continue garter (p 1 rnd, k 1 rnd, p 1 rnd).
Rnd 11 (dec): *K6, k2tog; rep from * around.
(12 decreases → 96 − 12 = 84 sts ✓)
Rnd 12: Purl.
Brim measures about 2½ in (6.5 cm). 84 sts remain — 6 panels × 14 sts = 84 sts ✓. The next round is the brim/band junction.
Band (cable body)
Begin Cable Pattern over 84 sts:
Rnds 1–7: *K6, p8; rep from * around.
Rnd 8: *C6F, p8; rep from * around. (84 sts ✓)
Work Rnds 1–8 of Cable Pattern 3 times total (24 rounds), or until the piece measures 5¼ in (13.5 cm) from the brim junction, ending with Rnd 8 (a cable round). If you reach 5¼ in mid-repeat, keep going through the next Rnd 8 so a full cable sits just below the crown.
(3 × 8-rnd repeats = 24 rnds ✓. At 18 rnds = 4 in, 24 rnds ≈ 5¼ in ✓.)
Crown
Cables stay on the 6 knit stitches of each panel. Decrease the reverse-stockinette gutters first; only then reduce the cables. On even (non-decrease) rounds, knit the knits and purl the purls as they face you. Switch to DPNs or magic loop when the circular needle is too long.
Rnd 1 (dec): *K6, p2tog, p4, p2tog; rep from * around.
(12 decreases → 84 − 12 = 72 sts ✓) — each panel is now k6, p6.
Rnd 2: *K6, p6; rep from * around.
Rnd 3 (dec): *K6, p2tog, p2, p2tog; rep from * around.
(12 decreases → 72 − 12 = 60 sts ✓) — k6, p4.
Rnd 4: *K6, p4; rep from * around.
Rnd 5 (dec): *K6, p2tog, p2tog; rep from * around.
(12 decreases → 60 − 12 = 48 sts ✓) — k6, p2.
Rnd 6: *K6, p2; rep from * around.
Rnd 7 (dec): *K6, p2tog; rep from * around.
(6 decreases → 48 − 6 = 42 sts ✓) — k6, p1.
Rnd 8 (cable): *C6F, p1; rep from * around. (42 sts ✓)
Last full 6-stitch cable — 8 rounds after the last band cable.
Rnd 9 (dec): *K2tog, k2, ssk, p1; rep from * around.
(12 decreases → 42 − 12 = 30 sts ✓) — k4, p1. Cables begin to taper.
Rnd 10: *K4, p1; rep from * around.
Rnd 11 (dec): *K2tog, ssk, p1; rep from * around.
(12 decreases → 30 − 12 = 18 sts ✓) — k2, p1.
Rnd 12: *K2, p1; rep from * around.
Rnd 13 (dec): *K2tog, p1; rep from * around.
(6 decreases → 18 − 6 = 12 sts ✓)
Rnd 14: *K1, p1; rep from * around.
Rnd 15 (dec): *K2tog; rep from * around.
(6 decreases → 12 − 6 = 6 sts ✓)
Cut yarn, leaving an 8 in (20 cm) tail. Thread the tail through the remaining 6 sts, pull snug, and fasten on the wrong side.
(Crown ≈ 15 rnds ≈ 3¼ in at gauge. Band 5¼ in + crown 3¼ in = 8½ in depth ✓.)
Finishing
Weave in ends on the wrong side.
Block. This step makes the cables pop and sets the brim. Soak the hat in lukewarm water with a drop of wool wash for 15–20 minutes. Roll in a towel and press out water — do not wring. Dry over a bowl, balloon, or hat form so the crown is smoothly rounded. Pin or weight the brim into a circle about 9–10 in (23–25.5 cm) across so it flares like a bucket, not a ruffle. Let dry completely.
Optional structured brim. After blocking, sew millinery or plastic brim wire along the cast-on edge with a tapestry needle and matching yarn, overlapping the wire ends by 1 in (2.5 cm). Skip this if you prefer a soft, packable brim — bulky wool already has plenty of body.
Beginner Tips
- Twisted join: Before working Rnd 1, lay the cast-on circle flat and confirm every stitch hangs the same way. If one section flips, un-join and straighten it. A twisted brim cannot be fixed later.
- Cable-round checklist: You still have 84 sts after every Rnd 8 on the band. If you are short, a stitch was dropped off the cable needle; if you have extra, a stitch was worked twice.
- Loose cables: If the crossing looks tight or the fabric puckers, you are pulling the working yarn after the cable. Give those 6 stitches a gentle tug apart (not down) to even them.
- Fit: The band should sit comfortably without leaving a red line. If your swatch was accurate and the band feels snug on the head, block it on a slightly larger form — wool will grow a little.
Wear with the brim turned down. This is a winter hat: the cabled band is designed to cover the ears, with the brim shading the face.
Disclaimer: This pattern was generated by AI and should be reviewed for accuracy before use. While we strive for quality, AI-generated content may contain errors. Please verify measurements, stitch counts, charts, and instructions before beginning your project. Generated by purlJam.uk
Love this pattern?
Save this pattern to your free PurlJam libraryAccess your pattern anytime
Bookmark this page to access your pattern anytime