Type
Crochet
Difficulty
intermediate
Category
custom
AI Thinking Process
Planning
Verification
Pattern
Classic Bone Floor Mat
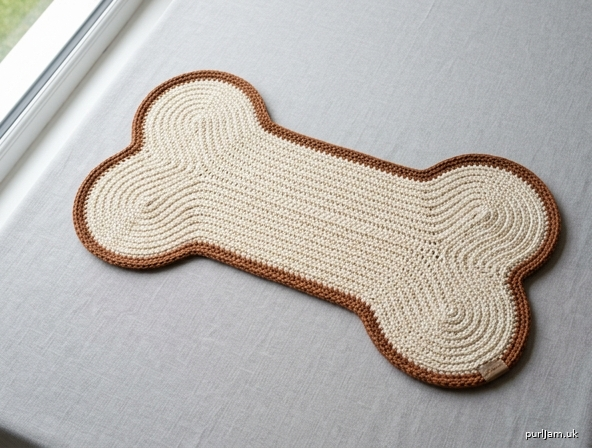
A sturdy, washable floor mat in the shape of a classic dog bone. Two firm single-crochet panels are joined into one double-thick mat, and a contrast corded edge draws the silhouette. Set it by a bowl, a crate, or a doorway.
The bone is worked in one piece from tip to tip: a rounded end swells into the first knob, narrows into a straight shaft, then mirrors on the second half. No seaming except the final edge.
Difficulty: Intermediate
Techniques: Edge increases and decreases, back-loop texture, joining two layers, spaced edging, reverse single crochet.
Finished Size
Each panel, blocked: 30¼" (77 cm) long × 12" (30.5 cm) wide at each knob × 6¼" (16 cm) wide at the shaft. Each tip is 2⅞" (7.3 cm) wide. The straight shaft is 9" (23 cm) long.
Finished mat, after edging: about 31" (79 cm) long × 12½" (32 cm) wide at the knobs × 6¾" (17 cm) wide at the shaft. Thickness is about ¼" (6 mm).
One size. Meeting gauge is what produces these measurements.
                         12 in / 30.5 cm
                    <--------------------->
                         _____________
                       /               \
                      |      knob       |
                       \               /
                        \_____________/   <-- neck
                              |  |
                              |  |  6¼ in / 16 cm shaft
                              |  |  9 in / 23 cm straight
                              |  |
                        _____________
                       /               \
                      |      knob       |
                       \_______________/

                    <--------------------->
                      30¼ in / 77 cm panel length
                      (about 31 in / 79 cm after edging)
Materials
Yarn: Worsted weight (CYC 4) cotton, single strand. Cotton wears and washes better on the floor than acrylic and is less slippery.
- Main Color (MC): approximately 600 yards (549 m) — about 5 skeins of a 120-yard (110 m) worsted cotton, such as Lily Sugar’n Cream, Lion Brand 24/7 Cotton, or Dishie. Cream, ivory, or natural reads as bone.
- Contrast Color (CC): approximately 80 yards (73 m) — a partial skein. Warm brown, chestnut, or terracotta.
Hook: US I/9 (5.5 mm), or the size that gives gauge.
Notions:
- Tapestry needle
- Locking stitch markers (about 14)
- Straight pins or locking markers for joining
- Scissors
- Optional: a non-slip rug pad to cut to shape
Gauge
14 sc and 16 rows = 4" (10 cm) in back-loop-only single crochet, after a light block.
Swatch: Ch 20.
- Row 1: Sc in the 2nd ch from the hook and in each ch across. (19 sc)
- Rows 2–20: Ch 1, turn, sc in the back loop only of each st across. (19 sc)
Block the swatch. Measure an interior 14 stitches and 16 rows. If they measure more than 4" (10 cm), use a smaller hook; if less, use a larger hook. Wash and dry the swatch the way you will wash the mat, then remeasure — cotton relaxes. A firm fabric is what you want. If the swatch meets gauge but feels floppy, choose a sturdier cotton rather than changing the hook.
Abbreviations (US)
| Abbreviation | Meaning |
|---|---|
| BLO | back loop only |
| CC | contrast color |
| ch | chain |
| MC | main color |
| RS | right side |
| sc | single crochet |
| sc2tog | single crochet 2 together |
| sl st | slip stitch |
| st(s) | stitch(es) |
| WS | wrong side |
| yo | yarn over |
Special Stitches
sc2tog (decrease): Insert the hook in the BLO of the next st, yo, pull up a loop, insert the hook in the BLO of the next st, yo, pull up a loop, yo, pull through all 3 loops on the hook. One stitch decreased.
Reverse sc (crab stitch): Working from left to right, insert the hook in the previous stitch, yo, pull up a loop, yo, pull through both loops. The stitch feels backward at first; the new stitch sits to the right of the hook. Do not turn the work.
Pattern Notes
- US terms throughout. Ch 1 at the start of a row or round does not count as a stitch. Do not work into the turning chain.
- Hold one strand only. Do not hold the yarn double.
- Row 1 is worked into the foundation chain. Rows 2–121 are worked in the back loop only. This ridge is the right side and gives the mat extra grip.
- The first stitch of every row is the first real sc of the previous row, not the turning chain.
- Increases are 2 sc in the first stitch and 2 sc in the last stitch. Decreases are sc2tog over the first 2 stitches and sc2tog over the last 2 stitches. Keep them at the very edge so the outline stays smooth.
- Stitch counts at the end of a row are in parentheses. On shaping rows, the count changes by 2. If your count is off by 1, you skipped or doubled an edge stitch — rip back to the last correct count.
- Mark the right side of Row 1 with a stitch marker and leave it in until the panels are joined.
- Make both panels identical. Do not mirror the second panel.
- The stepped edge from the increases and decreases is normal. The joining round covers it.
- Weave ends for at least 2" (5 cm), changing direction once. A floor mat abrades tails loose. If a dog can reach this mat, weave every end extra thoroughly and check the edge now and then. This is a floor mat, not a chew toy.
Instructions
Panel (make 2)
With MC, ch 11.
Row 1 (RS): Sc in the 2nd ch from the hook and in each ch across. (10 sc)
Mark this side as the right side.
Rows 2–17 (first tip, increase every row): Ch 1, turn, 2 sc in the BLO of the first st, sc in the BLO of each st across to the last st, 2 sc in the BLO of the last st.
Stitch counts, Rows 2 through 17: 12, 14, 16, 18, 20, 22, 24, 26, 28, 30, 32, 34, 36, 38, 40, 42.
End of Row 17: (42 sc). 10 + 16 increases × 2 = 42 ✓. Width should be about 12" (30.5 cm); length from the start about 4¼" (11 cm).
Rows 18–33 (first knob, even): Ch 1, turn, sc in the BLO of each st across. (42 sc)
End of Row 33: still 42 sc. Length from the start about 8¼" (21 cm).
Rows 34–43 (neck, decrease every row): Ch 1, turn, sc2tog, sc in the BLO of each st across to the last 2 sts, sc2tog.
Stitch counts, Rows 34 through 43: 40, 38, 36, 34, 32, 30, 28, 26, 24, 22.
End of Row 43: (22 sc). 42 − 10 decreases × 2 = 22 ✓. Width about 6¼" (16 cm); length from the start about 10¾" (27.5 cm).
Rows 44–79 (shaft, even): Ch 1, turn, sc in the BLO of each st across. (22 sc)
Place a marker every 10 rows if it helps you keep the count. 36 even rows. End of Row 79: still 22 sc. Length from the start about 19¾" (50 cm).
Rows 80–89 (second neck, increase every row): Ch 1, turn, 2 sc in the BLO of the first st, sc in the BLO of each st across to the last st, 2 sc in the BLO of the last st.
Stitch counts, Rows 80 through 89: 24, 26, 28, 30, 32, 34, 36, 38, 40, 42.
End of Row 89: (42 sc). 22 + 10 increases × 2 = 42 ✓.
Rows 90–105 (second knob, even): Ch 1, turn, sc in the BLO of each st across. (42 sc)
Rows 106–121 (second tip, decrease every row): Ch 1, turn, sc2tog, sc in the BLO of each st across to the last 2 sts, sc2tog.
Stitch counts, Rows 106 through 121: 40, 38, 36, 34, 32, 30, 28, 26, 24, 22, 20, 18, 16, 14, 12, 10.
End of Row 121: (10 sc). 42 − 16 decreases × 2 = 10 ✓.
Fasten off, leaving a 6" (15 cm) tail. Weave in the tail on the wrong side.
Row check: 1 + 16 + 16 + 10 + 36 + 10 + 16 + 16 = 121 rows. At 4 rows per inch, 121 ÷ 4 = 30¼" (77 cm) ✓.
Progress Check
Measure each panel before blocking. Small differences wash out in blocking; a miss of several stitches will not.
| After row | Stitches | Approx. length from Row 1 | Approx. width |
|---|---|---|---|
| 17 | 42 | 4¼" (11 cm) | 12" (30.5 cm) |
| 33 | 42 | 8¼" (21 cm) | 12" (30.5 cm) |
| 43 | 22 | 10¾" (27.5 cm) | 6¼" (16 cm) |
| 79 | 22 | 19¾" (50 cm) | 6¼" (16 cm) |
| 89 | 42 | 22¼" (56.5 cm) | 12" (30.5 cm) |
| 121 | 10 | 30¼" (77 cm) | 2⅞" (7.3 cm) |
Finishing
Block
Wet-block or steam-block each panel to 30¼" (77 cm) long, 12" (30.5 cm) across each knob, and 6¼" (16 cm) across the shaft. Pin the necks so both sides match. Let the panels dry completely. They must match each other before you join them; a larger panel will pucker the edge.
Mark the border sections
On the top panel only, place a locking marker in the row-end at the end of Rows 17, 33, 43, 79, 89, and 105, on both long sides (12 markers). These split the edge into the sections below. Remove each marker as you pass it.
Join
Hold the panels with wrong sides together and right sides facing out. Match Row 1 to Row 1 and Row 121 to Row 121. Do not rotate one panel. Pin the tips, both sides of each knob at its widest point, both sides of each neck, and every 2" (5 cm) along the shaft.
Lay the mat with the foundation edge (Row 1) at the bottom and the right side of the top panel facing you.
Join CC through both layers in the bottom-right corner stitch of Row 1.
Round 1 (joining round): Ch 1. Work through both panels for the entire round, keeping the edges matched. Place 1 sc in each of the next 10 stitches across the foundation edge (the bottom tip).
Then work up the left side, from Row 1 toward Row 121, as follows. “1 sc in each of the next N row-ends” means one single crochet in the end of each of those rows, through both panels. “2 sc in the next row-end” means two single crochets in that same row-end. “Skip the next row-end” means place no stitch there.
Left side (129 sc):
- Rows 1–17 (17 row-ends): (1 sc in each of the next 2 row-ends, 2 sc in the next row-end) 5 times, 1 sc in each of the next 2 row-ends. (22 sc)
- Rows 18–33 (16 row-ends): (1 sc in each of the next 7 row-ends, skip the next row-end) 2 times. (14 sc)
- Rows 34–43 (10 row-ends): (1 sc in each of the next 2 row-ends, 2 sc in the next row-end) 3 times, 1 sc in the next row-end. (13 sc)
- Rows 44–79 (36 row-ends): (1 sc in each of the next 8 row-ends, skip the next row-end) 4 times. (32 sc)
- Rows 80–89 (10 row-ends): (1 sc in each of the next 2 row-ends, 2 sc in the next row-end) 3 times, 1 sc in the next row-end. (13 sc)
- Rows 90–105 (16 row-ends): (1 sc in each of the next 7 row-ends, skip the next row-end) 2 times. (14 sc)
- Rows 106–121 (16 row-ends): (1 sc in each of the next 2 row-ends, 2 sc in the next row-end) 5 times, 1 sc in the next row-end. (21 sc)
22 + 14 + 13 + 32 + 13 + 14 + 21 = 129 sc on this side ✓.
Top tip: 1 sc in each of the next 10 stitches of Row 121, through both panels. (10 sc)
Then work down the right side, from Row 121 toward Row 1:
Right side (129 sc):
- Rows 121–106 (16 row-ends): 1 sc in the next row-end, (2 sc in the next row-end, 1 sc in each of the next 2 row-ends) 5 times. (21 sc)
- Rows 105–90 (16 row-ends): (skip the next row-end, 1 sc in each of the next 7 row-ends) 2 times. (14 sc)
- Rows 89–80 (10 row-ends): 1 sc in the next row-end, (2 sc in the next row-end, 1 sc in each of the next 2 row-ends) 3 times. (13 sc)
- Rows 79–44 (36 row-ends): (skip the next row-end, 1 sc in each of the next 8 row-ends) 4 times. (32 sc)
- Rows 43–34 (10 row-ends): 1 sc in the next row-end, (2 sc in the next row-end, 1 sc in each of the next 2 row-ends) 3 times. (13 sc)
- Rows 33–18 (16 row-ends): (skip the next row-end, 1 sc in each of the next 7 row-ends) 2 times. (14 sc)
- Rows 17–1 (17 row-ends): 1 sc in each of the next 2 row-ends, (2 sc in the next row-end, 1 sc in each of the next 2 row-ends) 5 times. (22 sc)
Join with a sl st to the first sc of the round. (278 sc) 10 + 129 + 10 + 129 = 278 ✓.
The edge should lie flat. If one small spot cups, add one sc there on a future mat; if it ruffles, skip one. Do not redo a flat edge to chase an exact count.
Round 2 (corded edge): Ch 1, do not turn. Reverse sc in each sc around, working from left to right. Keep this round relaxed — a tight crab stitch will cup the mat. Join with a sl st to the first reverse sc. (278 reverse sc)
Fasten off. Weave the join tail through the first and last stitches so the join does not gap, then back into the fabric for at least 2" (5 cm).
Non-slip option
Cut a non-slip rug pad about ½" (1.3 cm) smaller than the mat all around and lay it underneath. A removable pad can be taken out for washing. Rug-gripper tape on the wrong side is another option; test it on a corner first.
Care
Machine wash cold, gentle cycle, or hand wash. Lay flat to dry and smooth the bone back into shape while damp. Do not tumble dry. Cotton may soften and grow slightly on the first wash; that is already allowed for if you washed your gauge swatch. Avoid fabric softener, which makes a floor mat slippery.
Designer Notes
The neck is what makes this read as a bone rather than an oval. Do not smooth those decreases over extra rows, and do not skip the even knob sections — the 4" (10 cm) plateau at full width is what keeps each end plump.
If you want a quieter mat, work Rounds 1 and 2 in main color. Buy about 80 extra yards (73 m) of MC and omit the contrast skein.
The finished outline is symmetrical. If one knob looks fuller than the other after joining, the panels were not matched at the necks. Unpin that side and rejoin it before weaving in the contrast tails.
Disclaimer: This pattern was generated by AI and should be reviewed for accuracy before use. While we strive for quality, AI-generated content may contain errors. Please verify measurements, stitch counts, charts, and instructions before beginning your project. Generated by purlJam.uk
Love this pattern?
Save this pattern to your free PurlJam libraryAccess your pattern anytime
Bookmark this page to access your pattern anytime