Type
Crochet
Difficulty
intermediate
Category
pullover
AI Thinking Process
Planning
Verification
Pattern
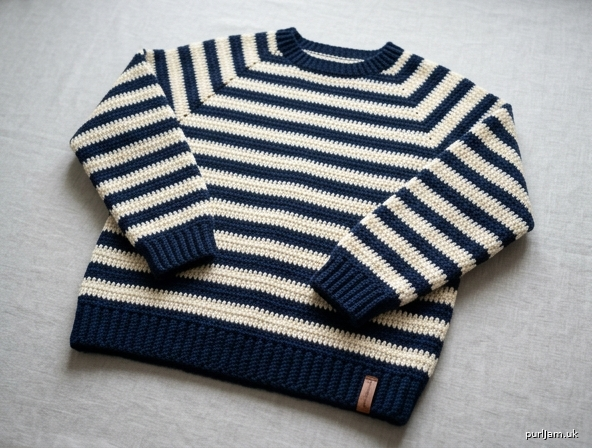
Striped Classic Crochet Pullover
Skill Level: Intermediate
Construction: Worked flat in pieces from the bottom up, then seamed. Horizontal 2-row stripes.
Sizes
Women’s Small (Medium, Large, XL, 2XL)
To fit bust: 34–36 (38–40, 42–44, 46–48, 50–52)" / 86.5–91.5 (96.5–101.5, 106.5–112, 117–122, 127–132) cm
Finished Measurements
- Bust: 38 (42, 46, 50, 54)" / 96.5 (106.5, 117, 127, 137) cm
- Length: 24 (24½, 25, 25½, 26)" / 61 (62, 63.5, 65, 66) cm
- Armhole depth: 7½ (8, 8½, 9, 9½)" / 19 (20.5, 21.5, 23, 24) cm
- Sleeve length to underarm (including cuff): 19½" / 49.5 cm (all sizes)
- Upper arm: 13¼ (14¼, 15½, 17¼, 18¾)" / 33.5 (36, 39.5, 44, 47.5) cm
Shown in size Medium. Choose size with approx. 2–4" / 5–10 cm positive ease at bust.
Yarn
Worsted weight yarn (CYC 4), approx. 180 yd / 165 m per 100 g
Color A (main / odd stripes): 720 (800, 900, 1000, 1120) yd / 660 (730, 825, 915, 1025) m
Color B (contrast / even stripes): 480 (540, 600, 680, 760) yd / 440 (495, 550, 620, 695) m
Example: Cascade 220, Lion Brand Wool-Ease, or similar. Two solid colors with clear contrast recommended.
Hook & Notions
- US H/8 (5 mm) crochet hook, or size needed to obtain gauge
- US G/6 (4 mm) hook for ribbing and neckband (optional; creates firmer edge)
- Yarn needle
- Stitch markers
- Scissors
Gauge
14 dc and 8 rows = 4" / 10 cm in double crochet with larger hook, after light blocking.
Ribbing: 16 sc BLO and 16 rows = 4" / 10 cm with smaller hook (or same hook if preferred).
Make a gauge swatch. Work 20 dc × 12 rows; measure center 4". Change hook size if needed. Fit depends on accurate gauge.
Abbreviations (US)
ch – chain
st(s) – stitch(es)
sc – single crochet
dc – double crochet
sc BLO – single crochet in back loop only
sl st – slip stitch
sk – skip
sp – space
RS – right side
WS – wrong side
pm – place marker
rep – repeat
beg – beginning
rem – remaining
inc – increase
dec – decrease
Special stitches
- dc2tog: Yo, insert hook in next st, yo, pull up loop, yo, draw through 2 loops; yo, insert hook in following st, yo, pull up loop, yo, draw through 2 loops; yo, draw through all 3 loops on hook. (1 st decreased)
Stripe Pattern
2-Row Stripe Sequence (Body and Sleeves, after ribbing):
- Rows 1–2: Color A
- Rows 3–4: Color B
Rep Rows 1–4 for stripe pattern.
Color changes: Work last yarn-over of last st of the row with the new color. Cut yarn at each change (or carry loosely up the side if seaming will hide floats). Weave ends into matching stripes.
BACK
Bottom Ribbing
With smaller hook and Color A, ch 11.
Row 1 (RS): Sc in 2nd ch from hook and in each ch across—10 sc. Turn.
Row 2: Ch 1, sc BLO in each st across—10 sc. Turn.
Rep Row 2 until you have worked 66 (74, 80, 88, 94) rows. Do not fasten off.
Turn ribbing to work along long edge.
Body
Change to larger hook. Continue with Color A (counts as Stripe Row 1).
Row 1 (RS): Ch 2 (does not count as st here and throughout unless noted), work 66 (74, 80, 88, 94) dc evenly across long edge of ribbing (approx. 1 dc per ribbing row)—66 (74, 80, 88, 94) dc. Turn.
(Math: 66 (74, 80, 88, 94) dc × 4" / 14 = 18.9 (21.1, 22.9, 25.1, 26.9)" width ✓)
Row 2: Ch 2, dc in each dc across. Turn.
Work even in dc, continuing 2-row Stripe Sequence, until piece measures 14 (14, 14, 14½, 14½)" / 35.5 (35.5, 35.5, 37, 37) cm from cast-on edge of ribbing, ending with a WS row. Note which stripe row you end on so Front and Sleeves can match at underarm if desired.
Armhole Shaping
Next row (RS): Sl st across first 8 (9, 10, 11, 12) sts, ch 2, dc in next st and in each st across to last 8 (9, 10, 11, 12) sts; leave rem sts unworked—50 (56, 60, 66, 70) dc. Turn.
(Math: 66−16=50; 74−18=56; 80−20=60; 88−22=66; 94−24=70 ✓)
Next row: Ch 2, dc in each dc across. Turn.
Work even in dc and established stripes until armhole measures 7½ (8, 8½, 9, 9½)" / 19 (20.5, 21.5, 23, 24) cm, ending with a WS row.
(Rows approx.: 15 (16, 17, 18, 19) rows at 2 rows/inch ✓)
Shoulder Shaping
Next row (RS): Ch 2, dc in first 13 (15, 16, 18, 19) sts; leave rem sts unworked for right shoulder (as worn). Fasten off.
Skip center 24 (26, 28, 30, 32) sts for neck, join matching stripe color with sl st in next st, ch 2, dc in same st and in each of rem 13 (15, 16, 18, 19) sts. Fasten off.
(Math: 13+24+13=50; 15+26+15=56; 16+28+16=60; 18+30+18=66; 19+32+19=70 ✓)
FRONT
Work same as Back through Armhole Shaping and continue even until armhole measures 5 (5½, 6, 6½, 7)" / 12.5 (14, 15, 16.5, 18) cm, ending with a WS row.
(Neck begins approx. 2½" / 6.5 cm before shoulder ✓)
Shape Front Neck
Place markers: Mark center 16 (18, 20, 22, 24) sts.
(Outer neck edges will be decreased to reach final neck width of 24 (26, 28, 30, 32) sts ✓)
Left Front (RS):
Row 1 (RS): Ch 2, dc in each st to 2 sts before marked center section, dc2tog; leave center marked sts and Right Front unworked—16 (18, 19, 21, 22) sts. Turn.
Row 2 (WS): Ch 2, dc2tog, dc in each st to end—15 (17, 18, 20, 21) sts. Turn.
Row 3: Ch 2, dc in each st to last 2 sts, dc2tog—14 (16, 17, 19, 20) sts. Turn.
Row 4: Ch 2, dc2tog, dc in each st to end—13 (15, 16, 18, 19) sts. Turn.
Work even on 13 (15, 16, 18, 19) sts until Left Front matches Back armhole depth to shoulder, ending with a WS row. Fasten off.
(4 dec rows: 16→13 (S), 18→15 (M), 19→16 (L), 21→18 (XL), 22→19 (2XL) ✓)
Right Front:
With RS facing, sk center 16 (18, 20, 22, 24) sts, join matching color in next st.
Row 1 (RS): Ch 2, dc2tog (same st and next st), dc in each st to end—16 (18, 19, 21, 22) sts. Turn.
Row 2: Ch 2, dc in each st to last 2 sts, dc2tog—15 (17, 18, 20, 21) sts. Turn.
Row 3: Ch 2, dc2tog, dc in each st to end—14 (16, 17, 18, 20) wait—correct: 14 (16, 17, 19, 20) sts. Turn.
Row 4: Ch 2, dc in each st to last 2 sts, dc2tog—13 (15, 16, 18, 19) sts. Turn.
Work even until Right Front matches Left Front / Back shoulder depth. Fasten off.
(Shoulder sts match Back: 13 (15, 16, 18, 19) each side ✓)
Final neck opening width after shaping: center skip 16 (18, 20, 22, 24) + 4 dec each side = 24 (26, 28, 30, 32) sts equivalent ✓.
SLEEVES (make 2)
Cuff Ribbing
With smaller hook and Color A, ch 11.
Row 1: Sc in 2nd ch from hook and in each ch across—10 sc. Turn.
Row 2: Ch 1, sc BLO in each st across. Turn.
Rep Row 2 until you have worked 28 (30, 32, 34, 36) rows. Do not fasten off.
Turn to work along long edge.
Sleeve Body
Change to larger hook. Begin Stripe Sequence with Color A.
Row 1 (RS): Ch 2, work 28 (30, 32, 34, 36) dc evenly across long edge—28 (30, 32, 34, 36) dc. Turn.
(Width: 8 (8.6, 9.1, 9.7, 10.3)" ✓)
Row 2: Ch 2, dc in each dc across. Turn.
Increase row: Ch 2, 2 dc in first st, dc in each st to last st, 2 dc in last st—2 sts increased. Turn.
Work increase row every 4th row 9 (10, 11, 13, 15) times total—46 (50, 54, 60, 66) dc.
(Math: 28+18=46; 30+20=50; 32+22=54; 34+26=60; 36+30=66 ✓)
Continue even in dc and stripes (no more increases) until Sleeve measures 17½" / 44.5 cm from bottom of cuff ribbing, ending with a WS row. (Total sleeve length with 2" cuff ≈ 19½".)
Sleeve Cap (simple set-in shaping)
Next row (RS): Sl st across first 8 (9, 10, 11, 12) sts, ch 2, dc across to last 8 (9, 10, 11, 12) sts; leave rem unworked—30 (32, 34, 38, 42) dc. Turn.
Dec row: Ch 2, dc2tog, dc in each st to last 2 sts, dc2tog—2 sts dec. Turn.
Rep Dec row 4 (4, 5, 5, 6) more times—20 (22, 22, 26, 28) dc.
(5 (5, 6, 6, 7) dec rows × 2 = 10 (10, 12, 12, 14) sts removed; 30−10=20; 32−10=22; 34−12=22; 38−12=26; 42−14=28 ✓)
Fasten off. Cap height approx. matches armhole depth for set-in fit.
FINISHING
Block
Block pieces to finished measurements. Match stripe rows at side and underarm seams as much as possible.
Shoulder Seams
With WS together (or RS together for mattress-style look), seam Front shoulders to Back shoulders using whip st or mattress st through both loops—13 (15, 16, 18, 19) sts each shoulder.
Set in Sleeves
Pin Sleeve cap into armhole, matching center of cap to shoulder seam and sleeve underarm BO edges to body armhole BO edges. Seam with whip st or mattress st.
Side and Underarm Seams
Seam side seams from bottom ribbing to underarm, then continue down Sleeve underarm to cuff, matching stripes. Use mattress st for a flat join or sl st crochet seam on WS.
Neckband
With smaller hook and Color A, RS facing, join at either shoulder seam.
Rnd 1: Ch 1, work sc evenly around neck opening—approx. 64 (68, 72, 76, 80) sc (about 3 sc per 2 row-ends on vertical edges and 1 sc per st on horizontal). Join with sl st to first sc. Pm for beg of rnd.
Rnds 2–4: Ch 1, sc BLO in each sc around; join with sl st to first sc.
For a taller band, work 2 more rnds. Fasten off.
(Optional fold-over: work 8–10 rnds and fold to inside; tack lightly.)
Weave Ends & Final Block
Weave in all ends, hiding them in matching color stripes. Lightly steam or wet-block finished garment, pinning to measurements. Do not flatten ribbing excessively—steam lightly so it retains stretch.
Schematic Reference (approximate)
| Measurement | S | M | L | XL | 2XL |
|---|---|---|---|---|---|
| Bust | 38" | 42" | 46" | 50" | 54" |
| Length | 24" | 24½" | 25" | 25½" | 26" |
| Armhole depth | 7½" | 8" | 8½" | 9" | 9½" |
| Shoulder each | ~3¾" | ~4¼" | ~4½" | ~5¼" | ~5½" |
| Neck width | ~7" | ~7½" | ~8" | ~8½" | ~9" |
| Upper arm | 13¼" | 14¼" | 15½" | 17¼" | 18¾" |
| Sleeve to underarm | 19½" | 19½" | 19½" | 19½" | 19½" |
Pattern Notes
- Ch 2 at beg of dc rows does not count as a stitch; first dc goes into the first st. Adjust if you prefer ch-3 counted as dc—keep counts consistent.
- Maintain stripe sequence across all pieces so side seams and sleeve join lines look intentional. Starting Front/Back/Sleeves on the same stripe row number helps.
- When changing colors, leave 6" tails and weave into the same color later.
- For a longer tunic, add even dc rows before armhole; for cropped, reduce body length before armhole by 2–3".
- Yarn amounts are estimates; striped colorwork and personal row gauge may vary—purchase extra of both colors if possible.
Enjoy your striped pullover!
Disclaimer: This pattern was generated by AI and should be reviewed for accuracy before use. While we strive for quality, AI-generated content may contain errors. Please verify measurements, stitch counts, charts, and instructions before beginning your project. Generated by purlJam.uk
Love this pattern?
Save this pattern to your free PurlJam libraryAccess your pattern anytime
Bookmark this page to access your pattern anytime