Type
Crochet
Difficulty
easy
Category
blanket
Pattern
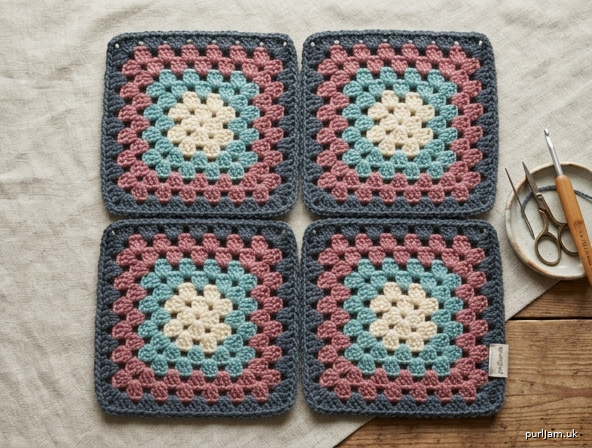
1. **Design Strategy**: Classic granny square afghan using 4 different traditional granny squares with 11 rounds each, worsted weight yarn. Squares joined with whip stitch for a beginner-friendly finish.

2. **Construction Plan**: Make 4 identical granny squares worked in joined rounds from center out, then whip stitch together in a 2x2 layout with optional border.

3. **Quality Assurance**:

- Ensure consistent tension across all 4 squares for uniform sizing

- Count corner ch-2 spaces every round to prevent skewing

- Block squares before joining for clean edges

4. **Final Calculations**: Gauge: traditional granny pattern = 4 dc clusters and 4 rows per 4 inches. Each round adds ~3/4 inch. 11 rounds ≈ 8.5–9 inches per square. Finished afghan (2x2): ~17–18 inches square before border; ~20 inches with border. Each round increases by 3 dc per side; Round 11 has 33 dc per side.

1. **Completeness**: Materials, gauge, abbreviations, square pattern (11 rnds), assembly, border, finishing — all included.

2. **Consistency**: Round-by-round stitch counts verified: each round adds 1 three-dc group per side. Rnd N has N three-dc groups per side.

3. **Constraints**: 4 squares ✓, 11 rounds each ✓, all same size ✓, afghan assembly ✓, easy level ✓, US terms ✓.

4. **Safety**: Math checked — Rnd 11 = 11 groups × 3 dc × 4 sides + 4 corners = 132 + 8 corner dc = 140 dc total, with 4 corner ch-2 sps.

# Classic Four-Square Granny Afghan

A timeless granny square throw made from four large 11-round squares joined into a cozy 2x2 blanket. Perfect beginner project for practicing the classic granny stitch.

---
## Skill Level

**Easy**

## Finished Measurements

- **Each Square:** approximately 9 inches (23 cm) square

- **Assembled Afghan (before border):** approximately 18 inches (46 cm) square

- **Assembled Afghan (with border):** approximately 20 inches (51 cm) square

*Note: This makes a small lap/baby-sized afghan. To enlarge, increase the number of squares (e.g., 16 squares in a 4x4 layout ≈ 36 inches).*

---
## Materials

- **Yarn:** Worsted weight (Medium / #4), smooth acrylic or wool blend

- Color A (Center): ~50 yds

- Color B (Middle rounds): ~75 yds

- Color C (Outer rounds): ~100 yds

- Color D (Border + joining): ~75 yds

- *Total: approximately 300 yds for all 4 squares + border*

- **Hook:** US H/8 (5.0 mm)

- **Notions:** Tapestry needle, scissors, stitch markers (optional)

*Tip: For a scrappy look, change color every round. For a classic look, use 3–4 colors as above.*

---
## Gauge

- Rounds 1–4 of granny square = approximately 4 inches (10 cm) across

- Each subsequent round adds approximately ½ inch (1.25 cm) to each side

- **Gauge is important for square-to-square consistency — check after Round 4.**

---
## Abbreviations (US Terms)

- **ch** — chain

- **sl st** — slip stitch

- **sc** — single crochet

- **dc** — double crochet

- **sp(s)** — space(s)

- **st(s)** — stitch(es)

- **rnd** — round

- **rep** — repeat

---
## Pattern Notes

- All rounds are worked on the right side; do not turn.

- Each round begins with **ch 3** (counts as first dc) and ends by joining with a **sl st** to the top of the beginning ch-3.

- Each corner is a **(3 dc, ch 2, 3 dc)** cluster worked into a ch-2 corner space.

- Each side gets one additional 3-dc group per round.

- Change color at the end of any round by completing the joining sl st in the new color, or carry one color throughout.

**Suggested color sequence:**

- Rnds 1–2: Color A

- Rnds 3–5: Color B

- Rnds 6–8: Color C

- Rnds 9–11: Color D

---
## SQUARE PATTERN

*(Make 4 — all identical)*

**Foundation:** With Color A, ch 4; join with sl st to first ch to form a ring. *(Alternatively, make a magic ring.)*

### Round 1

Ch 3 (counts as first dc), 2 dc in ring, ch 2, *3 dc in ring, ch 2; rep from *2 more times. Join with sl st to top of beg ch-3.

- **Count:** 4 groups of 3 dc, 4 ch-2 corner sps. ✓ *(12 dc total)*

### Round 2

Sl st into next 2 dc and into ch-2 corner sp. Ch 3, (2 dc, ch 2, 3 dc) in same corner sp, *ch 1, (3 dc, ch 2, 3 dc) in next corner sp; rep from *2 more times, ch 1. Join with sl st to top of beg ch-3.

- **Count:** 2 groups per side, 4 corners. ✓ *(24 dc total)*

### Round 3

Sl st into next 2 dc and into ch-2 corner sp. Ch 3, (2 dc, ch 2, 3 dc) in same corner sp, *ch 1, 3 dc in next ch-1 sp, ch 1, (3 dc, ch 2, 3 dc) in next corner sp; rep from *2 more times, ch 1, 3 dc in next ch-1 sp, ch 1. Join.

- **Count:** 3 groups per side. ✓ *(36 dc total)*

### Rounds 4–11

Continue in established pattern. For each round:

1. Sl st across to first ch-2 corner sp.

2. Ch 3, (2 dc, ch 2, 3 dc) in same corner sp.

3. *Ch 1, work 3 dc in each ch-1 sp along the side, ch 1, then (3 dc, ch 2, 3 dc) in next corner sp; rep from *2 more times.

4. Ch 1, work 3 dc in each remaining ch-1 sp along final side, ch 1. Join with sl st to top of beg ch-3.

**Stitch count per round (3-dc groups per side):**

| Round | Groups per Side | Total dc |

|-------|----------------|----------|

| 1 | 1 | 12 |

| 2 | 2 | 24 |

| 3 | 3 | 36 |

| 4 | 4 | 48 |

| 5 | 5 | 60 |

| 6 | 6 | 72 |

| 7 | 7 | 84 |

| 8 | 8 | 96 |

| 9 | 9 | 108 |

| 10 | 10 | 120 |

| 11 | 11 | 132 |

**Math check:** Each round adds 4 groups × 3 dc = 12 dc. ✓

Round 11: 11 groups × 3 dc × 4 sides = **132 dc**, plus 4 corner ch-2 sps. ✓

Fasten off after Round 11, leaving a 6-inch tail. Weave in all ends.

**Repeat to make 4 squares total.**

---
## Blocking (Recommended)

Before joining, block each square to ensure uniform size:

1. Lightly mist with water or steam.

2. Pin each square to a flat surface at exactly **9 x 9 inches**.

3. Allow to dry completely.

Blocking is the key to all 4 squares ending up the same size.

---
## Assembly — Whip Stitch Join

Arrange squares in a **2 x 2 layout**:

``

`[ Square 1 ] [ Square 2 ]`

`[ Square 3 ] [ Square 4 ]`

``

1. Place two squares with **right sides together**, edges aligned.

2. Thread tapestry needle with a long strand (~30 inches) of Color D.

3. Insert needle through the **back loops only** of both corresponding stitches along the edge.

4. Whip stitch across, inserting needle through each pair of stitches (one from each square). Pull snug but not tight.

5. Secure ends.

**Joining order:**

- Join Square 1 to Square 2 (top row).

- Join Square 3 to Square 4 (bottom row).

- Join the top row to the bottom row across the long seam.

*Tip: At the intersection where 4 corners meet, stitch through all layers to keep the center flat.*

---
## Border (Optional but Recommended)

With Color D and right side facing, join yarn with sl st to any corner ch-2 sp of the assembled afghan.

### Border Round 1

Ch 3 (counts as first dc), (2 dc, ch 2, 3 dc) in same corner sp. Work **3 dc in each ch-1 sp** and **3 dc in each joining seam** around, working (3 dc, ch 2, 3 dc) in each of the 4 outer corners. Join with sl st to top of beg ch-3.

### Border Round 2

Sl st to corner sp. Ch 1, sc in same sp, *sc evenly across to next corner, (sc, ch 2, sc) in corner sp; rep from *around. Join with sl st to first sc. Fasten off.

*For a fancier finish, add a Round 3 of reverse single crochet (crab stitch) around.*

---
## Finishing

1. Weave in all remaining ends with tapestry needle.

2. Give the finished afghan a final light blocking if desired.

3. Trim any stray ends.

---
## Care Instructions

- **Acrylic:** Machine wash cold, gentle cycle; tumble dry low.

- **Wool blend:** Hand wash cold; lay flat to dry.

---
**Designer's Note:** This classic 4-square layout is a perfect introduction to making granny afghans. Once you've mastered the rhythm of the granny stitch, you can scale this pattern up to any size by simply making more squares. Enjoy!
Disclaimer: This pattern was generated by AI and should be reviewed for accuracy before use. While we strive for quality, AI-generated content may contain errors. Please verify measurements, stitch counts, and instructions before beginning your project. Generated by purlJam.uk
Access your pattern anytime
Bookmark this page to access your pattern anytime