Type
Machine Knitting
Difficulty
intermediate
Category
custom
AI Thinking Process
Planning
Verification
Pattern
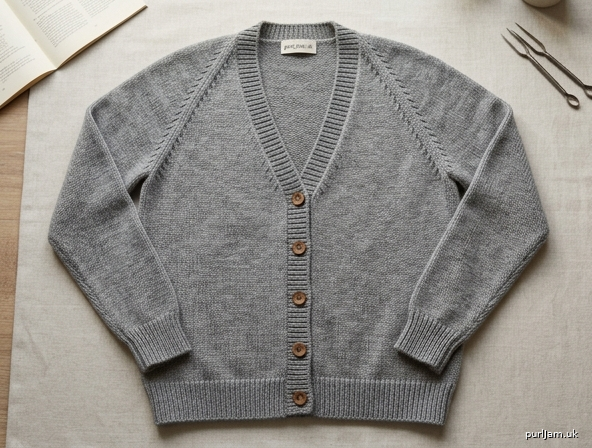
Classic V-Neck Machine-Knit Cardigan
Intermediate | Worsted weight | Mid-gauge (with standard-gauge EON and bulky notes)
A hip-length, set-in-sleeve cardigan with a clean V-neck, 1×1 rib trims, and a six- to seven-button front. All pieces are knitted flat on the main bed. Shaping is fully fashioned with a transfer tool. A ribber is helpful for the hems but is not required.
Sizes
S (M, L, XL, 2XL)
To fit bust: 34 (38, 42, 46, 50)" (86.5 [96.5, 106.5, 117, 127] cm) Finished bust (buttoned): 38 (42, 46, 50, 54)" (96.5 [106.5, 117, 127, 137] cm) Finished back length: 24 (24½, 25¾, 26¼, 27½)" (61 [62, 65.5, 66.5, 70] cm) Length to underarm: 16 (16, 16½, 16½, 17½)" (40.5 [40.5, 42, 42, 44.5] cm) Armhole depth: 8 (8½, 9, 9½, 10)" (20.5 [21.5, 23, 24, 25.5] cm) Back width: 19 (21, 23, 25, 27)" (48.5 [53.5, 58.5, 63.5, 68.5] cm) Sleeve length to underarm: 18½ (18½, 18½, 18½, 19½)" (47 [47, 47, 47, 49.5] cm) Upper arm: 13 (14¼, 15½, 17, 18¾)" (33 [36, 39.5, 43, 47.5] cm)
Numbers are given as S (M, L, XL, 2XL). One number applies to all sizes.
Ease is about 4" (10 cm) at the bust. Choose the size whose to-fit bust is closest to your actual bust.
Materials
- Yarn: Worsted weight (category 4), smooth wool or wool-blend recommended for blocking.
Yardage: 1,200 (1,350, 1,500, 1,650, 1,800) yd / 1,100 (1,235, 1,370, 1,510, 1,645) m.
Allow 10% extra for a heavily weighted swatch or a longer body. - Buttons: 6 (6, 7, 7, 7) buttons, ¾" (19 mm) diameter.
- Waste yarn: Smooth contrast yarn of similar thickness, plus a ravel cord.
- Notions: Tapestry needle, 2 stitch holders or extra waste yarn, blocking mats, steam iron, sewing needle and thread for buttons.
Machine and tools
- Primary machine: Mid-gauge flat bed, 6.5–7 mm needle pitch, 150- or 200-needle bed. (Largest piece is 122 needles.)
- Also works on:
- Bulky / 9 mm: Use a tighter tension (about T3–T5) and match the gauge below before starting.
- Standard gauge / 4.5 mm: Work every other needle (EON) at about T9–T10 so that needles in work equal the stitch counts given. Empty needles stay in NWP throughout.
- Ribber: Optional. Used only for 1×1 hems/cuffs/bands. Main-bed 1×1 is written as the default.
- Required tools: Cast-on comb, claw weights and/or bar weights, 1-prong and 2-prong transfer tools, latch tool, ravel cord. A decker comb is optional for the rib-to-stockinette conversion.
Tension / Gauge
Stockinette (main fabric): Tension dial T7 (adjust to match gauge).
18 sts and 24 rows = 4" (10 cm)
→ 4.5 sts / inch and 6 rows / inch.
1×1 rib: Tension dial T5 (two full numbers tighter than stockinette).
Waste yarn: T8, or one number looser than main tension.
Swatch (mandatory): Cast on 40 needles, knit 48 rows at T7, bind off. Rest the swatch, then steam-block the same way you will finish the garment. Count stitches and rows over the inner 4" (10 cm). If you have more stitches per 4" than 18, go up a tension number (looser); if fewer, go down (tighter). Recheck. Do not start the cardigan until gauge matches.
Abbreviations and machine terms
- BO — bind off (latch-tool or back-stitch bind-off)
- CO — cast on
- COL / COR — carriage on left / carriage on right
- dec — decrease (fully fashioned; see Pattern Notes)
- EON — every other needle
- HP — holding position (needles latched back; carriage set to hold)
- inc — increase (bring next empty needle to WP and e-wrap)
- MB — main bed
- NWP — non-working position
- RC — row counter
- T — tension dial
- UWP — upper working position (needles brought forward to knit back from hold)
- WP — working position
- WY — waste yarn
Carriage (plain stockinette): Both cam / part buttons out (Brother: N–N). Side levers (if present) on N. Holding cams / Russell levers off until a hold section is specified.
Pattern notes
- Center every piece on needle 0. Needle ranges below include needle 0.
- Reset RC to 000 at every heading that says so. Write down the RC at each checkpoint; do not rely on memory.
- Fully fashioned decrease (1 st at one edge): With a 2-prong transfer tool, move the edge 2 stitches one needle inward. Put the emptied outermost needle into NWP. Do this before the carriage knits that edge.
- Fully fashioned increase (1 st at one edge): Bring the next empty needle outside the fabric into WP. E-wrap the new needle so the first row does not leave a hole.
- 1×1 rib on the main bed (no ribber): After the ravel-cord row, transfer every other stitch onto its neighbor. Empty needles go to NWP. End needles stay in WP (knit selvedges). At the end of the rib, bring empty needles to WP, and with the 1-prong tool hang the running bar from the row below onto each newly filled needle so the first stockinette row is not a row of holes. Change to T7.
- 1×1 rib with ribber (optional): Zigzag / 1×1 setup, both beds, T4/T4 (or T5/T5). Knit the rib, transfer all ribber stitches to the main bed, drop the ribber, continue at T7 on the same stitch count.
- Weights: Hang the comb after 6–8 rows of waste. Add claw weights at both edges and move them up every 20–30 rows. Re-hang immediately after any bind-off so the edge does not flare.
- Selvedges: Keep the end needle in WP on every row. Do not use the end-needle selection / automatic wrap unless your machine requires it to prevent dropped edge stitches.
- Women’s button placement: Buttonholes are on the Right Front (as worn). Buttons sew to the Left Front.
- No punchcard or electronic patterning is required. Knit-leader / knit-radar users may draft the schematic from the finished measurements; RC instructions are complete without it.
Back
Needles in WP: L43–R42 (L47–R46, L52–R51, L56–R55, L61–R60)
= 86 (94, 104, 112, 122) needles
(L43 to R42 inclusive = 43 + 1 + 42 = 86 ✓)
Cast-on and rib
- All required needles to WP. Carriage COR. Waste yarn, T8. Knit 8–10 rows. Knit 1 row with ravel cord. Hang cast-on comb and weights.
- Join main yarn. T5. Knit 1–2 rows. Convert to 1×1 rib (Note 5 or 6).
- RC 000. Knit 16 rows 1×1 rib. RC 016, COR (started COR, 16 is even → COR ✓).
- Convert to every-needle stockinette (Note 5). Change to T7.
Body
- RC 000, COR, T7, stockinette.
- Knit even to RC 080 (080, 084, 084, 088), COR.
80 rows ÷ 6 = 13.33"; plus 2.5" rib ≈ 16" to underarm ✓
Armholes
Carriage is COR as required to bind off the right edge first.
- Next row (COR): Latch-tool BO 5 (5, 6, 7, 8) sts at the beginning of the row (right edge). Knit across. COL. Re-hang a claw weight on the new right edge.
- Next row (COL): BO 5 (5, 6, 7, 8) sts at the beginning of the row (left edge). Knit across. COR.
Stitches remaining: 86 − 5 − 5 = 76 (94 − 10 = 84; 104 − 12 = 92; 112 − 14 = 98; 122 − 16 = 106) ✓ - Decrease 1 st at each end every 2 rows 4 (5, 6, 6, 7) times, using the fully fashioned decrease (Note 3), always with the carriage at that edge.
5 + 4 = 9 sts removed each side (5+5=10; 6+6=12; 7+6=13; 8+7=15) ✓
Remaining: 76 − 8 = 68 (84 − 10 = 74; 92 − 12 = 80; 98 − 12 = 86; 106 − 14 = 92) ✓
Work even on 68 (74, 80, 86, 92) sts until RC 122 (125, 132, 135, 142). COR.
(Armhole so far: 42 [45, 48, 51, 54] rows = 7 [7½, 8, 8½, 9]", leaving 1" / 6 rows for shoulder slope ✓)
Neck and short-row shoulders
Remaining 68 (74, 80, 86, 92) sts divide as
20 / 28 / 20 (22 / 30 / 22; 24 / 32 / 24; 26 / 34 / 26; 28 / 36 / 28)
(20 + 28 + 20 = 68 ✓)
Set holding cams / Russell levers to HOLD.
Right shoulder (armhole = right edge, neck = left edge of this group):
- Put the center 28 (30, 32, 34, 36) needles and the left 20 (22, 24, 26, 28) needles into HP. Right-shoulder needles stay in WP.
- Knit 1 row toward the neck (left). COL.
- Put 7 (7, 8, 9, 9) needles at the neck edge into HP. Knit to the armhole. COR.
- Knit 1 row to the neck. COL.
- Put the next 7 (8, 8, 9, 9) needles at the neck edge into HP. Knit to the armhole. COR.
- Knit 1 row to the neck. COL.
- Remaining 6 (7, 8, 8, 10) needles are in WP (7+7+6 = 20; 7+8+7 = 22; 8+8+8 = 24; 9+9+8 = 26; 9+9+10 = 28 ✓). Knit 1 row to the armhole. COR.
- Break yarn, leaving a 12" (30 cm) tail. Remove the 20 (22, 24, 26, 28) right-shoulder stitches onto waste yarn.
Left shoulder:
- Move the carriage to the left with all remaining needles in HP (free pass, no yarn). COL.
- Bring the left-shoulder needles to WP; leave back-neck needles in HP.
- Mirror the three short-row steps, holding groups at the neck edge (now the right side of this group). Remove left-shoulder stitches onto waste yarn.
Back neck:
- Remove the held 28 (30, 32, 34, 36) neck stitches onto waste yarn or a holder. These will be picked up for the neckband.
RC at take-off: RC 128 (131, 138, 141, 148).
16 rib + 80 body + 48 armhole = 144 rows → 144 ÷ 6 = 24" for S ✓
Set the back aside.
Right Front
(As worn — this is the buttonhole side. On the machine, neck / center front = LEFT edge, armhole = RIGHT edge.)
Needles in WP: L20–R19 (L22–R21, L24–R23, L27–R26, L29–R28)
= 40 (44, 48, 54, 58) needles
(L20 to R19 inclusive = 20 + 1 + 19 = 40 ✓)
Cast-on and rib
Same method as the back, on 40 (44, 48, 54, 58) needles.
RC 000, T5, 16 rows 1×1 rib. RC 016, COR. Convert to stockinette, T7.
Body to V-neck
- RC 000, COR, T7.
- Knit even to RC 074 (074, 078, 078, 082), COR.
V-neck and armhole (worked at the same time)
V-neck (left edge): Decrease 1 st at the neck edge every 4 rows 11 (12, 12, 15, 15) times, fully fashioned.
Work these decreases when the carriage is COL (left edge is the start of the next pass).
First neck dec at RC 075 (075, 079, 079, 083); last at RC 115 (119, 123, 135, 139).
AND AT THE SAME TIME, shape the armhole (right edge):
- At RC 080 (080, 084, 084, 088), COR: BO 5 (5, 6, 7, 8) sts at the beginning of the row (armhole). Knit across. COL. Re-hang a claw weight.
- Then decrease 1 st at the armhole edge only every 2 rows 4 (5, 6, 6, 7) times (these happen at COR).
Armhole removes 5 + 4 = 9 sts (5+5=10; 6+6=12; 7+6=13; 8+7=15) ✓
When both shapings are complete:
40 − 9 − 11 = 20 (44 − 10 − 12 = 22; 48 − 12 − 12 = 24; 54 − 13 − 15 = 26; 58 − 15 − 15 = 28) ✓
These 20 (22, 24, 26, 28) stitches match the back shoulder ✓
Work even on the remaining shoulder stitches until RC 122 (125, 132, 135, 142), COR.
Short-row shoulder
Armhole = right edge, neck = left edge. Set carriage to HOLD.
Mirror the back right-shoulder short rows on these 20 (22, 24, 26, 28) sts, holding 7 (7, 8, 9, 9), then 7 (8, 8, 9, 9), then knitting the remaining 6 (7, 8, 8, 10) (sums as for the back ✓).
Remove stitches onto waste yarn at RC 128 (131, 138, 141, 148).
Left Front
(As worn. On the machine, neck / center front = RIGHT edge, armhole = LEFT edge. No buttonholes on this piece.)
Cast on and rib exactly as for the Right Front: 40 (44, 48, 54, 58) needles, 16 rows T5, convert, T7, RC 000.
Knit even to RC 074 (074, 078, 078, 082).
V-neck (right edge): Decrease 1 st at the neck edge every 4 rows 11 (12, 12, 15, 15) times, fully fashioned, when the carriage is COR.
AND AT THE SAME TIME, shape the armhole (left edge):
- You need COL to bind off the left edge at the start of a row. If you are COR at RC 080 (080, 084, 084, 088), put all needles into HP and run a free pass to the left (no yarn), or knit one extra row. COL.
- BO 5 (5, 6, 7, 8) sts at the beginning of the row. Knit across.
- Decrease 1 st at the armhole edge only every 2 rows 4 (5, 6, 6, 7) times (these happen at COL).
Remaining stitches: 20 (22, 24, 26, 28) — same as the right front and the back shoulder ✓
Work even to RC 122 (125, 132, 135, 142). Short-row the shoulder as a mirror of the right front (hold groups at the neck edge). Take off on waste yarn at RC 128 (131, 138, 141, 148).
Sleeves (make 2 alike)
Cuff needles: L19–R18 (L20–R19, L22–R21, L23–R22, L25–R24)
= 38 (40, 44, 46, 50) needles
(L19 to R18 inclusive = 19 + 1 + 18 = 38 ✓)
Cuff
Waste yarn + ravel cord as for the back. Main yarn, T5, 1×1 rib.
RC 000. Knit 16 rows. RC 016, COR. Convert to stockinette, T7.
Sleeve shaping
- RC 000, COR, T7.
- Increase 1 st each end (Note 4) on the following schedule, then work even to the stated RC:
| Size | Increase every | Times each side | Last increase at | Then even to |
|---|---|---|---|---|
| S | 8 rows | 10 | RC 080 | RC 096 |
| M | 8 rows | 12 | RC 096 | RC 096 |
| L | 6 rows | 13 | RC 078 | RC 096 |
| XL | 6 rows | 15 | RC 090 | RC 096 |
| 2XL | 6 rows | 17 | RC 102 | RC 102 |
Stitch count at underarm:
38 + 10 + 10 = 58 (40+12+12=64; 44+13+13=70; 46+15+15=76; 50+17+17=84) ✓
RC 096 (096, 096, 096, 102), COR.
Sleeve cap
- BO 5 (5, 6, 7, 8) sts at the beginning of the next 2 rows.
Remaining: 58 − 10 = 48 (64−10=54; 70−12=58; 76−14=62; 84−16=68) ✓ - Decrease 1 st each end every row 3 (3, 4, 4, 5) times.
- Then decrease 1 st each end every other row 13 (15, 15, 16, 17) times.
- Then decrease 1 st each end every row 3 (3, 4, 4, 5) times.
Stitches removed each side after the underarm BO: 3+13+3 = 19 (3+15+3=21; 4+15+4=23; 4+16+4=24; 5+17+5=27) ✓
Remaining: 48 − 38 = 10 (54−42=12; 58−46=12; 62−48=14; 68−54=14) ✓
Cap rows after the 2 BO rows: 3 + 26 + 3 = 32 (3+30+3=36; 4+30+4=38; 4+32+4=40; 5+34+5=44) → about 5¼ (6, 6¼, 6¾, 7¼)" ✓
BO the remaining 10 (12, 12, 14, 14) sts with the latch tool. Fasten off.
Finishing
Block
Steam-block each piece to the finished measurements, wrong side up, hovering the iron under light steam. Do not flatten the rib. Let pieces dry completely. Shoulder stitch counts must still match: 20 (22, 24, 26, 28) back to 20 (22, 24, 26, 28) front ✓
Join shoulders (on the machine)
- Right shoulder: With wrong sides together (for a bound-off ridge on the inside) or right sides together (ridge on the outside — choose one and be consistent), rehang the back right-shoulder stitches on the needles, then rehang the front right-shoulder stitches onto the same needles (two stitches per needle).
- T6. Knit 1 row. Latch-tool BO.
- Repeat for the left shoulder.
- 20 = 20 (22=22, 24=24, 26=26, 28=28) ✓
Set in sleeves
With right sides facing, mattress-stitch the sleeve cap to the armhole, matching the underarm bind-offs and easing the cap around the curve. The slightly taller cap on the two largest sizes eases in — distribute extra fullness over the top third of the cap, not at the underarm.
Side and sleeve seams
Mattress-stitch the side seams from hem to underarm, then the sleeve seams from cuff to underarm. Match the rib-to-stockinette change exactly.
Front bands
Pick-up rate: 3 needles for every 4 rows along a selvedge (4.5 sts per inch vs 6 rows per inch → 3/4 ✓).
Right Front band (buttonholes):
- With the right side facing you, rehang the Right Front selvedge from the hem up the center-front edge and along the V to the shoulder, at 3 sts / 4 rows.
Approximate needle count: 108 (110, 116, 118, 124) needles. If you are 1–2 needles off, that is acceptable; the band must lie flat without flaring. - T5. 1×1 rib (empty needles NWP), or every-needle at T5 if you prefer a denser band.
- Knit 4 rows.
- Buttonhole row: Work 6 (6, 7, 7, 7) two-stitch buttonholes, evenly spaced along the straight (pre-V) portion only, with the lowest hole 1" (2.5 cm) from the hem and the highest ½" (1.3 cm) below the start of the V.
Machine 2-st buttonhole: At each marked pair, transfer both stitches to adjacent needles and put the two emptied needles into NWP for this row; on the next row, e-wrap those two needles back into WP. (Alternatively: latch-tool BO 2, then e-wrap CO 2 on the return row.) - Knit 5 more rows (10 rows rib total, about 1½" / 4 cm).
- Latch-tool BO in 1×1 rib (or very slightly looser than T5 so the edge does not cup).
Left Front band:
- Pick up the Left Front to match the Right Front needle-for-needle.
- T5, 1×1 rib, 10 rows, no buttonholes. Latch-tool BO.
Neckband
- With the right side facing, rehang: left V-edge (from the top of the left front band to the shoulder), the 28 (30, 32, 34, 36) back-neck stitches from waste yarn, then the right V-edge down to the top of the right front band.
- Pick up 3 sts / 4 rows along each V slope. At each shoulder seam pick up 1 extra stitch to close the gap.
- T5, 1×1 rib, 10 rows. Latch-tool BO. The ends of the neckband should meet the tops of the front bands; mattress-stitch those short joins.
Buttons and ends
Sew buttons to the Left Front opposite the buttonholes. Weave in all ends on the wrong side.
Final press
Steam the seams and bands from the wrong side. Do not crush the rib. Hang the cardigan to dry.
Schematic measurements (blocked)
| S | M | L | XL | 2XL | |
|---|---|---|---|---|---|
| Bust, buttoned | 38" (96.5 cm) | 42" (106.5 cm) | 46" (117 cm) | 50" (127 cm) | 54" (137 cm) |
| Back width | 19" (48.5 cm) | 21" (53.5 cm) | 23" (58.5 cm) | 25" (63.5 cm) | 27" (68.5 cm) |
| Length | 24" (61 cm) | 24½" (62 cm) | 25¾" (65.5 cm) | 26¼" (66.5 cm) | 27½" (70 cm) |
| To underarm | 16" (40.5 cm) | 16" (40.5 cm) | 16½" (42 cm) | 16½" (42 cm) | 17½" (44.5 cm) |
| Armhole depth | 8" (20.5 cm) | 8½" (21.5 cm) | 9" (23 cm) | 9½" (24 cm) | 10" (25.5 cm) |
| Shoulder seam | 4½" (11.5 cm) | 5" (12.5 cm) | 5¼" (13.5 cm) | 5¾" (14.5 cm) | 6¼" (16 cm) |
| Back neck | 6¼" (16 cm) | 6¾" (17 cm) | 7" (18 cm) | 7½" (19 cm) | 8" (20.5 cm) |
| Sleeve to underarm | 18½" (47 cm) | 18½" (47 cm) | 18½" (47 cm) | 18½" (47 cm) | 19½" (49.5 cm) |
| Upper arm | 13" (33 cm) | 14¼" (36 cm) | 15½" (39.5 cm) | 17" (43 cm) | 18¾" (47.5 cm) |
| Cuff | 8½" (21.5 cm) | 9" (23 cm) | 9¾" (25 cm) | 10¼" (26 cm) | 11" (28 cm) |
Quick RC checklist
Back / each Front (after rib, RC 000 at T7):
- V-neck starts (fronts only): RC 074 (074, 078, 078, 082)
- Armhole BO: RC 080 (080, 084, 084, 088)
- Begin shoulder short rows: RC 122 (125, 132, 135, 142)
- Take off: RC 128 (131, 138, 141, 148)
Sleeves (after cuff, RC 000 at T7):
- Top of increases / start of cap BO: RC 096 (096, 096, 096, 102)
Disclaimer: This pattern was generated by AI and should be reviewed for accuracy before use. While we strive for quality, AI-generated content may contain errors. Please verify measurements, stitch counts, charts, and instructions before beginning your project. Generated by purlJam.uk
Love this pattern?
Save this pattern to your free PurlJam libraryAccess your pattern anytime
Bookmark this page to access your pattern anytime