Type
Machine Knitting
Difficulty
intermediate
Category
custom
AI Thinking Process
Planning
Verification
Pattern
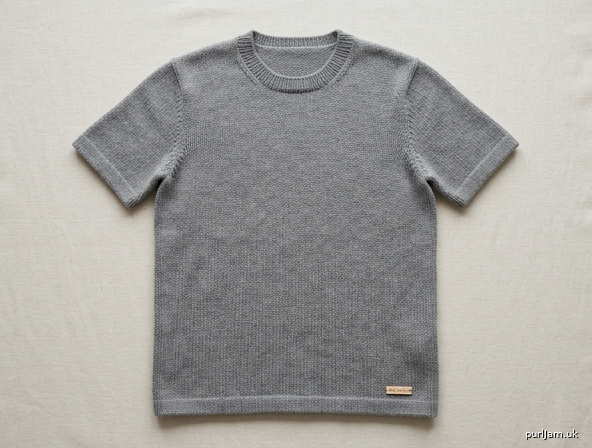
Machine-Knit Crew-Neck T-Shirt
Beginner | Worsted Weight | Flat Panels
A classic short-sleeve crew-neck T-shirt worked in four flat stockinette pieces on a standard or mid-gauge knitting machine. Simple bind-off armholes, basic neck shaping, and an easy sleeve cap make this an ideal first garment. No ribber required.
Materials
Yarn: Worsted weight (category 4), approx. 850 (950, 1100, 1250) yd / 780 (870, 1000, 1140) m
Suggested: smooth wool, cotton, or wool-blend that blocks cleanly.
Machine:
- Mid-gauge (6–7 mm) preferred
- Standard gauge (4.5 mm) at a loose tension, or bulky (8–9 mm) at a firmer tension
- Punchcard or electronic; single bed only
Notions:
- Cast-on comb and weights
- Ravel cord and waste yarn
- Transfer tool (1×2 or 1×3)
- Latch tool
- Tapestry needle
- Steam iron or blocking wires/mats
- Optional: claw weights for edges during neck shaping
Tension / Gauge
Tension dial: T6–T8 (mid-gauge) or T8–T10 (standard gauge). Swatch and adjust until you match gauge.
Gauge: 18 stitches and 24 rows = 4″ (10 cm) in stockinette stitch, measured after steaming/blocking.
(4.5 sts/in; 6 rows/in)
Always knit a 6″ × 6″ swatch, wash or steam as you will the garment, then measure the center 4″.
Sizes
Finished bust circumference: 36 (40, 44, 48)″ / 91.5 (101.5, 112, 122) cm
To fit bust: approx. 32–34 (36–38, 40–42, 44–46)″ with 2–4″ positive ease
Finished length (shoulder to hem): 24 (25, 26, 27)″ / 61 (63.5, 66, 68.5) cm
Armhole depth: 8 (8.5, 9, 9.5)″ / 20.5 (21.5, 23, 24) cm
Short sleeve length (underarm): 6″ / 15 cm
Upper arm circumference: 12 (13, 14.25, 15)″ / 30.5 (33, 36, 38) cm
Schematic key measurements are listed in Finishing. Choose size by finished bust; length is easily adjusted at the “Body to Armhole” section.
Abbreviations & Machine Terms
| Term | Meaning |
|---|---|
| BO | Bind off |
| CO | Cast on |
| COL / COR | Carriage on left / carriage on right |
| HP | Holding position |
| Ndl(s) | Needle(s) |
| RC | Row counter |
| St(s) | Stitch(es) |
| T | Tension dial setting |
| UWP | Upper working position |
| WY | Waste yarn |
| stockinette | Knit side facing (carriage knits every needle) |
Needle positions: A = out of work; B = working; D/E = holding (per your machine manual).
Carriage: Settings for stockinette — both part levers/buttons cancelled (knit both ways), no tuck/slip unless noted.
Pattern Notes
- Work all pieces flat on the main bed, stockinette (knit side toward you if using a ribber-free single bed; follow your machine’s stockinette setup).
- Use open CO over WY + ravel cord so hems and necks can be finished cleanly, or use e-wrap CO for a simple edge.
- Reset RC to 000 at the start of every major section as instructed.
- When shaping, always move the carriage fully clear of the needles so the cam box passes the held/selected needles cleanly.
- Hang claw weights near shaping edges to prevent dropped stitches or edge flare.
- Numbers are given as size S (M, L, XL). Highlight your size throughout.
- Inline checks (✓) confirm stitch math at critical points.
BACK
Machine setup: Main bed only. All ndls in B position for required width. Carriage stockinette settings. Tension as per gauge swatch (e.g. T7). Thread main yarn. Hang cast-on comb and weights after cast-on row.
-
Cast on
With WY, CO 82 (90, 100, 108) sts using your preferred open cast-on. Knit 6–8 rows WY. Knit 1 row ravel cord. Change to main yarn.
RC 000. COR.
(Width check: 82 ÷ 4.5 ≈ 18.2″; 90 ÷ 4.5 = 20″; 100 ÷ 4.5 ≈ 22.2″; 108 ÷ 4.5 = 24″ ✓) -
Hem (optional turned hem)
Knit 12 rows (2″). Optional: place a contrast marker row or note RC for fold line.
Continue, or for a plain edge simply proceed after CO.
RC 012 (if hem rows worked) or remain at section start.
For pattern clarity, the body length below is measured from the cast-on / fold edge. Reset as needed so body row counts stay accurate. -
Body to armhole
Reset RC 000. COR (or COL—knit evenly either direction).
Knit in stockinette until RC 096 (099, 102, 105).
(Length: 96 ÷ 6 = 16″; 99 ÷ 6 = 16.5″; 102 ÷ 6 = 17″; 105 ÷ 6 = 17.5″ ✓)
End COR. -
Shape armholes
BO 4 (5, 6, 7) sts at the beginning of the next 2 rows.
— Row 1 (COR→COL): BO 4 (5, 6, 7) sts, knit across. COL.
— Row 2 (COL→COR): BO 4 (5, 6, 7) sts, knit across. COR.
Sts remaining: 82 − 8 = 74; 90 − 10 = 80; 100 − 12 = 88; 108 − 14 = 94 ✓
RC 002 from armhole start (or continue cumulative RC if preferred; pattern uses section RC).Next row (COR): Decrease 1 st each end every other row 3 (3, 4, 4) times as follows:
- Transfer edge st to adjacent ndl (or use latched decrease), move empty ndl to A.
- Knit 1 row, reverse side same decrease, knit 1 row.
After 3 (3, 4, 4) dec pairs:
Sts remaining: 74 − 6 = 68; 80 − 6 = 74; 88 − 8 = 80; 94 − 8 = 86 ✓
RC at end of armhole shaping: 002 + 6 (6, 8, 8) = RC 008 (008, 010, 010).
-
Armhole straight
Continue even on 68 (74, 80, 86) sts until armhole measures 8 (8.5, 9, 9.5)″ from first BO.
Total armhole rows: 48 (51, 54, 57).
Knit until RC 048 (051, 054, 057) from armhole start. End COR.
(48 ÷ 6 = 8″ ✓) -
Shape back neck and shoulders
Place center 22 (24, 26, 28) sts on waste yarn or in HP for neck.
Remaining each side: [68 − 22]/ 2 = 23; [74 − 24]/ 2 = 25; [80 − 26]/ 2 = 27; [86 − 28]/ 2 = 29 shoulder sts ✓Work right shoulder first (side under carriage or as convenient):
- Knit on right 23 (25, 27, 29) sts only. At neck edge BO 3 sts once, then BO 2 sts once.
- At the same time, at armhole/shoulder edge BO 6 (6, 7, 8) sts every other row 3 times, then BO remaining 5 (7, 6, 5) sts.
(Shoulder total BO: 6+6+6+5 = 23; 6+6+6+7 = 25; 7+7+7+6 = 27; 8+8+8+5 = 29 ✓)
Rejoin yarn at left shoulder (COL or as needed). Work left shoulder to match, reversing shaping (neck decreases at neck edge; shoulder BOs at armhole edge).
Remove center neck sts onto WY if not already. Remove shoulder live sts onto WY if you prefer to graft later; otherwise BO as written.
Back complete. Remove from machine. Label piece.
FRONT
Work exactly as Back through armhole shaping and straight section until front is 2″ (12 rows) shorter than back to the start of shoulder shaping—i.e. begin front neck earlier.
-
CO and body: same as Back — 82 (90, 100, 108) sts, knit to armhole RC 096 (099, 102, 105).
-
Armhole BO and decs: same as Back → 68 (74, 80, 86) sts, armhole RC 008 (008, 010, 010).
-
Continue even until armhole RC 036 (039, 042, 045) (2″ / 12 rows before back shoulder point). End COR.
(36 = 48 − 12; 39 = 51 − 12; etc. ✓) -
Shape front neck
Place center 14 (16, 18, 20) sts on WY or HP.
Remaining each side: [68 − 14]/ 2 = 27; [74 − 16]/ 2 = 29; [80 − 18]/ 2 = 31; [86 − 20]/ 2 = 33 ✓Work each side separately (right side first):
At neck edge, BO or dec as follows (every other row unless noted):- BO 3 sts once
- BO 2 sts once
- Dec 1 st every other row 4 times
Neck decrease total per side: 3 + 2 + 4 = 9 sts ✓
Sts left for shoulder: 27 − 9 = 18; 29 − 9 = 20; 31 − 9 = 22; 33 − 9 = 24
Note: Front shoulder is slightly wider in raw count before final shoulder BO because back neck was wider; final seamed shoulder width will match when you BO the shoulder to the same final join length. For clean seams, BO front shoulders over the same number of rows as back:
When front armhole reaches RC 048 (051, 054, 057), shape shoulder identical to back:
BO 6 (6, 7, 8) sts at armhole edge every other row 3 times, then BO remaining sts (adjust final BO so all shoulder sts are cleared in the same row count as back).
Practical match: aim for shoulder seam length ≈ 5 (5.5, 6, 6.5)″.
(Final joined shoulder uses 23 (25, 27, 29) sts worth of width from back; ease or slightly gather front if 1–2 sts differ, or BO front to leave 23 (25, 27, 29) by working 1–2 extra neck decs if preferred.)Recommended clean match (use this):
After the 9 neck decs, continue any remaining rows to RC 048 (051, 054, 057) with no further neck dec, then BO shoulder exactly as back: 6 (6, 7, 8) × 3 + final 5 (7, 6, 5) on the 23 (25, 27, 29) sts closest to the armhole; if you still have extra sts at neck, BO them as part of final neck edge.
Simpler beginner option: after neck shaping, BO all remaining shoulder sts in 4 steps matching back BO sequence, easing to fit in finishing. -
Complete second side of neck/shoulder with reversed shaping.
Front complete. Remove; label.
SLEEVES (make 2)
-
Cast on
With WY + ravel cord (or e-wrap), CO 40 (44, 48, 52) sts. Main yarn.
RC 000. COR. Tension same as body (or 1 half-point tighter for a neater cuff if desired).
(Width: 40 ÷ 4.5 ≈ 8.9″; 44 ÷ 4.5 ≈ 9.8″; 48 ÷ 4.5 ≈ 10.7″; 52 ÷ 4.5 ≈ 11.6″ ✓) -
Cuff
Knit 12 rows (2″). Optional fold hem: knit 12 more rows and rehang first main-yarn row, or simply continue for a plain cuff. -
Sleeve shaping to underarm
Reset RC 000 after cuff.
Increase 1 st each end every 4 rows 7 (7, 8, 8) times:- To increase: bring adjacent ndl from A to B and pick up a purl bump or e-wrap the new ndl; knit across.
After increases: 40 + 14 = 54; 44 + 14 = 58; 48 + 16 = 64; 52 + 16 = 68 sts ✓
Rows used: 7 × 4 = 28; 28; 8 × 4 = 32; 32.
Then knit even until total sleeve length from cuff start of increases is 6″ — RC 036.
(If increases finished at RC 028/032, knit 8 (8, 4, 4) more rows even to RC 036 ✓)
End COR. Sts: 54 (58, 64, 68).
- To increase: bring adjacent ndl from A to B and pick up a purl bump or e-wrap the new ndl; knit across.
-
Sleeve cap
BO 4 (5, 6, 7) sts at the beginning of the next 2 rows.
Sts: 54 − 8 = 46; 58 − 10 = 48; 64 − 12 = 52; 68 − 14 = 54 ✓
RC 002 (cap).Decrease 1 st each end every other row 10 (11, 12, 13) times:
Sts remaining: 46 − 20 = 26; 48 − 22 = 26; 52 − 24 = 28; 54 − 26 = 28 ✓
Rows: 20 (22, 24, 26). RC 022 (024, 026, 028).Then BO 2 sts at the beginning of the next 4 rows (2 each side twice):
Sts: 26 − 8 = 18; 26 − 8 = 18; 28 − 8 = 20; 28 − 8 = 20 ✓
RC +4 → 026 (028, 030, 032).BO remaining 18 (18, 20, 20) sts.
Cap row total ≈ 26–32 rows (~4.3–5.3″), which eases into the 8–9.5″ armhole when seamed (standard short-sleeve ease) ✓
Sleeve complete. Make second identical sleeve.
Finishing
-
Block
Steam or wet-block all pieces to measurements:- Back/Front width: 18 (20, 22, 24)″
- Back/Front length: 24 (25, 26, 27)″
- Armhole depth: 8 (8.5, 9, 9.5)″
- Sleeve width at bicep: 12 (13, 14.25, 15)″
- Sleeve length to underarm: 6″ + cuff
Allow to dry fully. Do not stretch ribbing-style edges aggressively.
-
Shoulder seams
Join front and back shoulders with mattress stitch (knit side) or by rehanging both shoulders on the machine (right sides together or half-pitch join) and binding off together with latch tool. Match shoulder widths; ease any 1–2 st difference. -
Set in sleeves
With mattress stitch, sew sleeve caps into armholes, matching underarm BOs and easing the gentle cap curve evenly around the armhole. Pin at underarm, shoulder midpoint, and quarters before sewing. -
Side and sleeve seams
Mattress stitch body side seams from hem to underarm, then continue down the sleeve underarm seam in one continuous line (or sew sleeves first, then sides—your preference). Keep tension even so seams lie flat. -
Neckband (beginner machine method)
Option A – Latch-tool / hand finish:- Pick up approximately 80–100 sts evenly around neck (about 2 sts for every 3 rows on vertical edges + all live neck sts).
- With smaller hand needles or by rehanging on machine at tighter tension (T4–T5), work 6–8 rows stockinette or 1×1 mock rib (transfer every other st for 1–2 rows if desired).
- BO loosely with latch tool.
Option B – Machine rehang: - Hang neck edge on machine, decreasing extra sts evenly to ~90 (96, 102, 108) ndls.
- Knit 8 rows at T5.
- BO with latch tool loosely.
Fold band to inside and stitch lightly, or leave single thickness for a casual T-shirt look.
-
Hems (if open CO used)
Rehang cast-on stitches (after removing WY) and BO, or turn 1″ hem and stitch down by hand or with linker. -
Weave ends & final press
Weave all yarn ends on wrong side. Light steam seams flat. Do not crush the stockinette.
Wear & Care
Follow yarn label. Most worsted wool blends: hand wash cool or gentle cycle, lay flat to dry. Cotton may grow slightly—block length with care the first time.
Quick Reference RC Chart (per size)
| Section | S | M | L | XL |
|---|---|---|---|---|
| Body to armhole | 096 | 099 | 102 | 105 |
| Armhole shaping end | 008 | 008 | 010 | 010 |
| Armhole total (back) | 048 | 051 | 054 | 057 |
| Front neck start | 036 | 039 | 042 | 045 |
| Sleeve underarm | 036 | 036 | 036 | 036 |
You’re done. A clean, wearable machine-knit T-shirt with reliable stitch counts and beginner-friendly shaping. Adjust body rows before the armhole if you want a cropped or tunic length—keep armhole and sleeve numbers the same.
Disclaimer: This pattern was generated by AI and should be reviewed for accuracy before use. While we strive for quality, AI-generated content may contain errors. Please verify measurements, stitch counts, charts, and instructions before beginning your project. Generated by purlJam.uk
Love this pattern?
Save this pattern to your free PurlJam libraryAccess your pattern anytime
Bookmark this page to access your pattern anytime