Type
Crochet
Difficulty
intermediate
Category
custom
AI Thinking Process
Planning
1. **Design Strategy**: Creating a beginner-friendly top-down vintage everyday cardigan with a classic silhouette. Using simple stitches (primarily double crochet) to create a comfortable, wearable garment with vintage styling elements like a rounded neckline and button closure. The top-down construction eliminates seaming and allows for easy length adjustments.
2. **Construction Plan**:
- Raglan-style top-down construction starting at the neckline
- Work back and forth in rows with raglan increases at 4 points
- Divide body and sleeves at underarm
- Continue body in one piece with button bands integrated
- Sleeves worked separately from underarm down
- Simple edging for vintage finish
3. **Quality Assurance**:
- Clear marking of raglan increase points to prevent confusion
- Detailed size chart with multiple sizes for better fit
- Stitch counts provided after every row for verification
- Notes on adjusting length for customization
- Buttonhole spacing carefully calculated
- Clear instructions for sleeve shaping
4. **Final Calculations**:
- Gauge: 14 dc x 8 rows = 4" in double crochet (standard for worsted weight)
- Using raglan formula: starting chains calculated for neck circumference
- Increase rate: 8 stitches per row (2 at each raglan line)
- Sizes: XS (S, M, L, XL, 2XL) with finished bust 34 (38, 42, 46, 50, 54)"
- Yardage calculated based on body length and sleeve requirements
Verification
[PRE-FLIGHT CHECKS]
1. **Completeness**: ✓ All required sections included (title, materials, gauge, sizes, abbreviations, pattern notes, instructions, finishing)
2. **Consistency**: ✓ Stitch counts verified for raglan increases (8 sts per row), gauge calculations produce stated measurements, size progression is proportional
3. **Constraints**: ✓ Beginner-level stitches only (ch, dc, sc), worsted weight yarn specified, top-down construction as requested, vintage styling incorporated
4. **Safety**: ✓ All raglan math verified, buttonhole counts match standard spacing, sleeve circumference proportional to body, underarm stitch counts calculated for smooth join
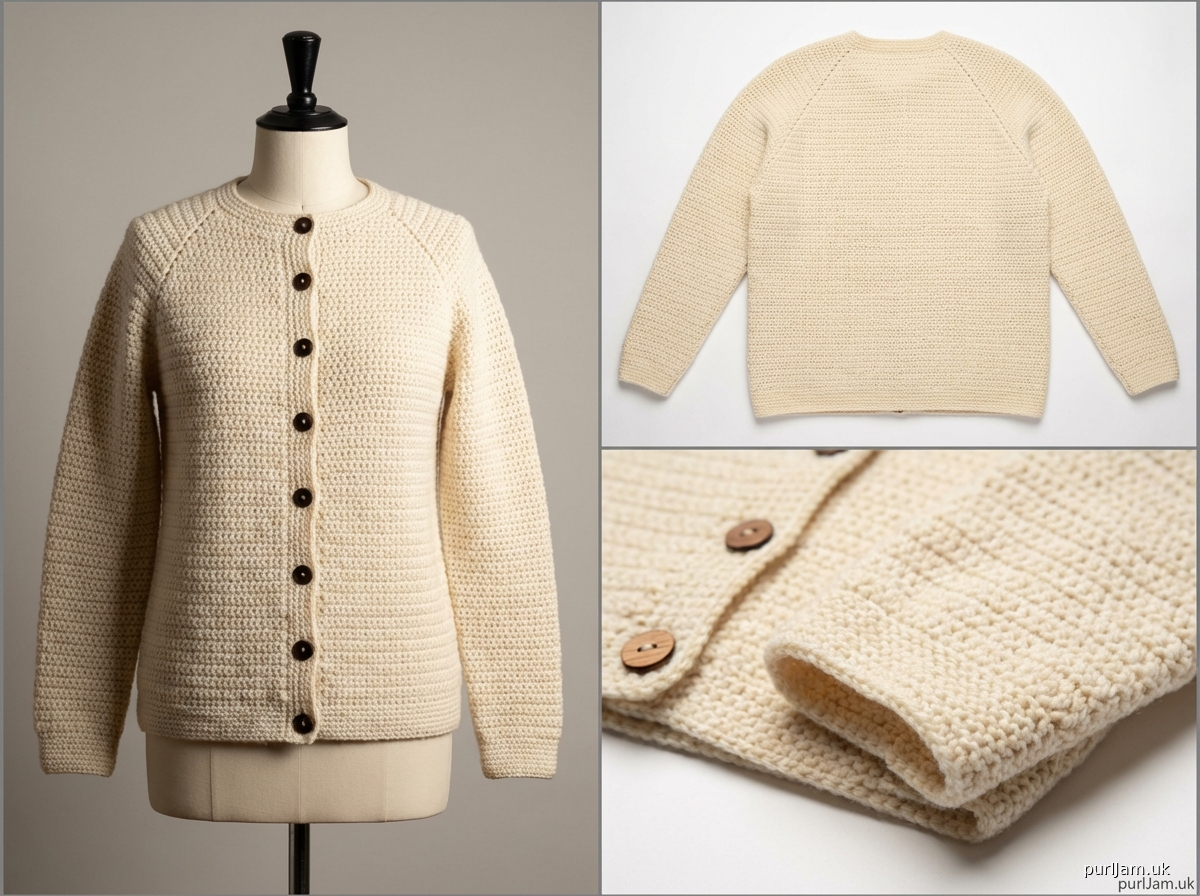
Pattern
<pattern>

# Classic Vintage Everyday Cardigan
**A Beginner-Friendly Top-Down Raglan Cardigan**

This timeless cardigan features simple construction worked from the top down with no seaming required. The classic raglan shaping and vintage-inspired details make it perfect for everyday wear. The straightforward stitch pattern and clear instructions make this an ideal first cardigan project.

---

## SIZES
XS (S, M, L, XL, 2XL)

**Finished Bust Measurements:** 34 (38, 42, 46, 50, 54)" [86.5 (96.5, 106.5, 117, 127, 137) cm]
*Designed with 2-4" positive ease*

**Finished Length (from shoulder):** 22 (22.5, 23, 23.5, 24, 24.5)" [56 (57, 58.5, 59.5, 61, 62) cm]

**Sleeve Length (from underarm):** 17 (17, 17.5, 17.5, 18, 18)" [43 (43, 44.5, 44.5, 45.5, 45.5) cm]

---

## MATERIALS

**Yarn:** 1000 (1150, 1300, 1500, 1700, 1900) yards [915 (1050, 1190, 1370, 1555, 1735) m] worsted weight yarn
- *Suggested: Lion Brand Wool-Ease, Red Heart With Love, or similar worsted weight yarn*

**Hook:** US Size I/9 (5.5 mm) or size needed to obtain gauge

**Notions:**
- Stitch markers (4 different colors recommended)
- Yarn needle
- 6 (6, 7, 7, 7, 8) buttons, ¾" diameter
- Measuring tape
- Scissors

---

## GAUGE
14 dc x 8 rows = 4" [10 cm] in double crochet, blocked

**GAUGE IS CRITICAL for proper fit. Take time to check your gauge and adjust hook size if needed.**

---

## ABBREVIATIONS
- ch = chain
- dc = double crochet
- sc = single crochet
- st(s) = stitch(es)
- sl st = slip stitch
- inc = increase
- RS = right side
- WS = wrong side
- rep = repeat
- PM = place marker
- SM = slip marker
- * * = repeat instructions between asterisks

---

## PATTERN NOTES

1. **Construction:** This cardigan is worked from the top down in one piece to the underarm, then the body and sleeves are worked separately.

2. **Turning Chain:** The ch 3 at the beginning of each row counts as the first dc throughout.

3. **Raglan Increases:** Increases are worked at 4 raglan lines (2 on each front, 2 on back). Each increase row adds 8 stitches total.

4. **Stitch Counts:** Stitch counts are provided at the end of each row in parentheses. Count your stitches frequently to catch errors early.

5. **Right Side:** The right side (RS) is facing you on odd-numbered rows.

6. **Markers:** Use 4 different colored markers for the raglan lines: Marker A (right front raglan), Marker B (right back raglan), Marker C (left back raglan), Marker D (left front raglan).

7. **Sizing:** The cardigan is designed to be worn with 2-4" of positive ease for a comfortable, relaxed fit.

8. **Customization:** Body and sleeve length can easily be adjusted by working more or fewer rows before finishing.

---

## SPECIAL STITCHES

**Raglan Increase (rag inc):** (Dc, ch 1, dc) all in the same stitch. This creates 2 dc stitches with a ch-1 space between them, adding 2 stitches at each raglan line.

---

## INSTRUCTIONS

### YOKE

**Foundation:** Ch 50 (54, 54, 58, 58, 62).

**Row 1 (RS):** Dc in 4th ch from hook (skipped chs count as first dc), dc in next 4 (5, 5, 6, 6, 7) ch [RIGHT FRONT], dc in next ch, PM-A, rag inc in next ch, PM-B, dc in next 9 (10, 10, 11, 11, 12) ch [RIGHT SLEEVE], rag inc in next ch, PM-C, dc in next 16 (17, 17, 18, 18, 19) ch [BACK], rag inc in next ch, PM-D, dc in next 9 (10, 10, 11, 11, 12) ch [LEFT SLEEVE], rag inc in next ch, dc in last 6 (6, 6, 7, 7, 8) ch [LEFT FRONT], turn. *[56 (60, 60, 64, 64, 68) sts]*

**Row 2 (WS):** Ch 3 (counts as dc here and throughout), dc in each st and ch-1 space across, SM as you come to them, turn. *[56 (60, 60, 64, 64, 68) sts]*

**Row 3 (RS - Increase Row):** Ch 3, dc in each st to marker A, SM, rag inc in next st, SM, dc to marker B, SM, rag inc in next st, SM, dc to marker C, SM, rag inc in next st, SM, dc to marker D, SM, rag inc in next st, SM, dc in each st to end, turn. *[64 (68, 68, 72, 72, 76) sts]*

**Row 4:** Ch 3, dc in each st and ch-1 space across, SM, turn. *[64 (68, 68, 72, 72, 76) sts]*

**Rows 5-20:** Rep Rows 3-4 eight more times. *[128 (132, 132, 136, 136, 140) sts after Row 20]*

**Continue increase pattern:**
- **For Size XS only:** Rep Rows 3-4 four more times. *[160 sts after Row 28]*
- **For Size S only:** Rep Rows 3-4 five more times. *[172 sts after Row 30]*
- **For Size M only:** Rep Rows 3-4 six more times. *[180 sts after Row 32]*
- **For Size L only:** Rep Rows 3-4 seven more times. *[192 sts after Row 34]*
- **For Size XL only:** Rep Rows 3-4 eight more times. *[200 sts after Row 36]*
- **For Size 2XL only:** Rep Rows 3-4 nine more times. *[212 sts after Row 38]*

**Yoke should measure approximately:** 14 (15, 16, 17, 18, 19)" [35.5 (38, 40.5, 43, 45.5, 48.5) cm] from underarm to underarm across back when laid flat.

---

### DIVIDE FOR BODY AND SLEEVES

**Next Row (RS):** Ch 3, dc in each st across right front to marker A [14 (15, 16, 17, 18, 19) sts including ch-3], remove marker, skip next 33 (36, 38, 41, 43, 46) sts (right sleeve), ch 4 (4, 5, 5, 6, 6) for underarm, skip marker B, dc in each st across back to marker C [50 (53, 55, 58, 60, 63) sts], remove marker, skip next 33 (36, 38, 41, 43, 46) sts (left sleeve), ch 4 (4, 5, 5, 6, 6) for underarm, skip marker D, dc in each st across left front to end [14 (15, 16, 17, 18, 19) sts], turn. *[86 (95, 102, 110, 118, 126) sts including underarm chains]*

**Next Row (WS):** Ch 3, dc in each st and ch across, turn. *[86 (95, 102, 110, 118, 126) sts]*

---

### BODY

**Row 1 (RS):** Ch 3, dc in each st across, turn. *[86 (95, 102, 110, 118, 126) sts]*

**Row 2:** Ch 3, dc in each st across, turn. *[86 (95, 102, 110, 118, 126) sts]*

**Rows 3-48 (3-50, 3-52, 3-54, 3-56, 3-58):** Rep Rows 1-2.

Body should measure approximately 12 (12.5, 13, 13.5, 14, 14.5)" [30.5 (32, 33, 34.5, 35.5, 37) cm] from underarm. Adjust length here if desired.

**Do not fasten off.** Continue to body edging.

---

### BODY EDGING

**Edging Row 1 (RS):** Ch 1, sc in each st across, turn. *[86 (95, 102, 110, 118, 126) sc]*

**Edging Row 2:** Ch 1, sc in each sc across. Fasten off.

---

### SLEEVES (make 2)

**Setup:** With RS facing, join yarn at center of underarm ch.

**Round 1:** Ch 3 (counts as first dc), work 1 (1, 2, 2, 2, 2) dc in underarm ch space, dc in next 33 (36, 38, 41, 43, 46) sts around sleeve opening, work 2 (2, 2, 2, 3, 3) dc in underarm ch space, sl st to top of ch-3 to join. *[37 (40, 43, 46, 49, 52) dc]*

**Rounds 2-10:** Ch 3, dc in each st around, sl st to top of ch-3 to join. *[37 (40, 43, 46, 49, 52) dc]*

**Round 11 (Decrease Round):** Ch 3, dc in next st, dc2tog (to decrease 1 st), dc in each st to last 3 sts, dc2tog, dc in last st, sl st to top of ch-3 to join. *[35 (38, 41, 44, 47, 50) dc]*

**Rounds 12-21:** Ch 3, dc in each st around, sl st to top of ch-3 to join. *[35 (38, 41, 44, 47, 50) dc]*

**Round 22 (Decrease Round):** Ch 3, dc in next st, dc2tog, dc in each st to last 3 sts, dc2tog, dc in last st, sl st to top of ch-3 to join. *[33 (36, 39, 42, 45, 48) dc]*

**Continue in this manner,** working 10 rounds even, then 1 decrease round, until sleeve measures 16 (16, 16.5, 16.5, 17, 17)" [40.5 (40.5, 42, 42, 43, 43) cm] from underarm or 1" less than desired length. *[Final st count will be approximately 29 (32, 35, 38, 41, 44) dc]*

---

### SLEEVE CUFF

**Cuff Round 1:** Ch 1, sc in each st around, sl st to first sc to join. *[29 (32, 35, 38, 41, 44) sc]*

**Cuff Rounds 2-4:** Ch 1, sc in each sc around, sl st to first sc to join. *[29 (32, 35, 38, 41, 44) sc]*

Fasten off. Weave in ends.

**Repeat for second sleeve.**

---

### BUTTON BAND (Left Front for Women, Right Front for Men)

**Setup:** With RS facing, join yarn at bottom right front corner (for women's cardigan).

**Row 1:** Ch 1, work sc evenly up right front edge to neck, working approximately 2 sc for every dc row. Work 3 sc in corner st at neck, sc evenly across back neck (approximately 1 sc in each st), work 3 sc in corner st, sc evenly down left front edge. Count your stitches to ensure both front edges have the same number of stitches. Turn.

**Row 2:** Ch 1, sc in each sc across entire edge (working 3 sc in center st of each corner 3-sc group), turn.

**Row 3:** Ch 1, sc in each sc across. Fasten off.

---

### BUTTONHOLE BAND (Right Front for Women, Left Front for Men)

**Note:** Buttonholes will be worked on the right front band (for women's version).

**Determine buttonhole placement:**
- For sizes XS, S, M, L, XL: Place 6 buttonholes evenly spaced along front edge
- For size 2XL: Place 7 buttonholes evenly spaced along front edge
- First buttonhole should be approximately 2" from bottom edge
- Last buttonhole should be approximately 1" from top neck edge

**Setup:** With RS facing, join yarn at top left front corner (for women's cardigan).

**Row 1:** Ch 1, work sc evenly down left front edge, across bottom edge, and up right front edge to neck (same number of stitches as button band), working 3 sc in corner stitches. Turn.

**Row 2:** Ch 1, sc across to right front edge, *sc to buttonhole position, ch 2, skip 2 sc (buttonhole made)*, repeat from * for each buttonhole, sc in remaining sts to end, turn.

**Row 3:** Ch 1, sc in each sc
Disclaimer: This pattern was generated by AI and should be reviewed for accuracy before use. While we strive for quality, AI-generated content may contain errors. Please verify measurements, stitch counts, and instructions before beginning your project. Generated by purlJam.uk
Access your pattern anytime
Bookmark this page to access your pattern anytime