Type
Crochet
Difficulty
intermediate
Category
amigurumi
AI Thinking Process
Planning
Verification
Pattern
Common Loon Amigurumi
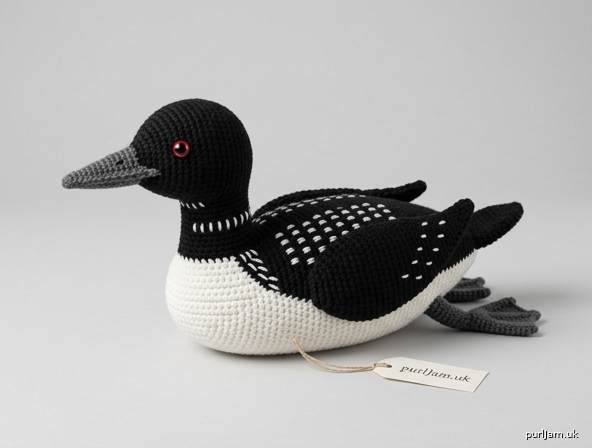
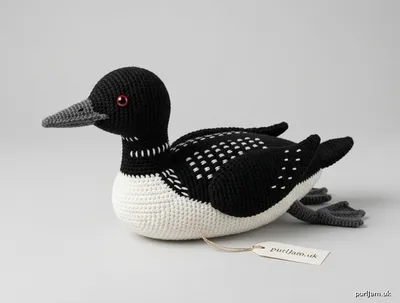
A swimming-pose common loon with a black head, white breast, embroidered necklace and back checkers, red eyes, and a pointed bill. Pieces are worked separately and sewn together.
Skill level: Intermediate (spiral amigurumi, tapestry color changes, assembly, embroidery)
Finished size: Approximately 9½ in (24 cm) long from bill tip to tail and 3½ in (9 cm) tall in a resting pose, using the yarn and hook below.
Materials
Yarn: Worsted weight (category 4)
- Color A (black): 100 yd / 91 m
- Color B (white): 40 yd / 37 m
- Color C (dark gray): 25 yd / 23 m
Hook: US E-4 / 3.5 mm, or size needed to obtain a dense fabric with no stuffing gaps
Notions:
- 12 mm (½ in) red safety eyes (1 pair)
- Polyester fiberfill
- Stitch marker
- Tapestry needle
- Straight pins
- Optional: small piece of red or white felt for eye backing; black embroidery floss for nostrils
Safety note: Safety eyes are a choking hazard. Do not use them on toys for children under 3 years. Embroider the eyes instead (see Finishing).
Gauge
6 sc and 6 rnds = 1 in (2.5 cm) in single crochet worked in the round.
Gauge is important for a firm fabric. If stuffing shows through, go down a hook size.
Abbreviations (US)
| Abbreviation | Meaning |
|---|---|
| blo | back loop only |
| ch | chain |
| dec | single crochet 2 together (invisible decrease preferred) |
| dc | double crochet |
| FO | fasten off |
| hdc | half double crochet |
| inc | 2 sc in the same stitch |
| MR | magic ring |
| rnd(s) | round(s) |
| sc | single crochet |
| sl st | slip stitch |
| st(s) | stitch(es) |
| yo | yarn over |
Pattern Notes
- Work in a continuous spiral unless a row is specified. Do not join or turn at the end of a round. Mark the first stitch of every round and move the marker up.
- Invisible decrease: Insert hook under the front loop of the next st, then under the front loop of the following st, yo, pull through both front loops, yo, pull through 2 loops.
- Color changes (body): Change color in the last yarn over of the stitch before the new color. Carry the unused color along the inside of the work and trap it every 2–3 stitches so it does not show on the right side. The start-of-round marker sits at center back (middle of the black section).
- Stuff firmly as you go, especially the head and the chest, so the bird holds a sleek, elongated shape.
- Parenthetical stitch counts are the number of stitches at the end of that round.
Head
With A (black).
Rnd 1: 6 sc in MR. (6)
Rnd 2: Inc in each st around. (6 increases → 6 + 6 = 12 ✓)
Rnd 3: *Sc 1, inc; repeat from * around. (6 increases → 12 + 6 = 18 ✓)
Rnd 4: *Sc 2, inc; repeat from * around. (6 increases → 18 + 6 = 24 ✓)
Rnd 5: *Sc 3, inc; repeat from * around. (6 increases → 24 + 6 = 30 ✓)
Rnd 6: *Sc 4, inc; repeat from * around. (6 increases → 30 + 6 = 36 ✓)
Rnd 7: *Sc 5, inc; repeat from * around. (6 increases → 36 + 6 = 42 ✓)
Rnds 8–14: Sc in each st around. (42) — 7 rounds
Safety eyes: Insert 12 mm red safety eyes between Rnds 10 and 11, 10 stitches apart across the front of the face. If using felt backing, sandwich a small felt circle behind each eye on the inside before locking the washers. Do not attach the washers until you are happy with placement.
Rnd 15: *Sc 5, dec; repeat from * around. (6 decreases → 42 − 6 = 36 ✓)
Rnd 16: Sc in each st around. (36)
Rnd 17: *Sc 4, dec; repeat from * around. (6 decreases → 36 − 6 = 30 ✓)
Rnd 18: *Sc 3, dec; repeat from * around. (6 decreases → 30 − 6 = 24 ✓)
Stuff the head firmly, shaping it slightly longer from crown to bill than from side to side.
Rnd 19: *Sc 2, dec; repeat from * around. (6 decreases → 24 − 6 = 18 ✓)
FO, leaving a 12 in (30 cm) tail for sewing. The remaining 18 stitches are the neck opening.
Body
Begin at the tail end with A (black). Place the start-of-round marker at center back and keep it there after color begins.
Rnd 1: 6 sc in MR. (6)
Rnd 2: Inc in each st around. (6 increases → 6 + 6 = 12 ✓)
Rnd 3: *Sc 1, inc; repeat from * around. (6 increases → 12 + 6 = 18 ✓)
Rnd 4: *Sc 2, inc; repeat from * around. (6 increases → 18 + 6 = 24 ✓)
Rnd 5: *Sc 3, inc; repeat from * around. (6 increases → 24 + 6 = 30 ✓)
Rnd 6: *Sc 4, inc; repeat from * around. (6 increases → 30 + 6 = 36 ✓)
Rnd 7: *Sc 5, inc; repeat from * around. (6 increases → 36 + 6 = 42 ✓)
Begin belly color. Work the first 21 sts in A (black / back) and the last 21 sts in B (white / belly) every round through Rnd 18.
Rnds 8–18: With A, sc 21; with B, sc 21. (42) — 11 rounds
(2 color changes per round; 21 + 21 = 42 ✓)
Keep the same 21/21 split while decreasing. Work each color’s decreases entirely within that color block.
Rnd 19: With A, *sc 5, dec; repeat from * 2 more times (3 decreases → 21 − 3 = 18 A ✓); with B, *sc 5, dec; repeat from * 2 more times (3 decreases → 21 − 3 = 18 B ✓). (36)
Rnds 20–21: With A, sc 18; with B, sc 18. (36)
Rnd 22: With A, *sc 4, dec; repeat from * 2 more times (3 decreases → 18 − 3 = 15 A ✓); with B, *sc 4, dec; repeat from * 2 more times (3 decreases → 18 − 3 = 15 B ✓). (30)
Rnd 23: With A, sc 15; with B, sc 15. (30)
Rnd 24: With A, *sc 3, dec; repeat from * 2 more times (3 decreases → 15 − 3 = 12 A ✓); with B, *sc 3, dec; repeat from * 2 more times (3 decreases → 15 − 3 = 12 B ✓). (24)
Rnd 25: With A, sc 12; with B, sc 12. (24)
Stuff the body firmly as you go, keeping the belly (white) down and the back (black) rounded.
Rnd 26: With A, *sc 2, dec; repeat from * 2 more times (3 decreases → 12 − 3 = 9 A ✓); with B, *sc 2, dec; repeat from * 2 more times (3 decreases → 12 − 3 = 9 B ✓). (18)
Rnd 27: With A, sc 9; with B, sc 9. (18)
FO, leaving a 12 in (30 cm) tail. Remaining 18 stitches match the head opening: 9 black (back of neck) and 9 white (throat).
Wings (make 2)
With A (black). Do not stuff, or stuff only the upper third very lightly.
Rnd 1: 6 sc in MR. (6)
Rnd 2: *Sc 1, inc; repeat from * around. (3 increases → 6 + 3 = 9 ✓)
Rnd 3: *Sc 2, inc; repeat from * around. (3 increases → 9 + 3 = 12 ✓)
Rnd 4: *Sc 3, inc; repeat from * around. (3 increases → 12 + 3 = 15 ✓)
Rnd 5: *Sc 4, inc; repeat from * around. (3 increases → 15 + 3 = 18 ✓)
Rnds 6–10: Sc in each st around. (18) — 5 rounds
Rnd 11: *Sc 4, dec; repeat from * around. (3 decreases → 18 − 3 = 15 ✓)
Rnd 12: *Sc 3, dec; repeat from * around. (3 decreases → 15 − 3 = 12 ✓)
Rnd 13: *Sc 1, dec; repeat from * around. (3 decreases → 12 − 3 = 9 ✓)
Flatten the opening so the wing is a tapered oval. Sc across the 4 + 5 sts through both layers to close, or FO and sew the opening shut. Leave a 10 in (25 cm) tail for sewing. The pointed end (Rnd 1) is the wingtip.
Legs (make 2)
With C (dark gray). Loons have short legs set far back on the body.
Rnd 1: 6 sc in MR. (6)
Rnd 2: *Sc 1, inc; repeat from * around. (3 increases → 6 + 3 = 9 ✓)
Rnds 3–7: Sc in each st around. (9) — 5 rounds
Stuff lightly. FO, leaving a 10 in (25 cm) tail. The MR end is the top (sewn to the body).
Webbed Feet (make 2)
With C (dark gray). Worked flat in rows, then edged.
Row 1: Ch 5, sc in 2nd ch from hook and in each ch across. (4)
Row 2: Ch 1, turn, inc, sc 2, inc. (4 + 2 = 6 ✓)
Row 3: Ch 1, turn, inc, sc 4, inc. (6 + 2 = 8 ✓)
Row 4: Ch 1, turn, sc 8. (8)
Row 5 (toes): Ch 1, turn, sl st in first st, *(hdc, dc, hdc) in next st, sl st in next st; repeat from * 2 more times, sl st in last st if it remains.
(3 toe clusters, each worked in 1 st, separated by sl sts, across 8 sts ✓)
Edging (webbing): Do not turn. Ch 1, sc evenly around the outer edge of the foot. Work 1 sc in each sl st and 3 sc in the dc at each toe tip so the toes flare. Join with sl st to the first edging sc. FO, leaving an 8 in (20 cm) tail.
Bill
With C (dark gray). Worked as a slim cone, slightly flattened when sewn.
Rnd 1: 4 sc in MR. (4)
Rnd 2: *Sc 1, inc; repeat from * around. (2 increases → 4 + 2 = 6 ✓)
Rnd 3: Sc in each st around. (6)
Rnd 4: *Sc 2, inc; repeat from * around. (2 increases → 6 + 2 = 8 ✓)
Rnds 5–6: Sc in each st around. (8) — 2 rounds
Rnd 7: *Sc 3, inc; repeat from * around. (2 increases → 8 + 2 = 10 ✓)
Rnds 8–10: Sc in each st around. (10) — 3 rounds
Stuff lightly, keeping the tip firm and pointed. FO, leaving a 10 in (25 cm) tail. Rnd 1 is the tip; the 10-st opening is sewn to the face.
Tail
With A (black).
Rnd 1: 6 sc in MR. (6)
Rnd 2: *Sc 1, inc; repeat from * around. (3 increases → 6 + 3 = 9 ✓)
Rnds 3–5: Sc in each st around. (9) — 3 rounds
Do not stuff. Flatten. Sc across through both layers to close, or FO and sew shut. Leave an 8 in (20 cm) tail. The closed edge is sewn to the rear of the body.
Assembly
Pin every piece and check the silhouette from the side before sewing. Use matching yarn and small, neat whipstitches. A loon is long and low; the finished bird should rest on its belly, not stand upright.
1. Bill. Center the bill on the front of the head, covering approximately Rnds 12–19, with the upper edge sitting just below the level of the eyes. The bill should project straight forward, angled a touch downward. Sew the 10-st opening in place, adding a pinch of stuffing if the base looks hollow. With C or black floss, embroider two tiny straight-stitch nostrils on the top of the bill, about ¼ in (6 mm) back from the tip.
2. Head to body. Align the head’s 18-st opening with the body’s 18-st opening. White body stitches sit at the throat (front/underside); black body stitches sit at the nape. The head is all black, so the white breast will meet black just under the chin — that is correct for a common loon. Sew around, stuffing the neck firmly before closing the last stitches so the neck does not dent.
3. Wings. Pin one wing on each side of the body, upper edge about ½ in (1.3 cm) behind the neck seam, spanning roughly body Rnds 10–16. Tips point back and slightly down, hugging the body. Sew along the upper third of each wing only, so the lower edge can sit slightly away from the body.
4. Tail. Sew the flattened tail to the center back of the tail end (over the original MR of the body), pointing slightly upward.
5. Legs. Sew the MR end of each leg to the underside rear of the body, just in front of the tail and about ¾ in (2 cm) apart. Legs should angle slightly backward and outward. This rear-set placement is essential; if the legs sit mid-body the toy will not read as a loon.
6. Feet. Sew one webbed foot to the open end of each leg, toes pointing outward and a little back, like a swimming kick. The feet should help the bird sit level on a table.
Embroidery and Finishing
All surface work uses B (white) unless noted. Keep stitches small and even.
Broken necklace: On the black neck, just above the head/body seam, embroider a collar of short horizontal satin or backstitches. Work 6–8 dashes that wrap the sides and nape, each about ¼ in (6 mm) long, with small gaps between them. Leave the white throat unmarked. This broken white collar is the common loon’s signature.
Back checkers: On the black back, between the wings and down toward the tail, embroider 4 or 5 staggered rows of small white dashes or tiny squares (2–3 wraps of satin stitch). About 5–7 marks per row. Do not fill the back solidly — a scattered checker reads more clearly at toy scale.
Wing spots: On the outer surface of each wing, embroider 2 short rows of 3–4 small white dashes, following the same checkered idea.
Optional chin dash: One short white stitch on the black chin, just above where the white breast meets the head, sharpens the face.
Embroidered eyes (under-3 option): Skip safety eyes. With red yarn, satin-stitch a ⅜ in (1 cm) oval on each side between Rnds 10 and 11, 10 sts apart. Add a tiny black or dark gray French knot pupil and a single white highlight stitch.
Weave in all remaining ends. Steam-block the feet flat if they curl, holding the iron above the fabric — do not crush the stuffed body.
The finished loon looks best in a swimming or resting pose, belly down, bill just above the “water.”
Disclaimer: This pattern was generated by AI and should be reviewed for accuracy before use. While we strive for quality, AI-generated content may contain errors. Please verify measurements, stitch counts, charts, and instructions before beginning your project. Generated by purlJam.uk
Love this pattern?
Save this pattern to your free PurlJam libraryAccess your pattern anytime
Bookmark this page to access your pattern anytime