Type
Crochet
Difficulty
intermediate
Category
amigurumi
AI Thinking Process
Planning
Verification
Pattern
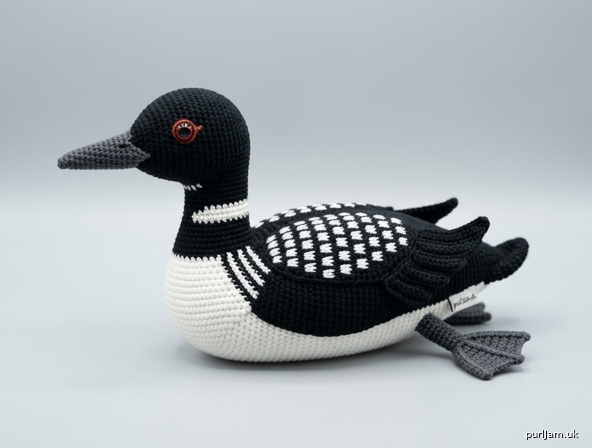
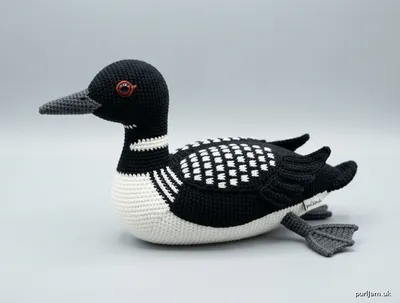
Common Loon Amigurumi Crochet Pattern
Difficulty: Advanced
Finished Size: Approximately 8.5 inches (22 cm) long from beak tip to tail, 4 inches (10 cm) tall in floating pose
Yarn Weight: Worsted (4)
Materials
- Worsted weight yarn:
- Color A (Black): 80 yd (73 m)
- Color B (White): 50 yd (46 m)
- Color C (Dark Gray): 20 yd (18 m)
- Color D (Red or rust for eyes optional accent): scrap
- US E-4 (3.5 mm) crochet hook (or size needed for tight gauge)
- 8–10 mm red or black safety eyes (red preferred for realism)
- Polyester fiberfill stuffing
- Yarn needle
- Stitch marker
- Pins for assembly
- Optional: black embroidery floss for fine feather details
Gauge
5 sc = 1 inch (2.5 cm); 11 sc = 2 inches (5 cm) in continuous sc rounds.
Work tightly so stuffing does not show. Adjust hook size if needed.
Abbreviations (US Terms)
- mr: magic ring
- sc: single crochet
- inc: 2 sc in same stitch
- invdec: invisible decrease (insert hook in FLO of next 2 sts, yo, pull through both, yo, pull through all 3 loops)
- st(s): stitch(es)
- rnd(s): round(s)
- ch: chain
- sl st: slip stitch
- BLO: back loop only
- FLO: front loop only
- [...] : total stitch count at end of round
- ( ) x N : repeat instructions in parentheses N times
- CC: color change
Work in continuous spirals unless noted. Do not join rounds. Use stitch marker in first st of each rnd and move up.
Pattern Notes
- Stuff firmly as you go, especially head and body; lightly stuff neck and wings.
- Color changes: work last yarn-over of previous st in new color. Carry unused yarn loosely inside or cut and weave ends for clean sections.
- Invisible decrease keeps surface smooth.
- Insert safety eyes before closing head.
- Advanced colorwork and surface embroidery create the iconic loon checkered back and neck bands.
Beak
With Color C (Dark Gray):
Rnd 1: 4 sc in mr [4]
Rnd 2: (sc, inc) x 2 [6]
Rnd 3: sc in each st around [6]
Rnd 4: (2 sc, inc) x 2 [8]
Rnd 5: sc in each st around [8]
Rnd 6: (3 sc, inc) x 2 [10]
Rnd 7: sc in each st around [10]
Fasten off Color C, leaving 6-inch tail. Do not stuff beak yet. Set aside; will attach to head.
Head
With Color A (Black):
Rnd 1: 6 sc in mr [6]
Rnd 2: inc in each st around [12]
Rnd 3: (sc, inc) x 6 [18]
Rnd 4: (2 sc, inc) x 6 [24]
Rnd 5: (3 sc, inc) x 6 [30]
Rnds 6–11: sc in each st around [30] (6 rnds)
Attach Beak: Position beak centered on front of head spanning Rnds 8–10. Using yarn needle and Color C tail, whipstitch beak securely to head, stuffing beak lightly with fiberfill before closing the join completely. Weave in end.
Eye Placement: Insert 8–10 mm safety eyes between Rnds 8 and 9, approximately 7–8 sts apart, centered above beak. If using black eyes, embroider a small red circle around each with Color D after assembly for loon realism. Secure washers tightly.
Rnd 12: (3 sc, invdec) x 6 [24]
Rnd 13: (2 sc, invdec) x 6 [18]
Stuff head firmly, shaping the crown rounded and cheeks full.
Rnd 14: (sc, invdec) x 6 [12]
Rnd 15: invdec x 6 [6]
Fasten off Color A, leaving long tail. Thread tail through remaining 6 sts and pull tight to close. Weave in end. Head complete.
Neck
Join Color A (Black) at base of head underside (where neck will emerge, opposite beak).
Rnd 1: Work 12 sc evenly spaced in a circle around the chosen base area, picking up sts through head fabric [12]
Rnds 2–5: sc in each st around [12] (4 rnds)
Stuff neck firmly but keep slightly flexible.
Rnd 6: (sc, inc) x 6 [18]
Do not fasten off. Continue directly into body.
(Optional neck band detail: On Rnd 4 of neck, CC to Color B for 1 rnd of sc, then return to Color A. This creates a simplified white neck ring.)
Body
Continue with Color A:
Rnd 7: (2 sc, inc) x 6 [24]
Rnd 8: (3 sc, inc) x 6 [30]
Rnd 9: (4 sc, inc) x 6 [36]
Rnd 10: (5 sc, inc) x 6 [42]
Begin belly color split (advanced intarsia-style):
Mark center front 18 sts for belly and center back 24 sts for back.
Rnds 11–18: Work sc around, changing to Color B (White) across the 18 belly sts and Color A (or C for gray accent) across the 24 back sts. Carry unused yarn inside or use bobbins. Keep tension even. [42] (8 rnds)
At Rnd 15, begin surface checkering prep if desired (see Finishing).
Rnd 19: With colors as established, (5 sc, invdec) x 6 [36]
Rnd 20: (4 sc, invdec) x 6 [30]
Stuff body very firmly, elongating slightly into a streamlined lozenge shape (wider mid-body, tapering to tail). Emphasize a flatter underside for floating stability.
Rnd 21: (3 sc, invdec) x 6 [24]
Rnd 22: (2 sc, invdec) x 6 [18]
Rnd 23: (sc, invdec) x 6 [12]
Rnd 24: invdec x 6 [6]
Fasten off, thread yarn through remaining sts, pull closed. Weave in end.
Wings (make 2)
With Color A (Black):
Rnd 1: 6 sc in mr [6]
Rnd 2: inc in each st around [12]
Rnd 3: (sc, inc) x 6 [18]
Rnds 4–6: sc in each st around [18]
Rnd 7: (sc, invdec) x 6 [12]
Rnds 8–10: sc in each st around [12]
Rnd 11: (2 sc, invdec) x 3 [9]
Rnd 12: sc in each st around [9]
Lightly stuff wing (keep flat-ish).
Rnd 13: (sc, invdec) x 3 [6]
Fasten off, leaving 12-inch tail for sewing. Flatten wing slightly into teardrop shape and whipstitch opening closed.
Legs and Webbed Feet (make 2)
Leg:
With Color C (Dark Gray):
Rnd 1: 6 sc in mr [6]
Rnd 2: (sc, inc) x 3 [9]
Rnds 3–7: sc in each st around [9] (5 rnds)
Stuff lightly. Do not close.
Webbed Foot (worked flat from leg opening):
Row 1: Ch 1, turn, sc in next 4 sts, leave remaining sts unworked [4]
Row 2: Ch 1, turn, sc in each st [4]
Row 3: Ch 1, turn, sc, inc, sc, inc [6]
Row 4: Ch 1, turn, sc in each st [6]
Fasten off, leaving long tail.
To form webbing: Fold foot so edges meet; with yarn needle, stitch 2–3 loose horizontal bars of yarn across the open side of the foot flap to create three toe divisions. Secure and weave ends. Repeat for second leg/foot.
Tail
With Color A (Black):
Rnd 1: 6 sc in mr [6]
Rnd 2: (sc, inc) x 3 [9]
Rnds 3–5: sc in each st around [9]
Rnd 6: (sc, invdec) x 3 [6]
Flatten and sc across both layers to close [3 sc]. Fasten off, leaving 8-inch tail for sewing. Lightly stuff if desired.
Assembly
- Wings: Pin wings to sides of body spanning roughly Body Rnds 12–18, angled slightly backward and folded close to body (tips pointing toward tail). Whipstitch securely along top edge and partially along front with matching yarn. Leave lower edge free for dimensional look.
- Legs/Feet: For floating/swimming pose, position legs on underside toward rear third of body, splayed slightly outward and backward. Sew tops of legs firmly to body. Feet should rest flat or slightly angled for stability so bird does not roll.
- Tail: Sew flattened tail to rear end of body, centered and slightly upturned.
- Neck-to-Body junction: Already continuous; add extra stuffing through any small gap if needed and close with a few hidden stitches.
- Balance check: Bird should rest stably on belly with feet splayed. Adjust stuffing or limb angles if it tips.
Finishing & Details
- Checkered Back (Advanced Surface Embroidery): With Color B (White), work surface slip stitches or short straight stitches in a staggered checker/grid pattern across the black/gray back section (Body Rnds 11–18). Space “checks” about 2 sts wide and 2 rnds tall. Alternate placement each row for classic loon plumage. Secure ends inside.
- Neck Striping (optional): Embroider 2–3 thin vertical white lines on sides of neck with Color B.
- Beak Detail: With black yarn or floss, embroider a fine center line down top of beak if desired.
- Eyes: If safety eyes are black, stitch a small red ring around each with Color D or embroidery floss.
- Weave in all remaining ends securely.
- Gently shape body into smooth, hydrodynamic oval. Steam-block lightly if yarn allows (do not flatten stuffing).
Safety Note
Safety eyes and firmly attached parts are required for children under 3 years. Check all seams regularly. This is a decorative/collectible piece when made with small parts.
Care
Spot clean only. Do not machine wash. Reshape and air dry if needed.
Enjoy your advanced common loon amigurumi! The colorwork and shaping capture the elegant diving bird in a charming floating pose.
Disclaimer: This pattern was generated by AI and should be reviewed for accuracy before use. While we strive for quality, AI-generated content may contain errors. Please verify measurements, stitch counts, charts, and instructions before beginning your project. Generated by purlJam.uk
Love this pattern?
Save this pattern to your free PurlJam libraryAccess your pattern anytime
Bookmark this page to access your pattern anytime