Type
Crochet
Difficulty
intermediate
Category
amigurumi
AI Thinking Process
Planning
Verification
Pattern
Penny the Piglet — Amigurumi Crochet Pattern
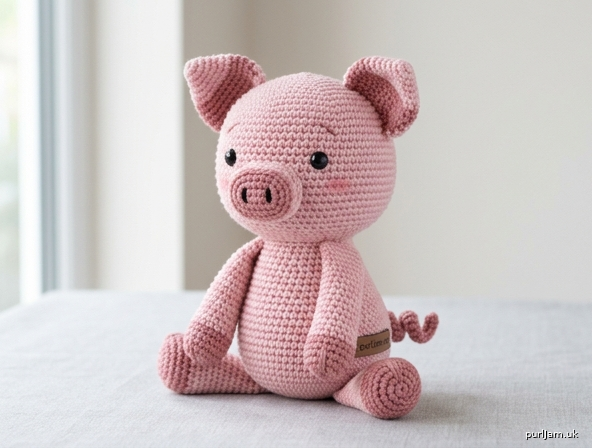
Difficulty: Intermediate Finished Size: Approximately 7" (18 cm) tall in a seated pose Design: A sweet sitting piglet with a flat snout, perky triangle ears, stubby legs, and a signature curly tail.
Materials
- Yarn: Worsted weight (weight 4) in:
- Main color (MC): Pink — approx. 120 yds
- Contrast (CC): Darker/dusty pink for snout & inner ears — approx. 20 yds
- Hook: US G-6 (4.0 mm) — sized down for tight gauge
- Safety eyes: 9 mm (pair)
- Fiberfill stuffing (polyester)
- Yarn needle for assembly and embroidery
- Stitch marker to track rounds
- Black embroidery floss or yarn for nostrils
- Optional: Pink embroidery floss for cheek blush accents
Gauge
4 sc = 1" (2.5 cm); 4 rounds = 1" (2.5 cm) Work tightly so no stuffing shows through the fabric.
Abbreviations (US Terms)
- sc – single crochet
- inc – 2 sc in same stitch (increase)
- dec – invisible decrease (insert hook in FLO of next 2 sts, yo, pull through both, yo, pull through all 3)
- st(s) – stitch(es)
- rnd – round
- FLO – front loop only
- [ ] – total stitch count at end of round
Notes: Work in continuous spirals (do not join) unless stated. Move your stitch marker up each round.
HEAD (make 1, in MC)
- Rnd 1: 6 sc in magic ring [6]
- Rnd 2: inc in each st around [12] (6 inc → 6 + 6 = 12 ✓)
- Rnd 3: (sc, inc) around [18] (6 inc → 12 + 6 = 18 ✓)
- Rnd 4: (2 sc, inc) around [24] (6 inc → 18 + 6 = 24 ✓)
- Rnd 5: (3 sc, inc) around [30] (6 inc → 24 + 6 = 30 ✓)
- Rnds 6–13: sc in each st around [30] (8 even rounds)
Insert safety eyes between Rnds 11 and 12, approximately 6 sts apart. Begin stuffing firmly now.
- Rnd 14: (3 sc, dec) around [24] (6 dec → 30 − 6 = 24 ✓)
- Rnd 15: (2 sc, dec) around [18] (6 dec → 24 − 6 = 18 ✓)
- Rnd 16: (sc, dec) around [12] (6 dec → 18 − 6 = 12 ✓)
Finish stuffing firmly.
- Rnd 17: dec around [6] (6 dec → 12 − 6 = 6 ✓)
Fasten off, leaving a long tail. Weave through remaining 6 sts and pull closed.
BODY (make 1, in MC)
- Rnd 1: 6 sc in magic ring [6]
- Rnd 2: inc in each st around [12] (6 + 6 = 12 ✓)
- Rnd 3: (sc, inc) around [18] (12 + 6 = 18 ✓)
- Rnd 4: (2 sc, inc) around [24] (18 + 6 = 24 ✓)
- Rnd 5: (3 sc, inc) around [30] (24 + 6 = 30 ✓)
- Rnd 6: (4 sc, inc) around [36] (30 + 6 = 36 ✓)
- Rnds 7–15: sc in each st around [36] (9 even rounds)
- Rnd 16: (4 sc, dec) around [30] (36 − 6 = 30 ✓)
- Rnd 17: (3 sc, dec) around [24] (30 − 6 = 24 ✓)
Stuff body firmly, keeping a wide, rounded base for a stable seated pose.
- Rnd 18: (2 sc, dec) around [18] (24 − 6 = 18 ✓)
- Rnd 19: (sc, dec) around [12] (18 − 6 = 12 ✓)
Add final stuffing.
- Rnd 20: dec around [6] (12 − 6 = 6 ✓)
Fasten off, leaving a long tail for sewing to the head. Weave through remaining 6 sts but do NOT pull fully closed — the last round becomes the neck attachment point.
SNOUT (make 1, in CC)
Worked as a flat oval disc.
- Rnd 1: 6 sc in magic ring [6]
- Rnd 2: inc in each st around [12] (6 + 6 = 12 ✓)
- Rnd 3: (sc, inc) around [18] (12 + 6 = 18 ✓)
- Rnd 4: sc in each st around [18]
Fasten off, leaving a tail for sewing. Do not stuff — it should stay flat and disc-like.
LEGS (make 4, in MC)
Short, stubby legs.
- Rnd 1: 6 sc in magic ring [6]
- Rnd 2: inc in each st around [12] (6 + 6 = 12 ✓)
- Rnds 3–7: sc in each st around [12] (5 even rounds)
Stuff lightly to moderately. Fasten off, leaving a tail for sewing. Flatten the opening slightly for easier attachment.
EARS (make 2, in MC with CC accent)
Worked flat as triangles.
Start with CC (inner ear):
- Row 1: With CC, ch 2, work 4 sc in 2nd ch from hook, turn [4]
- Row 2: inc, 2 sc, inc [6] (2 inc → 4 + 2 = 6 ✓)
Switch to MC:
- Row 3: sc across [6]
- Row 4: dec, 2 sc, dec [4] (2 dec → 6 − 2 = 4 ✓)
- Row 5: dec, dec [2] (2 dec → 4 − 2 = 2 ✓)
- Row 6: dec [1] (1 dec → 2 − 1 = 1 ✓)
Fasten off, leaving a tail. The ear forms a triangle with a CC-lined base. Fold the base slightly when sewing for a perky shape.
CURLY TAIL (make 1, in MC)
The extra stitches create a natural coil.
- Ch 16.
- Work 2 sc in the 2nd ch from hook, then 2 sc in each remaining ch across [30 sc over 15 ch] (15 × 2 = 30 ✓)
The doubling forces the strip to spiral into a curl. Fasten off, leaving a tail for sewing.
ASSEMBLY
- Attach head to body: Pin the head onto the top of the body at the open neck round. Add a little extra stuffing through the neck opening before closing. Whip stitch securely all the way around.
- Snout: Center the CC snout disc on the front of the head, spanning roughly Rnds 8–11 just below the eyes. Whip stitch around the edge, leaving the disc flat.
- Nostrils: With black floss, embroider two small vertical or oval nostrils onto the snout, spaced about 1/4" apart.
- Ears: Pin the two triangle ears to the top of the head, about 4 sts apart, with the CC inner ear facing forward. Sew the base of each ear down, folding slightly for shape.
- Legs:
- Front legs (2): Sew to the lower front of the body, angled slightly forward for a seated look.
- Back legs (2): Sew to the lower sides of the body base, splayed outward slightly to stabilize the seated pose and prevent tipping.
- Curly tail: Sew one end of the coiled tail to the center back of the body at the lower rounds. Let the curl spring naturally.
- Optional blush: Add two soft pink embroidered cheek accents below the eyes for extra character.
FINISHING & SAFETY
- Weave in all ends securely.
- Give the piglet a gentle shape by pressing the body base flat so it sits upright.
- Safety: For children under 3, replace safety eyes with embroidered eyes. Tug-test all limbs, ears, snout, and tail to confirm they are firmly attached with no loose parts.
SIZE GUIDANCE
- Worsted + G-6 hook: ~7" (18 cm) tall (as written).
- For a larger piglet (~9"), use bulky yarn and a US H-8 (5.0 mm) hook without changing stitch counts.
- For a mini piglet (~5"), use DK yarn and a US E-4 (3.5 mm) hook.
Enjoy your new little Penny the Piglet! 🐷
Disclaimer: This pattern was generated by AI and should be reviewed for accuracy before use. While we strive for quality, AI-generated content may contain errors. Please verify measurements, stitch counts, and instructions before beginning your project. Generated by purlJam.uk
Access your pattern anytime
Bookmark this page to access your pattern anytime