Type
Knitting
Difficulty
intermediate
Category
blanket
AI Thinking Process
Planning
Verification
Pattern
Corner-to-Corner Textured Throw
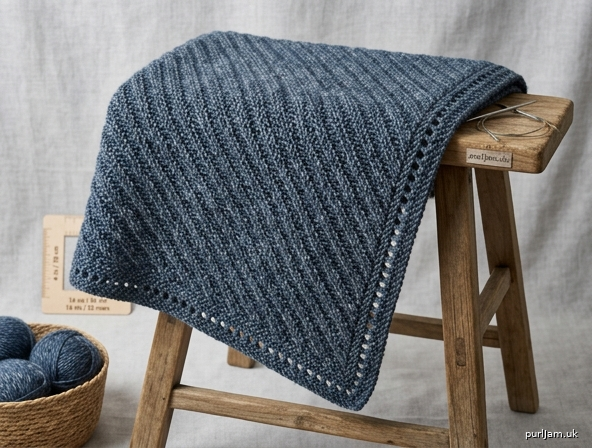
A reversible 50 × 60 in (127 × 152.5 cm) blanket worked diagonally from one corner to the opposite corner. Garter stitch creates a squishy, washable texture of diagonal ridges. A two-stitch yarn-over edge frames all four sides with a decorative eyelet border. Knit every row — no purling.
Skill level: Easy
Finished Measurements
Blocked: 50 in (127 cm) wide × 60 in (152.5 cm) long
The piece is a true rectangle after blocking. While it is on the needles it is a growing triangle, then a parallelogram; trust the side-edge measurements.
Materials
Yarn: Worsted weight (CYC 4), 2000 yd / 1830 m
A solid, tonal, or heathered yarn shows the diagonal garter ridges and the eyelet border. Self-striping or gradient yarn is also excellent here — colors stack into chevrons automatically.
Allow 10 skeins of 200 yd (183 m), or 9–10 skeins of 220 yd (201 m). Buy one extra skein if your gauge is denser than specified or if you plan tassels.
Needles: US 8 / 5 mm circular needle, 40 in (100 cm) or longer (required for the ~283 live stitches). Straight needles will not hold the work.
Notions:
- Tape measure
- 1 locking stitch marker (to mark the length edge)
- Tapestry needle
- Scissors
- Blocking mats and pins
- Optional: cardboard 5 in (12.5 cm) wide for tassels
Gauge
16 stitches and 32 rows (16 garter ridges) = 4 in (10 cm) in garter stitch, blocked.
Swatch: Cast on 24 stitches. Knit 48 rows. Bind off. Wash and block, then measure the center 4 in (10 cm).
Gauge controls drape and yardage. Size itself is obtained by measuring the side edges, so a small gauge difference still yields a 50 × 60 in blanket but will change how much yarn you use.
Abbreviations (US)
| Abbreviation | Meaning |
|---|---|
| BO | bind off |
| CO | cast on |
| k | knit |
| k3tog | knit 3 stitches together as one stitch (decrease 2) |
| st(s) | stitch(es) |
| yo | yarn over (bring yarn forward, then over the right needle to the back; counts as 1 stitch) |
Pattern Notes
- The blanket is worked flat, turning at the end of every row, on a circular needle used as a long straight needle.
- Every row is knit. Garter stitch is reversible; there is no right or wrong side.
- The decorative border is built in: every row begins K2, yo, …. On decrease rows the yo is paired with k3tog so the eyelet line continues while the stitch count drops.
- Do not count rows to reach the measurements. Measure the selvedge from the cast-on corner to the needle. Lay the piece flat and measure along the fabric edge, not along the stitches on the needle.
- Stitch counts in brackets are checkpoints only. If your count is within about 10 stitches of the number given when the side measures correctly, continue; the measurement is the instruction that matters.
- You will need the full 40 in (100 cm) cable once the work passes roughly 150 stitches.
Construction overview
- Increase section — start at Corner A. Both side edges grow until each measures 50 in (127 cm) (the finished width).
- Rectangle (shift) section — one edge (the width) is finished. The other edge (the length) continues to grow until it measures 60 in (152.5 cm). Stitch count stays even.
- Decrease section — both edges shrink to Corner C, the opposite corner, and the rectangle closes.
Pattern Rows
These three rows are the entire blanket. Read them once, then follow the section-by-section instructions.
Increase Row: K2, yo, knit to end.
(+1 st)
Shift-Decrease Row: K2, yo, k3tog, knit to end.
(−1 st; eyelet border continues)
Decrease Row: K2, yo, k3tog, knit to end.
(same as Shift-Decrease Row; −1 st)
Instructions
Increase Section (Corner A → 50 in sides)
CO 4 sts.
Work the Increase Row every row until both side edges, measured from the cast-on corner to the stitches on the needle, measure 50 in (127 cm).
Checkpoint: approximately 283 sts (4 CO + 279 increases = 283 sts ✓). The stitches on the needle form the diagonal of the triangle and will measure about 70–71 in (178–180 cm) if spread out; that is expected. Measure the side edges, not that diagonal.
Mark the length edge. Both sides are 50 in. Choose one selvedge to be the length (this edge will grow to 60 in). Clip a locking stitch marker into the fabric along that selvedge (not onto a live stitch). The unmarked selvedge is the finished width and will not grow any further.
Rectangle Section (shift to 60 in length)
Work the next two rows as a pair:
Row A (begins at the marked length edge): work the Increase Row. (+1 st)
Row B (begins at the unmarked width edge): work the Shift-Decrease Row. (−1 st)
Repeat Rows A and B until the marked length edge measures 60 in (152.5 cm) from the cast-on corner to the needle.
Checkpoint: stitch count remains 283 (one +1 and one −1 every 2 rows, net 0 ✓). The unmarked width edge stays 50 in (127 cm).
If you lose track of which row to work: begin an Increase Row whenever the marked length edge is in your left hand at the start of the row; begin a Shift-Decrease Row whenever the unmarked width edge is in your left hand.
Decrease Section (close to Corner C)
Remove the locking marker; it is no longer needed.
Work the Decrease Row every row until 5 sts remain.
Checkpoint path: 283 sts − 278 decreases = 5 sts ✓.
Finishing the corner:
Next row (5 sts): K2, yo, k3tog. 4 sts remain (2 + yo + 1 from k3tog = 4 ✓).
BO the remaining 4 sts knitwise. Cut yarn, leaving a 8 in (20 cm) tail, and pull through the last stitch.
Finishing
Weave in all ends on the “wrong” side of a garter ridge so they disappear into the fabric.
Block to size. Soak in lukewarm water with a little wool wash for 15–20 minutes. Press out water in a towel; do not wring. Pin to a 50 × 60 in (127 × 152.5 cm) rectangle: pin the four corners first, then the midpoints of each side, then ease the eyelet border out evenly. The bias fabric will look slightly diamond-shaped until it is pinned; blocking sets the rectangle. Let dry completely.
The yarn-over edge is the decorative border. After blocking, the eyelets open into a small picot-like frame on all four sides.
Optional Corner Tassels
Make 4 tassels and sew one to each corner.
Wrap worsted yarn 30 times around a 5 in (12.5 cm) piece of cardboard. Tie the wraps tightly at one end with a 12 in (30.5 cm) length of yarn (this tie is the hanging strand). Slide off the cardboard. Tie a second strand tightly about ½ in (1.25 cm) below the top to form the tassel neck. Cut the loops at the bottom and trim even. Thread the hanging strand through the corner stitch of the blanket and knot securely on the back. Weave in the ends.
Quick Reference
| Section | What you work | Stop when | Stitch count |
|---|---|---|---|
| Increase | Increase Row every row | Both sides = 50 in (127 cm) | 4 → ~283 |
| Shift | Inc on length edge, Shift-Dec on width edge | Length side = 60 in (152.5 cm) | stays ~283 |
| Decrease | Decrease Row every row | 5 sts, then final row to 4 sts, BO | ~283 → 4 |
Reversible. Machine-washable if the yarn is. No seaming.
Disclaimer: This pattern was generated by AI and should be reviewed for accuracy before use. While we strive for quality, AI-generated content may contain errors. Please verify measurements, stitch counts, charts, and instructions before beginning your project. Generated by purlJam.uk
Love this pattern?
Save this pattern to your free PurlJam libraryAccess your pattern anytime
Bookmark this page to access your pattern anytime