Type
Knitting
Difficulty
intermediate
Category
custom
AI Thinking Process
Planning
Verification
Pattern
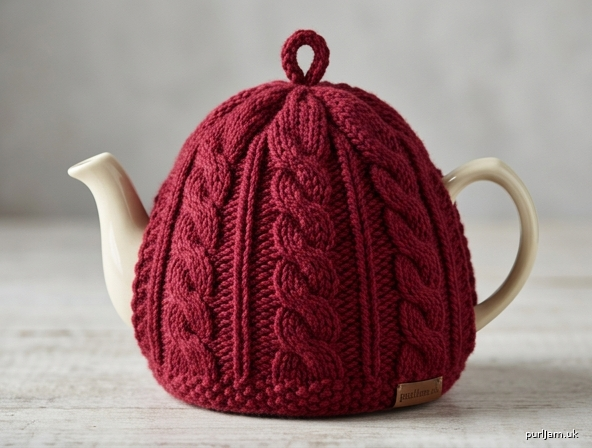
Cosy Cottage 6-Cup Cabled Teapot Cosy
A warm, chunky teapot cosy worked in soft bulky wool, featuring three vertical cable panels separated by purl "ditches" for a snug, textured hug around your teapot. Worked flat in two matching panels, then seamed with openings left for the spout and handle. Sized to fit a standard 6-cup (approx. 1.5 litre) round teapot.
Materials
- Yarn: Paintbox Yarns Wool Mix Chunky (bulky weight; 100% mix wool blend, approx. 130 m / 100 g per ball). 1 ball (approx. 90–100 m used). Choose a warm colour such as Rich Berry Red or Slate Grey.
- Needles: 6.0 mm (metric) straight or circular needles, or size needed to obtain tension.
- Notions: Cable needle, tapestry/darning needle for seaming, stitch markers, tape measure, scissors.
Tension (Gauge)
- 14 sts and 20 rows = 10 cm (4 in) over stocking stitch on 6.0 mm needles, after light blocking.
- This equals 1.4 sts per cm.
- Cable panels will draw in slightly; measure over the stocking-stitch edge areas.
Size
- To fit: Standard 6-cup round teapot (approx. 24 cm circumference at the belly, 13–14 cm tall).
- Finished cosy (each panel, flat): width approx. 20 cm, height approx. 14 cm to crown.
- Two seamed panels give an internal circumference of approx. 38–40 cm, allowing gentle loft and easy fit over spout and handle.
Abbreviations (UK)
- k – knit
- p – purl
- st(s) – stitch(es)
- k2tog – knit two together (right-leaning decrease)
- ssk – slip, slip, knit the two slipped sts together (left-leaning decrease)
- C6F – Cable 6 Front: slip next 3 sts onto cable needle, hold at front, k3, then k3 from cable needle
- RS / WS – right side / wrong side
- rep – repeat
- rem – remaining
Pattern Notes
- The cosy is made as two identical panels worked flat, then seamed along both sides. The seams are left partly open to accommodate the spout and the handle.
- Each panel contains three 6-stitch cable panels worked over a purl-ribbed background.
- C6F is worked every 8th row on the RS to create the twisted rope cables.
- Slip the first stitch of every row purlwise with yarn at back to create a tidy chain edge for seaming — this is included in the counts below (edge sts are the 2 knit sts at each end).
- Read RS rows right-to-left, WS rows left-to-right.
PANEL (make 2 identical)
Cast on
Cast on 28 sts.
Stitch layout check: 2 (edge) + 6 (cable) + 3 (purl) + 6 (cable) + 3 (purl) + 6 (cable) + 2 (edge) = 28 sts ✓
Ribbed hem
Row 1 (RS): k2, [p1, k1] to last 2 sts, k2. (28 sts) Row 2 (WS): k2, [k1, p1] to last 2 sts, k2. Rep Rows 1–2 once more. (4 rows of moss-edged rib worked)
Establish cable pattern
Set-up and work the 8-row cable repeat as follows.
Row 1 (RS): k2, k6, p3, k6, p3, k6, k2. Check: 2+6+3+6+3+6+2 = 28 ✓ Row 2 (WS): k2, p6, k3, p6, k3, p6, k2. Row 3 (RS): k2, k6, p3, k6, p3, k6, k2. Row 4 (WS): as Row 2. Row 5 (RS): k2, k6, p3, k6, p3, k6, k2. Row 6 (WS): as Row 2. Row 7 (RS — cable row): k2, C6F, p3, C6F, p3, C6F, k2. Row 8 (WS): as Row 2.
Work Rows 1–8 of the cable repeat twice total (16 rows), then work Rows 1–4 once more (4 rows).
Rows worked so far on panel: 4 (rib) + 16 + 4 = 24 rows. Body height ≈ 24 rows ÷ 20 rows per 10 cm = 12 cm ✓ (before crown).
You should now be on a WS row just completed; the next row is a RS row.
Crown shaping
The crown decreases the 28 sts down to 10 sts, gathered closed to form the dome.
Decrease Row 1 (RS): k2, [ssk, k2, k2tog], p3, [ssk, k2, k2tog], p3, [ssk, k2, k2tog], k2. Each cable panel: 6 → 4 sts. Total: 2 + 4 + 3 + 4 + 3 + 4 + 2 = 22 sts (28 − 6 = 22 ✓).
Row 2 (WS): k2, p4, k3, p4, k3, p4, k2. (22 sts)
Decrease Row 3 (RS): k2, [ssk, k2tog], p3, [ssk, k2tog], p3, [ssk, k2tog], k2. Each cable panel: 4 → 2 sts. Total: 2 + 2 + 3 + 2 + 3 + 2 + 2 = 16 sts (22 − 6 = 16 ✓).
Row 4 (WS): k2, p2, k3, p2, k3, p2, k2. (16 sts)
Decrease Row 5 (RS): k2, k2tog, [p3tog is not used — see note], continuing as: k2, k2tog, k1, k2tog, k1, k2tog, k2. To keep it simple, work Row 5 as: k1, [k2tog] across to last st, k1. 16 sts: k1 (1) + k2tog ×7 (14 sts → 7) + k1 (1) = 9 sts (1 + 7 + 1 = 9 ✓).
Row 6 (WS): p across. (9 sts)
Finish the panel
Cut yarn leaving a 20 cm tail. Thread tail through a tapestry needle, slip the remaining 9 sts off the needle and through the tail, pull snug to gather the crown, and secure with a couple of small stitches. Do not cut the crown tails yet — you will use them to join the dome.
Make the second panel identically.
Finishing / Making Up
-
Block both panels lightly to 20 cm wide × 14 cm tall, opening out the cables. Allow to dry fully.
-
Join the crown: Place the two panels wrong-sides together with cables matching. Use the crown tails to stitch the two gathered tops firmly together so the dome sits centred.
-
Side seams with openings: Lay the panels flat, right sides together, aligning the ribbed hems.
- Seam A (from hem upward): Starting at the bottom hem, use mattress stitch through the slipped chain edges to seam up 4 cm, then leave a 6 cm opening (for the handle), then seam the remaining distance up to the crown.
- Seam B (opposite side): Starting at the bottom hem, seam up 4 cm, then leave a 5 cm opening (for the spout), then seam the remaining distance up to the crown.
- Tip: Test-fit over your teapot before finalising the openings — adjust the opening heights to match your pot's spout and handle positions.
-
Weave in all remaining ends on the wrong side.
-
Optional top loop: Using a double strand, make a small crochet chain or knitted i-cord loop (approx. 5 cm) at the very crown for easy lifting; secure firmly.
-
Final block the seamed cosy over the teapot (with the pot cool and dry) to set the shape.
Fit Check Summary
- Each panel: 28 sts cast on, 24 body rows (12 cm) + 6 crown rows = 30 rows total.
- Crown decrease sequence: 28 → 22 → 16 → 9 sts, gathered. ✓
- Seamed circumference: 2 × 20 cm = 40 cm flat, hugging a ~24 cm teapot with cosy loft and stretch. ✓
Enjoy your snug, cabled teapot cosy — perfect for keeping six cups' worth of tea beautifully warm.
Disclaimer: This pattern was generated by AI and should be reviewed for accuracy before use. While we strive for quality, AI-generated content may contain errors. Please verify measurements, stitch counts, and instructions before beginning your project. Generated by purlJam.uk
Access your pattern anytime
Bookmark this page to access your pattern anytime