Type
Knitting
Difficulty
beginner
Category
socks
AI Thinking Process
Planning
Verification
Pattern
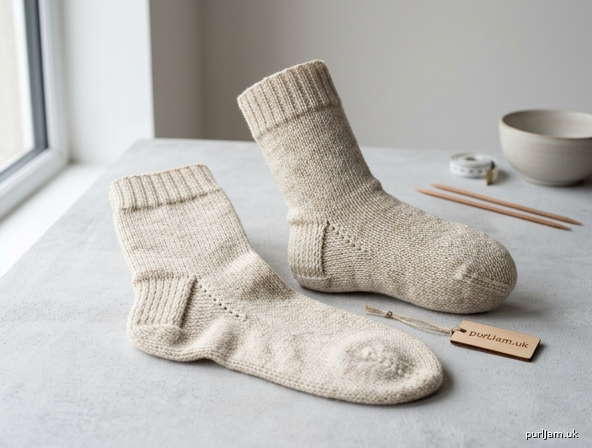
Cosy Cuff-Down Socks
Beginner · Aran (worsted) weight · knitted in the round from the cuff down
A warm, everyday pair of socks worked from the cuff down with a traditional heel flap and gusset. This construction is the most straightforward for a first pair: you start at the top, you can try the sock on as you go, and you never have to guess the foot length in advance. The pattern makes a pair (two identical socks) — work the second sock exactly as the first.
Skill level
Beginner. You should already be comfortable with knit, purl, and knitting in the round. Decreases (k2tog, ssk, p2tog) and grafting (Kitchener stitch) are taught in the pattern.
Sizes
Small (Medium, Large)
Instructions are written for Small, with Medium and Large in parentheses. When only one number is given, it applies to all sizes.
To fit foot circumference (measured around the ball of the foot): 18–19.5 (20–22, 23.5–26) cm / 7–7¾ (8–8¾, 9¼–10¼) in
Finished sock circumference (unstretched): 16.5 (18, 22) cm / 6½ (7, 8¾) in
Socks are designed with about 10% negative ease so they cling and stay up.
Typical finished foot length (adjust to fit): 22 (24, 27) cm / 8¾ (9½, 10½) in, including the toe.
Cuff + leg length is given as 15 (16, 17) cm / 6 (6¼, 6¾) in from the cast-on edge to the start of the heel flap; you may lengthen or shorten the leg freely.
Materials
Yarn Aran weight yarn (US worsted / 10-ply), approximately 180 (220, 280) metres / 197 (240, 306) yards for the pair.
A wool or wool–nylon blend (about 75% wool / 25% nylon) is ideal: wool for warmth and bounce, nylon for a longer-wearing heel and toe. Superwash is easier to launder. Smooth, light-coloured yarn makes the stitches easier to see on a first pair.
Needles 3.75 mm (UK 9) needles in one of the following:
- a set of 5 double-pointed needles (DPNs), or
- one 80 cm circular needle for magic loop, or
- two 40 cm circular needles (two-circulars method).
A 4 mm (UK 8) needle is useful if you cast on tightly (use it only for the cast-on, then change to 3.75 mm).
Notions
- Stitch marker (beginning of round); 2 optional side markers
- Tapestry needle
- Scissors
- Tape measure
Tension (gauge)
22 stitches and 30 rounds = 10 cm / 4 in over stocking stitch knitted in the round on 3.75 mm needles, after a light steam or wet block.
Work a circular swatch (or the cuff of the first sock) and measure it. Tension is critical for socks:
- Too few stitches per 10 cm (fabric too loose): the socks will slop about, pill, and wear out quickly.
- Too many stitches per 10 cm (fabric too tight): they will be uncomfortable and may not fit over the heel.
If you have more than 22 sts to 10 cm, go up a needle size. If you have fewer, go down a needle size. Do not simply change the stitch count to “make it work” unless you are confident redesigning the heel and toe.
Abbreviations
BOR — beginning of round cm — centimetre(s) DPN(s) — double-pointed needle(s) in — inch(es) k — knit k2tog — knit 2 stitches together (right-leaning decrease) m — metre(s) p — purl p2tog — purl 2 stitches together pwise — purlwise (as if to purl) rem — remain(ing) rep — repeat rnd(s) — round(s) RS — right side sl — slip stitch from left needle to right needle without knitting it ssk — slip 1 knitwise, slip 1 knitwise, insert left needle into the fronts of both slipped stitches and knit them together (left-leaning decrease) st(s) — stitch(es) st st — stocking stitch (knit every round in the round; knit on RS / purl on WS when working flat) WS — wrong side wyib — with yarn in back wyif — with yarn in front
Pattern notes
A pair. The instructions are for one sock. Make two.
Needle method. Choose one and stay with it.
- DPNs (4 working needles + 1 empty): divide the stitches evenly on 4 needles. The empty needle is always the one you knit onto. The yarn joins between needle 4 and needle 1 — that join is the BOR.
- Magic loop: divide the stitches in half on one long circular needle, with a loop of cable at each side. One half is the back-of-leg / sole; the other half is the front-of-leg / instep.
- Two circulars: half the stitches on each needle, same split as magic loop.
Distributing the cast-on. 36 (40, 48) sts divide evenly: 9 (10, 12) sts on each of 4 DPNs, or 18 (20, 24) sts on each half for magic loop / two circulars. ✓
Joining in the round. Lay the work flat and check that the cast-on edge is not twisted before you join. A twist cannot be undone later.
Trying on. After the gusset, you can slip the sock onto your foot (carefully, on the needles or onto spare yarn) to check length as you go. That is the great advantage of cuff-down socks.
Ladder prevention. Keep the first stitch of each needle (or of each magic-loop half) snug. A gentle tug on the second stitch after you start a new needle usually closes the gap.
Construction map. Cuff in k2, p2 rib → stocking-stitch leg → heel flap on half the stitches (worked flat) → heel turn (short rows) → pick up gusset stitches along the flap → decrease the gusset back to the original stitch count → stocking-stitch foot → wedge toe → Kitchener stitch.
Instructions
Work both socks the same.
Cuff
Using 3.75 mm needles and a stretchy method (long-tail is fine if you do not pull it tight; a needle one size larger for the cast-on only also helps), cast on 36 (40, 48) sts.
Join to work in the round, being careful not to twist, and place a marker for BOR.
Rib round: *K2, p2; rep from * to end of round.
This rib fits the stitch count exactly: 36 (40, 48) is divisible by 4. ✓
Repeat the Rib round until the cuff measures 5 cm / 2 in from the cast-on edge.
Leg
Next round: Knit all stitches.
Continue in stocking stitch (knit every round) until the piece measures 15 (16, 17) cm / 6 (6¼, 6¾) in from the cast-on edge, or until the leg is the length you want before the heel. End at BOR.
The fabric should be a firm, even stocking stitch — not stiff, but not drapey.
Heel flap
The heel flap is worked flat, back and forth on half the stitches. The remaining stitches sit on hold and become the instep.
Set-up: Knit 18 (20, 24) sts. These are the heel stitches. Turn. The remaining 18 (20, 24) sts are the instep; leave them on a spare needle, on the cable, or on a holder. ✓
The slipped-stitch pattern thickens the fabric so the heel wears longer, and the slipped edge stitches form a neat chain that is easy to pick up later.
Row 1 (RS): *Sl 1 pwise wyib, k1; rep from * to end of heel stitches. Turn. Row 2 (WS): Sl 1 pwise wyif, purl to end. Turn.
Repeat Rows 1–2 until you have worked 18 (20, 24) rows in total, ending with a WS (purl) row. You will have 9 (10, 12) slipped-stitch chains along each side of the flap — one chain for every two rows. ✓
The flap should look roughly square.
Heel turn
Short rows now cup the heel. You will see a small gap each time you turn; the decrease (ssk or p2tog) always eats the stitch before the gap together with the stitch after it.
Row 1 (RS): Sl 1 pwise wyib, k8 (10, 12), ssk, k1, turn. Row 2 (WS): Sl 1 pwise wyif, p2 (4, 4), p2tog, p1, turn. Row 3: Sl 1 pwise wyib, knit to 1 st before the gap, ssk, k1, turn. Row 4: Sl 1 pwise wyif, purl to 1 st before the gap, p2tog, p1, turn.
Repeat Rows 3–4 a further 3 (3, 4) times.
You now have 10 (12, 14) heel stitches remaining, and no stitches left waiting beyond the gaps. Ending after a WS row. ✓
(If on the very last decrease you do not have a stitch left to k1 or p1 after the ssk/p2tog, simply work the decrease and turn.)
Gusset
You will now pick the sock back up into the round: knit across the heel, pick up stitches down one side of the flap, knit the instep, pick up up the other side, and return to the centre of the heel. That centre becomes the new BOR so the gusset decreases sit neatly at each side of the foot.
Pick-up round (RS):
- Knit across the 10 (12, 14) heel stitches.
- Pick up and knit 9 (10, 12) sts down the left side of the heel flap — one stitch in each slipped-stitch chain. (If a small hole remains at the corner between flap and instep, pick up one extra stitch in the corner and knit it together with the next stitch on the following round, so the count stays the same.)
- Knit across the 18 (20, 24) instep stitches.
- Pick up and knit 9 (10, 12) sts up the right side of the heel flap, matching the first side.
- Knit 5 (6, 7) stitches (half of the remaining heel stitches) so that the round now begins at the centre of the heel. Place BOR marker.
Stitch count after pick-up: 10 (12, 14) heel + 9 (10, 12) left + 18 (20, 24) instep + 9 (10, 12) right = 46 (52, 62) sts. ✓
Needle map (optional but helpful):
- DPNs: Needle 1 — remaining half-heel + left pickup (the stitches before the instep). Needles 2 and 3 — instep, 9 (10, 12) sts each. Needle 4 — right pickup + first half-heel. BOR is at the centre of the heel, between needle 4 and needle 1.
- Magic loop / two circulars: Sole/gusset half on one needle, instep half on the other. You may place a marker each side of the 18 (20, 24) instep stitches.
Gusset decrease round: Knit to 3 sts before the instep, k2tog, k1; knit the 18 (20, 24) instep stitches; k1, ssk, knit to BOR. (2 sts decreased.)
Plain round: Knit all stitches.
Repeat the last 2 rounds a further 4 (5, 6) times — that is 5 (6, 7) decrease rounds in total.
Stitches remaining: 46 − 10 = 36 (52 − 12 = 40, 62 − 14 = 48). ✓
You are back to the original stitch count. The extra triangles of fabric at each side of the ankle are the gussets; they give the heel room to flex.
Foot
Work even in stocking stitch (knit every round) on 36 (40, 48) sts until the foot measures 4 (4.5, 5) cm / 1½ (1¾, 2) in shorter than the desired total foot length, measuring from the back of the heel (the fold at the bottom of the heel flap, not from the needles).
Trying on: slip the stitches onto a length of smooth waste yarn and try the sock on. The unmet length should be the toe — about 4–5 cm. Resume on the working needles when you are happy.
If you do not have the recipient’s foot, these are typical adult finished lengths from back of heel to tip of toe, so you would start the toe when the foot measures about 18 (19.5, 22) cm / 7 (7¾, 8¾) in from the back of the heel:
- Small: 22 cm / 8¾ in total
- Medium: 24 cm / 9½ in total
- Large: 27 cm / 10½ in total
Toe
The toe is a simple wedge: four decreases every other round, two on the sole side and two on the instep side.
Arrange the stitches if needed so that 18 (20, 24) sts sit on the instep and 18 (20, 24) sts sit on the sole, with the sides of the foot at the two boundaries. BOR at the start of the sole is convenient. ✓
Decrease round: K1, ssk, knit to 3 sts before the side (end of sole), k2tog, k1; k1, ssk, knit to 3 sts before the end of instep, k2tog, k1. (4 sts decreased.)
Plain round: Knit all stitches.
Repeat the last 2 rounds until 12 (12, 16) sts remain: 6 (6, 8) on the sole and 6 (6, 8) on the instep.
Count check: 36 (40, 48) − 12 (12, 16) = 24 (28, 32) sts decreased; 24 (28, 32) ÷ 4 = 6 (7, 8) decrease rounds. ✓
Cut the yarn, leaving a tail about 40 cm / 16 in long.
Finishing — Kitchener stitch (grafting the toe)
Hold the sock so the two needles are parallel, with the instep needle at the front and the sole needle at the back, yarn coming from the right-hand end of the back needle. You should have 6 (6, 8) sts on each needle.
Thread the tail onto a tapestry needle.
Set-up (once only):
- Front needle: insert the tapestry needle purlwise into the first stitch, and leave the stitch on the needle.
- Back needle: insert the tapestry needle knitwise into the first stitch, and leave the stitch on the needle.
Repeat these 4 movements until 1 stitch remains on each needle:
- Front: insert knitwise, slip that stitch off the needle.
- Front: insert purlwise into the new first stitch, leave it on.
- Back: insert purlwise, slip that stitch off the needle.
- Back: insert knitwise into the new first stitch, leave it on.
Keep the tension of the grafted stitches matching the knitted fabric — snug, not cinched.
Final two stitches: Front: knitwise and off. Back: purlwise and off.
A mnemonic many knitters use after the set-up is: “Front: knit off, purl on. Back: purl off, knit on.”
Weave in the tail on the inside. Weave in the cast-on tail at the cuff.
Second sock
Work the second sock exactly as the first so you have a pair.
Making up and care
Block the socks lightly: soak in lukewarm water with a little wool wash, press out water in a towel (do not wring), and lay flat to dry, gently shaping the foot and heel. Do not stretch the ribbing.
If the yarn is not superwash, wash by hand and dry flat. Superwash pairs may be washed on a gentle cycle in a mesh bag; still dry them flat to keep the fabric from growing.
Beginner tips
- Count often. After the heel turn you should have 10 (12, 14) sts; after pickup 46 (52, 62); after the gusset 36 (40, 48); at the toe 12 (12, 16). If a number is wrong, it is easier to fix it at that moment than later.
- Slipped chains are your friends. When picking up the gusset, slide the needle under both legs of each chain along the flap edge for a tidy, strong join.
- Watch the join. The first stitch of each needle (or magic-loop half) likes to loosen. Give the working yarn a gentle tug after that stitch.
- SSK vs k2tog. On the gusset and toe, ssk leans left and k2tog leans right; together they draw the fabric in toward the centre line of each side of the foot. Do not substitute one for the other or the decrease lines will slant the wrong way.
- First pair? Light-coloured, smooth yarn and good light make the heel-turn gaps much easier to see.
These are warm, casual socks — denser and thicker than fine fingering-weight dress socks. Wear them around the house, in boots, or anywhere you want a bit of knitted comfort.
Disclaimer: This pattern was generated by AI and should be reviewed for accuracy before use. While we strive for quality, AI-generated content may contain errors. Please verify measurements, stitch counts, charts, and instructions before beginning your project. Generated by purlJam.uk
Love this pattern?
Save this pattern to your free PurlJam libraryAccess your pattern anytime
Bookmark this page to access your pattern anytime