Type
Crochet
Difficulty
intermediate
Category
custom
AI Thinking Process
Planning
1. **Design Strategy**: A couture bustier cup requires precise shaping, structure, and support. I'll design individual cups worked from the bottom up with strategic increases to create a 3D shape. Advanced techniques will include structured foundation, underwire channel, dart shaping, and decorative edging. The design will feature a foundation row with wire channel, dome shaping through calculated increases, and attachment points for band/straps.
2. **Construction Plan**: Each cup will be worked separately in turned rows from the underbust foundation upward. Construction includes:
- Foundation row with folded wire channel
- Dart shaping through short rows and strategic increases
- Graduated increases for cup curve
- Reinforced top edge
- Side and center attachment points
Pattern will provide instructions for B, C, and D cup sizes with adjustable depth
3. **Quality Assurance**: Critical considerations:
- Precise stitch counts for symmetrical cups (left and right mirror images)
- Firm gauge essential for support structure
- Clear marking for underwire placement
- Reinforcement areas clearly indicated
- Strap and band attachment points specified
- Blocking instructions for shape retention
4. **Final Calculations**:
- Gauge: 18 sts × 10 rows = 4" in hdc (firm tension)
- Cup base width: B=5.5", C=6", D=6.5" (25-27-29 sts)
- Cup depth: B=6", C=6.5", D=7" (15-16-18 rows)
- Increases calculated for 3D dome projection
Verification
[PRE-FLIGHT CHECKS]
1. **Completeness**: Pattern includes title, materials, gauge, 3 sizes, abbreviations, notes, full instructions for both cups, finishing, and assembly
2. **Consistency**: Stitch counts verified for each row across all sizes; increases mathematically correct for dome shaping
3. **Constraints**: Advanced level appropriate with short rows, precise shaping, structural elements, and couture finishing techniques
4. **Safety**: All increases/decreases calculated; stitch counts marked at end of each row; foundation math verified for each size
Pattern
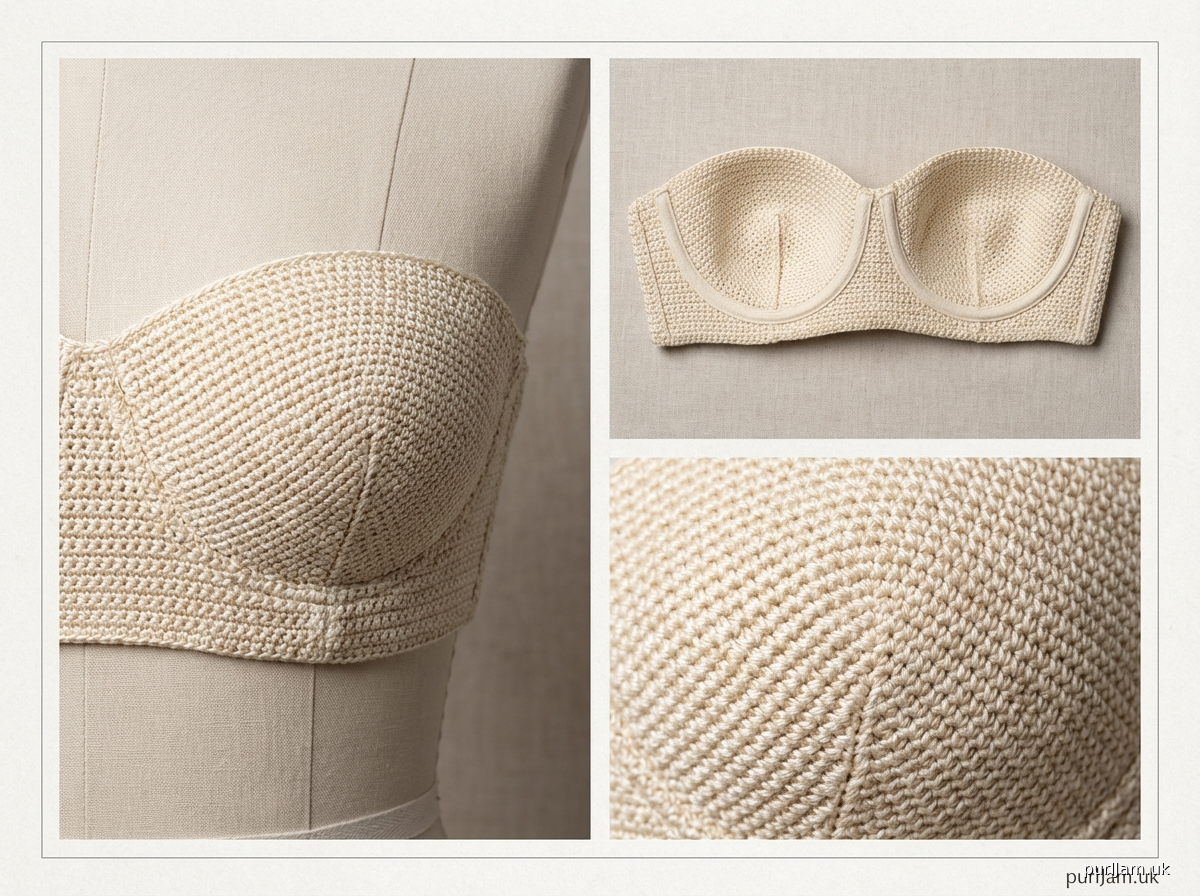
<pattern>

# COUTURE STRUCTURED BUSTIER CUP

A professionally constructed bustier cup designed for advanced crocheters. This pattern creates a single structured cup with underwire channel, engineered shaping, and reinforced edges suitable for incorporation into custom corsetry, bustiers, or formal wear. The cup is worked flat from the bottom up with calculated dart shaping and 3D dome construction.

**Finished Measurements:**
- Size B Cup: 5.5" width × 6" depth
- Size C Cup: 6" width × 6.5" depth
- Size D Cup: 6.5" width × 7" depth

---

## MATERIALS

**Yarn:**
- Worsted weight yarn (#4 Medium), 100% mercerized cotton recommended for structure and support
- Yardage: 100-120 yards per cup (200-240 yards for pair)
- Sample shown in Omega Sinfonia (100% mercerized cotton, 153 yds/50g)

**Hook:**
- US G/6 (4.0 mm) for firm gauge - SIZE MATTERS for structural integrity
- Go down a hook size if needed to achieve firm fabric

**Notions:**
- Underwire (size 34B, 34C, or 34D or appropriate for bust size)
- Stitch markers (4)
- Tapestry needle
- 1/4" grosgrain ribbon for channeling (8" per cup)
- Sewing needle and thread to match
- Optional: Boning for side seams (6" pieces)
- Optional: Power mesh for interior lining

---

## GAUGE

**18 sts × 10 rows = 4" (10 cm) in hdc, worked firmly**

Gauge is CRITICAL for this project. The fabric must be firm enough to provide support but not so tight it loses elasticity. Block your gauge swatch and remeasure.

⚠️ **IMPORTANT:** If your gauge is too loose, the cup will not provide adequate support. If too tight, it will be uncomfortable.

---

## ABBREVIATIONS

- ch = chain
- st(s) = stitch(es)
- hdc = half double crochet
- dc = double crochet
- sc = single crochet
- sl st = slip stitch
- inc = increase (2 sts in same st)
- dec = decrease (hdc2tog unless otherwise specified)
- RS = right side
- WS = wrong side
- BLO = back loop only
- FLO = front loop only
- sk = skip
- sp = space
- PM = place marker
- sm = slip marker

---

## PATTERN NOTES

1. **Direction of Work:** Each cup is worked separately in turned rows from the bottom edge (underbust) upward.

2. **Stitch Counts:** Stitch counts at the end of rows appear in parentheses like this: (25 sts). COUNT YOUR STITCHES at the end of every row.

3. **Turning Chain:** Ch-2 at beginning of rows counts as first hdc throughout unless otherwise stated.

4. **Sizing:** Instructions are written for Size B (C, D). When only one number appears, it applies to all sizes.

5. **Making a Pair:** Work the pattern as written for the RIGHT cup. For the LEFT cup, work as a mirror image by reversing all shaping (increases/decreases on opposite ends).

6. **Underwire Channel:** Rows 1-2 create a folded channel. The underwire will be inserted during finishing.

7. **Firm Tension:** Work with slightly tighter tension than usual for structural stability.

8. **Sample shown in Size C.**

---

## SPECIAL STITCHES

**Foundation Half Double Crochet (fhdc):**
Ch 2, yo, insert hook in first ch (closest to hook), yo and pull up loop (3 loops on hook), yo and pull through 1 loop (ch made), yo and pull through all 3 loops (hdc made). *Yo, insert hook under 2 loops of ch just made, yo and pull up loop, yo and pull through 1 loop (ch made), yo and pull through all 3 loops; rep from * for indicated number of foundation stitches.

**Half Double Crochet 2 Together (hdc2tog):**
[Yo, insert hook in next st, yo and pull up loop] twice (5 loops on hook), yo and pull through all 5 loops.

**Short Row:**
Work across indicated stitches, then turn, leaving remaining stitches unworked.

---

## INSTRUCTIONS

### RIGHT CUP

**Foundation Row (RS):** Work 25 (27, 29) fhdc. Do not turn. (25, 27, 29 sts)

**Row 1 (RS):** Ch 1, working in bottom loops of foundation, sc in each st across. Turn. (25, 27, 29 sts)
*This creates the fold line for the underwire channel.*

**Row 2 (WS):** Ch 2 (counts as hdc), hdc in each st across. Turn. (25, 27, 29 sts)
*The underwire channel is now formed between Foundation Row and Row 2.*

**Row 3 (RS):** Ch 2, hdc in next 4 (5, 6) sts, 2 hdc in next st, hdc in next 14 (15, 16) sts, 2 hdc in next st, hdc in last 5 (6, 6) sts. Turn. (27, 29, 31 sts)

**Row 4 (WS):** Ch 2, hdc in each st across. Turn. (27, 29, 31 sts)

**Row 5 (RS):** Ch 2, hdc in next 5 (6, 7) sts, 2 hdc in next st, hdc in next 14 (15, 16) sts, 2 hdc in next st, hdc in last 6 (6, 7) sts. Turn. (29, 31, 33 sts)

**Row 6 (WS):** Ch 2, hdc in each st across. Turn. (29, 31, 33 sts)

**Begin Dart Shaping:**

**Row 7 (RS):** Ch 2, hdc in next 6 (7, 8) sts, 2 hdc in next st, hdc in next 6 (7, 7) sts, PM, hdc in next 2 (2, 3) sts, 2 hdc in next st, hdc in next 2 (2, 3) sts, PM (this marks dart center), hdc in next 6 (7, 7) sts, 2 hdc in next st, hdc in last 7 (7, 8) sts. Turn. (32, 34, 36 sts)
*Markers indicate the dart apex, which will create projection.*

**Row 8 (WS):** Ch 2, hdc in each st across, sm as you come to them. Turn. (32, 34, 36 sts)

**Row 9 (RS):** Ch 2, hdc in next 7 (8, 9) sts, 2 hdc in next st, hdc to 2 sts before first marker, 2 hdc in next st, hdc in next st, sm, hdc in next 4 (4, 5) sts, sm, hdc in next st, 2 hdc in next st, hdc to last 9 (10, 11) sts, 2 hdc in next st, hdc in last 8 (9, 10) sts. Turn. (36, 38, 40 sts)

**Row 10 (WS):** Ch 2, hdc in each st across, sm. Turn. (36, 38, 40 sts)

**Row 11 (RS):** Ch 2, hdc in next 8 (9, 10) sts, 2 hdc in next st, hdc to 2 sts before first marker, 2 hdc in next st, hdc in next st, sm, hdc in next 4 (4, 5) sts, sm, hdc in next st, 2 hdc in next st, hdc to last 10 (11, 12) sts, 2 hdc in next st, hdc in last 9 (10, 11) sts. Turn. (40, 42, 44 sts)

**Size B Only:**

**Row 12 (WS):** Ch 2, hdc in each st across, sm. Turn. (40 sts)

**Row 13 (RS):** Ch 2, hdc in next 9 sts, 2 hdc in next st, hdc to first marker, sm, hdc in next 4 sts, sm, hdc to last 11 sts, 2 hdc in next st, hdc in last 10 sts. Turn. (42 sts)

**Row 14 (WS):** Ch 2, hdc in each st across, remove markers. Turn. (42 sts)

**Row 15 (RS):** Ch 2, hdc in next 19 sts, hdc2tog, hdc in next 20 sts. Turn. (41 sts)

**Top Edge Shaping (Size B):**

**Row 16 (WS):** Ch 1, sc in first 10 sts, hdc in next 21 sts, sc in last 10 sts. Turn. (41 sts)

Proceed to Finishing.

**Sizes C (D) Only:**

**Row 12 (WS):** Ch 2, hdc in each st across, sm. Turn. (42, 44 sts)

**Row 13 (RS):** Ch 2, hdc in next 10 (11) sts, 2 hdc in next st, hdc to first marker, sm, hdc in next 4 (5) sts, sm, hdc to last 12 (13) sts, 2 hdc in next st, hdc in last 11 (12) sts. Turn. (44, 46 sts)

**Row 14 (WS):** Ch 2, hdc in each st across, sm. Turn. (44, 46 sts)

**Row 15 (RS):** Ch 2, hdc in next 10 (11) sts, 2 hdc in next st, hdc to first marker, sm, hdc in next 4 (5) sts, sm, hdc to last 12 (13) sts, 2 hdc in next st, hdc in last 11 (12) sts. Turn. (46, 48 sts)

**Size C Only:**

**Row 16 (WS):** Ch 2, hdc in each st across, remove markers. Turn. (46 sts)

**Row 17 (RS):** Ch 2, hdc in next 21 sts, hdc2tog, hdc in next 22 sts. Turn. (45 sts)

**Top Edge Shaping (Size C):**

**Row 18 (WS):** Ch 1, sc in first 11 sts, hdc in next 23 sts, sc in last 11 sts. Turn. (45 sts)

Proceed to Finishing.

**Size D Only:**

**Row 16 (WS):** Ch 2, hdc in each st across, sm. Turn. (48 sts)

**Row 17 (RS):** Ch 2, hdc in next 12 sts, 2 hdc in next st, hdc to first marker, sm, hdc in next 5 sts, sm, hdc to last 14 sts, 2 hdc in next st, hdc in last 13 sts. Turn. (50 sts)

**Row 18 (WS):** Ch 2, hdc in each st across, remove markers. Turn. (50 sts)

**Row 19 (RS):** Ch 2, hdc in next 23 sts, hdc2tog, hdc in next 24 sts. Turn. (49 sts)

**Top Edge Shaping (Size D):**

**Row 20 (WS):** Ch 1, sc in first 12 sts, hdc in next 25 sts, sc in last 12 sts. Turn. (49 sts)

Proceed to Finishing.

---

### FINISHING & EDGING

**Reinforced Edge:**

With RS facing, work one round of sc evenly around entire cup edge:

**Round 1:** Beginning at bottom right corner (where foundation meets side edge), ch 1, work sc evenly around entire cup perimeter, working 3 sc in each corner for shaping, join with sl st to first sc. Do not turn.

**Round 2 (Picot Edge - Optional for couture finish):** *Ch 3, sl st in first ch (picot made), sk 1 st, sc in next 2 sts; rep from * around, adjusting as needed at corners, join with sl st. Fasten off.

Leave long tail (24") for sewing.

---

### LEFT CUP

Work as for Right Cup, but reverse all shaping by working increases on opposite ends of rows.

OR: Work the Right Cup pattern while viewing your work in a mirror to naturally create the mirror image.

---

## ASSEMBLY & CONSTRUCTION

1. **Block Each Cup:** Pin cups to schematic measurements on blocking board. Spray with water or starch solution. Allow to dry completely. This sets the 3D shape.

2. **Create Underwire Channel:**
   - Fold foundation row along Row 1 (sc row) to WS.
   - Using sewing needle and thread, whipstitch the bottom edge of foundation row to WS of Row 2, creating a channel.
   - Leave 1" open at one side edge for wire insertion.

3. **Insert Underwire:**
   - Slide underwire into channel.
   - Adjust positioning so wire curves naturally with cup shape.
   - Stitch channel opening closed, securing wire ends with extra stitching.
   - Optional: Cover wire ends with small pieces of felt for comfort.

4. **Reinforce Attachment Points:**
   - At top center (for front closure): Sew 1" piece of grosgrain ribbon to WS for stability.
   - At side edges: Sew 2" piece of ribbon vertically along side seam for band attachment.
   - For straps: Create
Disclaimer: This pattern was generated by AI and should be reviewed for accuracy before use. While we strive for quality, AI-generated content may contain errors. Please verify measurements, stitch counts, and instructions before beginning your project. Generated by purlJam.uk
Access your pattern anytime
Bookmark this page to access your pattern anytime