Type
Knitting
Difficulty
beginner
Category
pullover
AI Thinking Process
Planning
Verification
Pattern
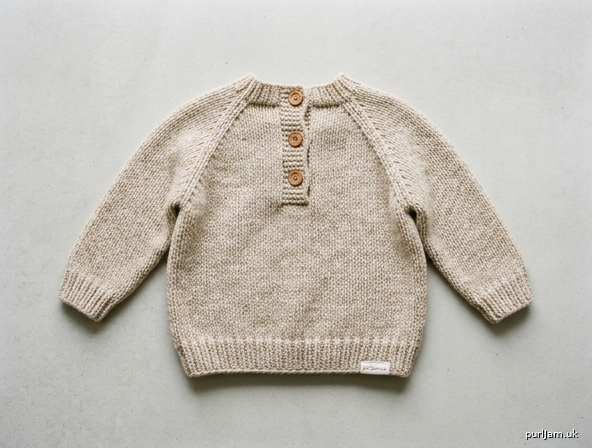
Cozy Baby Raglan Pullover
Top-down chunky raglan with back button placket
Skill level: Beginner
A squishy, seamless baby pullover knitted from the neck down in chunky yarn. The raglan yoke is worked flat with a three-button back placket so it slips on without a struggle, then the body and sleeves are joined and knitted in the round—no side or sleeve seams against the skin. Ribbed edges keep it tidy; extra body length leaves room for diapers. Choose a soft, machine-washable yarn; parents will thank you.
Sizes
0–3 (3–6, 6–12, 12–18, 18–24) months
To fit chest: 16 (18, 20, 21, 22)" [40.5 (45.5, 51, 53.5, 56) cm]
Shown with about 2¼–3¼" [5.5–8.5 cm] positive ease.
Instructions are written for the smallest size, with larger sizes in parentheses. When only one number is given, it applies to all sizes. Highlight your size before you begin.
Finished measurements
- Chest circumference: 18¼ (20½, 22¾, 24, 25¼)" [46.5 (52, 58, 61, 64) cm]
- Length (back neck to hem): 10½ (11½, 12½, 13½, 14½)" [26.5 (29, 32, 34.5, 37) cm]
- Yoke depth (back neck to underarm): 4¼ (4½, 5, 5, 5½)" [11 (11.5, 12.5, 12.5, 14) cm]
- Sleeve length (underarm to cuff edge): 6 (6½, 7½, 8, 8½)" [15 (16.5, 19, 20.5, 21.5) cm]
- Upper arm circumference: 7½ (8, 9¾, 9¾, 10¾)" [19 (20.5, 25, 25, 27.5) cm]
Yarn
Chunky / bulky weight (category 5)
200 (250, 300, 350, 400) yd [185 (230, 275, 320, 365) m]
About 2 (2, 3, 3, 4) skeins of a 100 g / 137 yd [125 m] yarn.
Use a soft, machine-washable yarn such as superwash wool, a wool-acrylic blend, or a cotton-acrylic blend. Avoid scratchy, non-superwash wool next to baby skin.
Suggested yarns: Cascade 128 Superwash, Berroco Comfort Chunky, or a similar machine-washable chunky.
Needles
- US 10 / 6 mm: 16" [40 cm] circular needle and a set of double-pointed needles (DPNs), or a 32" [80 cm] circular for magic loop
- US 8 / 5 mm: 16" [40 cm] circular needle and a set of DPNs (or magic loop)
The yoke is worked flat, so you may use straight needles or a circular needle worked back and forth.
Use the needle size you need to obtain gauge. Change the ribbing needles in proportion if you go up or down.
Notions
- 4 stitch markers
- Waste yarn or stitch holders
- Tapestry needle
- 3 buttons, ⅝" [16 mm] diameter
- Sewing needle and thread (to attach buttons)
Gauge
14 stitches and 20 rows/rounds = 4" (10 cm) in stockinette stitch on larger needles, after blocking.
Work a gauge swatch. Cast on 20 stitches, work 28 rows in stockinette, bind off, wet-block, and measure the center 4". If you have too many stitches in 4", go up a needle size; if too few, go down a size. Gauge affects every number in this pattern—do not skip it.
Abbreviations (US)
- BO — bind off
- BOR — beginning of round
- CO — cast on
- k — knit
- k2tog — knit 2 stitches together (1 stitch decreased)
- kfb — knit into the front and then the back of the same stitch (1 stitch increased)
- p — purl
- PM — place marker
- rep — repeat
- rnd(s) — round(s)
- RS — right side
- sm — slip marker
- ssk — slip 1 knitwise, slip 1 knitwise, knit those 2 stitches together through the back loop (1 stitch decreased)
- st(s) — stitch(es)
- St st — stockinette stitch (knit on RS / every round; purl on WS)
- WS — wrong side
- yo — yarn over
Notes
- Construction: Cast on at the neck and work the yoke flat with a garter-stitch button placket at the back. Raglan increases are made with kfb every right-side row. Sleeves are placed on hold, underarm stitches are cast on, and the body is joined to work in the round. Sleeves are then worked in the round from the underarm down.
- Buttonholes: Worked on the 4-stitch band at the beginning of designated RS rows: k1, k2tog, yo, k1. Buttons are sewn to the opposite band.
- Button safety: Sew buttons on very firmly with sewing thread (not yarn). For babies who mouth clothing, consider snaps instead of buttons.
- Fit: Lengths are written for a slightly long baby body. Try on as you go if you can; add or subtract even rounds before the hem and cuffs to customize.
- Care: Follow your yarn’s machine-wash instructions. Superwash and acrylic blends are the practical choice for baby clothes.
How to kfb (beginner refresher)
Knit the next stitch as usual but do not slide it off the left needle. Swing the right needle around and knit into the back loop of the same stitch. Now slide it off. You have made 2 stitches from 1.
Pattern
Neck ribbing
With smaller needles and using a long-tail cast-on, CO 44 (48, 52, 56, 60) sts.
Row 1 (RS): K4, *k1, p1; rep from * to last 4 sts, k4.
Row 2 (WS): K4, *k1, p1; rep from * to last 4 sts, k4.
The first and last 4 stitches are the garter button bands (knit them every row). The center 36 (40, 44, 48, 52) stitches are 1x1 rib.
Work Rows 1–2 twice more, and on Row 5 (RS) work a buttonhole over the first 4 sts: k1, k2tog, yo, k1, then continue the row as established.
6 rows of ribbing complete, ending after a WS row.
Yoke
Change to larger needles.
Next row (RS) — setup and Increase Row 1: K4, k 5 (6, 6, 7, 7), kfb, PM, kfb, k 4 (4, 6, 6, 8), kfb, PM, kfb, k 10 (12, 12, 14, 14), kfb, PM, kfb, k 4 (4, 6, 6, 8), kfb, PM, kfb, k 5 (6, 6, 7, 7), k4.
52 (56, 60, 64, 68) sts (44 (48, 52, 56, 60) + 8 = 52 (56, 60, 64, 68) ✓).
The markers sit on the four raglan lines, in this order: left back, left sleeve, front, right sleeve, right back, with a 4-st band at each end.
WS row: K4, purl to last 4 sts (slipping markers), k4.
Increase Row (RS): K4, *knit to 1 st before marker, kfb, sm, kfb; rep from * 3 more times, knit to last 4 sts, k4. (8 sts increased)
WS row: K4, purl to last 4 sts, k4.
Work the Increase Row on every RS row until you have worked it 8 (9, 10, 10, 11) times in total (counting the setup row as Increase Row 1). Work WS rows even as set.
Buttonholes at the same time: Work a buttonhole (k1, k2tog, yo, k1 over the first 4 sts) at the beginning of Increase Row 4 (4, 5, 5, 5) and Increase Row 8 (8, 10, 10, 10). That is 3 buttonholes total, including the one in the neck ribbing.
After the last Increase Row, work 1 WS row even.
108 (120, 132, 136, 148) sts (44 + 8 × 8 = 108 ✓; 48 + 8 × 9 = 120 ✓; 52 + 8 × 10 = 132 ✓; 56 + 8 × 10 = 136 ✓; 60 + 8 × 11 = 148 ✓).
Yoke should measure about 4¼ (4½, 5, 5, 5½)" [11 (11.5, 12.5, 12.5, 14) cm] from the cast-on edge. If you are short of that measurement, work extra even rows (k4, knit to last 4, k4 on RS; k4, purl to last 4, k4 on WS) before dividing. If you are already there, divide on the next RS row.
Stitch layout at the end of the yoke (including 4-st bands):
- Button band: 4 sts
- Left back: 14 (16, 17, 18, 19) sts
- Left sleeve: 22 (24, 28, 28, 32) sts
- Front: 28 (32, 34, 36, 38) sts
- Right sleeve: 22 (24, 28, 28, 32) sts
- Right back: 14 (16, 17, 18, 19) sts
- Button band: 4 sts
- Total: 4+14+22+28+22+14+4 = 108 ✓ (and matching totals for the larger sizes)
Divide body and sleeves
Next row (RS): K4 and place these 4 band sts on a holder; knit across left back to marker, remove marker; place 22 (24, 28, 28, 32) left-sleeve sts on waste yarn or a holder, remove marker; using the backward-loop method, CO 4 (4, 6, 6, 6) sts for the underarm; knit across 28 (32, 34, 36, 38) front sts to marker, remove marker; place 22 (24, 28, 28, 32) right-sleeve sts on waste yarn or a holder, remove marker; CO 4 (4, 6, 6, 6) sts for the underarm; knit across right back; place remaining 4 band sts on a holder.
Body: 64 (72, 80, 84, 88) sts (14 + 4 + 28 + 4 + 14 = 64 ✓; 16 + 4 + 32 + 4 + 16 = 72 ✓; 17 + 6 + 34 + 6 + 17 = 80 ✓; 18 + 6 + 36 + 6 + 18 = 84 ✓; 19 + 6 + 38 + 6 + 19 = 88 ✓).
Join to work in the round. PM for BOR at center back (the gap between the two back halves). The two band pieces remain on holders to sew down later.
Body
With larger 16" circular needle, knit every round until the body measures 5 (5½, 6, 7, 7¾)" [12.5 (14, 15, 18, 19.5) cm] from the underarm cast-on, or until it is 1½" [4 cm] short of the total length you want.
Hem Change to smaller 16" circular needle.
Rib round: *K1, p1; rep from * to end.
Work in 1x1 rib until the hem measures 1½" [4 cm].
BO loosely in rib (use a larger needle if the bind-off feels tight—the hem must pass over the diaper).
Sleeves
Work both sleeves the same.
Place the 22 (24, 28, 28, 32) held sleeve sts onto larger DPNs (or a long circular for magic loop). With RS facing, rejoin yarn at the center of the underarm. Pick up and knit 4 (4, 6, 6, 6) sts along the underarm cast-on, then knit across the sleeve sts. If a small hole appears at either underarm corner, pick up 1 extra stitch in the gap and knit it together with the next stitch on the following round.
26 (28, 34, 34, 38) sts (22 + 4 = 26 ✓; 24 + 4 = 28 ✓; 28 + 6 = 34 ✓; 32 + 6 = 38 ✓).
PM for BOR at center underarm. Knit 2 rounds even.
Decrease round: K1, k2tog, knit to last 3 sts, ssk, k1. (2 sts decreased)
Work a Decrease round every 4th (5th, 4th, 4th, 4th) round 5 (5, 7, 7, 8) times — 16 (18, 20, 20, 22) sts remain (26 − 2 × 5 = 16 ✓; 28 − 2 × 5 = 18 ✓; 34 − 2 × 7 = 20 ✓; 38 − 2 × 8 = 22 ✓).
Knit even until the sleeve measures 4½ (5, 6, 6½, 7)" [11.5 (12.5, 15, 16.5, 18) cm] from the underarm.
Cuff Change to smaller DPNs.
Work in 1x1 rib (*k1, p1; rep from * to end) until the cuff measures 1½" [4 cm].
BO loosely in rib.
Finishing
- Bind off the 4 held stitches of each button band.
- Overlap the bands at the base of the placket, buttonhole band on top, and sew the bound-off edges neatly to the body.
- Sew the 3 buttons to the under band, lining them up with the buttonholes. Use sewing thread and stitch through each hole several times.
- Weave in all ends on the wrong side.
- Wet-block: soak in lukewarm water with a little wool wash, press out water in a towel (do not wring), and lay flat to the finished measurements to dry. This evens the raglan lines and relaxes the ribbing.
Schematic measurements
                    neck opening
                 (buttons at back)
               /                   \
              /      yoke depth      \
             /  4¼ (4½, 5, 5, 5½)"    \
            /___________________________\
           |                             |
  sleeve   |                             |  sleeve
  6 (6½,   |         BODY                |  6 (6½,
  7½, 8,   |  chest 18¼ (20½, 22¾,       |  7½, 8,
  8½)"     |  24, 25¼)"                  |  8½)"
           |                             |
           |  total length               |
           |  10½ (11½, 12½, 13½, 14½)"  |
           |_____________________________|
                      hem
| 0–3 m | 3–6 m | 6–12 m | 12–18 m | 18–24 m | |
|---|---|---|---|---|---|
| A Chest | 18¼" | 20½" | 22¾" | 24" | 25¼" |
| B Length | 10½" | 11½" | 12½" | 13½" | 14½" |
| C Sleeve | 6" | 6½" | 7½" | 8" | 8½" |
| D Upper arm | 7½" | 8" | 9¾" | 9¾" | 10¾" |
| E Yoke depth | 4¼" | 4½" | 5" | 5" | 5½" |
Customizing
- Longer / shorter body: Knit more or fewer even rounds before the hem. Babies need a little extra length for diapers; a toddler can take another inch.
- Longer / shorter sleeves: Adjust even rounds after the last sleeve decrease, before the cuff.
- Yarn substitution: Any chunky yarn that matches 14 sts = 4" will work. Always swatch. Stay with machine-washable fibers for baby garments.
- No buttons: If you prefer a closed neck, skip the placket, join in the round after the ribbing, and use a very stretchy cast-on—but a placket is strongly recommended in this gauge so the sweater fits over the head.
Disclaimer: This pattern was generated by AI and should be reviewed for accuracy before use. While we strive for quality, AI-generated content may contain errors. Please verify measurements, stitch counts, charts, and instructions before beginning your project. Generated by purlJam.uk
Love this pattern?
Save this pattern to your free PurlJam libraryAccess your pattern anytime
Bookmark this page to access your pattern anytime