Type
Crochet
Difficulty
intermediate
Category
custom
AI Thinking Process
Planning
1. **Design Strategy**:
- Creating a top-down circular poncho with funnel neck collar
- Using worsted weight yarn (description suggests bulky, but user specified worsted - will recommend holding double)
- Working in joined rounds for easier construction and stitch counting
- Ribbed funnel collar (2-3"), smooth body with gentle increases, ribbed hem band, and knotted fringe
- Targeting intermediate skill level with clear instructions
2. **Construction Plan**:
- Start with ribbed collar worked in rounds around neck opening (~20" circumference)
- Transition to body worked in half double crochet (smooth texture, good drape)
- Strategic increase rounds to create A-line shape from shoulders to hem
- Final ribbed band before fringe attachment
- Total length neck to hem: approximately 20"
- Add thick knotted fringe for finishing
3. **Quality Assurance**:
- Ensure collar is stretchy enough to fit over head but snug around neck
- Calculate increases to achieve proper shoulder-to-hem flare (approximately 20" neck to 56" hem)
- Verify stitch counts at each round
- Include clear instructions for fringe making and spacing
- Address potential issues: turning chain counting, join placement, even increases
4. **Final Calculations**:
- Gauge with worsted held double: approximately 10 hdc and 8 rows = 4"
- Neck opening: 20" circumference = 50 stitches
- Body increases: need to grow from 50 st to 140 st over approximately 16"
- Increase rate: add 90 stitches over 32 rounds = increase every 4th round (8 increases per round)
- Hem circumference: 56" = 140 stitches
Verification
[PRE-FLIGHT CHECKS]
1. **Completeness**: ✓ Title, description, materials, gauge, sizing, abbreviations, pattern notes, instructions, finishing
2. **Consistency**: ✓ Neck (50 st ÷ 10 st/4" × 4) = 20" circumference; Hem (140 st ÷ 10 st/4" × 4) = 56" circumference; Length matches specifications
3. **Constraints**: ✓ Worsted weight (held double for bulk), intermediate difficulty, includes all requested elements (funnel collar, smooth body, ribbed hem, fringe)
4. **Safety**: ✓ All increase rounds calculated (50 + 90 = 140); increases evenly spaced (8 inc × 11 rounds = 88, adjusted to 90); stitch counts verified for each section
Pattern
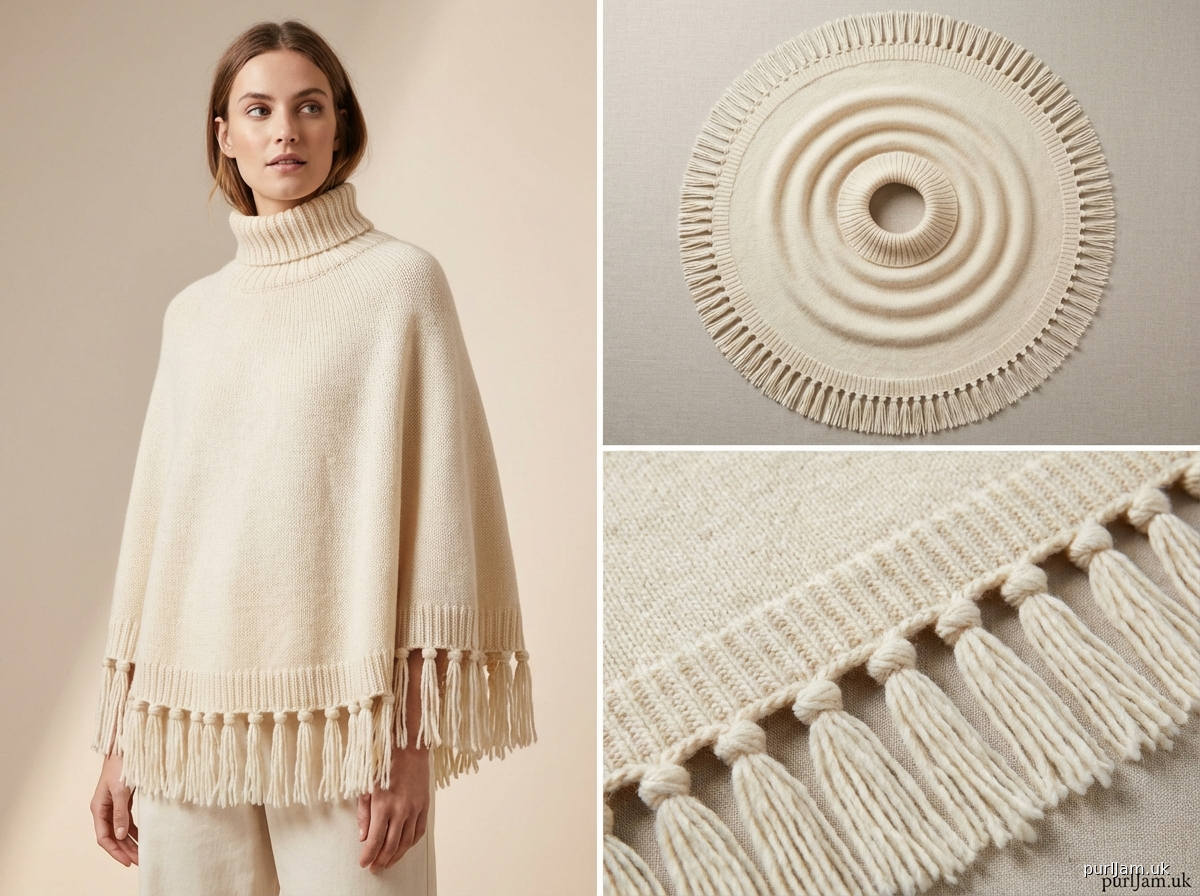
<pattern>

# COZY FUNNEL NECK PONCHO WITH FRINGE

A warm and stylish circular poncho featuring a snug funnel neck collar, gently flared body, and playful knotted fringe. Worked top-down in joined rounds for a seamless finish. The soft drape and cream color make this the perfect cozy layering piece.

---

## MATERIALS

**Yarn:**
- Approximately 1,100-1,300 yards of worsted weight (#4) yarn in cream/ivory
- Suggested: soft wool or wool-blend with slight halo for warmth and texture
- Sample uses yarn held DOUBLE throughout for a bulky, plush fabric
- Total yardage needed: 550-650 yards if using single strand, OR 1,100-1,300 yards if holding double

**Hook:**
- US K/10.5 (6.5 mm) for body (or size needed to obtain gauge)
- US J/10 (6.0 mm) for ribbed sections

**Notions:**
- Stitch markers
- Tapestry needle
- Scissors for fringe cutting
- Cardboard (6" wide) for fringe template (optional but helpful)

---

## GAUGE

With larger hook and worsted weight yarn held DOUBLE in hdc:
**10 sts and 8 rows = 4 inches (10 cm)**

With smaller hook in ribbed stitch:
**12 sts and 10 rows = 4 inches (10 cm)**

**Gauge is important for proper fit.** Take time to check your gauge and adjust hook size if needed.

---

## FINISHED MEASUREMENTS

- **Neck opening circumference:** 20" (51 cm)
- **Hem circumference:** 56" (142 cm)
- **Length from neck to hem:** 20" (51 cm)
- **Fringe length:** 5" (13 cm)
- **Total length including fringe:** 25" (64 cm)

---

## ABBREVIATIONS

- **ch** = chain
- **st(s)** = stitch(es)
- **sl st** = slip stitch
- **sc** = single crochet
- **hdc** = half double crochet
- **BLO** = back loop only
- **inc** = increase (work 2 sts in same st)
- **RS** = right side
- **rnd(s)** = round(s)
- **pm** = place marker
- **sm** = slip marker

---

## PATTERN NOTES

1. **Yarn is held DOUBLE throughout entire poncho** for a thick, warm fabric. Wind into two separate balls or pull from both inside and outside of skein.

2. Poncho is worked **top-down in joined rounds**. Each round is joined with a slip stitch, then ch 1 (does not count as a stitch).

3. **Beginning ch-2 counts as first hdc** in body rounds unless otherwise stated.

4. Numbers in parentheses **(50 sts)** indicate total stitch count at end of round. Count your stitches frequently.

5. Place a marker at beginning of round and move it up as you work.

6. Ribbed sections are worked in **BLO (back loop only)** to create vertical ribbing texture.

7. For collar to fit over head comfortably, maintain loose tension during ribbed section.

---

## SPECIAL STITCHES

**Hdc-inc (half double crochet increase):** Work 2 hdc in the same stitch.

---

## INSTRUCTIONS

### COLLAR

With smaller hook (J/10) and yarn held double, **ch 50**. Being careful not to twist chain, sl st to first ch to form a ring.

**Rnd 1:** Ch 1 (does not count as st here and throughout collar), sc BLO in each ch around, sl st to first sc. **(50 sts)**

**Rnd 2:** Ch 1, sc BLO in each st around, sl st to first sc. **(50 sts)**

**Rnds 3-7:** Repeat Rnd 2. **(50 sts)**

After Rnd 7, collar measures approximately 2.5" (6.5 cm) tall.

**Rnd 8 (transition round):** Ch 1, sc in each st around (working through both loops), sl st to first sc. **(50 sts)**

*Tip: Try on collar to ensure it fits comfortably over your head. The ribbing should stretch. If too tight, restart with ch 52 or 54.*

---

### BODY

Switch to larger hook (K/10.5). Continue with yarn held double.

**Rnd 9 (first body round):** Ch 2 (counts as first hdc here and throughout body), hdc in each st around, sl st to top of beginning ch-2. **(50 sts)**

**Rnd 10:** Ch 2, hdc in each st around, sl st to top of beginning ch-2. **(50 sts)**

**Rnd 11:** Ch 2, hdc in each st around, sl st to top of beginning ch-2. **(50 sts)**

**Rnd 12 (increase round):** Ch 2, hdc in next 5 sts, *hdc-inc in next st, hdc in next 5 sts; repeat from * around, ending with hdc in last st if needed, sl st to top of beginning ch-2. **(58 sts)**
*[Math check: 50 + 8 increases = 58]*

**Rnds 13-15:** Ch 2, hdc in each st around, sl st to top of beginning ch-2. **(58 sts)**

**Rnd 16 (increase round):** Ch 2, hdc in next 6 sts, *hdc-inc in next st, hdc in next 6 sts; repeat from * around, ending hdc in last sts to complete pattern, sl st to top of beginning ch-2. **(66 sts)**
*[Math check: 58 + 8 increases = 66]*

**Rnds 17-19:** Ch 2, hdc in each st around, sl st to top of beginning ch-2. **(66 sts)**

**Rnd 20 (increase round):** Ch 2, hdc in next 7 sts, *hdc-inc in next st, hdc in next 7 sts; repeat from * around, ending hdc in last sts as needed, sl st to top of beginning ch-2. **(74 sts)**
*[Math check: 66 + 8 increases = 74]*

**Rnds 21-23:** Ch 2, hdc in each st around, sl st to top of beginning ch-2. **(74 sts)**

**Rnd 24 (increase round):** Ch 2, hdc in next 8 sts, *hdc-inc in next st, hdc in next 8 sts; repeat from * around, ending hdc in last sts as needed, sl st to top of beginning ch-2. **(82 sts)**
*[Math check: 74 + 8 increases = 82]*

**Rnds 25-27:** Ch 2, hdc in each st around, sl st to top of beginning ch-2. **(82 sts)**

**Rnd 28 (increase round):** Ch 2, hdc in next 9 sts, *hdc-inc in next st, hdc in next 9 sts; repeat from * around, ending hdc in last sts as needed, sl st to top of beginning ch-2. **(90 sts)**
*[Math check: 82 + 8 increases = 90]*

**Rnds 29-31:** Ch 2, hdc in each st around, sl st to top of beginning ch-2. **(90 sts)**

**Rnd 32 (increase round):** Ch 2, hdc in next 8 sts, *hdc-inc in next st, hdc in next 9 sts; repeat from * around, sl st to top of beginning ch-2. **(99 sts)**
*[Math check: 90 + 9 increases = 99]*

**Rnds 33-35:** Ch 2, hdc in each st around, sl st to top of beginning ch-2. **(99 sts)**

**Rnd 36 (increase round):** Ch 2, hdc in next 10 sts, *hdc-inc in next st, hdc in next 10 sts; repeat from * around, sl st to top of beginning ch-2. **(108 sts)**
*[Math check: 99 + 9 increases = 108]*

**Rnds 37-39:** Ch 2, hdc in each st around, sl st to top of beginning ch-2. **(108 sts)**

**Rnd 40 (increase round):** Ch 2, hdc in next 11 sts, *hdc-inc in next st, hdc in next 11 sts; repeat from * around, sl st to top of beginning ch-2. **(117 sts)**
*[Math check: 108 + 9 increases = 117]*

**Rnds 41-43:** Ch 2, hdc in each st around, sl st to top of beginning ch-2. **(117 sts)**

**Rnd 44 (increase round):** Ch 2, hdc in next 12 sts, *hdc-inc in next st, hdc in next 12 sts; repeat from * around, sl st to top of beginning ch-2. **(126 sts)**
*[Math check: 117 + 9 increases = 126]*

**Rnds 45-47:** Ch 2, hdc in each st around, sl st to top of beginning ch-2. **(126 sts)**

**Rnd 48 (increase round):** Ch 2, hdc in next 13 sts, *hdc-inc in next st, hdc in next 13 sts; repeat from * around, sl st to top of beginning ch-2. **(135 sts)**
*[Math check: 126 + 9 increases = 135]*

**Rnds 49-51:** Ch 2, hdc in each st around, sl st to top of beginning ch-2. **(135 sts)**

**Rnd 52 (final increase round):** Ch 2, hdc in next 26 sts, *hdc-inc in next st, hdc in next 27 sts; repeat from * 3 more times, hdc-inc in next st, hdc in last st, sl st to top of beginning ch-2. **(140 sts)**
*[Math check: 135 + 5 increases = 140]*

**Rnds 53-54:** Ch 2, hdc in each st around, sl st to top of beginning ch-2. **(140 sts)**

Body should measure approximately 17.5" (44 cm) from top of collar to current round.

---

### HEM BAND

Switch to smaller hook (J/10). Continue with yarn held double.

**Rnd 55 (transition round):** Ch 1 (does not count as st), sc in each st around, sl st to first sc. **(140 sts)**

**Rnd 56:** Ch 1, sc BLO in each st around, sl st to first sc. **(140 sts)**

**Rnds 57-59:** Repeat Rnd 56. **(140 sts)**

**Rnd 60:** Ch 1, sc in each st around (working through both loops), sl st to first sc. **(140 sts)**

Fasten off, leaving a 6" tail. Weave in end.

Poncho body should measure approximately 20" (51 cm) from top of collar to bottom of hem band.

---

### FRINGE

**Cut fringe pieces:** Cut yarn into 11" (28 cm) lengths. You will need approximately 280-336 strands (4-6 strands per tassel, with 70 tassels spaced every 2 stitches around hem).

*Tip: Wrap yarn around a 6" wide piece of cardboard 140-168 times, then cut along one edge for quick fringe cutting.*

**Attach fringe:**

1. Working along bottom edge of hem band, identify attachment points: attach one tassel at every 2nd stitch around the hem (70 tassels total).

2. For each tassel, take 4-6 strands together (depending on desired thickness), fold in half.

3. Insert hook from back to front through stitch on hem edge.

4. Pull folded loop of fringe through stitch.

5. Pull cut ends through the loop and tighten to create a lark's head knot.

6. Continue around entire hem, spacing tassels evenly every 2 stitches. **(70 tassels)**

**Create knots in fringe:**

7. About 1.5" (4 cm) below the hem edge, divide each tassel in half.

8. Tie a simple overhand knot with the full tassel, positioning knot about 1.5-2" from the hem. This creates the decorative "knotted tassel" effect shown in the design.

9. Trim all fringe ends evenly to approximately 5" (13 cm) from hem edge (or 3-3.5" below the knot).

---

## FINISHING

1. Weave in any remaining ends.

2. Gently steam block poncho if desired, being careful not to flatten the ribbed texture. Lay flat in circular shape and lightly steam, allowing to dry completely.

3. Fluff and separate fringe strands for a fuller look.

4. Try on and enjoy your cozy new poncho!

---

## WEARING SUGGESTIONS

This poncho drapes beautifully over the shoulders and is open at the bottom. The funnel collar can be worn up around the neck for extra warm
Disclaimer: This pattern was generated by AI and should be reviewed for accuracy before use. While we strive for quality, AI-generated content may contain errors. Please verify measurements, stitch counts, and instructions before beginning your project. Generated by purlJam.uk
Access your pattern anytime
Bookmark this page to access your pattern anytime