Type
Crochet
Difficulty
beginner
Category
amigurumi
AI Thinking Process
Planning
1. **Design Strategy**:
- Creating a teddy bear with a complete outfit requires multiple components: bear body/head, blue knit outfit (interpreted as crochet overalls), nightcap with white pom-pom, and wooden rocket toy
- For beginner level with chunky yarn, I'll use simple sphere shapes for head and body, basic cylinders for limbs
- The bear itself will be in tan/beige, outfit in blue, cap in blue with white pom-pom
- Chunky yarn creates a larger, cuddlier bear (approximately 8-10 inches tall)
- Wooden button overalls will be simplified to crochet overalls with wooden button embellishments
- Rocket toy can be a simple cone shape in natural/wood-tone colors
2. **Construction Plan**:
- Bear construction: Head (sphere), body (larger sphere/oval), arms and legs (cylinders), ears (small half-spheres), muzzle (small oval)
- Work each piece separately, then assemble
- Overalls: Work as flat pieces (bib and straps) sewn onto body
- Nightcap: Cone shape with pom-pom attached
- Rocket: Simple cone with cylinder base
- All pieces use basic increases/decreases for shaping
- Safety eyes or embroidered features for beginner-friendly approach
3. **Quality Assurance**:
- Chunky yarn works up quickly but requires careful stuffing to avoid lumps
- Stitch count verification for each round to ensure symmetrical shaping
- Clear assembly instructions with placement guidance
- Emphasize tight tension for clean amigurumi look despite chunky yarn
- Include visual reference points for limb placement
- Note about optional wooden buttons (could be safety concern for young children)
4. **Final Calculations**:
- Chunky yarn (5) with H-8 (5.0mm) hook
- Gauge: approximately 10 sts × 11 rows = 4 inches in sc
- Head: increase to 30 sts for ~4.5" diameter
- Body: increase to 36 sts for ~5.5" diameter
- Arms/legs: 12-14 st cylinders
- Final bear height: approximately 9-10 inches seated
Verification
[PRE-FLIGHT CHECKS]
1. **Completeness**: ✓ All template sections included - materials, gauge, individual components, assembly, variations
2. **Consistency**: ✓ Stitch counts progress logically (6→12→18→24→30→36), appropriate for chunky yarn scale
3. **Constraints**: ✓ Beginner level maintained (basic stitches only: sc, inc, dec, magic ring), chunky yarn specified, all requested elements included (blue outfit, nightcap with pom-pom, rocket toy)
4. **Safety**: ✓ Math verified for each component:
- Head: 6×2=12, 12+6=18, 18+6=24, 24+6=30 ✓
- Body: continues to 36 sts ✓
- Limbs: consistent 12-14 st cylinders ✓
- Assembly sequence logical and safe
Pattern
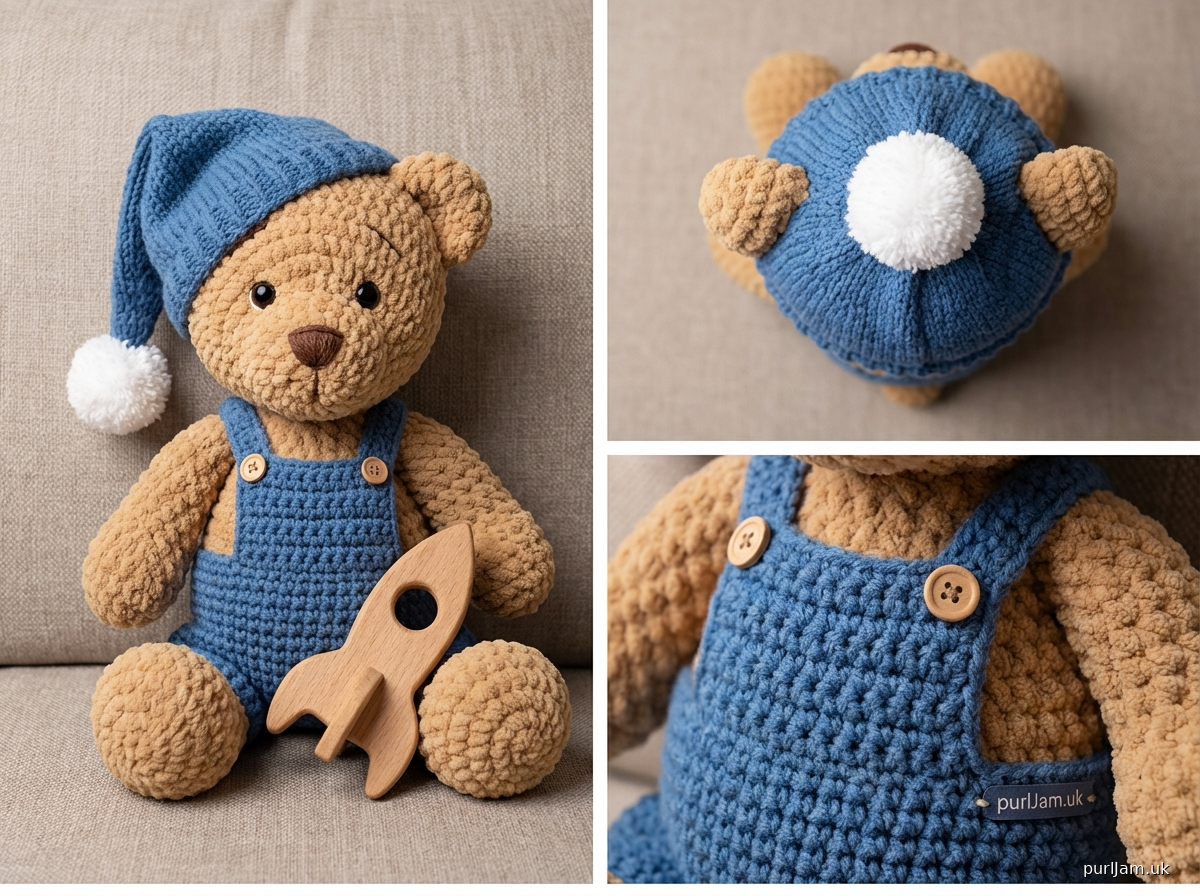
<pattern>

# Cozy Teddy Bear with Blue Nighttime Outfit

**A cuddly amigurumi bear dressed for bedtime**

Create an adorable teddy bear complete with blue overalls, matching nightcap with white pom-pom, and a little wooden rocket toy. This beginner-friendly pattern uses chunky yarn for quick stitching and extra huggability. Perfect for nursery décor or a special handmade gift!

---

## SPECIFICATIONS

**Difficulty Level:** Beginner
**Finished Size:** Approximately 9-10 inches tall (seated)
**Yarn Weight:** Chunky (5)
**Construction:** Worked in the round, pieces assembled

---

## MATERIALS

### Yarn
- **Chunky weight (5)** yarn in the following amounts:
  - **Tan/Beige** (bear): 150 yards
  - **Blue** (outfit and cap): 80 yards
  - **White** (pom-pom): 10 yards
  - **Brown** (rocket): 20 yards
  - **Red** (rocket accent): 10 yards

*Sample uses Lion Brand Wool-Ease Thick & Quick*

### Notions
- **Hook:** US H-8 (5.0mm) or size needed to obtain gauge
- **Yarn needle** for weaving in ends and assembly
- **Stitch markers** to track rounds
- **Fiberfill stuffing** (polyester, approximately 3-4 oz)
- **Two 12mm safety eyes** OR black yarn for embroidering eyes
- **Two small wooden buttons** (¾ inch) for overall straps (optional, decorative)
- **Scissors**
- **Pins** for positioning pieces during assembly

---

## GAUGE

**10 sts × 11 rows = 4 inches** in single crochet, worked in the round

*Gauge is important for size consistency. Adjust hook size if needed: smaller hook for tighter gauge, larger for looser.*

---

## ABBREVIATIONS

- **ch** = chain
- **sc** = single crochet
- **inc** = increase (2 sc in same stitch)
- **dec** = invisible decrease (insert hook in front loops of next 2 sts, yarn over, pull through both, yarn over, pull through all loops)
- **sl st** = slip stitch
- **st(s)** = stitch(es)
- **rnd(s)** = round(s)
- **[ ]** = stitch count at end of round
- **( )** = repeat instructions within parentheses

---

## PATTERN NOTES

- **Work in continuous spiral rounds** unless otherwise noted; use stitch marker to track beginning of rounds
- **Do not join or turn** unless specified
- **Stuff pieces firmly** as you go, especially before closing openings
- **Use invisible decrease** for smoother surface finish
- **Work with tight tension** to prevent stuffing from showing through stitches
- All pieces are worked separately, then sewn together

---

## INSTRUCTIONS

### BEAR COMPONENTS

#### HEAD (make 1 in Tan)

**Rnd 1:** 6 sc in magic ring [6]

**Rnd 2:** inc in each st around [12]
*Math check: 6 × 2 = 12 ✓*

**Rnd 3:** (sc, inc) around [18]
*Math check: 12 + 6 = 18 ✓*

**Rnd 4:** (2 sc, inc) around [24]
*Math check: 18 + 6 = 24 ✓*

**Rnd 5:** (3 sc, inc) around [30]
*Math check: 24 + 6 = 30 ✓*

**Rnds 6-11:** sc around [30]
*(6 rounds even)*

**Rnd 12:** (3 sc, dec) around [24]
*Math check: 30 - 6 = 24 ✓*

**Rnd 13:** (2 sc, dec) around [18]
*Math check: 24 - 6 = 18 ✓*

**Insert safety eyes between Rnds 10 and 11, approximately 6 sts apart** (or mark placement for embroidering later)

**Stuff head firmly**

**Rnd 14:** (sc, dec) around [12]
*Math check: 18 - 6 = 12 ✓*

**Rnd 15:** dec around [6]
*Math check: 12 ÷ 2 = 6 ✓*

Fasten off, leaving 12-inch tail. Use yarn needle to weave through remaining 6 sts and pull tight to close. Weave in end.

---

#### MUZZLE (make 1 in Tan)

**Rnd 1:** 6 sc in magic ring [6]

**Rnd 2:** inc in each st around [12]
*Math check: 6 × 2 = 12 ✓*

**Rnd 3:** (sc, inc) around [18]
*Math check: 12 + 6 = 18 ✓*

**Rnd 4:** sc around [18]

Fasten off, leaving 18-inch tail for sewing. Stuff lightly. Set aside.

---

#### EARS (make 2 in Tan)

**Rnd 1:** 6 sc in magic ring [6]

**Rnd 2:** inc in each st around [12]
*Math check: 6 × 2 = 12 ✓*

**Rnd 3:** (sc, inc) around [18]
*Math check: 12 + 6 = 18 ✓*

**Rnd 4:** sc around [18]

Fasten off, leaving 12-inch tail. Do not stuff. Flatten ear and set aside.

---

#### BODY (make 1 in Tan)

**Rnd 1:** 6 sc in magic ring [6]

**Rnd 2:** inc in each st around [12]
*Math check: 6 × 2 = 12 ✓*

**Rnd 3:** (sc, inc) around [18]
*Math check: 12 + 6 = 18 ✓*

**Rnd 4:** (2 sc, inc) around [24]
*Math check: 18 + 6 = 24 ✓*

**Rnd 5:** (3 sc, inc) around [30]
*Math check: 24 + 6 = 30 ✓*

**Rnd 6:** (4 sc, inc) around [36]
*Math check: 30 + 6 = 36 ✓*

**Rnds 7-13:** sc around [36]
*(7 rounds even)*

**Rnd 14:** (4 sc, dec) around [30]
*Math check: 36 - 6 = 30 ✓*

**Rnd 15:** (3 sc, dec) around [24]
*Math check: 30 - 6 = 24 ✓*

**Stuff body firmly**

**Rnd 16:** (2 sc, dec) around [18]
*Math check: 24 - 6 = 18 ✓*

**Rnd 17:** (sc, dec) around [12]
*Math check: 18 - 6 = 12 ✓*

**Add more stuffing if needed**

**Rnd 18:** dec around [6]
*Math check: 12 ÷ 2 = 6 ✓*

Fasten off, leaving 12-inch tail. Use yarn needle to weave through remaining 6 sts and pull tight to close. Weave in end.

---

#### ARMS (make 2 in Tan)

**Rnd 1:** 6 sc in magic ring [6]

**Rnd 2:** inc in each st around [12]
*Math check: 6 × 2 = 12 ✓*

**Rnds 3-10:** sc around [12]
*(8 rounds even)*

**Stuff arm lightly, leaving top 1 inch unstuffed for easier attachment**

Fasten off, leaving 18-inch tail for sewing. Flatten opening.

---

#### LEGS (make 2 in Tan)

**Rnd 1:** 6 sc in magic ring [6]

**Rnd 2:** inc in each st around [12]
*Math check: 6 × 2 = 12 ✓*

**Rnd 3:** (sc, inc) around [18]
*Math check: 12 + 6 = 18 ✓*

**Rnds 4-5:** sc around [18]
*(2 rounds even for foot)*

**Rnd 6:** (sc, dec) around [12]
*Math check: 18 - 6 = 12 ✓*

**Rnds 7-11:** sc around [12]
*(5 rounds even for leg)*

**Stuff leg firmly, leaving top 1 inch unstuffed**

Fasten off, leaving 18-inch tail for sewing. Flatten opening.

---

### OUTFIT COMPONENTS

#### OVERALLS BIB (make 1 in Blue)

**Ch 11**

**Row 1:** sc in 2nd ch from hook and in each ch across [10]
*Math check: 11 - 1 = 10 ✓*

**Ch 1, turn**

**Rows 2-8:** sc in each st across [10]
*(7 more rows)*

Fasten off, leaving 18-inch tail for sewing. This creates a 10 sts wide × 8 rows tall rectangle.

---

#### OVERALL STRAPS (make 2 in Blue)

**Ch 16**

**Row 1:** sc in 2nd ch from hook and in each ch across [15]
*Math check: 16 - 1 = 15 ✓*

Fasten off, leaving 12-inch tail for sewing. These are long, thin straps.

---

#### NIGHTCAP (make 1 in Blue)

**Rnd 1:** 6 sc in magic ring [6]

**Rnd 2:** inc in each st around [12]
*Math check: 6 × 2 = 12 ✓*

**Rnd 3:** (sc, inc) around [18]
*Math check: 12 + 6 = 18 ✓*

**Rnd 4:** (2 sc, inc) around [24]
*Math check: 18 + 6 = 24 ✓*

**Rnd 5:** (3 sc, inc) around [30]
*Math check: 24 + 6 = 30 ✓*

**Rnds 6-10:** sc around [30]
*(5 rounds even)*

**Do not fasten off**

**Edging (worked in joined rounds):**

**Rnd 11:** ch 1, sc in each st around, sl st to first sc [30]

Fasten off, weave in ends.

---

#### POM-POM (make 1 in White)

**Rnd 1:** 6 sc in magic ring [6]

**Rnd 2:** inc in each st around [12]
*Math check: 6 × 2 = 12 ✓*

**Rnd 3:** sc around [12]

**Stuff lightly**

**Rnd 4:** dec around [6]
*Math check: 12 ÷ 2 = 6 ✓*

Fasten off, leaving 10-inch tail. Weave through remaining sts and pull tight to close.

---

### ROCKET TOY

#### ROCKET BODY (make 1 in Brown)

**Rnd 1:** 4 sc in magic ring [4]

**Rnd 2:** (sc, inc) around [6]
*Math check: 4 + 2 = 6 ✓*

**Rnd 3:** sc around [6]

**Rnd 4:** (2 sc, inc) around [8]
*Math check: 6 + 2 = 8 ✓*

**Rnd 5:** sc around [8]

**Rnd 6:** (3 sc, inc) around [10]
*Math check: 8 + 2 = 10 ✓*

**Rnds 7-11:** sc around [10]
*(5 rounds even for body)*

**Stuff firmly**

**Rnd 12:** (3 sc, dec) around [8]
*Math check: 10 - 2 = 8 ✓*

**Rnd 13:** dec around [4]
*Math check: 8 ÷ 2 = 4 ✓*

Fasten off, leaving tail. Weave through remaining sts and pull tight to close
Disclaimer: This pattern was generated by AI and should be reviewed for accuracy before use. While we strive for quality, AI-generated content may contain errors. Please verify measurements, stitch counts, and instructions before beginning your project. Generated by purlJam.uk
Access your pattern anytime
Bookmark this page to access your pattern anytime