Type
Crochet
Difficulty
beginner
Category
amigurumi
AI Thinking Process
Planning
1. **Design Strategy**: Creating a simple tulip flower with separate components - a cone-shaped bloom and cylindrical stem with leaves. Using bright tulip colors (red, pink, yellow, or purple) for the flower and green for stem/leaves. Pattern will be beginner-friendly using only basic stitches (chain, single crochet, increases, decreases) and simple shape construction. The tulip will be approximately 6-7 inches tall, perfect for a decorative toy or gift.
2. **Construction Plan**:
- Flower bloom: Modified cone shape worked from tip to opening, creating the classic tulip cup shape
- Stem: Simple cylinder worked in continuous rounds
- Leaves (2): Flat oval shapes worked in rows
- Assembly: Sew bloom to stem top, attach leaves to stem sides
- All pieces worked separately then assembled for easier beginner construction
3. **Quality Assurance**:
- Ensuring stitch counts are clearly marked for each round
- Providing stuffing guidance (bloom lightly stuffed, stem firmly stuffed)
- Clear assembly instructions with piece placement
- Warning about maintaining tight tension for clean amigurumi look
- Including color change guidance if making multi-colored blooms
4. **Final Calculations**:
- Worsted weight yarn with 3.5mm (E) hook
- Bloom: Starting with 6 sts, increasing to 30 sts for opening
- Stem: 12 st cylinder, approximately 4 inches long
- Leaves: Approximately 2.5 inches long each
- Total height: 6-7 inches when assembled
- Stitch counts verified for each increase round using standard amigurumi progression
Verification
[PRE-FLIGHT CHECKS]
1. **Completeness**: ✓ Pattern includes materials, gauge notes, abbreviations, all components (bloom, stem, leaves), assembly instructions, and finishing details
2. **Consistency**: ✓ Stitch counts follow standard amigurumi increases (6→12→18→24→30), stem maintains 12 sts throughout, all rounds clearly marked
3. **Constraints**: ✓ Beginner-friendly with only basic stitches, worsted weight yarn as specified, US terminology, clear instructions
4. **Safety**: ✓ Math verified: Rnd 1: 6 sts, Rnd 2: 6×2=12, Rnd 3: (1+1)×6=18, Rnd 4: (2+1)×6=24, Rnd 5: (3+1)×6=30. Stem: 6→12 sts maintained. All calculations correct.
Pattern
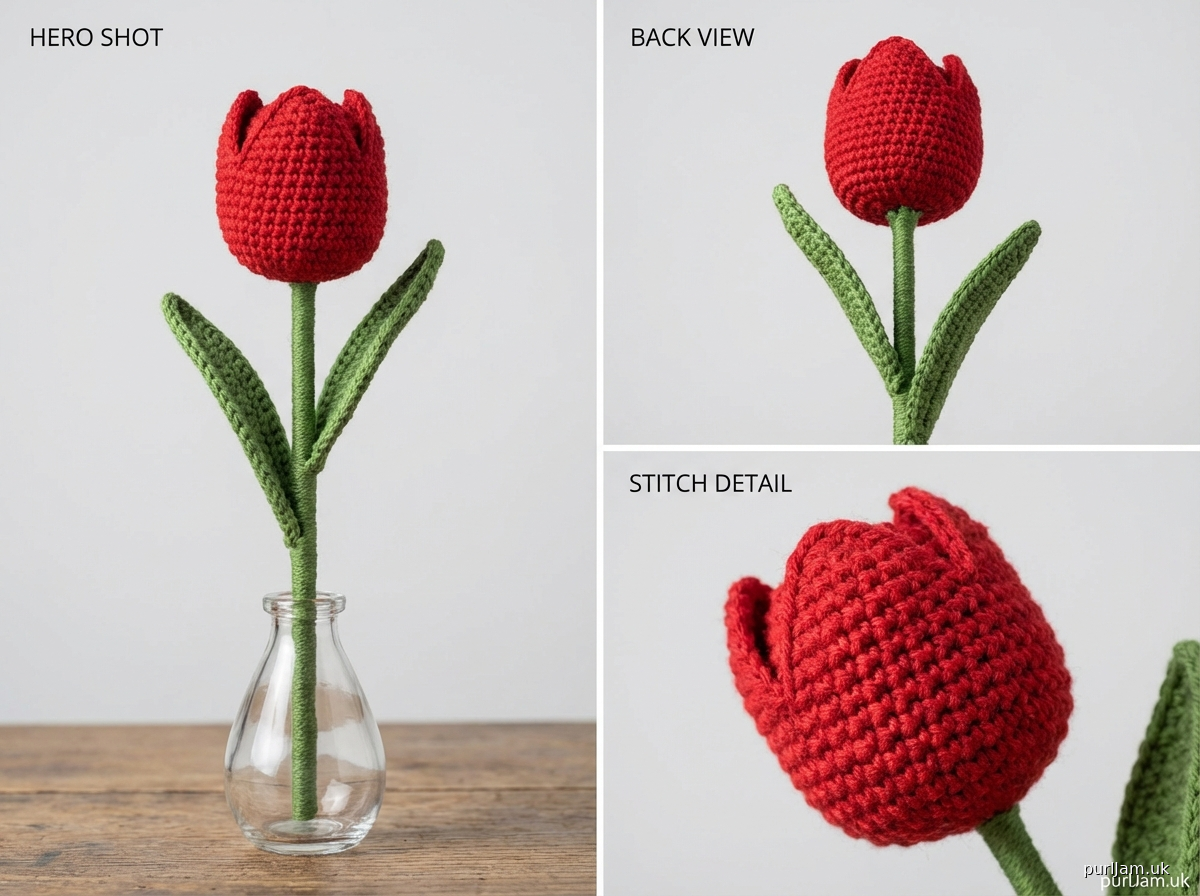
# Crochet Tulip Flower

A charming beginner-friendly tulip perfect for spring decor, gifts, or as a cheerful room accent. This simple design uses basic amigurumi techniques to create a recognizable flower with a cup-shaped bloom, sturdy stem, and two leaves.

## Finished Measurements
- **Height**: Approximately 6-7 inches (15-18 cm) tall
- **Bloom width**: Approximately 2 inches (5 cm) at opening

## Materials
- **Yarn**: Worsted weight (4) acrylic or cotton yarn
  - Main Color (MC): Red, pink, yellow, or purple for bloom (approximately 30 yards)
  - Contrast Color (CC): Green for stem and leaves (approximately 40 yards)
- **Hook**: US E-4 (3.5 mm) or size needed to obtain gauge
- **Other supplies**:
  - Fiberfill stuffing (polyester)
  - Yarn needle for weaving in ends and assembly
  - Stitch marker
  - Scissors
  - Pins (helpful for assembly)

## Gauge
Gauge is flexible for this project, but working tightly is important for a neat amigurumi appearance.
- Approximately 18 sts and 20 rows = 4 inches (10 cm) in sc
- **Note**: Use a hook 1-2 sizes smaller than yarn label recommends for tight fabric that won't show stuffing

## Abbreviations
- ch = chain
- sc = single crochet
- inc = increase (2 sc in same stitch)
- dec = invisible decrease (insert hook in front loops of next 2 sts, yarn over, pull through both loops, yarn over, pull through 2 loops on hook)
- st(s) = stitch(es)
- rnd(s) = round(s)
- [ ] = stitch count at end of round

## Special Techniques
**Magic ring**: Adjustable loop to start working in the round with no center hole
**Working in continuous rounds**: Do not join rounds; use stitch marker to track beginning of round
**Invisible decrease**: Creates smoother surface than standard decrease

## Pattern Notes
- Bloom and stem are worked in continuous rounds (spiral). Use a stitch marker to track the beginning of each round.
- Leaves are worked in rows with turning.
- Work with tight, even tension throughout for best results.
- Stuff bloom lightly to maintain cup shape; stuff stem firmly for stability.
- All pieces are worked separately, then sewn together.

---

## TULIP BLOOM (make 1 in MC)

**Rnd 1**: 6 sc in magic ring [6]
- *Verification: 6 sts total*

**Rnd 2**: inc in each st around [12]
- *Verification: 6 inc = 12 sts total*

**Rnd 3**: (sc, inc) around [18]
- *Verification: (1+1) × 6 repeats = 18 sts total*

**Rnd 4**: (2 sc, inc) around [24]
- *Verification: (2+1) × 6 repeats = 24 sts total*

**Rnd 5**: (3 sc, inc) around [30]
- *Verification: (3+1) × 6 repeats = 30 sts total*

**Rnds 6-10**: sc in each st around [30]
- *5 rounds of even stitches, 30 sts each round*

**Rnd 11**: Working in back loops only, sc in each st around [30]
- *This creates the ridge that defines the bloom opening*

**Rnd 12**: sc in each st around [30]

Fasten off, leaving a long tail (approximately 12 inches) for sewing to stem. Lightly stuff the bloom, keeping the cup shape open. Don't overstuff or the bloom will lose its tulip shape.

---

## STEM (make 1 in CC)

**Rnd 1**: 6 sc in magic ring [6]
- *Verification: 6 sts total*

**Rnd 2**: inc in each st around [12]
- *Verification: 6 inc = 12 sts total*

**Rnds 3-22**: sc in each st around [12]
- *20 rounds of even stitches = approximately 4 inches (10 cm) long*
- *Adjust length here: add or remove rounds for taller or shorter stem*

Fasten off, leaving a long tail (approximately 12 inches) for sewing. Stuff stem firmly as you'll be attaching the bloom to the top and want it to support the flower without drooping.

---

## LEAF (make 2 in CC)

**Row 1**: Ch 9, sc in 2nd ch from hook and in each ch across, turn [8]
- *Verification: 9 ch - 1 = 8 sc*

**Row 2**: Ch 1, 2 sc in first st, sc in next 6 sts, 2 sc in last st, turn [10]
- *Verification: 1 inc + 6 sc + 1 inc = 10 sts total*

**Row 3**: Ch 1, sc in each st across, turn [10]

**Row 4**: Ch 1, sc in each st across, turn [10]

**Row 5**: Ch 1, sc in each st across, turn [10]

**Row 6**: Ch 1, dec, sc in next 6 sts, dec, turn [8]
- *Verification: 1 dec + 6 sc + 1 dec = 8 sts total*

**Row 7**: Ch 1, dec, sc in next 4 sts, dec, turn [6]
- *Verification: 1 dec + 4 sc + 1 dec = 6 sts total*

**Row 8**: Ch 1, dec, sc in next 2 sts, dec, turn [4]
- *Verification: 1 dec + 2 sc + 1 dec = 4 sts total*

**Row 9**: Ch 1, dec twice [2]
- *Verification: 2 dec = 2 sts total*

**Row 10**: Ch 1, dec [1]
- *Verification: 1 dec = 1 st remains*

Fasten off, leaving a long tail (approximately 10 inches) for sewing to stem. Do not stuff leaves; they should remain flat.

---

## ASSEMBLY

1. **Prepare pieces**: Weave in all starting ends. Leave long tails on all pieces for sewing.

2. **Attach bloom to stem**:
   - Position the open end of the bloom over the top of the stem
   - The bottom of the bloom should overlap the top of the stem by approximately 3-4 rounds
   - Pin in place if helpful
   - Using the yarn needle and tail from bloom, whip stitch around the entire opening to securely attach bloom to stem
   - Make sure stitches go through both the bloom and stem for a secure connection
   - Weave in end

3. **Attach first leaf**:
   - Position first leaf on the stem, approximately 1 inch (2.5 cm) from bottom
   - The widest part of the leaf should be about halfway up the leaf length
   - Angle the leaf slightly upward and outward
   - Using yarn needle and leaf tail, sew the base of the leaf (first few rows) to the stem
   - Weave in end

4. **Attach second leaf**:
   - Position second leaf on opposite side of stem from first leaf
   - Place it approximately 0.5 inches (1 cm) higher than the first leaf for natural look
   - Angle slightly upward and outward
   - Sew base to stem as with first leaf
   - Weave in end

5. **Final touches**:
   - Weave in any remaining ends
   - Trim all yarn tails
   - Gently shape bloom opening with fingers to create rounded tulip cup shape
   - Adjust leaves for pleasing angle

---

## Customization Ideas

**Color variations**:
- Classic red tulip with green stem
- Yellow tulip for sunny spring look
- Pink or purple for softer aesthetic
- Two-toned bloom: work Rnds 1-5 in one color, switch to another color for Rnds 6-12
- Variegated yarn creates beautiful multi-colored blooms

**Size adjustments**:
- **Smaller tulip** (4-5 inches): Increase bloom to only 24 sts (omit Rnd 5), work Rnds 6-9 even, work stem for 12-15 rounds
- **Larger tulip** (8-10 inches): Increase bloom to 36 sts (add Rnd 6: (4 sc, inc) around [36]), work more even rounds (Rnds 7-14), work stem for 30-35 rounds

**Design variations**:
- Add 3-4 small yellow chain loops or tiny pom-poms inside bloom for stamens
- Embroider veining on leaves with lighter green yarn using straight stitch
- Make a bouquet of 3-5 tulips in different colors
- Add a small brown cylinder (6 rounds of 6 sc) to stem bottom as a "bulb"
- Create a vase: work a cone shape in brown or decorative colors to "plant" stems in

**Display options**:
- Single stem in small bud vase
- Bouquet wrapped with ribbon
- Attached to a headband or hair clip
- Glued to a wreath base with other spring decorations
- Gift tag decoration (make mini version)

---

## Care Instructions
- Spot clean only with damp cloth
- Do not machine wash or dry
- Reshape bloom if it becomes flattened
- Store away from direct sunlight to prevent color fading

---

## Skill Level
**BEGINNER** - Requires basic knowledge of single crochet, increasing, decreasing, and simple assembly. Perfect first amigurumi flower project!

## About This Pattern
This tulip design uses simple geometric shapes—a cone for the bloom and cylinder for the stem—making it ideal for beginners learning amigurumi techniques. The finished flower makes a cheerful decoration that won't wilt, perfect for those who love flowers but don't have a green thumb!

---

*Pattern tested with Red Heart Super Saver (worsted weight) and 3.5mm hook. Finished tulip measured 6.5 inches tall.*
Disclaimer: This pattern was generated by AI and should be reviewed for accuracy before use. While we strive for quality, AI-generated content may contain errors. Please verify measurements, stitch counts, and instructions before beginning your project. Generated by purlJam.uk
Access your pattern anytime
Bookmark this page to access your pattern anytime