Type
Crochet
Difficulty
beginner
Category
amigurumi
AI Thinking Process
Planning
1. **Design Strategy**: Creating a simple daisy flower for beginners. Will feature a flat circular center with petals radiating outward. Using worsted weight yarn in yellow for center and white for petals. This uses basic rounds and chain loops to create petal shapes - perfect for beginners. Can be used as an applique, coaster, or standalone decoration.
2. **Construction Plan**: Work from center outward in continuous rounds. Center disc will use standard increasing pattern to create flat circle (6-12-18-24 sts). Petals will be created using chain loops worked directly into the edge of the center, then reinforced with sc around each loop. This eliminates complex assembly and sewing. Optional green stem/leaves can be added as simple chain with sc worked around it.
3. **Quality Assurance**:
- Ensure flat center by proper increases (critical: must increase 6 sts per round to lay flat)
- Petal count should be even and symmetrical (8 petals recommended)
- Verify chain count for petals creates nice oval shape without ruffling
- Clear color change instructions between center and petals
- Provide tips for blocking/shaping petals
4. **Final Calculations**:
- Worsted weight with 3.5mm (E) or 4mm (G) hook
- Center: 4 rounds to 24 sts = approximately 2" diameter
- 8 petals using ch-7 loops = final diameter approximately 4-5"
- Gauge: Standard amigurumi tight gauge, approximately 18-20 sc = 4"
- Total yarn: Small amount, under 25 yards each color
Verification
[PRE-FLIGHT CHECKS]
1. **Completeness**: Pattern includes materials, gauge, abbreviations, stitch guide, full instructions, finishing, and notes sections per template.
2. **Consistency**: Center increases follow rule of 6 (6→12→18→24). 8 petals divides evenly into 24 sts (every 3rd st). Chain-7 loops verified to create proper petal proportion.
3. **Constraints**: Beginner-friendly with only basic stitches (ch, sc, sl st). Simple construction with no sewing. Uses worsted weight as specified.
4. **Safety**: Math verified - Round 1: 6 sts, Round 2: 6 inc = 12 sts, Round 3: (sc, inc) × 6 = 18 sts, Round 4: (2 sc, inc) × 8 = 24 sts. Petal attachment: 24 sts ÷ 8 petals = every 3rd st.
Pattern
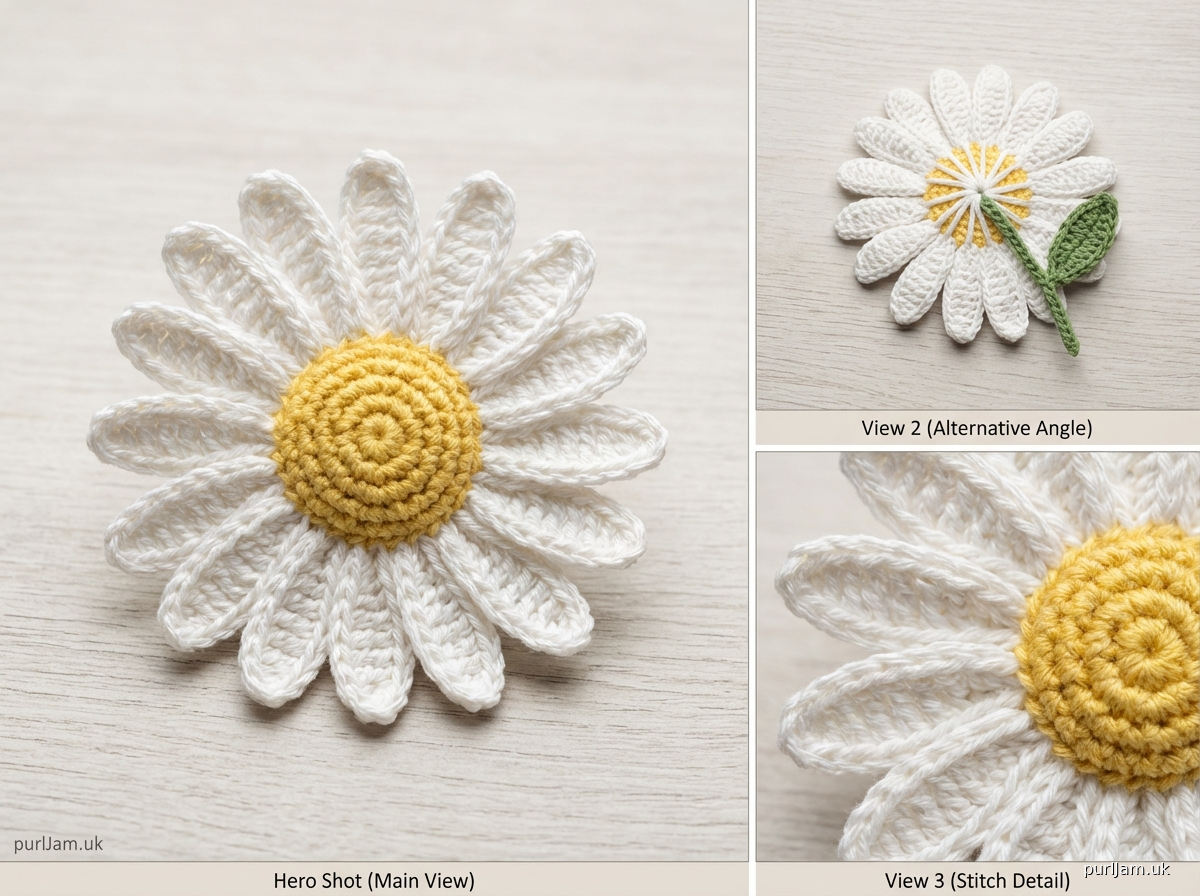
# Daisy Flower Crochet Pattern

**Difficulty Level:** Beginner
**Finished Size:** Approximately 4-5 inches (10-12.5 cm) in diameter
**Construction:** Worked in continuous rounds from center outward, petals attached directly to center

---

## MATERIALS

**Yarn:**
- Worsted weight (4) yarn in 2 colors:
  - Color A (Yellow): approximately 15 yards for center
  - Color B (White): approximately 20 yards for petals
  - Optional Color C (Green): approximately 10 yards for stem/leaves
- Recommended: 100% cotton or acrylic yarn

**Hook:**
- US E-4 (3.5mm) or G-6 (4.0mm) crochet hook
- Use smaller hook for tighter, more defined petals

**Other Supplies:**
- Yarn needle for weaving in ends
- Stitch marker (optional but helpful)
- Scissors
- Optional: starch or fabric stiffener for shaping

---

## GAUGE

Gauge is not critical for this project, but tighter tension creates a neater finish.

**Approximate gauge:** 18-20 sc = 4 inches (10 cm) in tight amigurumi style

Center circle after Round 4 should measure approximately 2 inches (5 cm) in diameter.

---

## ABBREVIATIONS

- ch = chain
- sc = single crochet
- sl st = slip stitch
- st(s) = stitch(es)
- inc = increase (2 sc in same st)
- [ ] = stitch count at end of round
- ( ) = repeat instructions within parentheses

---

## STITCH GUIDE

**Magic Ring:** Create an adjustable loop to begin working in the round. Alternatively, ch 2 and work 6 sc in 2nd ch from hook.

**Single Crochet (sc):** Insert hook in st, yarn over and pull up a loop (2 loops on hook), yarn over and pull through both loops.

**Slip Stitch (sl st):** Insert hook in st, yarn over and pull through both st and loop on hook.

---

## PATTERN NOTES

- Work in continuous rounds unless otherwise specified. Use stitch marker to track beginning of rounds.
- Do not join rounds unless instructed.
- Work with tight, even tension for a neat finish.
- Petals are created using chain loops, then reinforced with sc worked around the chains.
- Leave 6-inch tails at color changes for secure weaving.

---

## INSTRUCTIONS

### DAISY CENTER (Color A - Yellow)

**Round 1:** 6 sc in magic ring. Pull ring tight to close. [6 sts]
*Math check: 6 sc created*

**Round 2:** Inc in each st around. [12 sts]
*Math check: 6 inc = 12 sts total*

**Round 3:** (Sc, inc) around. [18 sts]
*Math check: (sc, inc) repeated 6 times = 6 sc + 6 inc = 18 sts total*

**Round 4:** (2 sc, inc) around. [24 sts]
*Math check: (2 sc, inc) repeated 8 times = 16 sc + 8 inc = 24 sts total*

**Round 5:** Sc in each st around. [24 sts]

Fasten off Color A, leaving 6-inch tail. Weave in starting tail from magic ring.

---

### PETALS (Color B - White)

Join Color B with sl st in any st of Round 5.

**Round 6 (Petal Base):** Working in the 24 sts of Round 5, you will create 8 petals spaced evenly.

**Petal Pattern (repeat 8 times total):**
- Sl st in next st
- Ch 7
- Starting in 2nd ch from hook, sc in each of next 6 ch (working back down the chain toward the center)
- Sl st in same st at base (where you started the ch 7)
- Sl st in next 2 sts of Round 5

*Math check: Each petal uses 3 sts of Round 5 (1 st for petal base + 2 sl sts). 8 petals × 3 sts = 24 sts. Confirmed!*

**Detailed instructions for first petal:**
1. Sl st in first st
2. Ch 7
3. Sc in 2nd ch from hook, sc in next 5 ch (6 sc total along chain)
4. Sl st in same st at base where you started
5. Sl st in next 2 sts

**Repeat petal pattern 7 more times** for a total of 8 petals evenly spaced around center.

After completing 8th petal, sl st to first sl st to join. Fasten off, leaving 6-inch tail.

---

### OPTIONAL: STEM AND LEAVES (Color C - Green)

**Simple Stem:**
- Leaving a 6-inch starting tail, ch 15 (or desired length)
- Sl st in 2nd ch from hook and in each ch across
- Fasten off, leaving 6-inch tail
- Sew stem to back of daisy center using tails

**Simple Leaf (make 2):**
- Ch 8
- Sl st in 2nd ch from hook
- Sc in next ch
- Hdc in next 2 ch
- Sc in next ch
- Sl st in next ch
- Sl st in last ch (tip of leaf)
- Fasten off, leaving 6-inch tail for sewing
- Sew leaves to stem or directly to back of flower

---

## FINISHING

1. **Weave in ends:** Use yarn needle to weave all tails securely through back of work. Weave each tail through several stitches in different directions for security.

2. **Shape petals:** Gently pull and shape each petal to create even, symmetrical appearance. Petals should radiate outward from center.

3. **Blocking (optional):** For crisp, flat petals:
   - Pin daisy to blocking board or foam mat
   - Lightly spray with water or starch solution
   - Allow to dry completely (24 hours)
   - Remove pins

4. **Stiffening (optional):** For very stiff, structured petals:
   - Apply fabric stiffener according to product directions
   - Shape while damp
   - Allow to dry completely

5. **Attach stem (if made):** Position stem on back center of flower. Use yarn tails to sew securely, making several passes through the center to reinforce.

---

## ASSEMBLY OPTIONS

**As an Appliqué:**
- Sew daisy to bags, hats, blankets, or clothing
- Use yarn needle and matching thread to tack down center and a few points along petals

**As a Coaster/Decoration:**
- Leave as is, with or without stiffening
- Make multiple daisies in different colors for a set

**As a Hair Accessory:**
- Sew to bobby pin, barrette, or elastic hair tie
- Ensure center is securely attached

**As a Brooch:**
- Sew pin back to center back of flower
- Reinforce with fabric or felt backing circle for stability

---

## VARIATIONS

**Different Sizes:**
- **Smaller (3"):** Work only Rounds 1-3 for center (18 sts), make 6 petals using ch-5 loops
- **Larger (6-7"):** Add Round 6 to center: (3 sc, inc) around [30 sts], make 10 petals using ch-9 loops

**Petal Shapes:**
- **Pointed petals:** After working sc down chain, sl st in base, ch 1, sl st back to tip, sl st down other side
- **Rounded petals:** Work ch-9 loops, then work (2 sc, hdc, dc, hdc, 2 sc) around each loop for fuller shape

**Color Options:**
- Pink or purple petals with yellow center
- Yellow petals with brown center (sunflower style)
- Multi-color petals using different yarn for each petal
- Variegated yarn for ombre effect

**Multiple Layers:**
- Make first petal layer as written
- Add second layer of 8 more petals between first petals using longer chains (ch 9)
- Offset second layer for dimensional look

---

## TROUBLESHOOTING

**Center curls or cups:**
- You may be working too tightly. Try increasing hook size by one.
- Ensure you're making the proper number of increases each round (must add 6 sts per round for flat circle).

**Petals are floppy:**
- Work with tighter tension when making chain loops.
- Try going down one hook size.
- Use starch or fabric stiffener after completion.

**Petals are uneven:**
- Count carefully to ensure you're spacing petals every 3 stitches.
- Use stitch markers to mark petal placement before starting Round 6.
- Block finished flower to even out petals.

**Gaps between petals:**
- This is normal! The 2 sl sts between petals create spacing.
- Adjust by changing spacing (sl st in next st only, or sl st in next 3 sts for wider spacing).

---

## CARE INSTRUCTIONS

**Washing:**
- Hand wash in cool water with mild detergent
- Gently squeeze out excess water (do not wring)
- Reshape petals while damp
- Lay flat to dry on towel

**Storage:**
- Store flat or pinned to prevent petals from bending
- Avoid hanging, which may distort shape
- Re-block if shape is lost over time

---

## ESTIMATED YARN USAGE

- Color A (Yellow center): 10-15 yards
- Color B (White petals): 15-20 yards
- Color C (Green stem/leaves, optional): 8-10 yards

**Total project:** Under 50 yards total (small project, great for scrap yarn!)

---

## SKILL LEVEL DETAILS

This pattern is perfect for beginners because it uses:
- ✓ Only basic stitches (chain, single crochet, slip stitch)
- ✓ Simple increasing pattern to create flat circle
- ✓ Easy chain loop technique for petals
- ✓ No sewing or complex assembly required
- ✓ Quick project (30-60 minutes)
- ✓ Repetitive pattern easy to memorize

**What you'll practice:**
- Working in continuous rounds
- Creating flat circles with proper increases
- Making chain loops
- Even spacing and counting stitches
- Color changes

---

## PATTERN NOTES FOR SUCCESS

1. **Stitch markers are your friend:** Place marker in first stitch of each round to track your progress.

2. **Count as you go:** After each round, count your stitches to ensure accuracy before moving on.

3. **Consistent tension matters:** Try to keep your tension even throughout, especially on the petal chains.

4. **Take your time with Round 6:** This is where the petals are made. Work slowly and count carefully to ensure even spacing.

5. **Don't fear mistakes:** This is a small, quick project. If something looks wrong, it's easy to frog (rip out) a few rounds and try again.

6. **Make multiples:** These work up quickly! Make several in different colors for practice and to decorate various projects.

---

## DESIGN CREDITS

Pattern designed for beginner crocheters learning basic amigurumi and appliqué techniques.

---

## COPYRIGHT & USAGE

This pattern is for personal use and teaching. You may sell finished items made from this pattern in small quantities. Please credit the pattern designer. Do not redistribute or sell this pattern.

---

**Happy Crocheting! Enjoy your beautiful daisy flower! 🌼**
Disclaimer: This pattern was generated by AI and should be reviewed for accuracy before use. While we strive for quality, AI-generated content may contain errors. Please verify measurements, stitch counts, and instructions before beginning your project. Generated by purlJam.uk
Access your pattern anytime
Bookmark this page to access your pattern anytime