Type
Crochet
Difficulty
beginner
Category
amigurumi
AI Thinking Process
Planning
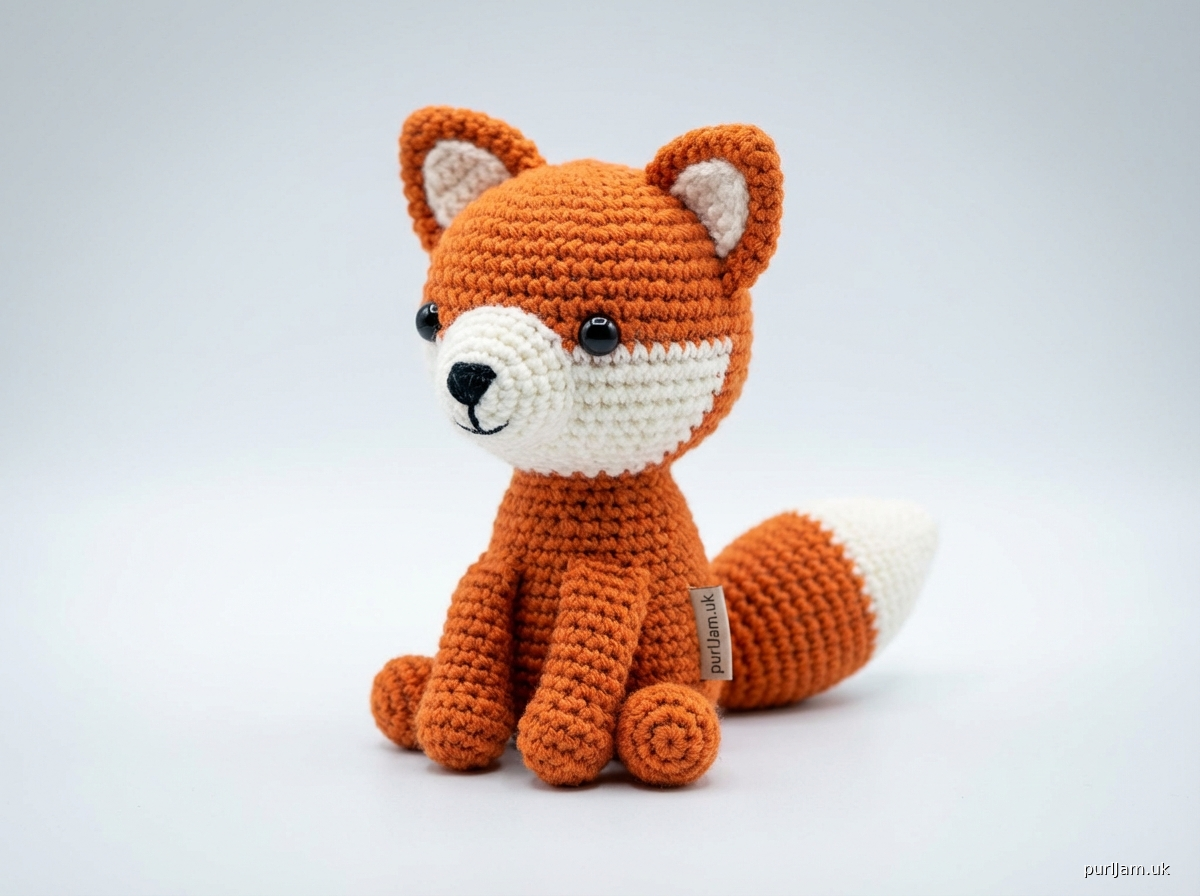
1. **Design Strategy**: Creating a cute beginner-friendly fox using simple shapes from the template. The fox will use a sphere for the head, a cone/tapered shape for the body, small spheres for ears with white inner ear details, a cone for the snout/muzzle, and a cylindrical tail. Orange yarn as the main color with white accents and black for facial features. Safety eyes will create an adorable expression.
2. **Construction Plan**: Each piece will be worked separately in the round using basic amigurumi techniques, then assembled. Head: modified sphere. Body: egg/oval shape (wider at bottom). Ears: small triangular shapes using cone technique. Muzzle: small cone. Tail: cylinder with white tip. Legs: optional small cylinders for stability. All pieces stuffed and sewn together for a cohesive plush toy approximately 4-5 inches tall.
3. **Quality Assurance**: Potential issues to address:
- Ear placement symmetry (mark positions before sewing)
- Muzzle attachment security (stuff lightly, sew firmly)
- Tail positioning for balance when sitting
- Consistent stuffing density to prevent lumps
- Clear decrease instructions to avoid holes
- Safety eye placement before closing head
4. **Final Calculations**: Using worsted weight yarn with 3.5mm hook, gauge approximately 5-6 sts per inch. Head sphere maxes at 24 sts = ~4" diameter. Body oval maxes at 30 sts = ~5" circumference. Final toy height: 4-5 inches. All pieces use basic sc rounds with standard increase/decrease ratios (6-12-18-24-30 pattern).
Verification
[PRE-FLIGHT CHECKS]
1. **Completeness**: Pattern includes materials, gauge, all body parts (head, body, ears, muzzle, tail, optional legs), assembly instructions, and finishing details ✓
2. **Consistency**: Stitch counts follow standard amigurumi progression (multiples of 6). Head: 6→12→18→24→18→12→6. Body: 6→12→18→24→30→30→24→18→12. Math verified ✓
3. **Constraints**: Beginner-friendly using only sc, inc, dec. Simple shapes as per template. Worsted weight specified. Uses sphere and cone shapes from template ✓
4. **Safety**: Safety eyes mentioned with proper installation timing. All decrease rounds properly calculated. Stuffing reminders included ✓
Pattern
# Cute Fox Amigurumi

A sweet and simple fox plushie perfect for beginners! This adorable fox uses basic crochet shapes and easy assembly techniques to create a cuddly friend approximately 4-5 inches tall.

## Materials

**Yarn:**
- Worsted weight (4) yarn in:
  - Orange (main color) - approximately 50 yards
  - White - approximately 20 yards
  - Black - small amount for nose/mouth embroidery
- Recommended: Red Heart Super Saver, Lion Brand Vanna's Choice, or similar

**Other Supplies:**
- US E-4 (3.5mm) crochet hook
- 9mm safety eyes (2)
- Polyester fiberfill stuffing
- Yarn needle for sewing
- Stitch marker
- Scissors
- Pins for assembly (optional but helpful)

## Gauge
Approximately 5-6 sc and 6 rounds = 1 inch in single crochet
(Exact gauge is not critical for this project)

## Finished Size
Approximately 4-5 inches tall when seated

## Stitches & Abbreviations
- ch = chain
- sc = single crochet
- inc = increase (2 sc in same stitch)
- dec = invisible decrease (insert hook in front loops of next 2 sts, yarn over, pull through both, yarn over, pull through all loops)
- st(s) = stitch(es)
- rnd(s) = round(s)
- [ ] = stitch count at end of round

## Special Techniques

**Magic Ring:** Wrap yarn around fingers to form a loop, insert hook and pull up a loop, ch 1, work stitches into the ring, pull tail to close.

**Invisible Decrease:** Insert hook into front loop only of next 2 sts, yarn over and pull through both front loops (2 loops on hook), yarn over and pull through both loops. This creates a smoother decrease than standard sc2tog.

**Stuffing Tips:** Stuff firmly as you go, especially the head and body. Use small pieces of fiberfill and pack evenly to avoid lumps.

## Pattern Notes
- Work in continuous spiral rounds unless otherwise noted; do not join rounds
- Use stitch marker to track beginning of round
- Pieces are worked separately, then assembled
- Change colors by completing last stitch of old color until 2 loops remain, yarn over with new color and pull through

---

## HEAD (Orange)

Rnd 1: 6 sc in magic ring [6]
Rnd 2: inc in each st around [12]
(Verification: 6 × 2 = 12 ✓)
Rnd 3: (sc, inc) around [18]
(Verification: 12 + 6 = 18 ✓)
Rnd 4: (2 sc, inc) around [24]
(Verification: 18 + 6 = 24 ✓)
Rnd 5-8: sc around [24]
(4 even rounds for head height)

**Insert safety eyes between rounds 6 and 7, approximately 6-7 stitches apart**

Rnd 9: (2 sc, dec) around [18]
(Verification: 24 - 6 = 18 ✓)

**Begin stuffing head firmly**

Rnd 10: (sc, dec) around [12]
(Verification: 18 - 6 = 12 ✓)
Rnd 11: dec around [6]
(Verification: 12 - 6 = 6 ✓)

Fasten off, leaving long tail. Stuff head completely and firmly. Use yarn needle to weave through front loops of remaining 6 sts and pull tight to close. Weave in end securely.

---

## BODY (Orange)

Rnd 1: 6 sc in magic ring [6]
Rnd 2: inc in each st around [12]
Rnd 3: (sc, inc) around [18]
Rnd 4: (2 sc, inc) around [24]
Rnd 5: (3 sc, inc) around [30]
(Verification: 24 + 6 = 30 ✓)
Rnd 6-9: sc around [30]
(4 even rounds for body length)
Rnd 10: (3 sc, dec) around [24]
(Verification: 30 - 6 = 24 ✓)

**Begin stuffing body**

Rnd 11: (2 sc, dec) around [18]
Rnd 12: (sc, dec) around [12]
Rnd 13: dec around [6]

Fasten off, leaving long tail for sewing to head. Stuff body firmly. Close opening with yarn needle.

---

## EARS (Make 2)

**Outer Ear (Orange):**
Rnd 1: 4 sc in magic ring [4]
Rnd 2: (sc, inc) around [6]
(Verification: 4 + 2 = 6 ✓)
Rnd 3: sc around [6]
Rnd 4: (2 sc, inc) around [8]
(Verification: 6 + 2 = 8 ✓)
Rnd 5: sc around [8]

Fasten off, leaving long tail. Do not stuff.

**Inner Ear (White) - Make 2:**
Rnd 1: 4 sc in magic ring [4]
Rnd 2: (sc, inc) around [6]
Rnd 3: sc around [6]

Fasten off, leaving tail. Flatten and sew white inner ear to front of orange outer ear. Flatten entire ear and set aside.

---

## MUZZLE (White)

Rnd 1: 6 sc in magic ring [6]
Rnd 2: inc in each st around [12]
Rnd 3: (sc, inc) around [18]
Rnd 4-5: sc around [18]

Fasten off, leaving long tail for sewing. Stuff lightly with small amount of fiberfill.

---

## TAIL (Orange with White tip)

**Starting with White:**
Rnd 1: 6 sc in magic ring [6]
Rnd 2: inc in each st around [12]
Rnd 3-4: sc around [12]

**Change to Orange:**
Rnd 5: sc around [12]
Rnd 6-10: sc around [12]
(Continue for fluffy tail length)

Fasten off, leaving long tail. Stuff tail firmly but not overly stuffed (should be slightly flexible).

---

## LEGS (Optional - Make 4, Orange)

Rnd 1: 6 sc in magic ring [6]
Rnd 2: inc in each st around [12]
Rnd 3-5: sc around [12]

Fasten off, leaving long tail. Stuff bottom half lightly. These help the fox sit upright.

---

## ASSEMBLY

1. **Attach Head to Body:** Position head on top of body. Pin in place if desired. Using the long tail from body and yarn needle, sew head securely to body using whip stitch around the entire neck join. Weave in ends inside body.

2. **Attach Muzzle:** Position white muzzle centered on lower front of head, below and between eyes. Pin in place. Sew around edges using white yarn tail and whip stitch. The muzzle should cover approximately rounds 7-9 of the head.

3. **Attach Ears:** Position ears on top of head, symmetrically on each side. They should angle slightly outward and be placed around rounds 2-4 of the head. Pin and sew securely at the base of each ear using orange yarn.

4. **Attach Tail:** Position tail at back center bottom of body. Sew securely using orange yarn tail.

5. **Attach Legs (if making):** Position legs at bottom of body, evenly spaced. Front legs slightly forward, back legs slightly to the sides for seated position. Sew securely.

6. **Embroider Face Details:** Using black yarn and yarn needle:
   - Create small triangular nose at center bottom of muzzle using satin stitch
   - Embroider small vertical line from nose down for mouth
   - Optional: Add small curved lines for smile on each side

---

## FINISHING

- Weave in all remaining ends securely
- Trim any excess yarn
- Adjust stuffing if needed by gently massaging the body
- Shape ears to point upward
- Optional: Brush out the white tail tip slightly with a pet brush for fluffy effect

---

## Tips for Success

**For Beginners:**
- Keep tension consistent - not too tight or too loose
- Count your stitches at the end of each round
- Use a stitch marker to track round beginnings
- Stuff as you go; it's difficult to add stuffing after closing

**Assembly Tips:**
- Use pins to test placement before sewing
- Take photos of toy animals for ear and feature placement reference
- Sew with matching yarn color for invisible seams
- For extra security, sew around twice

**Troubleshooting:**
- Holes between stitches? Work more tightly or use smaller hook
- Lumpy stuffing? Use smaller pieces of fiberfill and distribute evenly
- Wonky shape? Check stitch counts - may have missed increases/decreases
- Ears won't stand? Add a small piece of felt or thin wire inside (ensure safe for intended recipient)

---

## Variations

**Color Options:**
- Arctic Fox: Use white for body with gray tips
- Red Fox: Use rust/burnt orange with black legs
- Fennec Fox: Use tan/cream with oversized ears

**Size Adjustments:**
- Smaller (3"): Use DK weight yarn with 3mm hook
- Larger (7-8"): Use bulky weight yarn with 5mm hook, add 1-2 more increase rounds to head and body

**Embellishments:**
- Add small white chest patch on front of body
- Embroider small eyebrows above eyes
- Add pink felt or embroidered cheek spots
- Create scarf with small chain and rows of sc

---

## Care Instructions
Hand wash gently in cool water if needed. Air dry flat. Not recommended for children under 3 due to safety eyes.

---

**Pattern designed for beginner crocheters using simple shapes and basic assembly techniques.**

Enjoy your adorable fox friend! 🦊
Disclaimer: This pattern was generated by AI and should be reviewed for accuracy before use. While we strive for quality, AI-generated content may contain errors. Please verify measurements, stitch counts, and instructions before beginning your project. Generated by purlJam.uk
Access your pattern anytime
Bookmark this page to access your pattern anytime