Type
Crochet
Difficulty
advanced
Category
pullover
Pattern
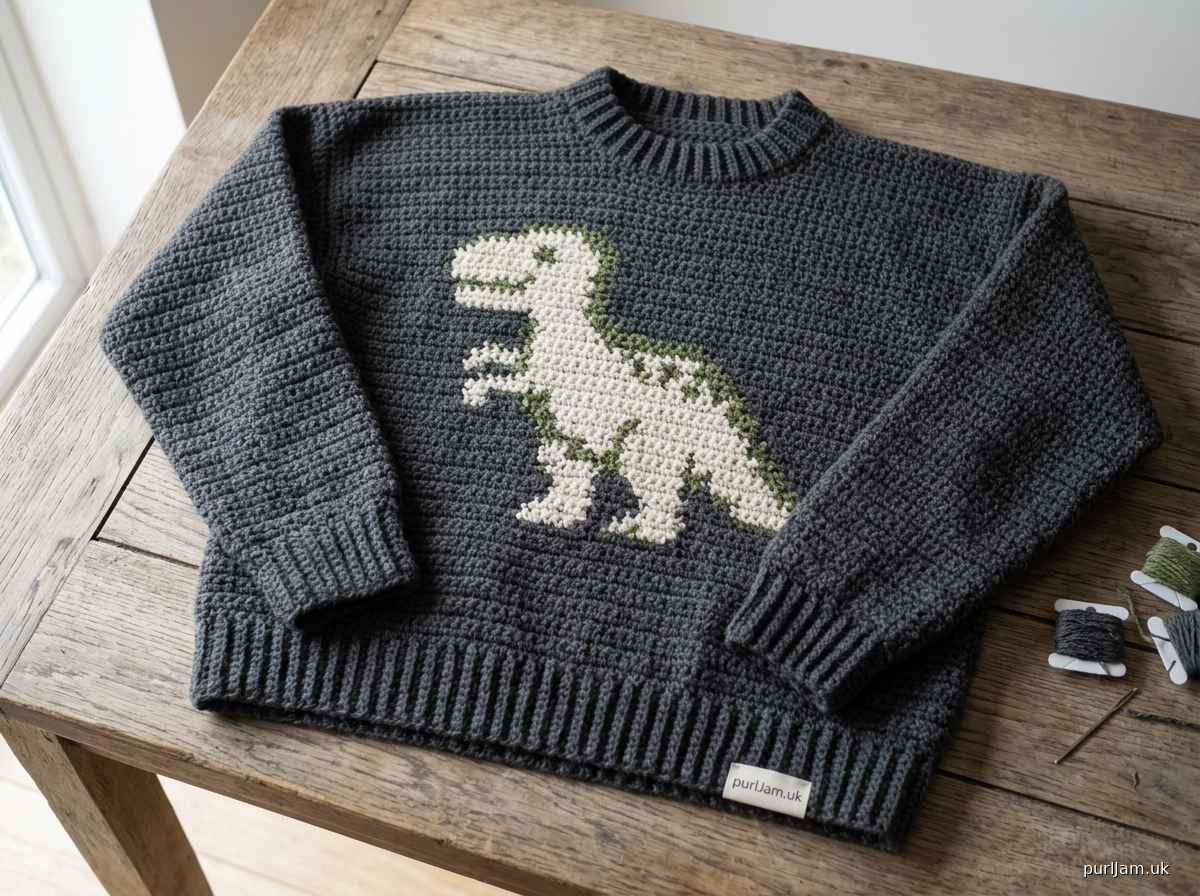
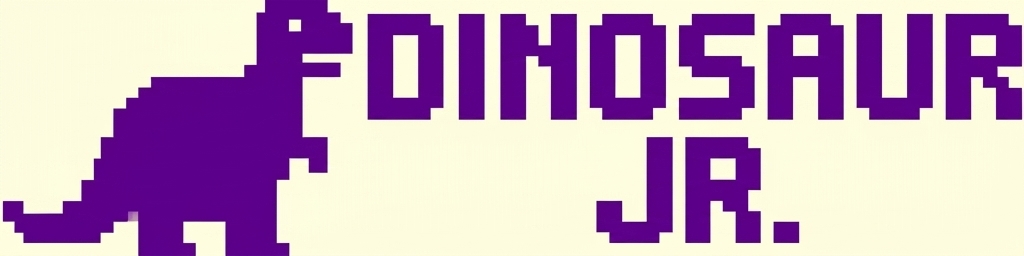
# Dinosaur Jr Jumper
### A Crochet Pullover with Graphic Chart Panel
**Difficulty:** Advanced
**Construction:** Worked flat in four pieces (back, front, two sleeves), seamed, with neckband worked in the round.

---

## Sizes
Sample shown in size **Medium**. Pattern written for **S (M, L, XL, 2XL)**.

| Size | To Fit Bust | Finished Bust | Length | Sleeve Length |
|------|------------|---------------|--------|---------------|
| S    | 34–36"     | 38"           | 23"    | 18"           |
| M    | 38–40"     | 42"           | 24"    | 18.5"         |
| L    | 42–44"     | 46"           | 25"    | 19"           |
| XL   | 46–48"     | 50"           | 26"    | 19.5"         |
| 2XL  | 50–52"     | 54"           | 27"    | 20"           |

Designed with approximately **4" of positive ease**.

---

## Materials

- **Yarn:** Worsted weight (CYC #4), smooth plied wool or wool blend
  - **Main Color (MC):** 900 (1000, 1100, 1250, 1400) yds — suggested charcoal gray
  - **Contrast Color A (CC1):** 150 yds — suggested cream / off-white
  - **Contrast Color B (CC2):** 75 yds — suggested rust or moss green (for chart accent)
- **Hook:** US H/8 (5.0 mm) — or size needed for gauge
- **Smaller Hook:** US G/6 (4.0 mm) for ribbing
- **Notions:** Tapestry needle, stitch markers, yarn bobbins (4–6 for intarsia), scissors, blocking mat & pins

---

## Gauge

**14 dc × 8 rows = 4" (10 cm)** in double crochet on US H/8 hook, blocked.
**16 sc × 18 rows = 4"** in single crochet back-loop ribbing on US G/6 hook.
*Always swatch and block. Gauge is critical for fit, especially with intarsia.*

---

## Abbreviations (US Terms)

- **ch** — chain
- **sc** — single crochet
- **dc** — double crochet
- **hdc** — half double crochet
- **sl st** — slip stitch
- **st(s)** — stitch(es)
- **BLO** — back loops only
- **MC / CC1 / CC2** — main / contrast colors
- **RS / WS** — right side / wrong side
- **rep** — repeat

---

## Special Techniques

- **SC Ribbing (BLO):** Worked sideways. Ch desired height + 1, sc in 2nd ch from hook and across, turn. Each subsequent row: ch 1, sc in BLO across, turn. Ribbing length is determined by number of rows.
- **Intarsia Color Change (in dc):** Work the last yarn-over of the final stitch in the old color with the new color; drop old color to WS. Use a separate bobbin for each color block. Twist yarns at color change to avoid holes.
- **Joining Ribbing to Body:** With RS facing, work specified number of dc evenly along the long edge of ribbing.

---

## Pattern Notes

- Body pieces are worked bottom-up. Ribbing is worked first (sideways), then turned 90° and the body is worked across the long edge.
- The **front piece** features an attached graphic stitch chart panel worked in intarsia (see *Attached Stitch Chart* section).
- Turning chains do **not** count as stitches. Begin each dc row with ch 2, work first dc into the first stitch.
- All shaping is at the edges; the chart panel is centered on the front and not affected by side shaping (verified for all sizes).

---

## BACK

### Bottom Ribbing
With smaller hook and MC, ch **11** (height of ribbing = approx. 2.5").
**Row 1:** Sc in 2nd ch from hook and each ch across — 10 sc. Turn.
**Rows 2–N:** Ch 1, sc in BLO across — 10 sc. Turn.

Repeat Row 2 until ribbing measures **19 (21, 23, 25.25, 27.25)"** along long edge — approximately **86 (95, 104, 114, 123) rows**. Do not fasten off.

### Body
Switch to larger hook. Rotate work 90° to work along long edge of ribbing.
**Setup Row (RS):** Ch 2, work **67 (74, 81, 88, 95) dc** evenly along long edge. Turn.
*Math check: 67/14 × 4 = 19.1"; 74/14 × 4 = 21.1"; 81/14 × 4 = 23.1"; 88/14 × 4 = 25.1"; 95/14 × 4 = 27.1" — equals half-bust ✓*

**Rows 2–N:** Ch 2, dc in each st across — 67 (74, 81, 88, 95) dc. Turn.

Continue in dc until piece measures **14 (14.5, 15, 15.5, 16)"** from cast-on edge, ending with a WS row.

### Armhole Shaping
**Next Row (RS):** Sl st across first **4 (5, 6, 7, 8)** sts, ch 2, dc in next st and each st until **4 (5, 6, 7, 8)** sts remain, turn — **59 (64, 69, 74, 79) dc**.

**Decrease Rows:** Dc2tog at each end of next 2 rows — **55 (60, 65, 70, 75) dc**.

Continue in dc until armhole measures **8 (8.5, 9, 9.5, 10)"**.

### Shoulder & Back Neck
**Shoulder Row:** Sl st across first **5 (6, 6, 7, 7)** sts, ch 2, dc to last **5 (6, 6, 7, 7)** sts, turn.
**Next Row:** Sl st across first **5 (5, 6, 6, 7)** sts, ch 2, dc to last **5 (5, 6, 6, 7)** sts. Fasten off, leaving center back neck **25 (28, 29, 30, 33) sts** for neckband pickup.

---

## FRONT

Work bottom ribbing and setup row exactly as for Back — **67 (74, 81, 88, 95) dc**.

### Plain Body Section
Work in dc until piece measures **8"** from cast-on edge, ending with a WS row.

### Chart Panel Section
The chart panel is **40 sts wide × 40 rows tall**, worked in intarsia using MC, CC1, and CC2.

**Center the chart:** On next RS row, work **(67−40)/2 = 13 (17, 20, 24, 27)** dc in MC, place marker, work **40 sts** following attached chart, place marker, work **14 (17, 21, 24, 28)** dc in MC to end. Turn.
*(Side margins differ by 1 st on odd-margin sizes; the larger margin is on the left of RS.)*

Continue working from the chart for 40 rows total (approximately 20" of pattern, but the chart only occupies 40 rows ≈ 20" — see Note). Maintain MC outside the markers throughout the chart panel.

> **Note:** With gauge of 8 rows = 4", 40 chart rows = **20"**. The chart begins at 8" and ends at 28" if worked in full; for this garment we work the chart for **24 rows ≈ 12"** to fit within the 23–27" total length. Begin chart at row indicated on the attached chart legend, not row 1, OR scale the chart to your size as noted in the *Attached Stitch Chart* section below.

After completing chart rows, cut CC1 and CC2 leaving 6" tails. Continue in MC only.

### Armhole Shaping
When piece measures **14 (14.5, 15, 15.5, 16)"**, work armhole shaping exactly as Back — **55 (60, 65, 70, 75) dc** after dec rows.

### Front Neck Shaping
When armhole measures **5.5 (6, 6.5, 7, 7.5)"**, divide for neck.

**Right Front (as worn):**
**Row 1 (RS):** Ch 2, dc in first **20 (22, 24, 26, 28)** sts. Turn — leave remaining sts unworked.
**Row 2:** Sl st across first 3 sts, ch 2, dc to end. Turn — 17 (19, 21, 23, 25) sts.
**Row 3:** Ch 2, dc to last 2 sts, dc2tog. Turn — 16 (18, 20, 22, 24) sts.
**Row 4:** Ch 2, dc2tog, dc to end. Turn — 15 (17, 19, 21, 23) sts.
**Rows 5–6:** Rep Rows 3–4 — 13 (15, 17, 19, 21) sts… continue dec 1 st at neck edge every row until **10 (11, 12, 14, 14)** sts remain.
Work even until armhole matches Back. Shape shoulder as Back. Fasten off.

**Left Front:** Skip center **15 (16, 17, 18, 19)** sts. Rejoin MC and mirror Right Front shaping.

*Math check: 20 + 15 + 20 = 55 ✓ for size S; 22 + 16 + 22 = 60 ✓ for M; etc.*

---

## SLEEVES (Make 2)

### Cuff
With smaller hook and MC, ch **13** (height ≈ 3").
Work sc BLO ribbing as for body until piece measures **8.5 (9, 9.5, 10, 10.5)"** along long edge — approximately **38 (40, 42, 45, 47) rows**.

### Sleeve Body
Switch to larger hook.
**Setup Row (RS):** Ch 2, work **30 (32, 34, 36, 38) dc** evenly along long edge. Turn.

**Rows 2–3:** Ch 2, dc across. Turn.
**Increase Row (RS):** Ch 2, 2 dc in first st, dc to last st, 2 dc in last st. Turn — +2 sts.
Repeat increase row every **4th row 7 (7, 8, 8, 9) times** total — **44 (46, 50, 52, 56) dc**.

Work even in dc until sleeve measures **18 (18.5, 19, 19.5, 20)"** from cast-on edge.

### Sleeve Cap Shaping
**Next Row:** Sl st across first **4 (5, 6, 7, 8)** sts, ch 2, dc to last **4 (5, 6, 7, 8)** sts, turn — **36 (36, 38, 38, 40) dc**.
Dec 1 st at each end every RS row until **14** sts remain.
Final row: dc across. Fasten off.

---

## ATTACHED STITCH CHART

> **Use the separate attached chart panel** for the visual grid. **Do not** look in this text for a row-by-row grid — the chart is provided as a separate asset alongside this pattern.

### Placement
The attached chart is the **graphic motif worked across the center 40 stitches × 40 rows of the FRONT piece only**, beginning when the front body measures **8"** from cast-on (i.e., immediately after the plain lower body section and before armhole shaping). It is centered horizontally as calculated in the *Front* instructions above.

### How to Read the Chart
- **Each square = 1 dc stitch.** Each row of squares = 1 row of dc.
- **RS rows (odd rows) are read right to left.** WS rows (even rows) are read left to right.
- **Symbols/colors on the chart map to:** MC (background), CC1 (primary motif — e.g., dinosaur silhouette), CC2 (accent — e.g., logo highlight). A legend is printed on the attached chart.
- Begin at **Row 1, bottom-right corner** of the chart on a RS row.

### Color Management & Intarsia Notes
- Wind small bobbins for each color block: at minimum 1 × MC (right margin), 1 × motif color block(s), 1 × MC (left margin). Add additional bobbins for any isolated color islands shown on the chart.
- **Twist yarns at every color change** on the WS to lock the floats and prevent holes; do not carry yarn across the back of large blocks.
- Bring the new color up from under the old color to maintain consistent twist direction.
- Weave in ends along same-color stitches on the WS after blocking.

### Stitch-Count Integration Math
- Chart width = **40 sts**; front width = **67 (74, 81, 88, 95) sts**.
- Side margins in MC = **13 / 14 (17 / 17, 20 / 21, 24 / 24, 27 / 28) sts** (right / left as worn, RS facing).
- Chart height = **40 rows = 20"**, but available vertical space between row 8" and start of neck shaping (~19.5–22") is approximately **22–28 rows ≈ 11–14"**. **Scale or crop the chart vertically** per the legend on the attached chart to fit your size, OR start the chart higher (at 6" instead of 8") if working the full 40 rows.
- Verify after chart completion: total front stitch count must still equal **67 (74, 81, 88, 95)** before armhole shaping. ✓

---

## FINISHING

1. **Block all pieces** to schematic measurements. This is essential for the intarsia panel to lie flat.
2. **Seam shoulders** with whip stitch or sl st seam, RS together.
3. **Set in sleeves:** Center sleeve cap at shoulder seam; pin and seam with whip stitch.
4. **Seam sides and underarms** in one continuous line with sl st seam, MC, RS together.

### Neckband
With smaller hook, MC, and RS facing, join at right shoulder seam.
**Round 1:** Ch 1, sc evenly around neckline — approximately **72 (76, 80, 84, 88) sc**, ensuring a multiple of 2. Sl st to first sc.
**Rounds 2–6:** Ch 1, sc in BLO of each st around. Sl st to join. (Adjust to 4–5 rounds for crew neck depth ≈ 1".)
Fasten off and weave in all ends.

### Final Touches
- Weave in all ends, especially intarsia color change tails, securing each along same-color stitches.
- Steam-block neckband and seams lightly.
- Allow to dry flat before wearing.

---

## Schematic (Measurements in Inches)

```
BACK / FRONT                  SLEEVE
 ┌──── 19/21/23/25/27 ────┐   ┌── 12.5/13/14.3/14.9/16 ──┐
 │                        │   │                          │
 │      Armhole 8–10"     │   │   Sleeve length 18–20"   │
 │                        │   │                          │
 │   Body 14–16"          │   │   Cuff 8.5–10.5"         │
 │                        │   └──────────────────────────┘
 │   Ribbing 2.5"         │
 └────────────────────────┘
```

Enjoy your **Dinosaur Jr Jumper** — wear loud, wear proud. 🦖🎸
Disclaimer: This pattern was generated by AI and should be reviewed for accuracy before use. While we strive for quality, AI-generated content may contain errors. Please verify measurements, stitch counts, and instructions before beginning your project. Generated by purlJam.uk
Access your pattern anytime
Bookmark this page to access your pattern anytime