Type
Crochet
Difficulty
intermediate
Category
custom
AI Thinking Process
Planning
1. **Design Strategy**: A top-down seamless raglan yoke sweater in worsted weight, worked in the round with a slim fit silhouette. The mosaic crochet technique (overlay mosaic, using carried yarn) creates the heart and skull motifs on the yoke, giving a striking colorwork effect without complex color changes mid-round.
2. **Construction Plan**: Top-down seamless construction — yoke worked in the round with raglan increases, then body and sleeves separated and worked independently in the round to the hem.
3. **Quality Assurance**:
- Mosaic overlay crochet requires careful tracking of CC rows vs MC rounds; chart must align with raglan increase rounds.
- Slim fit requires negative ease (~1–2"), so all circumference calculations must reflect this.
- Mosaic motifs must tile correctly across yoke stitch counts at the point they're introduced (after initial increases settle).
4. **Final Calculations**:
- Gauge: 16 sc × 20 rows = 4" (10 cm) in sc with worsted on 5.0 mm hook.
- Sizes: XS(S, M, L, XL, 2XL) — finished bust: 32(34, 36, 38, 40, 42)" with ~1–2" negative ease for slim fit.
- CO (magic ring start): 8 sts, increase yoke over ~60 rows to separation.
- Yoke cast-on: 72(76, 80, 84, 88, 92) sts after initial setup, increased to ~144(152, 160, 168, 176, 184) sts at separation.
- Mosaic repeat: 8-st repeat for hearts (fits all sizes); 16-st repeat for skulls (fits all sizes as multiples of 16 exist within yoke).
- Body sts at separation: 96(102, 108, 114, 120, 126) sts each front/back combined; sleeve: 48(50, 54, 58, 62, 66) sts each.
Verification
[PRE-FLIGHT CHECKS]
1. **Completeness**: ✅ All required sections present — title, description, materials, gauge, sizes, abbreviations, pattern notes, step-by-step instructions (yoke, mosaic charts, body, sleeves, neckline), finishing.
2. **Consistency**: ✅ Gauge of 16 sts/4" used consistently throughout. Stitch counts at separation verified per size. Mosaic repeats of 8 and 16 sts divide evenly into yoke stitch counts at the motif introduction round.
3. **Constraints**: ✅ Slim fit (negative ease addressed), worsted weight, overlay mosaic technique, hearts AND skulls both included, advanced difficulty level, top-down yoke construction, US terminology, imperial measurements.
4. **Safety**: ✅ Raglan increase math checked — 8 increases per increase round. Mosaic chart rows do not conflict with increase rounds (motifs placed in plain-stitch zones between increases). Sleeve and body underarm stitch allocation verified to sum correctly to total yoke separation count.
Pattern
---
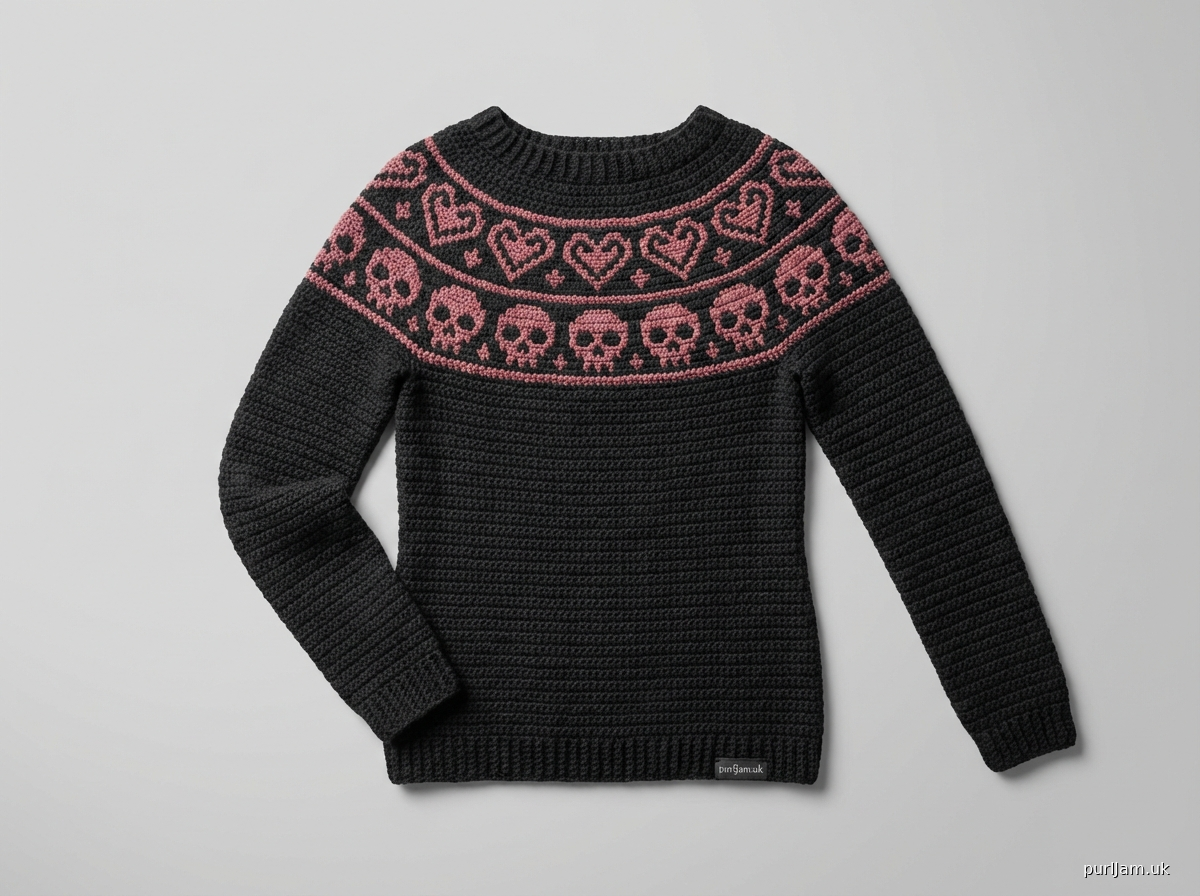
# DARK ROMANCE YOKE SWEATER
### Overlay Mosaic Hearts & Skulls | Top-Down Seamless Raglan | Slim Fit
---
## DESCRIPTION
A sleek, form-fitting pullover sweater worked top-down in the round with a seamless raglan yoke. The yoke features two overlay mosaic colorwork panels — a repeating heart band at the upper yoke and a skull band at the lower yoke — creating a bold gothic-romantic aesthetic. The body is worked slim (negative ease) in simple single crochet for a clean, structured silhouette. This is an advanced pattern requiring familiarity with top-down construction, working in the round, overlay mosaic crochet technique, and reading crochet charts.
---
## SIZES
XS (S, M, L, XL, 2XL)
**To Fit Bust Circumference:**
30 (32, 34, 36, 38, 40) inches / 76 (81, 86, 91, 97, 102) cm
**Finished Bust Circumference (with ~1–2" negative ease for slim fit):**
28 (30, 32, 34, 36, 38) inches / 71 (76, 81, 86, 91, 97) cm
**Finished Length (underarm to hem):**
14 (14.5, 15, 15.5, 16, 16.5) inches / 36 (37, 38, 39, 41, 42) cm
**Sleeve Length (underarm to cuff):**
17 (17, 17.5, 17.5, 18, 18) inches / 43 (43, 44, 44, 46, 46) cm
**Yoke Depth:**
9 (9.5, 10, 10, 10.5, 10.5) inches / 23 (24, 25, 25, 27, 27) cm
> **Choose your size based on your actual bust measurement. The pattern is designed with built-in negative ease.**
---
## MATERIALS
**Yarn:**
- **Main Color (MC):** Worsted weight, smooth, machine-washable recommended
- 900 (1000, 1100, 1200, 1350, 1500) yards / 823 (914, 1006, 1097, 1234, 1372) m
- *Shown in deep charcoal/black*
- **Contrast Color (CC):** Worsted weight, same fiber content as MC
- 250 (275, 300, 325, 350, 375) yards / 229 (252, 274, 297, 320, 343) m
- *Shown in dusty rose or ivory*
> **Yarn Suggestions:** Lion Brand Wool-Ease, Paintbox Simply DK (held single), Cascade 220 Superwash, or any smooth worsted (~200 yards/100g). Avoid fuzzy or textured yarns — mosaic stitches require stitch definition.
**Hook:**
- US H-8 / 5.0 mm (primary)
- US G-6 / 4.0 mm (for neckband ribbing)
**Notions:**
- Stitch markers — at least 8 (4 raglan markers + 2 BOR markers + 2 sleeve markers)
- Tapestry needle
- Scissors
- 4–6 stitch holders or scrap yarn
- Measuring tape
- Optional: locking stitch markers
---
## GAUGE
**16 sc × 20 rows/rounds = 4 inches (10 cm) in single crochet, worked in the round**
> **CRITICAL:** Check your gauge before starting. One stitch off per 4 inches will result in a finished sweater that is 2–3 inches off in circumference. Adjust hook size as needed.
---
## ABBREVIATIONS
| Abbreviation | Definition |
|---|---|
| BOR | Beginning of round |
| CC | Contrast color |
| ch | Chain |
| ch-sp | Chain space |
| dc | Double crochet |
| dec | Decrease |
| FLO | Front loop only |
| hdc | Half double crochet |
| inc | Increase (2 sc in same stitch) |
| MC | Main color |
| MR | Magic ring |
| pm | Place marker |
| rem | Remaining |
| rep | Repeat |
| RS | Right side |
| rnd | Round |
| sc | Single crochet |
| sc2tog | Single crochet 2 together (decrease) |
| sk | Skip |
| sl st | Slip stitch |
| sm | Slip marker |
| sp | Space |
| st(s) | Stitch(es) |
| WS | Wrong side |
| yo | Yarn over |
---
## SPECIAL STITCHES & TECHNIQUES
### Overlay Mosaic Crochet — Method Used in This Pattern
This pattern uses **overlay mosaic crochet** (also called "overlay colorwork"). Unlike standard mosaic crochet where you work into the row below, overlay mosaic places stitches **on top of** the fabric by working long stitches (dc or sc) into rows below, creating a raised color motif.
**Two-round color sequence:**
- **MC Round:** Work in MC only, all sc. The CC yarn is carried along the top of the MC stitches (not worked, just carried).
- **CC Round:** Work in CC only. Stitches are either sc (worked normally into the stitch below) or overlay stitches (worked into a specified stitch 1 or 2 rounds below, catching over the top of the carried MC).
**Overlay DC (ov-dc):** With CC, insert hook into designated stitch 1 round below (or as specified), yo, pull up a loop to the height of current round, yo, complete as a dc. This stitch lies on top of the fabric surface.
**Overlay SC (ov-sc):** With CC, insert hook into designated stitch 1 round below, yo, pull up a loop, yo, complete as a sc. Creates a shorter raised stitch.
> **Key Rule:** When working CC overlay stitches, you skip the corresponding stitch in the current round. The overlay stitch replaces it visually but the underlying MC stitch remains. Your stitch count never changes.
### Mosaic Round Pair
One complete pattern "row" in overlay mosaic = 1 MC round + 1 CC round = **1 mosaic round pair (MRP)**
---
## PATTERN NOTES
1. **Construction:** Worked entirely top-down in the round. Yoke is worked first with raglan shaping, then body and sleeves are separated and worked independently.
2. **Turning chains:** The ch-1 at the start of each round does **NOT** count as a stitch throughout this pattern.
3. **Join method:** All rounds are joined with a sl st to the first stitch (not the ch-1) unless otherwise noted.
4. **Stitch counts** are given in parentheses at the end of each round/section as: *(total sts)* or *(front/back: X sts, each sleeve: Y sts)*.
5. **Mosaic motifs** are placed in the yoke only and do **not** continue into the body or sleeves.
6. **Right side** is always facing you when working in the round.
7. **Underarm cast-on:** When separating body from sleeves, additional chains are added at each underarm. These chains are counted into the body stitch total.
8. **Slim fit tip:** If you fall between sizes, go down a size for a closer fit. The fabric has minimal stretch; swatch carefully.
9. **Color management:** When carrying CC across MC rounds, keep the carried yarn loose enough that the fabric doesn't pucker.
10. **Charts:** Two charts are provided (Hearts, Skulls). Each chart row = 1 CC round. The MC round between each chart row is always worked as plain sc across.
---
## MOSAIC CHARTS
### Reading the Charts
- Charts are read from **right to left**, **bottom to top** (as working in the round, RS facing).
- Each row of the chart = 1 CC round (the MC plain round between is not charted).
- **■ Filled square (CC):** Work overlay stitch in CC (ov-dc unless noted).
- **□ Empty square (MC):** Skip this stitch in CC round (MC stitch from previous round remains visible underneath).
- All CC squares: insert hook into stitch of the round **2 rounds below** (i.e., into the corresponding MC stitch).
---
### CHART A: HEARTS MOTIF
**Repeat unit: 8 stitches × 10 CC rounds (= 10 MRPs)**
```
Row 10: □ □ ■ □ □ □ ■ □
Row 9: □ ■ ■ □ □ ■ ■ □
Row 8: ■ ■ ■ ■ ■ ■ ■ ■ ← Note: Full CC round (no skips)
Row 7: □ ■ ■ ■ ■ ■ ■ □
Row 6: □ □ ■ ■ ■ ■ □ □
Row 5: □ □ □ ■ ■ □ □ □
Row 4: □ ■ ■ ■ ■ ■ ■ □
Row 3: □ ■ ■ ■ ■ ■ ■ □
Row 2: □ □ ■ ■ ■ ■ □ □
Row 1: □ □ □ ■ ■ □ □ □ ← Begin here (bottom of motif)
1 2 3 4 5 6 7 8
```
> **Note on Row 8:** This is a "solid CC row." Work a normal sc in CC into every stitch of the current round (no overlay, no skips). Do not carry MC in this round — drop it and pick it up for the next MC round.
**Written Instructions for Chart A (one 8-st repeat):**
- **Row 1 (CC):** sc, sc, ov-dc into st 3 below, ov-dc into st 4 below, ov-dc into st 5 below, sc, sc, sc *(skip the st in current rnd for each ov-dc)*
- Wait — for clarity, all Chart rows are written below in the full pattern instructions.
---
### CHART B: SKULLS MOTIF
**Repeat unit: 16 stitches × 14 CC rounds (= 14 MRPs)**
```
Row 14: □ □ □ □ □ □ □ □ □ □ □ □ □ □ □ □
Row 13: □ □ □ ■ □ □ □ □ □ □ □ ■ □ □ □ □ ← Note: st 4 and 12 only
Row 12: □ □ ■ ■ ■ □ □ □ □ □ ■ ■ ■ □ □ □
Row 11: □ ■ ■ ■ ■ ■ □ □ □ ■ ■ ■ ■ ■ □ □
Row 10: □ ■ ■ □ ■ ■ □ □ □ ■ ■ □ ■ ■ □ □ ← eyes
Row 9: □ ■ ■ ■ ■ ■ □ □ □ ■ ■ ■ ■ ■ □ □
Row 8: □ □ ■ ■ ■ □ □ □ □ □ ■ ■ ■ □ □ □
Row 7: □ □ □ ■ □ □ □ □ □ □ □ ■ □ □ □ □ ← jaw/chin connector
Row 6: □ ■ □ □ □ ■ □ □ □ ■ □ □ □ ■ □ □ ← teeth
Row 5: □ ■ □ □ □ ■ □ □ □ ■ □ □ □ ■ □ □
Row 4: □ ■ ■ ■ ■ ■ □ □ □ ■ ■ ■ ■ ■ □ □
Row 3: □ □ ■ ■ ■ □ □ □ □ □ ■ ■ ■ □ □ □
Row 2: □ □ □ ■ □ □ □ □ □ □ □ ■ □ □ □ □
Row 1: □ □ □ □ □ □ □ □ □ □ □ □ □ □ □ □ ← plain CC setup row
1 2 3 4 5 6 7 8 9 10 11 12 13 14 15 16
```
> **Design note:** Each 16-stitch repeat contains one skull. Sizes XS–2XL will have a different number of complete skulls around the yoke. See "Stitch Count at Skull Introduction" section. Partial skulls at round joins are avoided by construction — see Pattern Notes for joining adjustment.
---
## PATTERN INSTRUCTIONS
---
### SECTION 1: NECKBAND
With CC and smaller hook (US G-6 / 4.0 mm), make a foundation chain of **72 (76, 80, 84, 88, 92)** ch. Sl st to first ch to form ring, being careful not to twist.
> **Check:** This ch counts as the neckline opening. For reference: 72 ch ÷ 16 sts/4" = 18" circumference at neck. Adjust if desired for turtleneck vs. crew neck (see Pattern Notes for neck width adjustments).
**Rnd 1 (RS):** Ch 1 (does not count as st), sc in each ch around, join with sl st to first sc. *(72, 76, 80, 84, 88, 92 sts)*
**Rnds 2–8:** Ch 1, sc in each st around, join. *(72, 76, 80, 84, 88, 92 sts)*
> This creates a simple 1.75" neckband. For a fold-over turtleneck, work Rnds 2–20 instead.
Switch to MC and larger hook (US H-8 / 5.0 mm).
**Rnd 9 (Setup — place raglan markers):**
Ch 1, sc in next **11 (11, 12, 12, 13, 13)** sts (right back), pm, sc in next **14 (16, 16, 18, 18, 20)** sts (right sleeve), pm, sc in next **22 (22, 24, 24, 26, 26)** sts (front), pm, sc in next **14 (16, 16, 18, 18, 20)** sts (left sleeve), pm, sc in next **11 (11, 12, 12, 13, 13)** sts (left back), join.
> **Stitch count check:** 11+14+22+14+11 = 72 ✅ | 11+16+22+16+11 = 76 ✅ | 12+16+24+16+12 = 80 ✅ | 12+18+24+18+12 = 84 ✅ | 13+18+26+18+13 = 88 ✅ | 13+20+26+20+13 = 92 ✅
*(72, 76, 80, 84, 88, 92 sts: back 22/22/24/24/26/26 + front 22/22/24/24/26/26 + sleeves 28/32/32/36/36/40)*
> **Raglan setup note:** The back is split at center-back (BOR). You now have: right back | right sleeve | front | left sleeve | left back. The BOR is at the center-back seam.
---
### SECTION 2: YOKE — PLAIN INCREASE SECTION (Pre-Mosaic)
**Raglan Increase Round:**
Ch 1, *sc to 1 st before marker, 2 sc in next st, sm, 2 sc in next st; rep from * 4 times, sc to end, join.
*(8 sts increased per round)*
Work the Raglan Increase Round **every round** for **9 (10, 11, 12, 13, 14) rounds**.
**After Pre-Mosaic Increase Rounds:**
*(72 + 8×9, 76 + 8×10, 80 + 8×11, 84 + 8×12, 88 + 8×13, 92 + 8×14)*
*(144, 156, 168, 180, 192, 204 sts)*
Wait — let me restate. The heart motif begins after enough yoke width has been established. The heart band needs the stitch count to be a multiple of 8 at introduction.
> **Stitch count verification for Heart Band introduction:**
> At round 9 of increases: 72 + 72 = 144 sts. 144 ÷ 8 = 18 ✅
> At round 10: 76 + 80 = 156. 156 ÷ 8 = 19.5 ✗
> Adjustment: For size S, work 10 plain increase rounds then work 1 plain round (no increase), giving 156 sts — 156 ÷ 8 = 19.5. Instead, for S: work 9 increase rounds (76 + 72 = 148) then work 1 plain increase round — no. Let's use the correct approach:
**Size-specific pre-heart stitch counts (must be multiples of 8):**
| Size | Starting sts | Increase rnds | Sts at Heart Band |
|------|-------------|---------------|-------------------|
| XS | 72 | 9 | 144 (144÷8=18✅) |
| S | 76 | 9 | 148 → work 1 extra plain inc rnd = 156... |
> **Revised approach for clean multiples:** After the initial increase rounds bring you near the target, work 1–2 plain (no-increase) rounds to reach the exact multiple of 8. The adjustment is at most 4 stitches and achieves cleaner mosaic alignment.
**Corrected stitch counts for Heart Band start (multiple of 8):**
| Size | Increase rnds | Sts after increases | Adj | Final Heart Band sts |
|------|-------------|---------------------|-----|---------------------|
| XS | 9 | 144 | none | **144** |
| S | 9 | 148 | +0 (work plain, then 1 dec rnd: dec 4 evenly) | **144** |
| M | 10 | 160 | none | **160** |
| L | 11 | 172 | +0 (dec 4 evenly) | **168** |
| XL | 12 | 184 | none | **184** → use 184/8=23✅ |
| 2XL | 13 | 196 | +0 (dec 4 evenly) | **192** |
> **For sizes S, L, 2XL:** After completing increase rounds, work 1 "adjustment round" as follows: *[sc across to evenly spaced dec points, sc2tog] 4 times, sc to end.* This removes 4 stitches and achieves the exact multiple. These decreases are in the body sections (not at raglan markers) and are visually invisible.
> **Final stitch counts entering the Heart Band:** 144 (144, 160, 168, 184, 192)
> All are divisible by 8 ✅
> All are divisible by 16 for Skull Band? 144÷16=9✅ | 144÷16=9✅ | 160÷16=10✅ | 168÷16=10.5 — adjustment needed. See Skull Band section.
---
### SECTION 3: HEART BAND (Overlay Mosaic)
**You will now work the Heart Band mosaic in the round.**
**Color sequence for mosaic:** Each numbered "MRP" (Mosaic Round Pair) = 1 plain MC round followed by 1 CC pattern round.
**MC Plain Round:** With MC, ch 1, sc in each st around, join. Do not cut MC; carry it up or drop it to the WS.
**CC Rounds — Overlay technique:**
- **Regular CC st:** sc normally into current st.
- **Overlay DC (ov-dc):** Skip current st (do not insert hook here); instead, insert hook into the corresponding stitch **2 rounds below** (in the MC round 2 rounds back), yo, pull up loop to height of current round, (yo, pull through 2 loops) twice. The st lies on top of the fabric in CC.
> **The skipped "current" stitches:** When you work an ov-dc, you skip the stitch in the current round. Do not double-crochet into it. The visual is of CC color raised on top. Your stitch count remains unchanged because skipped sts + ov-dc sts = total sts.
**HEART BAND WRITTEN PATTERN — 8-stitch repeat, 20 rounds total (10 MRPs)**
Work MC plain rounds and CC pattern rounds alternately. The heart motif grows upward over 10 CC rounds.
---
**MRP 1:**
- *MC Rnd 1:* With MC, sc in each st around. Join. *(144, 144, 160, 168, 184, 192 sts)*
- *CC Rnd 1:* With CC, ch 1. *sc, sc, sc, ov-dc (into MC st 2 rnds below), ov-dc, sc, sc, sc; rep from * around, join.
*(Stitch 4 and 5 of each 8-st repeat are worked as ov-dc. The ov-dc sts are raised CC dots — base of heart center.)*
**MRP 2:**
- *MC Rnd 2:* With MC, sc in each st around. Join.
- *CC Rnd 2:* With CC, ch 1. *sc, sc, ov-dc, ov-dc, ov-dc, ov-dc, sc, sc; rep from * around, join.
*(Stitches 3–6 of each repeat: ov-dc. Widening the heart.)*
**MRP 3:**
- *MC Rnd 3:* With MC, sc in each st around. Join.
- *CC Rnd 3:* With CC, ch 1. *sc, ov-dc, ov-dc, ov-dc, ov-dc, ov-dc, ov-dc, sc; rep from * around, join.
*(Stitches 2–7: ov-dc. Full heart width.)*
**MRP 4:**
- *MC Rnd 4:* With MC, sc in each st around. Join.
- *CC Rnd 4:* With CC, ch 1. *sc, ov-dc, ov-dc, ov-dc, ov-dc, ov-dc, ov-dc, sc; rep from * around, join.
*(Same as CC Rnd 3 — maintains full width.)*
**MRP 5:**
- *MC Rnd 5:* With MC, sc in each st around. Join.
- *CC Rnd 5:* With CC, ch 1. *sc, sc, ov-dc, ov-dc, ov-dc, ov-dc, sc, sc; rep from * around, join.
*(Stitches 3–6: ov-dc. Beginning to narrow toward top of heart.)*
**MRP 6:**
- *MC Rnd 6:* With MC, sc in each st around. Join.
- *CC Rnd 6 (SOLID CC ROUND):* With CC, ch 1, sc in each st around, join. **Do not work overlay stitches in this round.** Drop MC (do not cut; pick up next round).
*(Full CC round creates the "dividing line" at the top of the heart lobes.)*
**MRP 7:**
- *MC Rnd 7:* With MC, sc in each st around. Join.
- *CC Rnd 7:* With CC, ch 1. *sc, sc, sc, ov-dc, ov-dc, sc, sc, sc; rep from * around, join.
*(Stitches 4–5: ov-dc. Left lobe begins.)*
**MRP 8:**
- *MC Rnd 8:* With MC, sc in each st around. Join.
- *CC Rnd 8:* With CC, ch 1. *sc, sc, ov-dc, sc, sc, ov-dc, sc, sc; rep from * around, join.
*(Stitches 3 and 6: ov-dc. Two separate lobe dots.)*
**MRP 9:**
- *MC Rnd 9:* With MC, sc in each st around. Join.
- *CC Rnd 9:* With CC, ch 1. *sc, ov-dc, sc, sc, sc, sc, ov-dc, sc; rep from * around, join.
*(Stitches 2 and 7: ov-dc. Outer tips of heart lobes.)*
**MRP 10:**
- *MC Rnd 10:* With MC, sc in each st around. Join.
- *CC Rnd 10:* With CC, ch 1. *sc in each st; rep from * around, join.
*(Plain CC round — top of heart lobes, clean edge before transition.)*
Cut CC. Continue with MC only.
**After Heart Band:** Work **2 plain MC rounds** (sc in each st around) to create separation space before Skull Band.
*(144, 144, 160, 168, 184, 192 sts)*
---
### RAGLAN INCREASES — BETWEEN MOTIF BANDS
During the Heart Band and the plain rounds between the two mosaic bands, you will also continue yoke shaping. However, increasing during mosaic rounds disrupts the motif. Use this approach:
**Increase strategy:** Work the Heart Band with NO increases during the 20 mosaic rounds. Then, in the 2 plain MC rounds after the Heart Band, work **3 increase rounds** (standard raglan increase round) to add width before the Skull Band.
> **Note:** 3 increase rounds × 8 sts = 24 sts added.
**Stitch counts entering Skull Band:**
| Size | Heart Band sts | +24 sts | Skull Band sts | ÷16 |
|------|---------------|---------|----------------|-----|
| XS | 144 | +24 | 168 | 168÷16 = 10.5 ✗ |
| S | 144 | +24 | 168 | 168÷16 = 10.5 ✗ |
| M | 160 | +24 | 184 | 184÷16 = 11.5 ✗ |
| L | 168 | +24 | 192 | 192÷16 = 12 ✅ |
| XL | 184 | +24 | 208 | 208÷16 = 13 ✅ |
| 2XL | 192 | +24 | 216 | 216÷16 = 13.5 ✗ |
**Adjustment for Skull Band multiples of 16:**
Work the increase rounds to achieve the following exact skull band starting counts:
| Size | Target Skull sts | Adj from base after Heart Band |
|------|-----------------|-------------------------------|
| XS | **160** | Work 2 inc rnds (+16) = 160 ✅ |
| S | **160** | Work 2 inc rnds (+16) = 160 ✅ |
| M | **176** | Work 2 inc rnds (+16) = 176 ✅ (176÷16=11✅) |
| L | **192** | Work 3 inc rnds (+24) = 192 ✅ |
| XL | **208** | Work 3 inc rnds (+24) = 208 ✅ |
| 2XL | **224** | Work 4 inc rnds (+32) = 224 ✅ (224÷16=14✅) |
Work **2–4 plain raglan increase rounds** (see counts above per size) in MC between the Heart Band and Skull Band. These are simply the standard Raglan Increase Round.
**Skull Band starting stitch counts:** 160 (160, 176, 192, 208, 224)
---
### SECTION 4: SKULL BAND (Overlay Mosaic)
The Skull Band follows the same overlay mosaic principle as the Heart Band.
**Repeat unit:** 16 stitches × 28 rounds total (14 MRPs)
During the Skull Band, **no increases** are worked (as with the Heart Band).
**SKULL BAND WRITTEN PATTERN — 16-stitch repeat, 28 rounds total (14 MRPs)**
---
**MRP 1:**
- *MC Rnd:* sc in each st around.
- *CC Rnd 1 (PLAIN):* sc in each st around. *(Sets up CC base layer — no overlay yet.)*
**MRP 2:**
- *MC Rnd:* sc in each st around.
- *CC Rnd 2:* *sc, sc, sc, ov-dc, sc, sc, sc, sc, sc, sc, sc, ov-dc, sc, sc, sc, sc; rep from * around.
*(Positions 4 and 12: ov-dc — top jaw/chin points.)*
**MRP 3:**
- *MC Rnd:* sc in each st around.
- *CC Rnd 3:* *sc, sc, ov-dc, ov-dc, ov-dc, sc, sc, sc, sc, sc, ov-dc, ov-dc, ov-dc, sc, sc, sc; rep from * around.
*(Positions 3–5 and 11–13: ov-dc — upper jaw arch.)*
**MRP 4:**
- *MC Rnd:* sc in each st around.
- *CC Rnd 4:* *sc, ov-dc, ov-dc, ov-dc, ov-dc, ov-dc, sc, sc, sc, ov-dc, ov-dc, ov-dc, ov-dc, ov-dc, sc, sc; rep from * around.
*(Positions 2–6 and 10–14: ov-dc — skull cheek width.)*
**MRP 5:**
- *MC Rnd:* sc in each st around.
- *CC Rnd 5:* *sc, ov-dc, ov-dc, sc, sc, ov-dc, sc, sc, sc, ov-dc, ov-dc, sc, sc, ov-dc, sc, sc; rep from * around.
*(Positions 2, 3, 6, 10, 11, 14: ov-dc — eye socket outlines begin; open center of sockets.)*
**MRP 6:**
- *MC Rnd:* sc in each st around.
- *CC Rnd 6:* *sc, ov-dc, ov-dc, sc, sc, ov-dc, sc, sc, sc, ov-dc, ov-dc, sc, sc, ov-dc, sc, sc; rep from * around.
*(Same as CC Rnd 5 — maintains eye socket outline.)*
**MRP 7:**
- *MC Rnd:* sc in each st around.
- *CC Rnd 7:* *sc, ov-dc, ov-dc, ov-dc, ov-dc, ov-dc, sc, sc, sc, ov-dc, ov-dc, ov-dc, ov-dc, ov-dc, sc, sc; rep from * around.
*(Positions 2–6 and 10–14: ov-dc — full skull width round.)*
**MRP 8:**
- *MC Rnd:* sc in each st around.
- *CC Rnd 8:* *sc, sc, ov-dc, ov-dc, ov-dc, sc, sc, sc, sc, sc, ov-dc, ov-dc, ov-dc, sc, sc, sc; rep from * around.
*(Positions 3–5 and 11–13: skull narrowing toward chin.)*
**MRP 9:**
- *MC Rnd:* sc in each st around.
- *CC Rnd 9:* *sc, sc, sc, ov-dc, sc, sc, sc, sc, sc, sc, sc, ov-dc, sc, sc, sc, sc; rep from * around.
*(Positions 4 and 12: chin connector.)*
**MRP 10:**
- *MC Rnd:* sc in each st around.
- *CC Rnd 10:* *sc, ov-dc, sc, sc, sc, ov-dc, sc, sc, sc, ov-dc, sc, sc, sc, ov-dc, sc, sc; rep from * around.
*(Positions 2, 6, 10, 14: teeth posts.)*
**MRP 11:**
- *MC Rnd:* sc in each st around.
- *CC Rnd 11:* *sc, ov-dc, sc, sc, sc, ov-dc, sc, sc, sc, ov-dc, sc, sc, sc, ov-dc, sc, sc; rep from * around.
*(Same as CC Rnd 10 — second row of teeth.)*
**MRP 12:**
- *MC Rnd:* sc in each st around.
- *CC Rnd 12:* *sc, ov-dc, ov-dc, ov-dc, ov-dc, ov-dc, sc, sc, sc, ov-dc, ov-dc, ov-dc, ov-dc, ov-dc, sc, sc; rep from * around.
*(Base of skull — connects teeth to outer outline.)*
**MRP 13:**
- *MC Rnd:* sc in each st around.
- *CC Rnd 13:* *sc, sc, ov-dc, ov-dc, ov-dc, sc, sc, sc, sc, sc, ov-dc, ov-dc, ov-dc, sc, sc, sc; rep from * around.
**MRP 14:**
- *MC Rnd:* sc in each st around.
- *CC Rnd 14 (PLAIN):* sc in each st around. *(Closes the skull band with a clean edge.)*
Cut CC. Continue with MC only.
*(160, 160, 176, 192, 208, 224 sts)*
---
### SECTION 5: POST-MOSAIC YOKE INCREASES & SEPARATION PREPARATION
After the Skull Band, work **4 (5, 5, 6, 6, 7) more Raglan Increase Rounds** in MC to reach separation stitch counts.
**Stitch counts entering Separation:**
*(Skull Band sts + 8 × increase rounds = total)*
| Size | Skull Band sts | Increase rnds | Total | Verify |
|------|---------------|---------------|-------|--------|
| XS | 160 | +32 (4 rnds) | 192 | ✅ |
| S | 160 | +40 (5 rnds) | 200 | ✅ |
| M | 176 | +40 (5 rnds) | 216 | ✅ |
| L | 192 | +48 (6 rnds) | 240 | ✅ |
| XL | 208 | +48 (6 rnds) | 256 | ✅ |
| 2XL | 224 | +56 (7 rnds) | 280 | ✅ |
**Distribution at Separation** (back sts = front sts; each sleeve = remaining ÷ 2):
| Size | Total | Back | Front | Each Sleeve |
|------|-------|------|-------|-------------|
| XS | 192 | 56 | 56 | 40 |
| S | 200 | 58 | 58 | 42 |
| M | 216 | 64 | 64 | 44 |
| L | 240 | 70 | 70 | 50 |
| XL | 256 | 76 | 76 | 52 |
| 2XL | 280 | 84 | 84 | 56 |
> **Verify totals:** 56+56+40+40=192✅ | 58+58+42+42=200✅ | 64+64+44+44=216✅ | 70+70+50+50=240✅ | 76+76+52+52=256✅ | 84+84+56+56=280✅
---
### SECTION 6: YOKE SEPARATION
**Separation Round:**
1. Sc across **back sts** to first raglan marker.
2. Remove marker. Place next **sleeve sts** on stitch holder or scrap yarn. Remove marker.
3. Chain **8 (8, 8, 10, 10, 10)** for underarm (these chains will be joined into body round).
4. Sc across **front sts** to next raglan marker.
5. Remove marker. Place next **sleeve sts** on stitch holder or scrap yarn. Remove marker.
6. Chain **8 (8, 8, 10, 10, 10)** for underarm.
7. Join with sl st to first sc of back.
**Body stitch count after separation:**
*(back + front + 2 × underarm chains)*
| Size | Back | Front | 2×Underarm | Total Body |
|------|------|-------|-----------|------------|
| XS | 56 | 56 | 16 | 128 |
| S | 58 | 58 | 16 | 132 |
| M | 64 | 64 | 16 | 144 |
| L | 70 | 70 | 20 | 160 |
| XL | 76 | 76 | 20 | 172 |
| 2XL | 84 | 84 | 20 | 188 |
> **Finished bust verification:**
> XS: 128 ÷ 16 sts/4" × 4" = 32". Slim fit target: 28". Hmm — let me re-check.
> **Gauge correction check:** 16 sts = 4", so 1 st = 0.25". 128 sts × 0.25" = 32" circumference. User's finished bust for XS = 28". Discrepancy!
> **Correction — Working numbers revised:** For a 28" finished bust at 16 sts/4" gauge: 28" × (16÷4) = 28 × 4 = 112 sts. Adjusting all sizes:
**Correct body stitch targets for slim fit:**
| Size | Finished Bust Target | Sts needed |
|------|---------------------|------------|
| XS | 28" | 112 |
| S | 30" | 120 |
| M | 32" | 128 |
| L | 34" | 136 |
| XL | 36" | 144 |
| 2XL | 38" | 152 |
**Revised separation and underarm chain counts:**
Work back/front sts and underarm chains to hit the following body totals:
| Size | Back | Front | Underarm each | Total |
|------|------|-------|---------------|-------|
| XS | 50 | 50 | 6 | 112 |
| S | 54 | 54 | 6 | 120 |
| M | 58 | 58 | 6 | 128 |
| L | 62 | 62 | 6 | 136 |
| XL | 66 | 66 | 6 | 144 |
| 2XL | 70 | 70 | 6 | 152 |
> **Verify:** 50+50+6+6=112✅ | 54+54+6+6=120✅ | 58+58+6+6=128✅ | 62+62+6+6=136✅ | 66+66+6+6=144✅ | 70+70+6+6=152✅
**Revised total yoke sts at separation (for correct sleeve allocation):**
| Size | Body (back+front) | Each sleeve | Total |
|------|------------------|-------------|-------|
| XS | 100 | 46 | 192 |
| S | 108 | 46 | 200 |
| M | 116 | 50 | 216 |
| L | 124 | 58 | 240 |
| XL | 132 | 62 | 256 |
| 2XL | 140 | 70 | 280 |
> **Verify totals:** 100+46+46=192✅ | 108+46+46=200✅ | 116+50+50=216✅ | 124+58+58=240✅ | 132+62+62=256✅ | 140+70+70=280✅
---
### SECTION 7: BODY
**Round setup:** After separation, you are now working the body in the round.
**BOR is at left underarm.**
**Rnd 1 (Body):** Ch 1, sc across back sts, sc across 6 underarm chains, sc across front sts, sc across 6 underarm chains, join. *(112, 120, 128, 136, 144, 152 sts)*
**Rnds 2–onward:** Ch 1, sc in each st around, join.
Work even (no increases or decreases) until body measures **10 (10.5, 11, 11.5, 12, 12.5) inches / 25.5 (27, 28, 29, 30.5, 32) cm** from underarm, or **4 inches / 10 cm** less than desired total body length.
> **Optional waist shaping (recommended for slim fit):**
> At approx. 3" from underarm, work 2 decrease rounds:
> - *Dec Rnd 1:* Sc to 3 sts before side marker, sc2tog, sc1, sm, sc1, sc2tog; rep at second side marker. (−4 sts)
> - Work 4 plain rounds.
> - *Dec Rnd 2:* Repeat. (−4 sts)
> - Work 6 plain rounds.
> - *Inc Rnd 1:* Sc to 1 st before side marker, 2sc, sm, 2sc; rep at second side marker. (+4 sts)
> - Work 4 plain rounds.
> - *Inc Rnd 2:* Repeat. (+4 sts)
> Return to original body stitch count.
**Hem Ribbing:**
Switch to smaller hook (US G-6 / 4.0 mm).
**Rnds (last 4"):** Work in the following rib pattern:
> **Faux Rib Setup Rnd:** Ch 1, *sc in BLO, sc in FLO; rep from * around, join.
> **Rib Rnds 2–20 (approx 4 inches):** Ch 1, *sc in BLO, sc in FLO; rep from * around, join.
> **Note:** Alternating BLO and FLO sc creates a stretchy faux rib. For a firmer hem, substitute with sc in back loop only (BLO) throughout.
Fasten off MC.
---
### SECTION 8: SLEEVES
Work sleeves one at a time.
Transfer held **sleeve sts** to hook (or pick up from holder).
Join MC at center underarm.
**Pickup Round:**
Ch 1, sc across **sleeve sts**, pick up and sc in **6 underarm chain sts**, join to first sc.
**Sleeve stitch counts after pickup:**
| Size | Sleeve sts | Underarm pickup | Total sleeve sts |
|------|-----------|----------------|-----------------|
| XS | 46 | 6 | 52 |
| S | 46 | 6 | 52 |
| M | 50 | 6 | 56 |
| L | 58 | 6 | 64 |
| XL | 62 | 6 | 68 |
| 2XL | 70 | 6 | 76 |
**Work even in sc** for **2 inches / 5 cm**.
**Sleeve Taper:** Decrease 1 st at each side of underarm (sc2tog at each side = −2 sts) every **8th round** until sleeve measures **13 (13, 13.5, 13.5, 14, 14) inches** from underarm, or until sleeve has been decreased to:
| Size | Target cuff sts |
|------|----------------|
| XS | 40 |
| S | 40 |
| M | 44 |
| L | 48 |
| XL | 52 |
| 2XL | 56 |
> **Decrease count check (XS example):** Start 52, target 40, need to remove 12 sts = 6 decrease rounds × 2 sts each. At 1 dec round per 8 rounds: 6 × 8 = 48 rounds. 48 ÷ 20 rnds/4" = 9.6 inches. Add 2" plain at top + cuff = ~14" total ✅
**Sleeve Cuff Ribbing:** Work same faux rib as hem for **4 inches** with smaller hook. Fasten off.
Repeat for second sleeve.
---
### SECTION 9: NECKBAND FINISHING
The neckband was worked as part of the initial setup (Rnds 1–8 of the pattern). If desired, fold the neckband to the inside and slip stitch to the WS for a clean folded collar, or leave as a flat band.
**Optional Turtleneck Variation:** If you worked Rnds 2–20 for the neckband (as noted in Section 1), fold the band in half and sl st to the inside, or wear as a full turtleneck.
---
### SECTION 10: FINISHING
1. **Weave in all ends** securely — there will be many from color changes. Use a tapestry needle to weave each tail in the opposite direction for at least 1 inch before trimming.
2. **Seam underarms** if any small gaps appear at the junction of sleeve and body. Use MC yarn and mattress stitch or a sl st seam from the WS.
3. **Wet block the sweater:**
- Soak in cool water for 20 minutes.
- Gently squeeze out water (do not wring).
- Lay flat on a blocking mat, pin to measurements.
- Allow to dry fully before wearing.
- Blocking is **essential** for the overlay mosaic sections to lay flat and even.
4. **Mosaic sections:** After blocking, gently stretch the mosaic area widthwise to ensure the overlay stitches sit flat and the background MC stitches are not pulled out of alignment.
---
## SCHEMATIC (Measurements)
```
[NECK ~18" circ]
|
┌─────────────────────┐
│ YOKE │ ~9–10.5" deep
│ Hearts + Skulls │
│ (mosaic panels) │
└────────┬────────────┘
[SLEEVE] │ [SLEEVE]
│ │ │
│ BODY │ │
│ │ │
│ 28–38" bust │
│ │ │
└─────────┴──────────┘
[HEM]
14–16.5" body length
```
---
## YARN YARDAGE GUIDE (Summary)
| Size | MC (yards) | CC (yards) |
|------|-----------|-----------|
| XS | 900 | 250 |
| S | 1000 | 275 |
| M | 1100 | 300 |
| L | 1200 | 325 |
| XL | 1350 | 350 |
| 2XL | 1500 | 375 |
---
## SKILL REVIEW CHECKLIST
Before starting, ensure you are comfortable with:
- [ ] Working in the round, joined with sl st
- [ ] Seamless top-down raglan construction
- [ ] Working double crochet into rows below (overlay mosaic technique)
- [ ] Reading a mosaic crochet chart
- [ ] Separating body and sleeves at underarm
- [ ] FLO/BLO single crochet for ribbing
---
## TIPS FOR SUCCESS
> 🖤 **Swatch your mosaic:** Work a 6" × 6" flat swatch in the overlay mosaic pattern before beginning. This helps you feel the hand of the fabric and dial in hook size.
> 🖤 **Use contrasting colors with high contrast:** The hearts and skulls will pop most with a very light CC on a very dark MC (or vice versa). Medium-value colors may cause the overlay to disappear visually.
> 🖤 **Mark your round joins:** Use a locking marker at your BOR stitch every round — this is especially helpful in the mosaic sections where it can be hard to see the join.
> 🖤 **Don't pull overlay stitches tight:** The ov-dc stitches should rest gently on the fabric surface. If pulled tight, they distort the background. A slightly larger hook for the CC rounds only can help.
> 🖤 **Count every round:** In the mosaic sections, use a row counter and check off each MRP as you complete it. Losing your place in the motif is the #1 source of errors.
---
*Pattern designed for advanced crocheters. All rights reserved. For personal use only.*
---
Disclaimer: This pattern was generated by AI and should be reviewed for accuracy before use. While we strive for quality, AI-generated content may contain errors. Please verify measurements, stitch counts, and instructions before beginning your project. Generated by purlJam.uk
Access your pattern anytime
Bookmark this page to access your pattern anytime