Type
Crochet
Difficulty
beginner
Category
amigurumi
AI Thinking Process
Planning
Verification
Pattern
Duck Swim-Ring Amigurumi
Beginner Crochet Toy – Simple Shapes
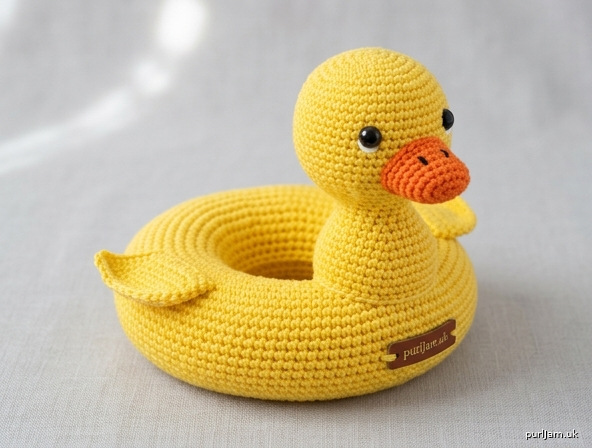
A plump, rounded swim-ring (torus) with a clean hole through the center and a cheerful duck head + upper body rising from one side. Finished size approximately 4½–5 inches (11–13 cm) across.
Materials
- Worsted weight (4) yarn:
- Main Color (MC): bright yellow – approx 60 yd (55 m)
- Contrast A (CA): orange – approx 5 yd (5 m)
- Tiny amount of black for nostrils/embroidery (optional)
- US E-4 / 3.5 mm crochet hook (or size needed to obtain dense fabric)
- 9 mm safety eyes (pair)
- Polyester fiberfill
- Yarn needle
- Stitch marker
- Scissors
- Optional: small amount of white yarn or felt for eye highlights
Abbreviations (US terms)
- MR: magic ring
- ch: chain
- sc: single crochet
- inc: 2 sc in same stitch
- dec: invisible decrease (sc2tog)
- st(s): stitch(es)
- rnd(s): round(s)
- FO: fasten off
- [ ]: total stitches at end of round
- ( ) × n: repeat instructions in parentheses n times
Gauge
5 sc × 5 rnds = 1" (2.5 cm) worked tightly in continuous spiral. Gauge is not critical but fabric must be dense so stuffing does not show.
Notes
- Work in continuous spiral unless stated. Do not join rounds; mark first st of each rnd.
- Stuff firmly as directed—especially the ring—so the shape stays round and the center hole remains open.
- Invisible decrease is recommended for a smooth surface.
- All pieces except the ring are closed; ring ends are sewn together after stuffing.
Ring (Swim Float) – make 1 in MC
Worked as a stuffed tube, then joined into a ring.
Rnd 1: 6 sc in MR. [6]
Rnd 2: inc in each st around. [12]
Rnd 3: (sc, inc) around. [18]
Rnd 4: (2 sc, inc) around. [24]
Rnds 5–46: sc in each st around. [24] (42 even rounds)
Stuff the tube firmly and evenly as you go, leaving the last 1" unstuffed for easier joining. FO, leaving a long 18" (45 cm) tail for sewing.
Form the ring: Curve the tube into a circle so the two open ends meet. Using the long tail and yarn needle, whip-stitch the 24 stitches of each end together, matching stitch for stitch. Add final stuffing just before closing completely so the ring is plump and the center hole is cleanly open (approx 1–1¼" / 2.5–3 cm diameter). Weave in end securely. (24 sts joined ✓)
Upper Body – make 1 in MC
A short dome that sits on the ring and supports the head.
Rnd 1: 6 sc in MR. [6]
Rnd 2: inc in each st around. [12]
Rnd 3: (sc, inc) around. [18]
Rnds 4–6: sc in each st around. [18]
Rnd 7: (sc, dec) around. [12]
Stuff lightly. FO, leaving a 12" (30 cm) tail for sewing. Do not close the remaining hole—this side is sewn to the ring.
Head – make 1 in MC
Rnd 1: 6 sc in MR. [6]
Rnd 2: inc in each st around. [12]
Rnd 3: (sc, inc) around. [18]
Rnd 4: (2 sc, inc) around. [24]
Rnds 5–8: sc in each st around. [24]
Insert 9 mm safety eyes between Rnds 5 and 6, spaced about 5 sts apart.
Rnd 9: (2 sc, dec) around. [18]
Rnd 10: (sc, dec) around. [12]
Stuff firmly.
Rnd 11: dec around. [6]
FO, leaving a short tail. Thread tail through remaining 6 sts and pull tight to close. Weave in end. (6 dec → 0 sts, closed ✓)
Beak – make 1 in CA
Rnd 1: 4 sc in MR. [4]
Rnd 2: (sc, inc) around. [6]
Rnd 3: sc in each st around. [6]
FO, leaving a 8" (20 cm) tail. Lightly stuff or leave unstuffed for a flatter beak. Do not close.
Wings – make 2 in MC
Worked as small flat ovals.
Ch 5.
Rnd 1: sc in 2nd ch from hook, sc in next 2 ch, 3 sc in last ch; pivot and work along opposite side of foundation chain: sc in next 2 ch, 2 sc in last ch. [10]
Rnd 2: sc in each st around. [10]
FO, leaving a 8" (20 cm) tail for sewing. Do not stuff.
Assembly
- Attach Upper Body to Ring: Position the open edge of the Upper Body on the outer top surface of the Ring at any point you choose as “front.” Pin in place. Using the long tail, sew all 12 sts of the body opening securely to the ring, catching ring stitches firmly. The body should sit upright and rise clearly above the ring.
- Attach Head: Sew the closed Head centered on top of the Upper Body. Take several stitches through both pieces so the head is stable and faces forward.
- Beak: Sew the open edge of the Beak to the front of the Head, centered between and just below the eyes (approx between Rnds 6–8 of head). Angle slightly upward.
- Wings: Flatten each wing. Sew one wing to each side of the Upper Body where it meets the ring, angling them slightly backward. Stitch along the center of the wing so the edges remain free.
- Optional details: With black yarn or embroidery thread, add two tiny straight stitches or French knots on the beak for nostrils. Add a small white highlight stitch beside each safety eye if desired.
- Weave in all remaining ends. Shape the ring with your hands so it is evenly plump and the center hole is round and open.
Finishing
Steam-block lightly if needed (do not crush the stuffing). The duck swim ring is ready! It will sit flat and the head/upper body will stand up from one side of the ring.
Enjoy your beginner-friendly duck floaty!
Disclaimer: This pattern was generated by AI and should be reviewed for accuracy before use. While we strive for quality, AI-generated content may contain errors. Please verify measurements, stitch counts, and instructions before beginning your project. Generated by purlJam.uk
Love this pattern?
Save this pattern to your free PurlJam libraryAccess your pattern anytime
Bookmark this page to access your pattern anytime