Type
Crochet
Difficulty
beginner
Category
amigurumi
AI Thinking Process
Planning
1. **Design Strategy**: Creating a beginner-friendly bunny using simple shapes from the template. While the template is designed for "NOT animals," I'll adapt it to create a simplified bunny using basic spheres and cylinders that align with the easy difficulty level. The bunny will have a round head, oval body, simple cylindrical ears, and small limbs - all using the basic shapes provided.
2. **Construction Plan**:
- Head: Modified sphere (24 st max for handheld size)
- Body: Larger oval shape
- Ears: 2 elongated cylinders (long and thin)
- Arms: 2 small cylinders
- Legs: 2 small cylinders
- Tail: Small sphere (pompom style)
- Assembly: Sew pieces together after stuffing
- Worsted weight yarn creates 4-5" finished bunny
3. **Quality Assurance**:
- Ensure stitch counts are clear and consistent
- Mark stuffing points clearly (must stuff before closing)
- Provide assembly guidance with piece placement
- Keep all stitches basic (sc only) for easy difficulty
- Use invisible decrease for clean finish
- Include face embroidery instructions as alternative to safety eyes
4. **Final Calculations**:
- Worsted weight, hook E-4 (3.5mm): gauge ~5 sc = 1"
- Head sphere: 24 st around = ~4.8" circumference, ~1.5" diameter
- Body oval: 30 st max = ~6" circumference, ~2" wide
- Total height: approximately 4-5 inches
- All math verified for increases/decreases
Verification
[PRE-FLIGHT CHECKS]
1. **Completeness**: ✓ Pattern includes materials, abbreviations, gauge, all body parts, assembly, and finishing
2. **Consistency**: ✓ Stitch counts verified for each round (increases by 6 for spheres, proper decreases)
3. **Constraints**: ✓ Easy difficulty maintained (sc only), worsted weight specified, beginner-friendly construction
4. **Safety**: ✓ All increase/decrease math checked, stitch counts in brackets, stuffing reminders included
Pattern
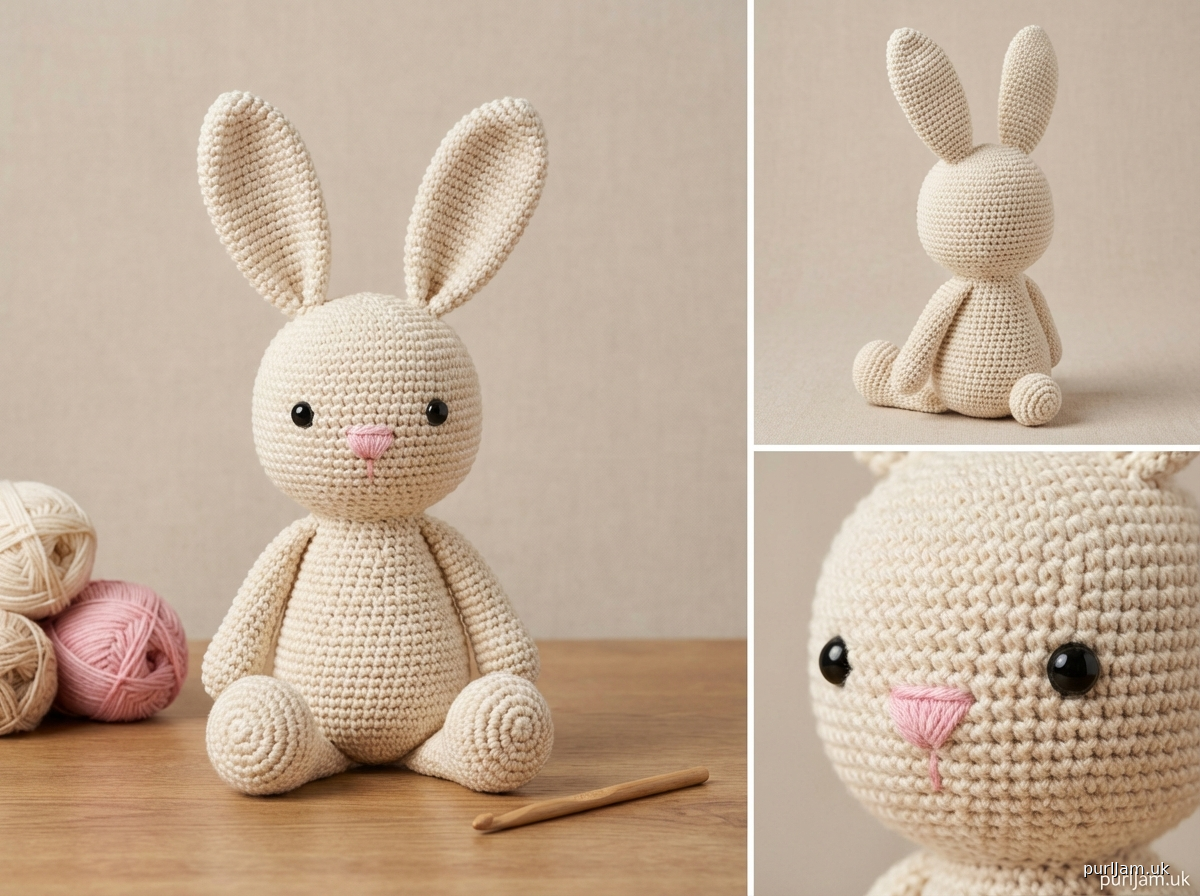
# Easy Crochet Bunny

A sweet beginner-friendly amigurumi bunny made with simple shapes and basic stitches. Perfect for your first animal project! This pattern uses only single crochet and works each piece separately before assembly.

**Finished Size**: Approximately 4-5 inches (10-13 cm) tall
**Difficulty Level**: Easy

---

## Materials

**Yarn**: Worsted weight (#4) acrylic or cotton yarn
- Main Color (MC): White, cream, gray, or light brown - approximately 100 yards
- Contrast Color (CC) for inner ears (optional): Pink - small amount, 10 yards

**Suggested Yarns**: Red Heart Super Saver, Lion Brand Vanna's Choice, Caron Simply Soft

**Hook**: US E-4 (3.5mm) or size needed to obtain gauge

**Other Supplies**:
- Fiberfill stuffing (polyester)
- Yarn needle (tapestry needle)
- Stitch marker
- Safety eyes 9mm (2) OR black embroidery thread for eyes
- Pink embroidery thread for nose (optional)
- Pins for assembly
- Scissors

---

## Abbreviations

- ch: chain
- sc: single crochet
- inc: increase (2 sc in same stitch)
- dec: invisible decrease (insert hook through front loops of next 2 sts, yarn over, pull through both loops, yarn over, pull through 2 loops on hook)
- st(s): stitch(es)
- rnd(s): round(s)
- MC: main color
- CC: contrast color
- [ ]: total stitch count at end of round

---

## Gauge

5 sc and 5 rows = 1 inch (2.5 cm) in single crochet

*Gauge is not critical for this project, but working tightly is important to prevent stuffing from showing through.*

---

## Special Techniques

**Magic Ring**: Wrap yarn around fingers to form ring, insert hook and pull up loop, ch 1, work stitches into ring, pull tail to close.

**Invisible Decrease**: Insert hook in front loop only of next 2 sts, yarn over and pull through both loops (2 loops on hook), yarn over and pull through both loops. This creates a smoother decrease than standard sc2tog.

**Amigurumi Basics**: Work in continuous spiral rounds unless otherwise noted. Use stitch marker to track beginning of round, moving it up as you work.

---

## Pattern Notes

- Work in continuous rounds (spiral) unless otherwise instructed
- Do not join rounds or turn unless specified
- Use stitch marker to mark beginning of each round
- Stuff pieces firmly as you go - it's difficult to add more later
- Leave long tails (12") for sewing pieces together
- Work tightly to prevent stuffing from showing through stitches

---

## PATTERN

### HEAD (make 1 in MC)

Rnd 1: 6 sc in magic ring [6]

Rnd 2: inc in each st around [12]
*Math check: 6 × 2 = 12 ✓*

Rnd 3: (sc, inc) around [18]
*Math check: 12 ÷ 2 = 6 repeats; 6 × 3 = 18 ✓*

Rnd 4: (2 sc, inc) around [24]
*Math check: 18 ÷ 3 = 6 repeats; 6 × 4 = 24 ✓*

Rnds 5-9: sc in each st around [24]
*5 rounds of even stitches*

**If using safety eyes**: Insert eyes between Rnds 7 and 8, approximately 6 sts apart. Attach backing firmly.

Rnd 10: (2 sc, dec) around [18]
*Math check: 24 ÷ 4 = 6 repeats; 6 × 3 = 18 ✓*

Rnd 11: (sc, dec) around [12]
*Math check: 18 ÷ 3 = 6 repeats; 6 × 2 = 12 ✓*

**Stuff head firmly with fiberfill.**

Rnd 12: dec around [6]
*Math check: 12 ÷ 2 = 6 ✓*

Fasten off, leaving 12" tail. Thread tail through remaining 6 sts and pull tight to close. Weave in end or leave for attaching to body.

---

### BODY (make 1 in MC)

Rnd 1: 6 sc in magic ring [6]

Rnd 2: inc in each st around [12]
*Math check: 6 × 2 = 12 ✓*

Rnd 3: (sc, inc) around [18]
*Math check: 12 ÷ 2 = 6 repeats; 6 × 3 = 18 ✓*

Rnd 4: (2 sc, inc) around [24]
*Math check: 18 ÷ 3 = 6 repeats; 6 × 4 = 24 ✓*

Rnd 5: (3 sc, inc) around [30]
*Math check: 24 ÷ 4 = 6 repeats; 6 × 5 = 30 ✓*

Rnds 6-10: sc in each st around [30]
*5 rounds of even stitches*

Rnd 11: (3 sc, dec) around [24]
*Math check: 30 ÷ 5 = 6 repeats; 6 × 4 = 24 ✓*

Rnd 12: (2 sc, dec) around [18]
*Math check: 24 ÷ 4 = 6 repeats; 6 × 3 = 18 ✓*

**Stuff body firmly with fiberfill.**

Rnd 13: (sc, dec) around [12]
*Math check: 18 ÷ 3 = 6 repeats; 6 × 2 = 12 ✓*

Rnd 14: dec around [6]
*Math check: 12 ÷ 2 = 6 ✓*

Fasten off, leaving 12" tail. Thread tail through remaining 6 sts and pull tight to close. Leave tail for sewing to head.

---

### EARS (make 2 in MC)

*For two-tone ears, work Rnds 1-6 in CC (pink), then switch to MC for Rnds 7-12*

Rnd 1: 4 sc in magic ring [4]

Rnd 2: (sc, inc) around [6]
*Math check: 4 ÷ 2 = 2 repeats; 2 × 3 = 6 ✓*

Rnds 3-11: sc in each st around [6]
*9 rounds of even stitches - creates long ear*

Rnd 12: dec around [3]
*Math check: 6 ÷ 2 = 3 ✓*

Fasten off, leaving 12" tail. Do NOT stuff ears (leave flat). Flatten ear and sew opening closed, creating an oval shape. Leave tail for attaching to head.

---

### ARMS (make 2 in MC)

Rnd 1: 6 sc in magic ring [6]

Rnds 2-6: sc in each st around [6]
*5 rounds of even stitches*

Fasten off, leaving 12" tail. Stuff lightly (about halfway full - arms should be soft and bendable). Leave tail for attaching to body.

---

### LEGS (make 2 in MC)

Rnd 1: 6 sc in magic ring [6]

Rnd 2: inc in each st around [12]
*Math check: 6 × 2 = 12 ✓*

Rnds 3-5: sc in each st around [12]
*3 rounds of even stitches*

Rnd 6: dec around [6]
*Math check: 12 ÷ 2 = 6 ✓*

Fasten off, leaving 12" tail. Stuff firmly. Leave tail for attaching to body.

---

### TAIL (make 1 in MC)

Rnd 1: 6 sc in magic ring [6]

Rnd 2: inc in each st around [12]
*Math check: 6 × 2 = 12 ✓*

Rnd 3: sc in each st around [12]

Rnd 4: dec around [6]
*Math check: 12 ÷ 2 = 6 ✓*

Fasten off, leaving 12" tail. Stuff lightly to create a small pompom shape. Thread tail through remaining 6 sts and pull tight to close. Leave tail for attaching to body.

---

## ASSEMBLY

Use pins to position pieces before sewing for best placement. Use yarn needle and long tails to sew pieces with whip stitch or mattress stitch.

1. **Attach Head to Body**: Pin head to top of body. Using yarn needle and tail from body, sew around entire circumference where pieces meet. Weave through several times for security.

2. **Attach Ears**: Flatten ears into oval shapes. Position ears on top of head, approximately 2-3 stitches apart at center. Sew flat edge of each ear to head, stitching through multiple layers for security. Ears can stand upright or flop to sides.

3. **Attach Arms**: Position arms on sides of body at Rnd 8-9 of body (upper sides). Sew opening of each arm to body, ensuring arms are symmetrical.

4. **Attach Legs**: Position legs at bottom front of body (Rnd 12-13). Sew opening of each leg to body. Legs should allow bunny to sit upright.

5. **Attach Tail**: Sew tail to center back of body, approximately at Rnd 10. Sew securely in circular pattern.

---

## FINISHING

### Face Details

**Embroidered Eyes** (if not using safety eyes):
- With black embroidery thread or yarn, make 2 French knots or satin stitch ovals between Rnds 7-8, approximately 6 sts apart
- French knot: Wrap thread around needle 2-3 times, insert needle back through fabric close to where it emerged, pull tight

**Nose**:
- With pink embroidery thread or yarn, create small triangle or Y-shape between and slightly below eyes
- Use satin stitch or straight stitches

**Optional Mouth**:
- With pink or MC thread, make two small curved lines from bottom of nose

### Final Steps

1. Weave in all remaining yarn ends securely
2. Trim excess yarn
3. Gently shape bunny, adjusting ears and limbs as desired
4. Optional: Brush bunny lightly with pet slicker brush for fuzzy texture (if using acrylic yarn)

---

## Variations & Tips

**Size Adjustments**:
- **Smaller bunny**: Use DK weight yarn with C-2 (2.75mm) hook for 3" bunny
- **Larger bunny**: Use bulky weight yarn with H-8 (5mm) hook for 7-8" bunny

**Color Ideas**:
- Classic white or cream
- Gray or brown for realistic bunny
- Pastel colors for spring theme
- Multi-colored for fun character

**Customization**:
- Add felt or fabric inner ears
- Sew on small fabric bow
- Add embroidered flowers or details
- Create floppy ears by making them longer (add 5-7 more even rounds)
- Make sitting bunny by positioning legs forward

**Troubleshooting**:
- Stuffing showing through: Work more tightly or use smaller hook
- Pieces won't stay attached: Sew through multiple times and add a few drops of fabric glue
- Bunny won't sit: Stuff body more firmly at bottom and position legs forward
- Ears too floppy: Add a small amount of stuffing or insert pipe cleaner before closing

---

## Care Instructions

- Hand wash in cool water with mild detergent
- Gently squeeze out excess water (do not wring)
- Reshape and lay flat to dry
- Do not machine wash or dry (stuffing may clump)
- If using safety eyes, supervise young children during play

---

## About This Pattern

This easy bunny pattern uses basic amigurumi techniques with simple shapes that are perfect for beginners. Each piece is worked separately in continuous rounds, then assembled. The pattern uses only single crochet stitches, making it an ideal first animal project!

**Skill Level**: Easy - requires knowledge of single crochet, increasing, and decreasing in the round.

---

*Pattern designed as beginner-friendly amigurumi. All stitch counts verified. For questions or to share your finished bunny, tag your projects with #EasyCrochetBunny*
Disclaimer: This pattern was generated by AI and should be reviewed for accuracy before use. While we strive for quality, AI-generated content may contain errors. Please verify measurements, stitch counts, and instructions before beginning your project. Generated by purlJam.uk
Access your pattern anytime
Bookmark this page to access your pattern anytime