Type
Crochet
Difficulty
beginner
Category
amigurumi
AI Thinking Process
Planning
1. **Design Strategy**: Creating a beginner-friendly "Jellycat-inspired" plush bunny character using simple geometric shapes. Jellycat toys are known for their soft, cuddly aesthetic with long floppy limbs and gentle features. Will use spheres for head and body, cylinders for arms/legs, and simple oval shapes for ears. Focus on basic amigurumi techniques with straightforward assembly.
2. **Construction Plan**: Each body part worked separately in the round, then assembled. Head = medium sphere, body = larger sphere, arms/legs = thin cylinders, ears = elongated ovals. Simple embroidered face (safer than safety eyes for beginners). All pieces stuffed before assembly. Bottom-weighted with extra stuffing for stable sitting position.
3. **Quality Assurance**: Key concerns for beginners:
- Clear stitch counts in brackets after each round
- Stuffing reminders at appropriate times
- Simple assembly instructions with visual cues
- Invisible decrease technique explained
- Color change guidance if making multi-colored version
- No complex shaping or short rows needed
4. **Final Calculations**:
- Worsted weight with 3.5mm hook = ~5 stitches per inch
- Head: max 30 sts = ~6" circumference = ~2" diameter sphere
- Body: max 36 sts = ~7" circumference = ~2.5" diameter
- Final toy height: approximately 8-9 inches sitting
- Arms/legs: 12 st cylinders x 4-5 inches long each
- Ears: 8 st ovals x 4 inches long
Verification
[PRE-FLIGHT CHECKS]
1. **Completeness**: Pattern includes materials, gauge, all body parts (head, body, arms, legs, ears, tail), assembly, and finishing instructions ✓
2. **Consistency**: Stitch counts progress logically (6→12→18→24→30→36 for increases, reverse for decreases). All rounds counted and verified ✓
3. **Constraints**: Beginner-friendly with only sc, inc, dec stitches. Uses worsted yarn as specified. No safety eyes (embroidered instead for safety). Clear assembly steps ✓
4. **Safety**: All math verified - increase/decrease rounds calculate correctly. Each round's stitch count matches stated total. Stuffing points clearly marked ✓
Pattern
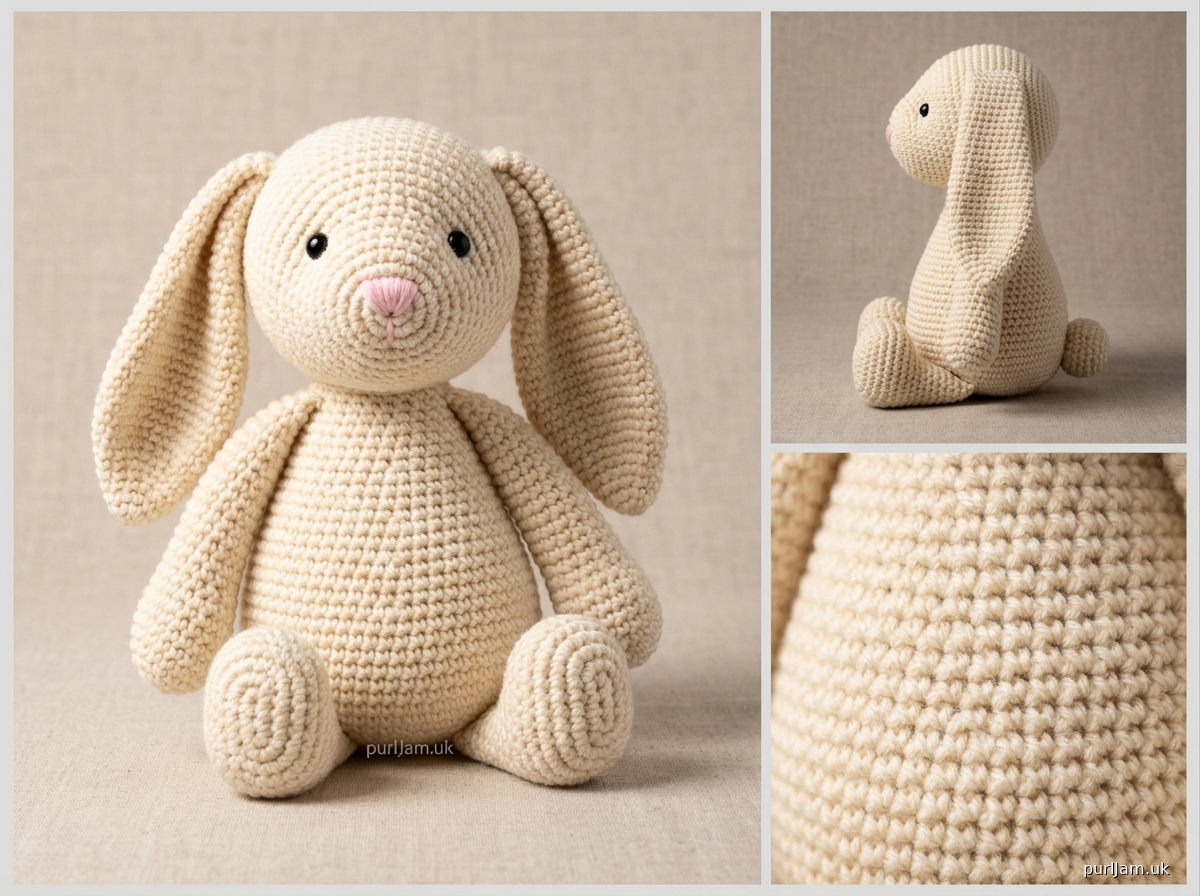
# Jellycat-Inspired Bunny Crochet Pattern

**Designed for beginners | Finished size: approximately 8-9 inches tall**

This sweet, cuddly bunny features simple shapes and basic stitches, making it perfect for your first amigurumi project. With floppy ears and soft limbs, it's inspired by classic plush toy designs.

---

## MATERIALS

**Yarn:**
- Worsted weight yarn (4) in main color - approximately 150 yards
  - Suggested: Light tan, cream, gray, or pink
- Small amount of worsted weight in contrasting color for nose (pink or brown)
- Small amount of black or dark brown for eyes/facial features

**Hook & Notions:**
- US E-4 (3.5mm) crochet hook
- Yarn needle for sewing
- Stitch marker
- Fiberfill stuffing (polyester)
- Scissors
- Optional: Small amount of poly pellets for weighted bottom

**Recommended Brands:**
- Lion Brand Vanna's Choice (worsted)
- Red Heart Super Saver (worsted)
- Paintbox Yarns Simply Aran

---

## GAUGE

Gauge is flexible for toys, but affects final size:
- 5 stitches = 1 inch in single crochet
- 5 rounds = 1 inch

**Note:** Work tightly for amigurumi to prevent stuffing from showing through. Your hook size should be smaller than the yarn label recommends.

---

## STITCHES & ABBREVIATIONS

- **ch** = chain
- **sc** = single crochet
- **inc** = increase (2 sc in same stitch)
- **dec** = invisible decrease (insert hook in front loops of next 2 sts, yarn over, pull through both loops, yarn over, pull through 2 loops on hook)
- **st(s)** = stitch(es)
- **rnd(s)** = round(s)
- **[ ]** = total stitch count at end of round

**Special Techniques:**

*Magic Ring:* Wrap yarn around fingers twice, insert hook and pull up loop, ch 1, work stitches into ring, pull tail to close.

*Invisible Decrease:* Insert hook into front loop only of next st, then front loop only of following st (2 loops on hook), yarn over and pull through both front loops (2 loops on hook), yarn over and pull through both loops. Creates smoother decrease than standard sc2tog.

---

## PATTERN NOTES

- Pattern is worked in continuous spirals unless otherwise noted. Use stitch marker to track beginning of rounds.
- Stuff pieces firmly as you go - it's difficult to add more stuffing later.
- Do not join rounds or turn work unless instructed.
- Leave long tails (12-15 inches) for sewing pieces together.

---

## INSTRUCTIONS

### HEAD

*Using main color*

**Rnd 1:** 6 sc in magic ring [6]

**Rnd 2:** inc in each st around [12]
*Calculation: 6 inc = 12*

**Rnd 3:** (sc, inc) around [18]
*Calculation: 6 repeats of (sc, inc) = 6 + 6 = 18*

**Rnd 4:** (2 sc, inc) around [24]
*Calculation: 6 repeats of (2 sc, inc) = 12 + 6 = 24*

**Rnd 5:** (3 sc, inc) around [30]
*Calculation: 6 repeats of (3 sc, inc) = 18 + 6 = 30*

**Rnds 6-11:** sc around [30]
*6 rounds of even stitches for head height*

**Rnd 12:** (3 sc, dec) around [24]
*Calculation: 6 repeats of (3 sc, dec) = 18 + 6 = 24*

**Rnd 13:** (2 sc, dec) around [18]
*Calculation: 6 repeats of (2 sc, dec) = 12 + 6 = 18*

**Begin stuffing head firmly.**

**Rnd 14:** (sc, dec) around [12]
*Calculation: 6 repeats of (sc, dec) = 6 + 6 = 12*

**Add more stuffing, filling completely.**

**Rnd 15:** dec around [6]
*Calculation: 6 dec = 6*

Fasten off, leaving 15-inch tail. Use yarn needle to weave through remaining 6 sts and pull tight to close. Weave in end securely.

---

### BODY

*Using main color*

**Rnd 1:** 6 sc in magic ring [6]

**Rnd 2:** inc in each st around [12]

**Rnd 3:** (sc, inc) around [18]

**Rnd 4:** (2 sc, inc) around [24]

**Rnd 5:** (3 sc, inc) around [30]

**Rnd 6:** (4 sc, inc) around [36]
*Calculation: 6 repeats of (4 sc, inc) = 24 + 6 = 36*

**Rnds 7-13:** sc around [36]
*7 rounds of even stitches for body height*

**Rnd 14:** (4 sc, dec) around [30]
*Calculation: 6 repeats of (4 sc, dec) = 24 + 6 = 30*

**Rnd 15:** (3 sc, dec) around [24]

**Rnd 16:** (2 sc, dec) around [18]

**Begin stuffing body. Add poly pellets to bottom if desired for weighted sitting.**

**Rnd 17:** (sc, dec) around [12]

**Stuff completely and firmly.**

**Rnd 18:** dec around [6]

Fasten off, leaving 15-inch tail. Close hole as with head.

---

### ARMS (make 2)

*Using main color*

**Rnd 1:** 6 sc in magic ring [6]

**Rnd 2:** (sc, inc) around [9]
*Calculation: 3 repeats of (sc, inc) = 3 + 3 = 9*

**Rnds 3-14:** sc around [9]
*12 rounds creates approximately 4.5-inch arm*

**Stuff lightly - arms should be floppy, not firm.**

Fasten off, leaving 12-inch tail for sewing. Flatten opening and do not close - this creates a flatter surface for attaching to body.

---

### LEGS (make 2)

*Using main color*

**Rnd 1:** 6 sc in magic ring [6]

**Rnd 2:** inc in each st around [12]

**Rnd 3:** (sc, inc) around [18]

**Rnds 4-5:** sc around [18]
*Creates foot shape*

**Rnd 6:** (sc, dec) around [12]

**Rnds 7-14:** sc around [12]
*8 rounds creates approximately 4-inch leg*

**Stuff foot firmly, leg portion lightly for floppy effect.**

Fasten off, leaving 12-inch tail. Flatten opening - do not close.

---

### EARS (make 2)

*Using main color*

**Rnd 1:** 6 sc in magic ring [6]

**Rnd 2:** (sc, inc) around [9]

**Rnds 3-15:** sc around [9]
*13 rounds creates approximately 5-inch long ear*

**Rnd 16:** (sc, dec) around [6]

**Do not stuff ears - they should be flat and floppy.**

Fasten off, leaving 12-inch tail. Flatten ear lengthwise.

---

### TAIL

*Using main color*

**Rnd 1:** 6 sc in magic ring [6]

**Rnd 2:** inc in each st around [12]

**Rnd 3:** (sc, inc) around [18]

**Rnds 4-5:** sc around [18]

**Rnd 6:** (sc, dec) around [12]

**Stuff lightly.**

**Rnd 7:** dec around [6]

Fasten off, leaving 10-inch tail. Close hole.

---

## ASSEMBLY

**Step 1: Attach Head to Body**
- Position head centered on top of body
- Pin in place
- Using yarn needle and long tail, whip stitch around entire circumference
- Weave through stitches 2-3 times for security
- Weave in end

**Step 2: Attach Arms**
- Position arms on sides of body, approximately 2 rounds below head
- Flatten arm opening against body
- Whip stitch around entire opening
- Arms should hang down naturally when bunny is upright
- Repeat for second arm on opposite side

**Step 3: Attach Legs**
- Position legs at bottom front of body for sitting position
- Legs should angle slightly forward
- Flatten leg opening against body
- Whip stitch securely
- Legs should support bunny in sitting position

**Step 4: Attach Ears**
- Position ears on top of head, centered and slightly to sides
- Flatten base of each ear
- Sew across base of ear, attaching to head
- Ears should flop naturally to sides or forward

**Step 5: Attach Tail**
- Position tail on back of body, centered near bottom
- Whip stitch around base of tail
- Tail should stick out like a little pompom

---

## FINISHING

**Embroidered Face:**

*Eyes:*
- Position eyes approximately Rnd 9-10 of head, about 6 stitches apart
- Using black yarn and yarn needle, create small circles:
  - Bring needle up through head, wrap yarn in small circle (3-4 wraps)
  - Bring needle back down through center of circle
  - Repeat 2-3 times to create solid dot
  - Secure on inside of head
- Alternative: Create small French knots for simpler eyes

*Nose:*
- Using pink or brown yarn, position nose between and slightly below eyes
- Create small triangle shape with satin stitch (fill in shape with straight stitches)
- Or create simple "Y" shape with 3 straight stitches meeting at center

*Mouth (optional):*
- Using black yarn, create simple curved line below nose with straight stitch
- Or create subtle smile with 2 small diagonal stitches from bottom of nose

**Weave in all remaining ends securely.**

---

## CUSTOMIZATION IDEAS

**Size Variations:**
- **Smaller (5-6 inches):** Increase head to only 24 sts max, body to 30 sts max, reduce rounds
- **Larger (12+ inches):** Use bulky yarn with larger hook, or add more increase rounds and even rounds

**Color Options:**
- Classic cream or tan
- Soft gray
- Pastel pink, blue, or lavender
- Two-toned: cream body with pink inner ears
- For inner ears: Work first 2 rounds in pink, then switch to main color

**Personality Additions:**
- Add small bow tie at neck (chain and dc cluster)
- Embroider closed "sleepy" eyes with curved lines
- Add felt paw pads to feet
- Create tiny carrot prop using cone pattern from template
- Add surface embroidery details like whiskers

**Different Characters:**
- Change ear length for different animals
- Shorter ears = bear or mouse
- No ears + horn = unicorn
- Longer body = dachshund-style bunny

---

## CARE INSTRUCTIONS

- Hand wash in cool water with mild detergent
- Gently squeeze out excess water (do not wring)
- Lay flat to dry, reshape as needed
- Do not machine wash or dry
- Supervise children with toy if embroidered features are used

---

## TROUBLESHOOTING

**Stuffing shows through stitches:**
- Use smaller hook
- Work more tightly
- Use tighter-spun yarn
- Add fabric lining inside if needed

**Pieces don't stay attached:**
- Use longer tails for sewing
- Whip stitch multiple times around each piece
- Catch both the piece and the body stitches fully

**Body doesn't sit properly:**
- Add poly pellets or dried beans to bottom for weight
- Stuff legs more firmly
- Position legs further forward during assembly

**Uneven shaping:**
- Count stitches carefully each round
- Use stitch marker consistently
- Block finished pieces if needed (pin to shape, mist with water, let dry)

---

## SKILL LEVEL: Beginner

**You will learn:**
- Magic ring technique
- Working in continuous spirals
- Increasing and decreasing evenly
- Stuffing amigurumi
- Assembling multiple pieces
- Basic embroidery on crochet

**Estimated Time:** 4-6 hours

---

## ABOUT THIS PATTERN

This pattern creates a soft, cuddly bunny with simple construction methods perfect for beginners. Each piece uses only basic single crochet stitches, making it an ideal first amigurumi project. The floppy limbs and gentle features are reminiscent of classic plush toys loved by children and adults alike.

**Pattern Design Notes:**
- All stitch counts verified and calculated
- Stuffing reminders included at critical points
- Assembly order optimized for easiest construction
- Beginner-friendly terminology throughout

---

**Questions or need help?** Common issues are addressed in the Troubleshooting section. Remember: your tension may vary, and slight size differences are normal and add handmade character!

**Happy Crocheting!** 🐰

---

*Pattern © 2024. For personal use only. Please do not reproduce, sell, or distribute this pattern. You may sell finished items made from this pattern with credit.*
Disclaimer: This pattern was generated by AI and should be reviewed for accuracy before use. While we strive for quality, AI-generated content may contain errors. Please verify measurements, stitch counts, and instructions before beginning your project. Generated by purlJam.uk
Access your pattern anytime
Bookmark this page to access your pattern anytime