Type
Knitting
Difficulty
beginner
Category
socks
AI Thinking Process
Planning
Verification
Pattern
Easy Cuff-Down Worsted Socks
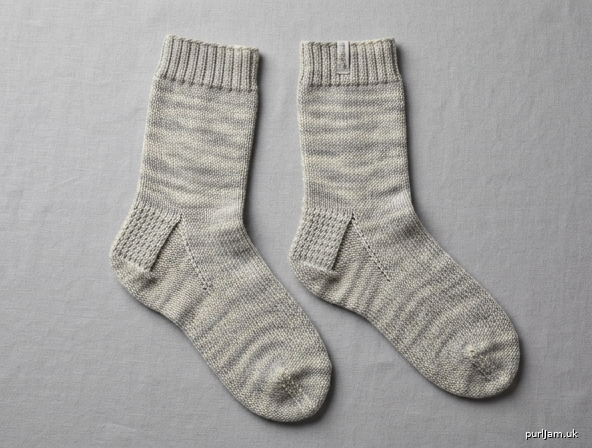
A first-pair sock: cuff-down crew socks in worsted weight, with a traditional heel flap, gusset, and grafted wedge toe. Worked in the round on double-pointed needles or with magic loop. Cuff-down construction lets you try the sock on as you go. This pattern makes a pair (two identical socks).
Skill level: Beginner (first socks). You should already be comfortable knitting and purling in the round, knitting through the back loop (for ssk), and using a tapestry needle.
Sizes
Small (Medium, Large)
Instructions are written for Small with Medium and Large in parentheses. When only one number is given, it applies to all sizes.
To fit foot circumference: 7½ (8½, 9½)" [19 (21.5, 24) cm] Finished sock circumference (unstretched): 6½ (7¼, 8¾)" [16.5 (18.5, 22) cm] Negative ease: about 1" [2.5 cm] — socks should measure smaller than the foot so they stay up.
Suggested foot length (try on to confirm):
- Small: about 8" [20.5 cm] (child / small adult)
- Medium: about 9½" [24 cm] (typical women’s)
- Large: about 10½" [26.5 cm] (typical men’s)
Length is not fixed in the pattern. Work the foot until it is 2" [5 cm] shorter than the desired finished length; the toe adds about 2" [5 cm].
Yarn
Worsted weight (CYC 4), wool or wool/nylon blend preferred (elasticity and durability). Avoid 100% cotton — it has no bounce and wears through at the heel.
Yardage for the pair: 200 (250, 300) yd [183 (229, 274) m]
One 100 g skein is often enough for Small; Medium and Large usually need a second skein or a 150 g put-up. Buy extra if you want a longer leg.
Shown conceptually as: a smooth, lightly twisted worsted, solid or gently variegated so the heel and toe shaping stay easy to see.
Needles
US 6 (4 mm) — choose one:
- A set of 5 double-pointed needles (DPNs), or
- One 32–40" [80–100 cm] circular needle for magic loop
If your gauge is looser than specified, go down to US 5 (3.75 mm). Socks need a firm fabric.
Notions
- Stitch markers (2–3; one distinct for beginning of round)
- Tapestry needle
- Scissors
- Measuring tape
- Optional: stitch holder or spare cable for instep stitches during the heel flap
Gauge
22 stitches and 30 rounds = 4" (10 cm) in stockinette stitch in the round, blocked.
5½ sts = 1" (2.5 cm)
Swatch in the round: cast on 28 sts, join, knit 3" [7.5 cm], bind off. Measure the center 4" [10 cm] (or 2" [5 cm] and double it).
- Too few stitches per inch → sock will be large, slack, and wear out fast. Use smaller needles.
- Too many stitches per inch → sock will be tight. Use larger needles.
Abbreviations (US)
BO — bind off CO — cast on k — knit k2tog — knit 2 stitches together (right-leaning decrease) p — purl p2tog — purl 2 stitches together pm — place marker rep — repeat rnd(s) — round(s) RS — right side sl — slip stitch purlwise (unless noted) ssk — slip 1 knitwise, slip 1 knitwise, insert left needle into the fronts of both slipped stitches and knit them together (left-leaning decrease) st(s) — stitch(es) St st — stockinette stitch (knit every round in the round; knit on RS, purl on WS when flat) WS — wrong side wyib — with yarn in back wyif — with yarn in front
Notes
- This pattern makes a pair. Work Sock 1 completely, then work Sock 2 the same way.
- Try on as you go. That is the main advantage of cuff-down socks. After the gusset, slip the sock onto your (or the recipient’s) foot to check length before starting the toe.
- Join without twisting. After the cast-on, lay the work flat and check that the cast-on edge runs in a single unbroken ring before you join.
- Cast on loosely. A tight cuff will not stretch over the heel. Long-tail cast-on is recommended. If your long-tail is tight, cast on over US 7 (4.5 mm) and switch to US 6 (4 mm) for the first round.
- DPN vs magic loop. Both are written below. Pick one and stay with it for the pair.
- Slipped-stitch heel. Slipping every other stitch on right-side heel-flap rows makes a dense, durable heel.
- Optional snugger leg. For a sock that stays up better, work the entire leg in k2, p2 rib instead of switching to stockinette.
How to distribute stitches
DPNs (set of 5 — 4 hold stitches, 1 is the working needle):
- Small: 9 sts on each of 4 needles (9 × 4 = 36 ✓)
- Medium: 10 sts on each of 4 needles (10 × 4 = 40 ✓)
- Large: 12 sts on each of 4 needles (12 × 4 = 48 ✓)
Magic loop (1 long circular):
- Split in half: 18 / 18 (20 / 20, 24 / 24) sts (36, 40, 48 ✓)
Pattern (make 2)
Cuff
Using long-tail cast-on and US 6 (4 mm), CO 36 (40, 48) sts. (36, 40, and 48 are all divisible by 4 for k2, p2 rib ✓)
Join to work in the round, being careful not to twist. Place a marker for the beginning of round.
Rib rnd: *K2, p2; rep from * to end of rnd.
Work rib until cuff measures 1½–2" [4–5 cm] from the cast-on edge. (About 12–16 rnds at this gauge.)
Leg
Next rnd: Knit all stitches.
Continue in stockinette (knit every round) until the piece measures 6 (6½, 7)" [15 (16.5, 18) cm] from the cast-on edge, or desired length to the start of the heel.
Crew-length note: 6–7" [15–18 cm] to the heel is a standard crew. Work longer for a taller sock; work shorter (about 5" [12.5 cm]) for a child ankle sock.
Heel Flap
The heel is worked flat, back and forth on half the stitches. The remaining stitches rest for the instep.
Set-up: Knit 18 (20, 24) sts. These are the heel stitches. Turn.
Leave the remaining 18 (20, 24) sts on hold for the instep (on the spare DPN/s or on the magic-loop cable). (18 + 18 = 36 ✓; 20 + 20 = 40 ✓; 24 + 24 = 48 ✓)
Work the slipped-stitch heel on the 18 (20, 24) heel sts only:
Row 1 (RS): *Sl 1 wyib, k1; rep from * to end. Row 2 (WS): Sl 1 wyif, purl to end.
Rep Rows 1–2 until the flap has 18 (20, 24) rows, ending with a WS (purl) row. You will have 9 (10, 12) slipped chain stitches along each vertical edge — these are your pick-up stitches later. (18, 20, and 24 rows, one chain per 2 rows → 9, 10, 12 chains ✓)
The flap should look roughly square and measure about 2–2½" [5–6.5 cm] tall.
Heel Turn
Short rows shape the bottom of the heel. You will see a small gap each time you turn; the ssk / p2tog closes that gap on the next row.
Row 1 (RS): Sl 1, k 10 (11, 13), ssk, k1, turn. Row 2 (WS): Sl 1, p 5 (5, 7), p2tog, p1, turn. Row 3: Sl 1, knit to 1 st before the gap, ssk (the stitch before the gap together with the stitch after the gap), k1, turn. Row 4: Sl 1, purl to 1 st before the gap, p2tog, p1, turn.
Rep Rows 3–4 until every heel stitch has been worked. The last two rows will use the remaining edge stitches — there should be no stitches left waiting beyond the decrease.
12 (12, 14) sts remain. (18 − 6 = 12 ✓; 20 − 8 = 12 ✓; 24 − 10 = 14 ✓)
Gusset
Resume working in the round. Pick up stitches along the sides of the heel flap, then decrease the extra stitches until you are back to 36 (40, 48).
With RS facing:
- Knit across the 12 (12, 14) heel sts.
- Pick up and knit 9 (10, 12) sts along the left side of the heel flap (1 st in each slipped chain). If a small hole appears at the corner where the flap meets the instep, pick up 1 extra st through that hole and knit it together with the next pick-up st on the following round so the count stays 9 (10, 12).
- Place marker (start of instep). Knit across the 18 (20, 24) held instep sts. Place marker (end of instep).
- Pick up and knit 9 (10, 12) sts along the right side of the heel flap.
- Knit 6 (6, 7) sts (half of the remaining heel sts) to reach the center of the heel. This is the new beginning of round. Move your beginning-of-round marker here.
Stitch count check:
- Small: 12 heel + 9 + 18 instep + 9 = 48 sts ✓
- Medium: 12 heel + 10 + 20 instep + 10 = 52 sts ✓
- Large: 14 heel + 12 + 24 instep + 12 = 62 sts ✓
Instep stitches sit between the two instep markers: 18 (20, 24) sts.
Gusset decrease rnd: Knit to 3 sts before the first instep marker, k2tog, k1, slip marker, knit instep sts, slip marker, k1, ssk, knit to end of rnd. (2 sts decreased)
Plain rnd: Knit all sts.
Rep the last 2 rnds 5 (5, 6) more times — 6 (6, 7) decrease rnds total — until 36 (40, 48) sts remain.
- Small: 48 − (6 × 2) = 36 ✓
- Medium: 52 − (6 × 2) = 40 ✓
- Large: 62 − (7 × 2) = 48 ✓
You are back to the original stitch count. Instep is still 18 (20, 24); sole is 18 (20, 24).
Remove the instep markers if you like, or leave them to mark the sides of the foot.
Foot
Knit every round in stockinette until the foot measures 2" [5 cm] shorter than the desired finished length, measuring from the back of the heel (the point of the heel turn).
Try the sock on. Slide it on carefully (use DPNs or the circular cable). The toe will add about 2" [5 cm]. If the sock currently reaches the base of your toes, you are ready for the toe.
Typical stop-and-start-toe lengths from back of heel:
- Small: about 6" [15 cm]
- Medium: about 7½" [19 cm]
- Large: about 8½" [21.5 cm]
Toe
Arrange stitches so that 18 (20, 24) instep sts are on one needle (or one magic-loop half) and 18 (20, 24) sole sts are on the other. Beginning of round is at the start of the sole (right side of the foot as worn).
Rnd 1 (decrease):
- Sole: K1, ssk, knit to 3 sts before the side, k2tog, k1.
- Instep: K1, ssk, knit to 3 sts before the side, k2tog, k1. (4 sts decreased)
Rnd 2: Knit.
Rep Rnds 1–2 until 12 (16, 16) sts remain — 6 (8, 8) on the sole and 6 (8, 8) on the instep.
- Small: 36 → 32 → 28 → 24 → 20 → 16 → 12 (6 decrease rnds ✓)
- Medium: 40 → 36 → 32 → 28 → 24 → 20 → 16 (6 decrease rnds ✓)
- Large: 48 → 44 → 40 → 36 → 32 → 28 → 24 → 20 → 16 (8 decrease rnds ✓)
Knit to the side (end of sole sts) so the yarn is at the side of the toe, ready to graft.
Cut yarn, leaving an 18" [45 cm] tail. Thread the tail on a tapestry needle.
Close the toe — Kitchener stitch
Hold the two needles parallel in your left hand, tips pointing right. Sole sts on the front needle, instep sts on the back needle. Wrong sides of the fabric face each other. Yarn tail comes from the back needle on the right.
Set-up (do this once only):
- Insert the tapestry needle into the first stitch on the front needle as if to purl. Pull the yarn through. Leave the stitch on the needle.
- Insert the tapestry needle into the first stitch on the back needle as if to knit. Pull the yarn through. Leave the stitch on the needle.
Repeat these 4 motions until all stitches are grafted:
- Front needle: insert as if to knit, slip that stitch off.
- Front needle: insert into the new first stitch as if to purl, leave it on.
- Back needle: insert as if to purl, slip that stitch off.
- Back needle: insert into the new first stitch as if to knit, leave it on.
Keep the yarn under the needles and match the tension of the knitted fabric — not too tight (a drawn-in ridge) and not too loose (a floppy ladder).
Mnemonic: Knit off, purl on; purl off, knit on.
When one stitch remains on each needle, work steps 1 and 3 only (knit off the front, purl off the back). Weave the tail to the inside.
Finishing
Weave in all ends on the wrong side.
Work Sock 2 the same as Sock 1.
Blocking: Soak both socks in lukewarm water with a little wool wash for 15 minutes. Roll in a towel to press out water. Lay flat to dry, patting each sock into a smooth foot shape. Do not stretch the cuff. Optional: slide onto sock blockers of the correct size.
Fit notes
- Too loose at the cuff: Next pair, go down a needle size for the rib, or work the whole leg in k2, p2 rib.
- Too tight to get over the heel: Cast on more loosely, or use a needle one size larger for the cast-on only.
- Heel feels baggy: You may have worked the flap too long; 18 (20, 24) rows is enough at this gauge.
- Toe too pointy: Stop decreases at 16 sts for Small as well, then graft.
- Toe too blunt: Continue decreases down to 8 (8, 12) sts before grafting.
Enjoy your pair.
Disclaimer: This pattern was generated by AI and should be reviewed for accuracy before use. While we strive for quality, AI-generated content may contain errors. Please verify measurements, stitch counts, charts, and instructions before beginning your project. Generated by purlJam.uk
Love this pattern?
Save this pattern to your free PurlJam libraryAccess your pattern anytime
Bookmark this page to access your pattern anytime