Type
Crochet
Difficulty
beginner
Category
kimono
AI Thinking Process
Planning
Verification
Pattern
Easy Kimono Cardigan
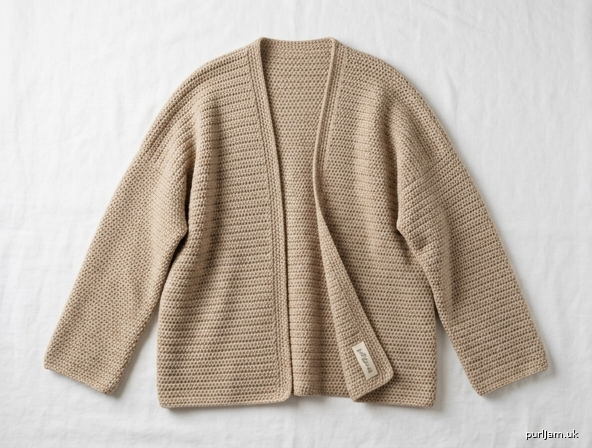
A relaxed, open-front cardigan worked entirely in half double crochet. The body and sleeves are plain rectangles with no shaping: shoulders are straight seams, sleeves sit at a right angle well below the natural shoulder, and the fit is boxy and oversized. Wear it open, or close it gently with the ties. This is a first-garment project: chain, half double crochet, single crochet, and simple seams.
Construction at a glance
- Back and fronts are worked hem to shoulder, then stopped. There are no armhole decreases and no shoulder slopes.
- Sleeves are the same width from cuff to top. They are not tapered.
- The sleeve is sewn straight across the shoulder seam, half on the back and half on the front, forming the T.
- A single-crochet border finishes the front opening, neck, and hem. There is no collar.
Skill level: Beginner
Skills used: chain, half double crochet, single crochet, slip stitch, sewing seams, working into row-ends.
Terminology: US crochet terms. Do not convert these stitches to UK terms. In US terms, hdc is half double crochet and sc is single crochet.
Sizes
S/M (L/XL, 2XL/3XL)
Instructions are written for S/M, with L/XL and 2XL/3XL in parentheses. Where only one number is given, it applies to all sizes.
| S/M | L/XL | 2XL/3XL | |
|---|---|---|---|
| To fit bust | 36–42 in (91–107 cm) | 44–50 in (112–127 cm) | 52–58 in (132–147 cm) |
| Finished bust, fronts meeting | 48 in (122 cm) | 56 in (142 cm) | 64 in (163 cm) |
| Ease over fit range | 6–12 in (15–30 cm) | 6–12 in (15–30 cm) | 6–12 in (15–30 cm) |
| Back width | 24 in (61 cm) | 28 in (71 cm) | 32 in (81 cm) |
| Each front width | 12 in (30.5 cm) | 14 in (35.5 cm) | 16 in (40.5 cm) |
| Body length, hem to shoulder, before edging | 26 in (66 cm) | 27 in (68.5 cm) | 28 in (71 cm) |
| Side seam | 18 in (46 cm) | 18 in (46 cm) | 18 in (46 cm) |
| Armhole depth | 8 in (20.5 cm) | 9 in (23 cm) | 10 in (25.5 cm) |
| Shoulder seam | 8 in (20.5 cm) | 10 in (25.5 cm) | 12 in (30.5 cm) |
| Back neck width | 8 in (20.5 cm) | 8 in (20.5 cm) | 8 in (20.5 cm) |
| Sleeve length, before cuff edging | 18 in (46 cm) | 18 in (46 cm) | 19 in (48 cm) |
| Sleeve width (circumference) | 16 in (40.5 cm) | 18 in (46 cm) | 20 in (51 cm) |
Choose the size whose “to fit bust” range contains your bust measurement. Length and sleeve length matter more than bust in this style. The two fronts meet at center front when the finished bust is measured; they do not overlap. The sleeve seam hangs about 4–5 inches (10–13 cm) below the natural shoulder. That drop is intentional.
The single-crochet edging adds about ½ inch (1.5 cm) to body length and to sleeve length after the pieces are sewn.
BACK                         FRONT (make 2)              SLEEVE (make 2)
┌─────────────────────┐      ┌──────────────┐            ┌────────────────┐
│  24 (28, 32) in     │      │ 12 (14, 16)  │            │ 16 (18, 20) in │
│                     │      │              │            │     width      │
│  26 (27, 28) in     │      │ same length  │            │ 18 (18, 19) in │
│                     │      │ as back      │            │     length     │
└─────────────────────┘      └──────────────┘            └────────────────┘
Yarn
Worsted weight (CYC category 4). A cotton blend, bamboo blend, or soft acrylic drapes well after blocking. Wool blends hold a slightly firmer, warmer fabric. Very stiff yarn will make the kimono boxier; very heavy cotton will pull the shoulders down.
Amount (approximate, including edging and ties): 1400 (1650, 1950) yards / 1280 (1510, 1785) meters
That is about 7 (9, 10) skeins if each skein has 200 yards (183 meters). Buy one extra skein if your skeins have less yardage, if you lengthen the body or sleeves, or if you want a comfortable margin for the gauge swatch.
Hook
US J-10 / 6 mm, or the size needed to obtain gauge.
A relaxed fabric is correct for this cardigan. If your swatch is stiff or small, go up a hook size. If it is floppy and much larger than gauge, go down a hook size.
Notions
- Tapestry needle
- Stitch markers (4)
- Scissors
- Measuring tape
- Optional, if you prefer a button to ties: one button, 1 inch (2.5 cm)
Gauge
12 hdc and 8 rows = 4 inches (10 cm), measured after blocking.
That is 3 stitches per inch and 2 rows per inch. Match both. Width is forgiving because of the ease; length is not.
Swatch: Chain 19. Hdc in the 2nd chain from the hook and in each chain across (18 hdc). Chain 1, turn. Hdc in each stitch across. Repeat until you have 12 rows. Block the swatch. Measure the center 12 stitches and 8 rows; they should equal 4 inches (10 cm). (18 stitches at gauge = 6 inches wide; 12 rows at gauge = 6 inches tall, so the 4-inch measurement sits inside the swatch, not on the curled edge.)
Abbreviations
- ch: chain
- hdc: half double crochet
- sc: single crochet
- sl st: slip stitch
- st(s): stitch(es)
- RS: right side
- WS: wrong side
- rep: repeat
Notes
- The turning chain does not count as a stitch. Always work the first hdc of a row into the first stitch, not into the turning chain. Count your stitches at the end of every row. The count never changes.
- Chain loosely for the foundation. A tight chain makes the hem shorter than the rest of the piece.
- Mark the RS of each piece as soon as you can tell which side you like. Use the same side as the RS on every piece.
- There is no shaping. Do not decrease for armholes. Do not increase or decrease along the sleeves. Do not shape the waist.
- Do not sew the entire top edge of the back to the fronts. Only the outer stitches are the shoulder seams. The center stitches are the neck. If you sew all the way across, the cardigan will have no neck opening.
- Block the pieces to the measurements in the table before seaming if the edges curl. Give the finished cardigan a final block as well.
- Seam through the outer loops, not deep into the fabric, so the finished bust stays close to the stated width.
Back
Make 1.
Chain 73 (85, 97).
Row 1 (RS): Hdc in the 2nd chain from the hook and in each chain across. — 72 (84, 96) hdc.
(Chain 73 − 1 = 72; chain 85 − 1 = 84; chain 97 − 1 = 96. ✓)
Row 2: Ch 1, turn. Hdc in each hdc across. — 72 (84, 96) hdc.
Repeat Row 2 until you have 52 (54, 56) rows, ending with a WS row.
Size check: 72 ÷ 3 = 24 inches wide; 84 ÷ 3 = 28 inches; 96 ÷ 3 = 32 inches. ✓ 52 ÷ 2 = 26 inches long; 54 ÷ 2 = 27 inches; 56 ÷ 2 = 28 inches. ✓
Fasten off, leaving a long tail for seaming. Mark the RS.
Front
Make 2. The two fronts are identical.
Chain 37 (43, 49).
Row 1 (RS): Hdc in the 2nd chain from the hook and in each chain across. — 36 (42, 48) hdc.
(Chain 37 − 1 = 36; chain 43 − 1 = 42; chain 49 − 1 = 48. ✓ Each front is exactly half the back stitch count: 72 ÷ 2 = 36, 84 ÷ 2 = 42, 96 ÷ 2 = 48. ✓)
Row 2: Ch 1, turn. Hdc in each hdc across. — 36 (42, 48) hdc.
Repeat Row 2 until you have 52 (54, 56) rows, the same number as the back, ending with a WS row.
Size check: 36 ÷ 3 = 12 inches wide; 42 ÷ 3 = 14 inches; 48 ÷ 3 = 16 inches. Length matches the back. ✓
Fasten off, leaving a long tail for seaming. Mark the RS.
Sleeve
Make 2.
Chain 49 (55, 61).
Row 1 (RS): Hdc in the 2nd chain from the hook and in each chain across. — 48 (54, 60) hdc.
(Chain 49 − 1 = 48; chain 55 − 1 = 54; chain 61 − 1 = 60. ✓)
Row 2: Ch 1, turn. Hdc in each hdc across. — 48 (54, 60) hdc.
Repeat Row 2 until you have 36 (36, 38) rows, ending with a WS row.
Size check: 48 ÷ 3 = 16 inches wide; 54 ÷ 3 = 18 inches; 60 ÷ 3 = 20 inches. 36 ÷ 2 = 18 inches long; 38 ÷ 2 = 19 inches. ✓ The first and last rows are the same width. There is no taper.
Fasten off, leaving a long tail for seaming. Mark the RS. The foundation-chain edge is the cuff. The last row is the edge that joins the body.
Assembly
Use the main yarn and a tapestry needle, or slip-stitch the seams with the hook. Hold pieces with right sides together for a slip-stitch or whipstitch seam, and sew through outer loops. Keep seams even and not tight.
1. Mark the armholes
On the back, count 16 (18, 20) rows down from the top (shoulder) edge along each side. Place a marker on each side edge.
(16 rows ÷ 2 = 8 inches; 18 ÷ 2 = 9 inches; 20 ÷ 2 = 10 inches. That is the armhole depth. ✓)
On each front, the long edge that will sit at center front is the inner edge. The other long edge is the outer edge (side seam). Count 16 (18, 20) rows down from the top along the outer edge only, and place a marker.
Rows left for the side seam: 52 − 16 = 36; 54 − 18 = 36; 56 − 20 = 36. All sizes have a side seam of 36 rows, which is 18 inches. ✓
2. Seam the shoulders
Lay a front on the back, right sides together. Match the outer top corner of the front to an outer top corner of the back. The inner edge of the front points toward the center of the back.
Sew 24 (30, 36) stitches only, starting at the outer corner and working inward.
(24 stitches ÷ 3 = 8 inches; 30 ÷ 3 = 10 inches; 36 ÷ 3 = 12 inches. ✓)
Stop there. Leave the remaining 12 stitches of the front top edge unsewn. Those 12 stitches are the front neck: 12 ÷ 3 = 4 inches. ✓
Repeat on the other shoulder with the second front.
Neck check, back: stitches sewn + stitches left open must equal the back. 24 + 24 + 24 = 72. ✓ 30 + 24 + 30 = 84. ✓ 36 + 24 + 36 = 96. ✓
The center 24 stitches of the back (8 inches) are the back neck. Do not sew them.
Neck check, each front: 24 + 12 = 36; 30 + 12 = 42; 36 + 12 = 48. ✓
3. Attach the sleeves
Fold one sleeve in half across its last row and mark the center stitch. Last-row counts: 48 (54, 60). Center falls between stitches 24 and 25 (27 and 28, 30 and 31).
Pin that center to the shoulder seam, with the sleeve extending away from the neck and the RS of the sleeve matching the RS of the body when the cardigan is worn (right sides together while you sew).
Pin each end of the sleeve’s last row to an armhole marker: one end on the back marker, one end on the front marker.
Ease the sleeve in at a ratio of 3 sleeve stitches for every 2 row-ends, all the way to each marker.
Ease check: Half the sleeve is 24 (27, 30) stitches, sewn to 16 (18, 20) row-ends. 24 ÷ 16 = 1.5; 27 ÷ 18 = 1.5; 30 ÷ 20 = 1.5. That is exactly 3 stitches per 2 rows. ✓ Eight pairs of rows take 24 stitches; nine pairs take 27; ten pairs take 30. ✓
Sew the sleeve in place. Repeat for the second sleeve. The sleeve meets the body in a straight line at a right angle. Do not gather it into a curved armhole.
4. Seam the sides
Sew from each armhole marker down to the hem, matching row to row. That is 36 rows (18 inches) on every size. The underarm of the sleeve should meet the top of this seam.
5. Seam the sleeve undersides
Fold each sleeve, right sides together, and sew the long edges from the cuff up to the underarm. Match row to row: 36 (36, 38) rows. When you reach the underarm, the sleeve seam should meet the side seam you just sewed.
Turn the cardigan right side out.
Edging
The border is worked in one piece around both front edges, the neck, and the hem. Keep the RS facing you. Do not turn at the end of the round.
On each front edge, place stitches at this rate: 1 sc in the next row-end, 2 sc in the following row-end. That is 3 sc for every 2 rows, which lies flat on this gauge.
Join yarn with a sl st at either lower front corner (where the front edge meets the hem).
Round 1: Ch 1. Work 3 sc in the same corner stitch. Place a marker in the center (2nd) of these 3 sc.
Work up that front edge: (1 sc in the next row-end, 2 sc in the next row-end) 26 (27, 28) times. — 78 (81, 84) sc, using all 52 (54, 56) row-ends. (26 × 2 = 52 row-ends and 26 × 3 = 78 sc; 27 × 2 = 54 and 27 × 3 = 81; 28 × 2 = 56 and 28 × 3 = 84. ✓)
Work 3 sc in the top corner, where the front edge turns onto the unsewn top of the front. Mark the center of these 3 sc.
Sc in the next 12 hdc (front neck). Sc once in the shoulder seam. Sc in the next 24 hdc (back neck). Sc once in the next shoulder seam. Sc in the next 12 hdc (other front neck).
Work 3 sc in the next top corner. Mark the center sc.
Work down that front edge: (1 sc in the next row-end, 2 sc in the next row-end) 26 (27, 28) times. — 78 (81, 84) sc. ✓
Work 3 sc in the lower corner. Mark the center sc.
Sc in each foundation stitch across the hem of this front, the back, and the other front. Do not add extra stitches at the side seams. — 144 (168, 192) sc. (36 + 72 + 36 = 144; 42 + 84 + 42 = 168; 48 + 96 + 48 = 192. ✓)
Join with a sl st to the first sc of the round. Do not work another corner increase here; the starting 3 sc are already that corner.
Round 1 count: 362 (392, 422) sc.
S/M: 3 + 78 + 3 + 12 + 1 + 24 + 1 + 12 + 3 + 78 + 3 + 144 = 362. ✓ L/XL: 3 + 81 + 3 + 12 + 1 + 24 + 1 + 12 + 3 + 81 + 3 + 168 = 392. ✓ 2XL/3XL: 3 + 84 + 3 + 12 + 1 + 24 + 1 + 12 + 3 + 84 + 3 + 192 = 422. ✓
If your count is off by 1 or 2, adjust evenly along a front edge on the next round. Do not skip a whole section to force the number.
Round 2: Ch 1, do not turn. Sc in each sc around, and work 3 sc in each marked corner stitch (4 corners). Move each marker to the center of the new 3-sc group, or remove the markers as you pass them. Join with a sl st to the first sc.
Round 2 count: 370 (400, 430) sc. Each corner adds 2 stitches, and there are 4 corners: 362 + 8 = 370; 392 + 8 = 400; 422 + 8 = 430. ✓
Fasten off. Weave in the end.
Optional crab-stitch finish: With RS facing, join yarn at a side seam on the hem. Ch 1. Working in the reverse direction (left to right if you are right-handed), insert the hook in the next stitch back, yarn over, pull up a loop, yarn over, and pull through both loops. Repeat in each sc around. Join and fasten off. Skip this round if reverse single crochet is new and frustrating; two rounds of sc are a complete edge.
Cuffs
Join yarn at a cuff seam, RS facing.
Round 1: Ch 1. Sc in each foundation stitch around. Join with a sl st to the first sc. — 48 (54, 60) sc. (Same count as the sleeve foundation. ✓)
Round 2: Ch 1, do not turn. Sc in each sc around. Join. — 48 (54, 60) sc.
Fasten off. Repeat on the second cuff.
These rounds do not taper the sleeve. They only neaten the edge and add about ½ inch (1.5 cm) to the sleeve length.
Closure
Choose ties or a single button. You do not need both.
Ties (make 2)
Chain 4.
Row 1: Hdc in the 2nd chain from the hook and in each of the next 2 chains. — 3 hdc. (Chain 4 − 1 = 3. ✓)
Row 2: Ch 1, turn. Hdc in each hdc across. — 3 hdc.
Repeat Row 2 until the tie measures 30 (32, 34) inches / 76 (81, 86) cm, about 60 (64, 68) rows. (60 ÷ 2 = 30 inches; 64 ÷ 2 = 32 inches; 68 ÷ 2 = 34 inches. ✓ Width is 3 ÷ 3 = 1 inch / 2.5 cm.)
Fasten off, leaving a tail for sewing.
Sew one end of each tie to a front edge, on the wrong side of the edging or through both layers of the edging so the join is strong. Place each tie 9 inches (23 cm) up from the lower front corner. Tie in front when you want a little shape; leave them undone to wear the cardigan open.
Single button, instead of ties
On one front edge, 9 inches (23 cm) up from the lower corner, join yarn in the edging. Chain 8. Slip stitch in the same stitch to form a loop. Fasten off and weave in the end.
(A chain-8 loop is about 1 to 1½ inches / 2.5 to 4 cm across, enough for a 1-inch button. ✓)
Sew the button on the opposite front at the same height.
Finishing
Weave in any remaining ends.
Block the cardigan to the measurements in the table. Wet-block plant fibers and acrylic blends; steam-block gently if the yarn label allows. Pin the back to 24 (28, 32) inches wide and 26 (27, 28) inches from shoulder to hem, not counting edging. Pin each sleeve to 16 (18, 20) inches wide and 18 (18, 19) inches long before the cuff edging. Let it dry fully. Blocking opens the half double crochet and evens the seams. The edging will add about ½ inch (1.5 cm) beyond the blocked rectangle at the hem and cuffs.
Follow the yarn label for washing. Support the wet cardigan so the sleeves do not stretch.
Optional adjustments
Make these changes before you sew, and make the same change on every matching piece.
Longer or shorter body. Add or remove rows in multiples of 2 on the back and on both fronts. Each 2 rows changes the length by 1 inch (2.5 cm). Armhole depth stays 16 (18, 20) rows; only the side seam changes. On the edging, work one extra (1 sc, 2 sc) repeat on each front edge for every 2 rows you added, or one fewer repeat for every 2 rows you removed. Hem stitch count does not change.
Longer or shorter sleeves. Add or remove rows on the sleeves only. Each 2 rows changes sleeve length by 1 inch (2.5 cm). This does not change the body or the edging count.
Three-quarter sleeves. Work each sleeve for 26 rows (all sizes), so it measures 13 inches (33 cm) before the cuff edging (26 ÷ 2 = 13. ✓). Then work the cuff edging as written. Sleeve stitch count stays 48 (54, 60).
Stripes. Change color at the start of a row, on the wrong side if you can, and carry the yarn up the side edge only if the stripe repeat is 2 or 4 rows. Weave in ends if the repeat is larger. Use the same hook and keep the stitch count unchanged.
Worn open. Omit the ties and the button. The border is the finished front edge.
Disclaimer: This pattern was generated by AI and should be reviewed for accuracy before use. While we strive for quality, AI-generated content may contain errors. Please verify measurements, stitch counts, charts, and instructions before beginning your project. Generated by purlJam.uk
Love this pattern?
Save this pattern to your free PurlJam libraryAccess your pattern anytime
Bookmark this page to access your pattern anytime