Type
Crochet
Difficulty
beginner
Category
kimono
AI Thinking Process
Planning
Verification
Pattern
Easy Kimono Cardigan Top
A beginner T-shaped cardigan in worsted weight yarn
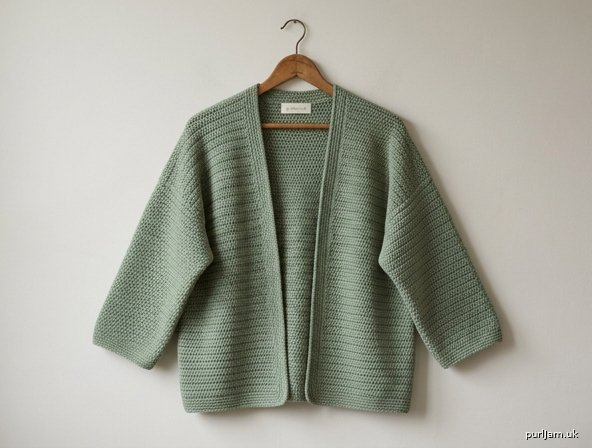
An oversized, boxy open-front cardigan worked entirely in half double crochet. Five simple rectangles are seamed into a classic kimono T: dropped shoulders, wide untapered sleeves, and no armhole or waist shaping. Hip-length and meant to be worn open, with an optional tie. Beginner-friendly throughout.
Skill Level
Beginner
Skills used: chain, half double crochet, single crochet, fastening off, seaming, working into row-ends.
Sizes
S/M (L/XL, 2XL/3XL)
Shown in pattern as: S/M (L/XL, 2XL/3XL)
To fit bust: 32–38 (40–46, 48–54)" / 81.5–96.5 (101.5–117, 122–137) cm
Choose the size whose finished bust is about 6–12" / 15–30.5 cm larger than your actual bust. Length and sleeve length matter more than bust on this silhouette; both are easy to customize (see Notes).
Finished Measurements
| Measurement | S/M | L/XL | 2XL/3XL |
|---|---|---|---|
| Bust circumference (open, fronts meeting) | 44" / 112 cm | 52" / 132 cm | 60" / 152.5 cm |
| Back width | 22" / 56 cm | 26" / 66 cm | 30" / 76 cm |
| Front width (each) | 11" / 28 cm | 13" / 33 cm | 15" / 38 cm |
| Body length (shoulder to hem) | 22" / 56 cm | 24" / 61 cm | 26" / 66 cm |
| Sleeve length (from dropped-shoulder join to cuff) | 14" / 35.5 cm | 15" / 38 cm | 16" / 40.5 cm |
| Sleeve circumference | 20" / 51 cm | 22" / 56 cm | 24" / 61 cm |
| Sleeve width, laid flat | 10" / 25.5 cm | 11" / 28 cm | 12" / 30.5 cm |
| Shoulder seam | 7" / 18 cm | 8" / 20.5 cm | 10" / 25.5 cm |
| Back neck opening | 8" / 20.5 cm | 10" / 25.5 cm | 10" / 25.5 cm |
Positive ease at bust: approximately 6–12" / 15–30.5 cm.
Materials
Yarn: Worsted weight (Category 4), 1,600 (2,000, 2,450) yards / 1,465 (1,830, 2,240) meters.
Approximately 8 (10, 12) skeins of a typical 220-yd / 201-m, 100 g skein.
A drapey fiber (cotton, cotton blend, bamboo, Tencel, or silk blend) gives the best kimono hang. Soft acrylic or a wool blend will feel more structured. Solid colors show the even hdc fabric clearly; stripes may be added every 4–6 rows if desired.
Hooks:
- US J/10 (6 mm), or size needed to obtain gauge
- US I/9 (5.5 mm) for the border (optional; the J/10 may be used throughout)
Notions:
- Yarn needle
- Scissors
- 8 stitch markers
- Measuring tape
- Optional: 2 large buttons or toggles; 1 extra skein if adding a wide belt
Gauge
12 hdc and 10 rows = 4" (10 cm) in half double crochet with US J/10 (6 mm), after light blocking.
3 hdc = 1" (2.5 cm); 2.5 rows = 1" (2.5 cm).
Work a swatch at least 6" / 15 cm square. Block it the same way you will block the cardigan, then measure the center 4" / 10 cm.
If you have more than 12 sts in 4", go up a hook size (fabric is too tight). If you have fewer than 12 sts in 4", go down a hook size (fabric is too loose).
This fit is oversized and forgiving, but matching gauge keeps the published measurements true.
Abbreviations (US terms)
- ch — chain
- hdc — half double crochet
- sc — single crochet
- st(s) — stitch(es)
- RS — right side
- WS — wrong side
- rep — repeat
- pm — place marker
- sl st — slip stitch
- FO — fasten off
Pattern Notes
- Worked flat, in rows, turning at the end of every row.
- Turning chain: Ch 1 at the start of each hdc row. This ch-1 does not count as a stitch. Work the first hdc into the first stitch of the row. This keeps the side edges straight and easy to seam.
- Hdc is nearly reversible. After a few rows, pick the side you prefer and treat it as RS.
- No stitch multiple. Hdc works over any number of stitches, so width is easy to tweak.
- Do not shape armholes, shoulders, waist, or sleeve taper. Every piece is a rectangle. That is what makes this a kimono.
- Length is measured, not only counted. Row counts are a guide. Hold the tape on the piece and add or subtract rows until the listed measurement is reached.
- To change body length: add or subtract rows on Back and both Fronts equally. Every 5 rows ≈ 2" / 5 cm. Every 2–3 rows ≈ 1" / 2.5 cm.
- To change body width: add or subtract stitches in groups of 3 (≈ 1" / 2.5 cm) on Back, and groups of 3 on each Front so the two fronts still add up to the back.
- To change sleeve length: add or subtract rows on both Sleeves. Same row-to-inch rate as the body.
- Optional stretchier hem: replace the foundation chain with foundation hdc (fhdc) using the stitch counts below (66, 33, 60, etc.).
- Place a marker in the first and last stitch of every row until the edges feel automatic.
- Join new yarn at the start of a row when possible. Weave ends in as you go.
Cardigan
Back
With US J/10 (6 mm), ch 67 (79, 91).
Row 1 (WS): Hdc in 2nd ch from hook and in each ch across, turn. 66 (78, 90) hdc ✓ (67 − 1 = 66; 79 − 1 = 78; 91 − 1 = 90 ✓) (66 sts ÷ 12 sts × 4" = 22" ✓; 78 ÷ 12 × 4" = 26" ✓; 90 ÷ 12 × 4" = 30" ✓)
Row 2: Ch 1, hdc in each hdc across, turn. 66 (78, 90) hdc ✓
Rep Row 2 until the piece measures 22 (24, 26)" / 56 (61, 66) cm from the foundation chain, ending after a RS row if you have designated one. Guide: 55 (60, 65) rows (55 rows ÷ 10 rows × 4" = 22" ✓; 60 ÷ 10 × 4" = 24" ✓; 65 ÷ 10 × 4" = 26" ✓).
FO, leaving a 24" / 61 cm tail for seaming. Place markers on the last row as follows, counting from the right-hand edge as the piece faces you:
- Marker A at stitch 21 (24, 30) (end of right shoulder)
- Marker B at stitch 45 (54, 60) (start of left shoulder)
Center neck stitches left open: 24 (30, 30) sts = 8 (10, 10)" ✓ (21 + 24 + 21 = 66 ✓; 24 + 30 + 24 = 78 ✓; 30 + 30 + 30 = 90 ✓)
Front (make 2)
Ch 34 (40, 46).
Row 1 (WS): Hdc in 2nd ch from hook and in each ch across, turn. 33 (39, 45) hdc ✓ (34 − 1 = 33; 40 − 1 = 39; 46 − 1 = 45 ✓) (33 ÷ 12 × 4" = 11" ✓; 39 ÷ 12 × 4" = 13" ✓; 45 ÷ 12 × 4" = 15" ✓)
Row 2: Ch 1, hdc in each hdc across, turn. 33 (39, 45) hdc ✓
Rep Row 2 until the piece measures exactly the same length as the Back: 22 (24, 26)" / 56 (61, 66) cm. Guide: 55 (60, 65) rows.
FO, leaving a 20" / 51 cm tail for seaming.
On the last row of each Front, place a marker 21 (24, 30) sts in from the outer/armhole edge (the edge that will sit at the dropped shoulder). The remaining 12 (15, 15) sts toward the center-front edge stay unseamed for the neck. (33 − 21 = 12 ✓; 39 − 24 = 15 ✓; 45 − 30 = 15 ✓) (12 sts ÷ 12 sts × 4" = 4"; 15 ÷ 12 × 4" = 5" ✓)
Make the second Front identical.
Sleeve (make 2)
Ch 61 (67, 73).
Row 1 (WS): Hdc in 2nd ch from hook and in each ch across, turn. 60 (66, 72) hdc ✓ (61 − 1 = 60; 67 − 1 = 66; 73 − 1 = 72 ✓) (60 ÷ 12 × 4" = 20" ✓; 66 ÷ 12 × 4" = 22" ✓; 72 ÷ 12 × 4" = 24" ✓)
Row 2: Ch 1, hdc in each hdc across, turn. 60 (66, 72) hdc ✓
Rep Row 2 until the piece measures 14 (15, 16)" / 35.5 (38, 40.5) cm from the foundation chain. Guide: 35 (38, 40) rows (35 ÷ 10 × 4" = 14" ✓; 38 ÷ 10 × 4" = 15.2" ≈ 15" ✓; 40 ÷ 10 × 4" = 16" ✓).
Do not taper. Stitch count stays 60 (66, 72) on every row.
FO, leaving a 30" / 76 cm tail for the underarm seam.
Fold the sleeve in half so the two short row-edges meet. The folded width is 10 (11, 12)" / 25.5 (28, 30.5) cm ✓ (half of 20 (22, 24)"). Place a marker at each end of one long (60/66/72-st) edge — this edge is the armhole edge that will be sewn to the body. The opposite long edge is the cuff.
Make the second Sleeve identical.
Finishing
Weave in any extra ends on the WS, but keep the long seaming tails free.
Pieces are seamed with wrong sides together using mattress stitch (neatest) or whip stitch (simplest for beginners), working under the edge loops so the seam stays flat. A slip-stitch crochet seam is also fine; keep it relaxed so the fabric still drapes.
1. Shoulder seams
Lay the Back flat, RS up. Place the Fronts on top, RS down, outer edges matching the Back’s outer edges.
On each side, sew from the dropped-shoulder (outer) edge inward for 21 (24, 30) sts — 7 (8, 10)" / 18 (20.5, 25.5) cm ✓ — joining Front to Back and stopping at the markers.
Leave the center 24 (30, 30) sts of the Back unbound. This is the back neck. Do not sew the fronts together at center.
You now have a straight, unshaped shoulder line. The inner 12 (15, 15) sts of each Front hang as the front neck opening.
2. Attach sleeves (T-join)
This step creates the kimono shape. The sleeve meets the body at a right angle. There is no armhole shaping.
Spread the joined Back and Fronts flat, RS up, like a capital T waiting for its crossbar.
Find the shoulder seam at the outer edge. On the Back side edge, measure 10 (11, 12)" / 25.5 (28, 30.5) cm down from that shoulder corner and pm. On the matching Front side edge, measure the same 10 (11, 12)" down from the same corner and pm. (10 + 10 = 20" sleeve circumference ✓; 11 + 11 = 22" ✓; 12 + 12 = 24" ✓)
Center the Sleeve’s marked armhole edge on the shoulder seam. Pin or clip:
- half of the sleeve edge 10 (11, 12)" along the Back side edge, shoulder to marker
- the other half 10 (11, 12)" along the Front side edge, shoulder to marker
Sew this perpendicular join through all layers, catching one body row-end for each small group of sleeve stitches so the 20 (22, 24)" sleeve edge fills the 20 (22, 24)" opening evenly.
Repeat for the second Sleeve. The garment should now look like a T.
3. Side seams
With WS together, sew each Front to the Back from the hem up to the underarm marker (the lower end of the sleeve join). Do not sew into the sleeve opening.
Side seam length is about 12 (13, 14)" / 30.5 (33, 35.5) cm. (Body 22 − armhole 10 = 12" ✓; 24 − 11 = 13" ✓; 26 − 12 = 14" ✓)
4. Sleeve undersides
Fold each Sleeve so the row-ends meet. Sew from the cuff to the underarm, joining the seam to the side seam. You now have a wide, untapered tube.
Turn the cardigan RS out.
Border
Use US I/9 (5.5 mm) for a slightly firmer edge, or stay on J/10 for a softer edge.
Join yarn at the left-front hem corner (as worn), RS facing.
Round 1: Ch 1. Work sc evenly around the entire outer edge as follows:
- 1 sc in each stitch along stitch-edges (both front hems and the back hem)
- 3 sc for every 2 row-ends along the front vertical edges (hdc rows are taller than sc)
- 1 sc in each stitch across the back neck
- 3 sc in each corner (front hem corners, and where each front edge meets the shoulder/neck)
Join with sl st to the first sc. Do not turn if working in joined rounds; or turn if you prefer a more ridged look.
Round 2: Ch 1, sc in each sc around, working 3 sc in each corner sc. Join with sl st. FO.
This two-round band neatens the open front and neck. For a slightly wider shawl-like band, work a 3rd round the same way.
Cuffs
Join yarn at the sleeve seam on the cuff edge.
Round 1: Ch 1, sc in each st around, join. 60 (66, 72) sc ✓
Round 2: Ch 1, sc in each sc around, join. FO.
Repeat on the second cuff.
Optional Closures
Simple ties (beginner): At about 10 (11, 12)" / 25.5 (28, 30.5) cm up from the hem on each inner front edge, join yarn with sl st, ch 50 (about 16–18" / 40.5–45.5 cm), FO, and weave the tail back through the last 4 chains to knot. Make a matching tie on the other front. Tie at the waist, or leave hanging.
Sash belt: Ch 6, hdc in 2nd ch from hook and in each ch across (5 hdc). Work even in hdc until the belt measures about 50 (54, 58)" / 127 (137, 147.5) cm. FO. Wear wrapped and knotted.
Worn open: No closure needed. That is the classic kimono finish.
Buttons/toggles: Sew 1–3 large buttons on the left front (as worn) and matching chain-loop button loops on the right front. Because the fit is oversized, buttons are decorative more than structural.
Blocking
Blocking is what makes crochet fabric drape like a kimono.
- Weave in every remaining end.
- Soak the cardigan in lukewarm water with a drop of wool wash (or mild soap) for 15–20 minutes. Do not agitate.
- Press water out — never wring. Roll in towels.
- Lay flat on blocking mats or towels. Smooth into the T-shape:
- Back 22 (26, 30)" wide
- Length 22 (24, 26)"
- Each sleeve 14 (15, 16)" from join to cuff and 10 (11, 12)" folded width
- Shoulders in a straight horizontal line
- Pin only enough to even the edges. Do not stretch the fabric aggressively; you want drape, not cardboard.
- Dry completely before moving.
Steam-blocking (hover an iron, never rest it on the stitches) also works for cotton and acrylic. Always check the yarn label first.
Wear and Fit Notes
- The sleeve seam sits below the natural shoulder. That drop is correct.
- Fronts are straight rectangles; they hang open in two clean panels. The sc band is the only “collar.”
- If the cardigan feels short, add rows to Back and Fronts before seaming. If sleeves feel short, add rows to both Sleeves. Because there is no shaping, extra length never throws off an armhole.
- The finished bust number assumes the two fronts meet at center. Worn open, the overlap (or gap) is up to you.
Schematic (text)
                cuff 20 (22, 24)" around
                 |------ 14 (15, 16)" ------|
                 |                          |
    -------------+------------ T -------------+-------------
    sleeve       |         BACK 22 (26, 30)"  |       sleeve
                 |    shoulder 7 (8, 10)" each |
                 |    neck opening 8 (10, 10)" |
    front 11     |                            |     front 11
    (13, 15)"    |         length              |     (13, 15)"
                 |      22 (24, 26)"           |
                 |                            |
                 +----------------------------+
                            hem
Finished bust 44 (52, 60)" with fronts meeting. Side seams run from hem up to the underarm only. Sleeves are the same width from join to cuff.
End of pattern.
Disclaimer: This pattern was generated by AI and should be reviewed for accuracy before use. While we strive for quality, AI-generated content may contain errors. Please verify measurements, stitch counts, charts, and instructions before beginning your project. Generated by purlJam.uk
Love this pattern?
Save this pattern to your free PurlJam libraryAccess your pattern anytime
Bookmark this page to access your pattern anytime