Type
Knitting
Difficulty
beginner
Category
socks
AI Thinking Process
Planning
Verification
Pattern
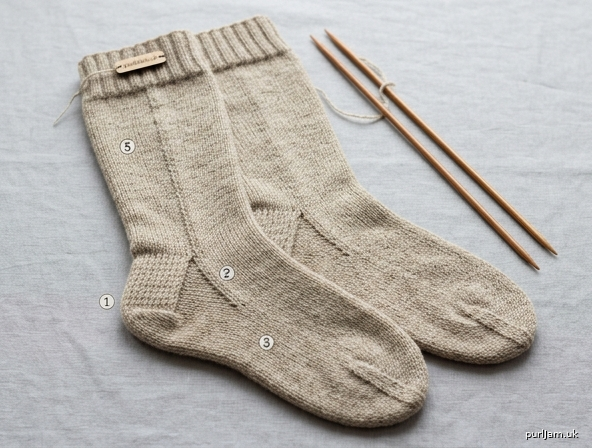
Easy Two-Needle Knee-High Socks
A pair of cuff-down knee-high socks knitted flat on two straight needles. No double-pointed needles and no knitting in the round. You work a stretchy ribbed cuff, a stocking-stitch leg with simple calf shaping, a reinforced heel flap, a gusset, and a wedge toe, then sew one seam along the inside of the leg.
This method is the easiest way to make socks if you are new to them: you can see every stitch on one needle, and you can pin the seam closed to check the fit as you go.
Make two socks alike.
Sizes
S (M, L)
Instructions are given for S with M and L in parentheses. When only one number is given, it applies to all sizes.
To fit
- Foot circumference: 19 (21.5, 24)cm (7½ (8½, 9½)in)
- Calf circumference: 32 (36, 40)cm (12½ (14¼, 15¾)in)
- Typical shoe size: UK 3–5 (5–7, 8–10) / EU 36–38 (38–40, 42–44)
Finished measurements (unstretched)
- Foot circumference: 18 (20, 22)cm (7 (8, 8¾)in)
- Calf circumference: 29 (33, 36.5)cm (11½ (13, 14¼)in)
- Leg length, top of cuff to start of heel: 36 (40, 44)cm (14¼ (15¾, 17¼)in) — adjustable
- Foot length: adjustable (see table in Foot)
Socks are designed with negative ease so they hug the leg and stay up. Choose the size by foot circumference first; if your calf is much larger or smaller than the “to fit” calf, see Fit notes at the end.
Yarn
Worsted weight (Aran / 10-ply), 450 (530, 620) metres (490 (580, 680) yards)
A wool or wool–nylon blend is best (the nylon strengthens the heels and toes; the wool helps the fabric spring back). Superwash is fine.
Allow extra if you lengthen the leg or foot.
Needles & notions
- 3.75mm (UK 9) straight needles, for the cuff
- 4mm (UK 8) straight needles, for the rest of the sock
- Use needles at least 30cm long; 35–40cm is more comfortable at the calf. A circular needle used back and forth (not in the round) is an excellent substitute if your straight needles feel crowded.
- Stitch holder or spare needle
- 2 stitch markers
- Tapestry needle
- Optional: sock elastic thread, to carry with the cuff yarn so the socks stay up
Tension (gauge)
22 stitches and 30 rows = 10cm (4in) over stocking stitch on 4mm needles, after a light steam or wet block.
Work a tension square of at least 12 × 12cm, then measure the centre 10cm.
- Too few stitches per 10cm (fabric too loose): the socks will sag and wear through. Try 3.75mm.
- Too many stitches per 10cm (fabric too tight): the socks will be stiff. Try 4.5mm.
For socks, a firm fabric is the aim. Match stitch tension first; row tension mainly affects length, which you can knit to measurement.
Abbreviations
| Abbr. | Meaning |
|---|---|
| alt | alternate |
| beg | beginning |
| cont | continue |
| dec | decrease(ing) |
| foll | following |
| k | knit |
| k2tog | knit 2 stitches together (right-leaning decrease) |
| p | purl |
| p2tog | purl 2 stitches together |
| pm | place marker |
| psso | pass slipped stitch over |
| rem | remain(ing) |
| rep | repeat |
| RS | right side |
| sl | slip |
| slm | slip marker |
| ssk | slip 1 knitwise, slip 1 knitwise, knit those 2 sts together through the back loop (left-leaning decrease) |
| st(s) | stitch(es) |
| st st | stocking stitch (knit RS rows, purl WS rows) |
| WS | wrong side |
| wyib | with yarn in back |
| wyif | with yarn in front |
Pattern notes (read before you cast on)
Worked flat. Every section is knitted back and forth in rows. The two side edges are sewn together at the end. Wear that seam along the inside of the leg (the side that faces your other leg). That placement puts the heel at the back of the foot.
Trying on. You cannot pull a flat sock onto your foot until it is seamed. Use locking stitch markers or safety pins to close the seam temporarily and check length at the calf, ankle, and foot.
Markers. You will place one marker to show where the instep (top of the foot) begins. Leave it in until the toe is finished.
Slipped stitches on the heel. Slip purlwise unless the instruction says knitwise. This keeps the stitch from twisting.
Picking up stitches. Insert the left needle under both legs of a slipped-stitch chain along the heel-flap edge, wrap the yarn as if to knit, and pull through. One picked-up stitch sits in each chain.
Make a pair. Complete two identical socks.
Cuff
With 3.75mm needles and a stretchy cast-on (long-tail is ideal), cast on 64 (72, 80) sts.
Row 1 (RS): *K2, p2; rep from * to end.
Row 2 (WS): *K2, p2; rep from * to end.
These two rows are both k2, p2 because the rib is a multiple of 4 and aligns on every row. Cont in k2, p2 rib until the cuff measures 8cm (3¼in) from the cast-on edge, ending after a WS row.
Optional stay-up: carry a strand of sock elastic with the working yarn for the whole cuff, or for the last 8 rows only.
64 (72, 80) sts.
Leg
Change to 4mm needles.
Work 4 rows in stocking stitch, starting with a RS (knit) row:
- RS: Knit.
- WS: Purl.
Shape the calf
The leg is decreased at each selvedge (these decreases sit along the back/inner seam and follow the natural line of the calf down to the ankle).
Decrease row (RS): K2, ssk, knit to last 4 sts, k2tog, k2. (2 sts decreased)
Next 3 rows: Work in st st (WS purl, RS knit, WS purl).
Rep the last 4 rows a further 11 (13, 15) times. 12 (14, 16) decrease rows worked in total.
12 (14, 16) decrease rows × 2 sts = 24 (28, 32) sts decreased → 64 − 24 = 40 (72 − 28 = 44, 80 − 32 = 48) sts ✓
40 (44, 48) sts.
Cont even in st st until the leg measures 36 (40, 44)cm (14¼ (15¾, 17¼)in) from the cast-on edge, ending after a WS (purl) row.
To lengthen or shorten: work more or fewer even rows here. Measure the wearer from just below the knee to the floor, then subtract about 8cm for the heel depth — that is a good target for this length. Pin the seam and try the tube on before starting the heel.
Heel flap
The heel is worked on the first 20 (22, 24) sts only. The remaining 20 (22, 24) sts are the instep (top of the foot) and rest on a holder.
Next row (RS): K20 (22, 24), turn. Place the remaining 20 (22, 24) sts on a holder. (20 + 20 = 40, 22 + 22 = 44, 24 + 24 = 48 ✓)
Work on these 20 (22, 24) heel sts only:
Row 1 (RS): *Sl 1 purlwise wyib, k1; rep from * to end.
Row 2 (WS): Sl 1 purlwise wyif, purl to end.
Rep Rows 1–2 a further 9 (10, 11) times.
20 (22, 24) rows worked in total. The flap should measure about 6.5 (7, 8)cm (2½ (2¾, 3¼)in) deep. The slipped stitches form a sturdy, padded fabric and a chain of stitches along each side — you will pick up into those chains later.
20 (22, 24) heel sts.
Turn the heel
Short rows pinch the bottom of the flap into a cup. You will see a small gap at each turn; the decrease always joins the stitch before that gap to the stitch after it.
Row 1 (RS): Sl 1, k11 (12, 13), ssk, k1, turn.
Row 2 (WS): Sl 1, p5, p2tog, p1, turn.
Row 3: Sl 1, knit to 1 st before the gap, ssk (the stitch before the gap together with the stitch after the gap), k1, turn.
Row 4: Sl 1, purl to 1 st before the gap, p2tog, p1, turn.
Rep Rows 3–4 until every heel stitch has been worked, ending after a WS row. On the last pair of rows, if only one stitch remains beyond the gap, work ssk (or p2tog) without the final k1 (or p1).
12 (14, 14) sts remain.
Gusset
You now pick up stitches along both sides of the heel flap, then rejoin the instep.
Break the yarn, leaving a 20cm tail. With RS facing, rejoin the yarn at the top of the heel-flap edge on the selvedge side (the corner where you first divided for the heel, at the start-of-row edge).
Set-up row (RS):
- Pick up and knit 11 (12, 13) sts down the selvedge side of the heel flap (one stitch in each slipped chain, plus one extra in the corner to close the hole).
- Knit across the 12 (14, 14) heel sts.
- Pick up and knit 11 (12, 13) sts up the other side of the heel flap (one in each slipped chain, plus one extra in the corner).
- Knit across the 20 (22, 24) instep sts from the holder.
- Pm to mark the start of the instep. (If it helps, also pm after the first picked-up group so you can see the sole section.)
54 (60, 64) sts. 11 + 12 + 11 + 20 = 54 (12 + 14 + 12 + 22 = 60, 13 + 14 + 13 + 24 = 64) ✓
Next row (WS): Purl to end, slipping the marker.
Decrease for the gusset
The extra picked-up stitches are reduced until you are back to the ankle count. One decrease eats the selvedge-side gusset; the other eats the gusset next to the instep.
Decrease row (RS): K2, ssk, knit to 3 sts before the instep marker, k2tog, k1, slm, knit to end. (2 sts decreased)
Next row (WS): Purl to end.
Rep the last 2 rows a further 6 (7, 7) times. 7 (8, 8) decrease rows worked.
7 (8, 8) × 2 = 14 (16, 16) sts decreased → 54 − 14 = 40 (60 − 16 = 44, 64 − 16 = 48) ✓
40 (44, 48) sts — 20 (22, 24) sole sts, marker, 20 (22, 24) instep sts.
If you are 1 or 2 stitches off after the heel turn, keep working Decrease row + purl row until 40 (44, 48) sts remain, then continue.
Foot
Keeping the instep marker in place, work even in st st (knit RS, purl WS) until the foot measures 4.5 (5, 5.5)cm (1¾ (2, 2¼)in) less than the desired finished foot length, measured from the back of the heel, ending after a WS row.
Guide to finished foot length (measure the wearer’s foot from back of heel to tip of longest toe, then subtract about 1cm for negative ease):
| UK size | Finished foot length |
|---|---|
| 3 | 22cm (8¾in) |
| 4 | 22.5cm (8¾in) |
| 5 | 23.5cm (9¼in) |
| 6 | 24.5cm (9¾in) |
| 7 | 25cm (9¾in) |
| 8 | 26cm (10¼in) |
| 9 | 27cm (10¾in) |
| 10 | 27.5cm (10¾in) |
| 11 | 28.5cm (11¼in) |
Pin the seam and try the sock on. The remaining fabric should reach to about the base of the toes; the toe shaping will cover the rest.
40 (44, 48) sts.
Toe
Decreases are worked at four points, matching a classic wedge toe: two on the sole, two on the instep.
Toe decrease row (RS): K1, ssk, knit to 3 sts before marker, k2tog, k1, slm, k1, ssk, knit to last 3 sts, k2tog, k1. (4 sts decreased)
Next row (WS): Purl to end.
Rep the last 2 rows until 16 sts remain (8 sole sts, marker, 8 instep sts), ending after a WS row.
S: 40 − 16 = 24, 24 ÷ 4 = 6 RS decrease rows ✓ M: 44 − 16 = 28, 28 ÷ 4 = 7 RS decrease rows ✓ L: 48 − 16 = 32, 32 ÷ 4 = 8 RS decrease rows ✓
16 sts.
Close the toe (choose one)
Beginner method — three-needle cast-off. Slip the 8 instep sts onto a spare needle, removing the marker. Hold the sole needle and the instep needle parallel, RS together (or WS together if you prefer the ridge on the inside). Using a third needle, k2tog (one st from each needle), *k2tog (one from each needle), pass first st over; rep from * until all sts are cast off. Fasten off.
Smoother method — Kitchener stitch. Slip the 8 instep sts onto a spare needle. Hold the two needles parallel, WS together, yarn at the right. Thread a tapestry needle.
Set-up: Front needle, tapestry needle through first st purlwise, leave st on. Back needle, through first st knitwise, leave st on.
Then repeat:
- Front: through first st knitwise, slip it off; through next st purlwise, leave it on.
- Back: through first st purlwise, slip it off; through next st knitwise, leave it on.
When 2 sts remain, work them in the same way and pull the yarn through. Neaten the tension of the grafted row so it matches the knitting.
Finishing
Seam
With RS facing you and the two selvedges together, sew the sock using mattress stitch from the top of the cuff, down the inside of the leg, along the side of the heel, and along the foot to the toe.
- On stocking stitch, insert the tapestry needle under the horizontal bar between the first and second stitch of each edge, alternating sides, and pull snug every few stitches so the seam sits flat.
- On the ribbed cuff, follow the knit columns so the k2, p2 pattern appears to continue around.
- Do not pull so tightly that the seam puckers; it should have the same stretch as the fabric.
The seam should sit on the inner leg. If it has landed on the front or the outer calf, rotate the sock when you put it on — the heel cup tells you which way is the back.
Ends and blocking
Weave in all ends on the WS.
Wet-block: soak in lukewarm water with a little wool wash for 15 minutes, press out water in a towel (do not wring), and lay flat to dry. Smooth the leg and foot to the finished measurements. Do not stretch the cuff — you want it to stay springy so the socks stay up.
Make the second sock.
Fit notes
Socks slide down. Work the cuff on 3.5mm needles, add elastic thread, or knit the cuff 2cm longer and fold it. A wool-rich yarn grips better than cotton or acrylic.
Calf is tight. Cast on the next size up, then decrease to your usual ankle count (work extra decrease rows, still 2 sts every 4th row, until you reach 40 (44, 48) sts).
Calf is loose. Cast on the next size down, or work the decrease rows every 2nd row instead of every 4th so the leg narrows sooner.
Heel is baggy or shallow. Work 2 extra (or 2 fewer) repeats of the heel-flap Rows 1–2. Pick up one extra stitch per extra two rows, then still decrease the gusset until 40 (44, 48) sts remain.
Foot circumference is wrong. This almost always means the tension does not match 22 sts = 10cm. Swatch again before the second sock.
At-a-glance construction
- Cast on 64 (72, 80) — cuff rib 8cm.
- Leg in st st, decrease 2 sts every 4th row 12 (14, 16) times to 40 (44, 48), then even to 36 (40, 44)cm.
- Heel flap on 20 (22, 24) sts for 20 (22, 24) rows; instep on holder.
- Turn heel → 12 (14, 14) sts.
- Pick up 11 (12, 13) each side → 54 (60, 64) sts.
- Gusset decrease to 40 (44, 48) sts.
- Foot even to 4.5 (5, 5.5)cm before desired length.
- Toe decrease 4 sts every RS row to 16 sts; close.
- Mattress-stitch the inner-leg seam. Make the second sock.
Disclaimer: This pattern was generated by AI and should be reviewed for accuracy before use. While we strive for quality, AI-generated content may contain errors. Please verify measurements, stitch counts, charts, and instructions before beginning your project. Generated by purlJam.uk
Love this pattern?
Save this pattern to your free PurlJam libraryAccess your pattern anytime
Bookmark this page to access your pattern anytime