Type
Knitting
Difficulty
beginner
Category
socks
AI Thinking Process
Planning
Verification
Pattern
Little Shark Socks
Beginner cuff-down worsted socks — a pair
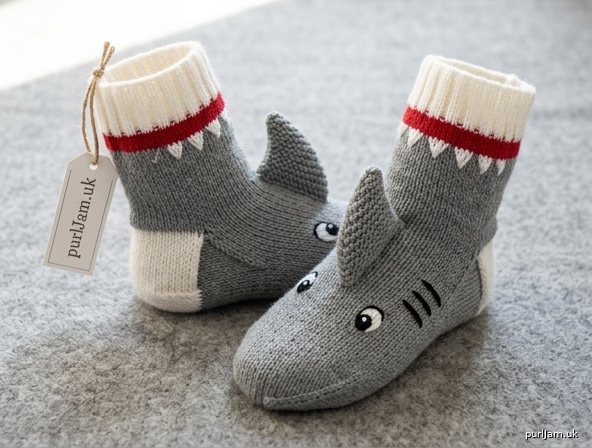
Friendly shark socks for kids: a white ribbed mouth, a flash of red gums, gray body, white heel-belly, embroidered teeth and eyes, and a knitted dorsal fin. Worked from the cuff down with a traditional heel flap so you can try them on as you go. This pattern makes a pair (2 socks). Knit the first sock completely, then make a second to match.
Skill level: Beginner. New-to-socks techniques (heel flap, picking up stitches, Kitchener stitch) are written out step by step.
Sizes
Toddler (Child, Youth)
To fit ages: 1–3 (4–7, 8–12) years
To fit foot circumference: 6½ (7¼, 8)" [16.5 (18.5, 20.5) cm]
Finished sock circumference: 5¾ (6½, 7¼)" [14.5 (16.5, 18.5) cm] (about 10% negative ease)
Leg length (including cuff): 3 (4, 5)" [7.5 (10, 12.5) cm]
Foot length: adjustable; typical finished lengths 5 (6½, 8)" [12.5 (16.5, 20.5) cm]
Instructions are for Toddler, with Child and Youth in parentheses. When only one number is given, it applies to all sizes. Highlight your size before you begin.
To choose a size, measure around the ball of the child’s foot. Pick the size whose “to fit” circumference is closest. Foot length is set while you knit — have the child try the sock on after the gusset.
Yarn
Worsted weight (CYC 4), wool or wool-blend preferred for bounce and wear. Superwash wool or wool/nylon is ideal for kids (easier washing). Acrylic will work but will be less elastic.
MC (shark gray or blue-gray): 100 (130, 160) yd [90 (120, 145) m]
CC (white — mouth, belly, teeth): 45 (55, 70) yd [40 (50, 65) m]
Red (gums): about 5 yd [5 m]
Black (pupils and optional gills): about 3 yd [3 m]
One typical 200 yd / 100 g worsted skein of MC and a leftover or partial skein of CC are enough for a pair, including the fins.
Needles
US 5 (3.75 mm) — one of the following:
- A set of 4 or 5 double-pointed needles (DPNs), or
- One 32–40" [80–100 cm] circular needle for magic loop, or
- Two circular needles of the same size
Use the method you already know (or see Setup below). Change needle size if needed to match gauge — denser fabric is better than loose fabric for socks.
Notions
- Stitch markers (2, plus 1 locking marker for the beginning of round)
- Tapestry needle
- Scissors
- Spare yarn or stitch holder
- Small amount of yarn-scrap stuffing for the fins (no plastic pellets)
Gauge
22 stitches and 30 rounds = 4" (10 cm) in stockinette stitch in the round, after a light steam or wet block.
That is 5½ sts per inch. Swatch in the round: a flat swatch will read a little wide.
Why gauge matters here: Too loose, and the socks slouch and wear out. Too tight, and they are hard to put on. If you have more than 22 sts in 4", go up a needle size. If you have fewer, go down a needle size.
Abbreviations (US)
BO — bind off
CC — contrasting color (white)
CO — cast on
dec — decrease
DPN(s) — double-pointed needle(s)
k — knit
k2tog — knit 2 stitches together (right-leaning decrease)
MC — main color (gray)
p — purl
p2tog — purl 2 stitches together
pm — place marker
rep — repeat
rnd(s) — round(s)
RS — right side
sl — slip stitch as if to purl
ssk — slip 1 knitwise, slip 1 knitwise, insert left needle into the front of both slipped stitches and knit them together (left-leaning decrease)
st(s) — stitch(es)
St st — stockinette stitch (knit every round in the round; knit RS / purl WS when flat)
WS — wrong side
wyib — with yarn in back
wyif — with yarn in front
Pattern Notes
- Make 2. Every instruction is for one sock; repeat for the second.
- Worked cuff down: cuff → leg → heel flap → heel turn → gusset → foot → toe.
- Cast on loosely so the cuff stretches over the heel. If your cast-on is tight, use a US 6 / 4 mm needle just for the cast-on, then change to US 5 / 3.75 mm.
- Join to work in the round without twisting the cast-on edge.
- Beginning of round sits at the center back of the leg (it will become the center of the heel).
- Cut yarn when changing colors, leaving a 6" [15 cm] tail to weave in. No need to carry colors.
- Safety: Embroider the eyes. Do not use buttons, beads, or safety eyes on children’s socks. Sew the dorsal fin on firmly and check it after washing.
Setup: distributing stitches
DPNs (4 needles holding stitches + 1 working needle, or 3 holding + 1 working):
After casting on 32 (36, 40) sts, divide as evenly as you can:
- 4 holding needles: 8 (9, 10) sts on each needle. 8 × 4 = 32 ✓ · 9 × 4 = 36 ✓ · 10 × 4 = 40 ✓
- 3 holding needles: 10/11/11 (12/12/12, 13/13/14)
The working needle is empty. Knit with it from Needle 1; that empty needle then becomes the new working needle.
Magic loop (one long circular):
Slide the cast-on onto the cable and pull a loop of cable out at the halfway point. Half the stitches sit on the front needle, half on the back: 16/16 (18/18, 20/20). 16 + 16 = 32 ✓ · 18 + 18 = 36 ✓ · 20 + 20 = 40 ✓
Place a locking marker on the first stitch of the round so it does not get lost when the stitches slide onto the cable.
Sock (make 2)
Cuff (white mouth)
With CC (white) and US 5 / 3.75 mm needles, loosely CO 32 (36, 40) stitches. Join to work in the round, being careful not to twist. Place a marker for beginning of round.
Rib rnd: *K2, p2; rep from * to end of rnd.
Work Rib rnd until cuff measures 1½" [4 cm] from the cast-on edge — about 11–12 rounds.
Gums (optional but very sharky)
Join red. Knit 2 rounds. Cut red.
Leg (gray body)
Join MC (gray). Knit every round (stockinette in the round) until the piece measures 3 (4, 5)" [7.5 (10, 12.5) cm] from the cast-on edge, including the white cuff.
Heel flap (white belly)
The heel is worked flat, back and forth, on half the stitches. The other half rest for the instep.
Set-up: Knit the first 16 (18, 20) stitches onto one needle — these are the heel stitches. 16 = 32 ÷ 2 ✓ · 18 = 36 ÷ 2 ✓ · 20 = 40 ÷ 2 ✓
Place the remaining 16 (18, 20) instep stitches on a holder, spare needle, or the cable of your circular to wait.
Cut MC, leaving a 6" tail. Join CC (white) to the heel stitches, RS facing.
The slipped-stitch pattern makes a sturdy, cushioned heel.
Row 1 (RS): *Sl 1 wyib, k1; rep from * to end.
Row 2 (WS): Sl 1 wyif, purl to end.
Rep Rows 1–2 until you have worked 16 (18, 20) rows total, ending after a WS (purl) row. You will see 8 (9, 10) chain-like slipped stitches along each side of the flap. 16 rows ÷ 2 = 8 edge sts ✓ · 18 ÷ 2 = 9 ✓ · 20 ÷ 2 = 10 ✓
Heel turn
Still with CC, work short rows to wrap the heel into a cup. You will see a small gap where you turned on the previous row; the decrease always eats the stitch before the gap together with the stitch after it.
Row 1 (RS): Sl 1, k8 (9, 10), ssk, k1, turn.
Row 2 (WS): Sl 1, p3, p2tog, p1, turn.
Row 3: Sl 1, knit to 1 st before the gap, ssk (the stitch before the gap together with the stitch after the gap), k1, turn.
Row 4: Sl 1, purl to 1 st before the gap, p2tog, p1, turn.
Rep Rows 3–4 until every heel stitch has been worked, ending after a WS row. On the last two rows, if only one stitch remains beyond the gap, work ssk or p2tog and turn — skip the final k1 or p1.
10 (10, 12) heel stitches remain. 16 − 6 = 10 ✓ · 18 − 8 = 10 ✓ · 20 − 8 = 12 ✓
Cut CC.
Gusset
Rejoin MC (gray), RS facing. You will now pick up stitches along both sides of the heel flap and return to knitting in the round.
Pick-up rnd:
- Knit across the 10 (10, 12) remaining heel stitches.
- Pick up and knit 8 (9, 10) stitches along the left side of the heel flap — one in each slipped chain. (10 heel + 8 pickup = 18 ✓ · 10 + 9 = 19 ✓ · 12 + 10 = 22 ✓)
- Knit across the 16 (18, 20) held instep stitches.
- Pick up and knit 8 (9, 10) stitches along the right side of the heel flap.
- Knit to the center of the heel. This is the new beginning of round (center of the sole).
Total: 42 (46, 52) stitches.
Toddler: 10 + 8 + 16 + 8 = 42 ✓
Child: 10 + 9 + 18 + 9 = 46 ✓
Youth: 12 + 10 + 20 + 10 = 52 ✓
Place markers (or use needle breaks) to mark the 2 instep stitches at each corner:
- Sole stitches: 26 (28, 32) — the heel + both pick-up sides
- Instep stitches: 16 (18, 20)
DPN arrangement that makes the decreases easy:
- Needle 1: from center of heel to the start of the instep (first gusset side + half of heel)
- Needle 2: all 16 (18, 20) instep stitches
- Needle 3: from the end of the instep back to center of heel
Magic loop: instep on one needle, sole on the other.
Gusset decreases
You will decrease 2 stitches every other round until you are back to the original count.
Dec rnd: Knit to 3 sts before the instep, k2tog, k1; knit across the instep; k1, ssk, knit to end of rnd. (2 sts decreased)
Even rnd: Knit.
Rep Dec rnd and Even rnd until 32 (36, 40) stitches remain.
Toddler: 42 − 32 = 10 sts to decrease → 5 Dec rnds ✓
Child: 46 − 36 = 10 sts → 5 Dec rnds ✓
Youth: 52 − 40 = 12 sts → 6 Dec rnds ✓
You now have 16 (18, 20) instep stitches and 16 (18, 20) sole stitches. 16 + 16 = 32 ✓ · 18 + 18 = 36 ✓ · 20 + 20 = 40 ✓
Foot
Knit every round in MC until the foot measures 1½ (1¾, 2)" [4 (4.5, 5) cm] shorter than the desired finished foot length, measured from the back of the heel.
Try it on. The toe will add that last 1½ (1¾, 2)". Typical total foot lengths:
- Toddler: 5" [12.5 cm]
- Child: 6½" [16.5 cm]
- Youth: 8" [20.5 cm]
If you are between lengths, stop a little early — a slightly short sock stays on better than one that is long in the toe.
Toe
Keep 16 (18, 20) stitches on the instep and 16 (18, 20) on the sole. Beginning of round is still the center of the sole; for the toe it is easier to start at the start of the instep. Knit to the start of the instep and treat that as the new beginning of round if you like.
Rnd 1 (dec):
Instep: K1, ssk, knit to last 3 instep sts, k2tog, k1.
Sole: K1, ssk, knit to last 3 sole sts, k2tog, k1.
(4 sts decreased)
Rnd 2: Knit.
Rep Rnds 1–2 until 8 stitches remain — 4 instep + 4 sole.
Toddler: (32 − 8) ÷ 4 = 6 Dec rnds ✓
Child: (36 − 8) ÷ 4 = 7 Dec rnds ✓
Youth: (40 − 8) ÷ 4 = 8 Dec rnds ✓
Those 6 (7, 8) decrease rounds plus the even rounds between them measure about 1½ (1¾, 2)" ✓
Cut MC, leaving a 12" [30 cm] tail for grafting.
Close the toe — Kitchener stitch
Arrange the remaining 8 stitches so 4 instep stitches are on one needle and 4 sole stitches are on the other, tips pointing right, yarn coming from the back (sole) needle.
Thread the tail on a tapestry needle.
Set-up (once only):
- Front needle: pass the tapestry needle purlwise through the first stitch and leave the stitch on the needle.
- Back needle: pass the tapestry needle knitwise through the first stitch and leave the stitch on the needle.
Repeat these 4 motions until 1 stitch remains on each needle:
- Front: go knitwise, slip that stitch off.
- Front: go purlwise through the new first stitch, leave it on.
- Back: go purlwise, slip that stitch off.
- Back: go knitwise through the new first stitch, leave it on.
Memory aid: Front: knit off, purl on. Back: purl off, knit on.
When 1 stitch remains on each needle, work steps 1 and 3 only (knit off the front, purl off the back). Weave the tail to the inside and snug the line of grafting so it matches the roundness of the sock — do not pull it into a ridge.
Dorsal Fin (make 2 — one per sock)
Worked flat in garter stitch (knit every row) with MC. Garter makes a firm little fin that stands up.
CO 3 sts.
Row 1 (WS): Knit.
Row 2 (RS): K1, knit into the front and back of the next st (kfb), k1. — 4 sts (3 + 1 = 4 ✓)
Row 3: Knit.
Row 4: K1, kfb, k to last 2 sts, kfb, k1. — 2 sts increased
Rep Rows 3–4 until you have 11 sts.
(4, 6, 8, 10, then 11? From 4 sts, four increase rows add 8 → 12. Stop at 11 as follows: after you reach 10 sts, work one RS row as k1, kfb, k to end — 11 sts ✓)
Knit 3 rows even.
Decrease row (RS): K1, k2tog, k to last 3 sts, ssk, k1. — 2 sts decreased
Next row: Knit.
Rep these 2 rows until 5 sts remain.
Next RS row: K1, sl 1, k2tog, pass slipped st over, k1. — 3 sts
Next row: Knit.
Last row: Sl 1, k2tog, pass slipped st over. Fasten off.
You have a long diamond. Fold it in half along the widest row (the 3 even rows at the middle) so the two points meet. This fold is the base of the fin (the part that sews to the sock); the folded, decreased sides form the upright triangle.
With WS together, mattress-stitch or whipstitch the two side edges, leaving the folded base open. Push a pea-sized bit of yarn-scrap stuffing inside so the fin stands, not a lump. Leave the base open for sewing.
Shark face
Work these with a tapestry needle after both socks are knitted. Use photos of the pair side by side so the eyes and fin sit in the same place on each sock.
Teeth
With CC (white), embroider a ring of triangles just below the red gums (or just below the white cuff if you skipped the red), pointing down toward the toe.
Each tooth is a small triangle about 3 stitches wide and 3–4 rounds tall:
- Base (nearest the cuff): 3 duplicate stitches side by side, or a small satin-stitch bar.
- Middle round: 2 stitches centered under the base.
- Tip (toward the toe): 1 stitch.
Space the teeth evenly — about 8 (9, 10) teeth around the leg, sitting on the gray. Leave a tiny gap of gray between teeth so they read as a bite, not a white stripe.
Eyes (embroidered — no buttons)
On the instep, about ½–1" [1.5–2.5 cm] below the teeth and slightly left and right of center:
- White: a small oval or circle, about 3 sts wide and 3–4 rnds tall (satin stitch or duplicate stitch).
- Black: a smaller pupil on the lower half of each white oval, looking slightly toward the toe so the shark looks eager, not surprised.
- Optional: a single tiny white stitch on each pupil for a catch-light.
Mirror the placement on the second sock.
Optional gills
With black or a darker gray, stitch 3 short diagonal lines on each side of the leg, just below the eyes, slanting back toward the heel. Each line is about ½" [1.5 cm].
Finishing
Attach the dorsal fin.
Pin the open base of the fin to the center of the instep, halfway between the teeth and the start of the toe (or a little closer to the ankle on small feet). The fin should stand up along the length of the foot, not across it. Sew the base to the sock with MC, stitching through both layers of the fin and into the sock fabric twice around. Tug to check it is child-proof.
Weave in all ends on the WS. Take a moment at the color changes (white cuff → red → gray, and white heel → gray gusset) so nothing pops to the right side.
Block: Soak the socks in lukewarm water with a little wool wash for 15 minutes. Squeeze — do not wring. Roll in a towel. Lay flat, gently shaping the foot and pulling the cuff even. Let dry. A light steam on the fin (hover the iron; do not crush it) helps it stand.
Make the second sock.
Fit and wear notes
- If the cuff feels loose, run a strand of elastic thread through the inside of the first few ribbing rounds, or go down one needle size for the cuff only next time.
- If the foot is tight, you likely knit at a denser gauge than 22 sts / 4"; use a larger needle for the next pair.
- These are worsted socks: warm, cushioned, and quicker than fingering-weight socks — great for slippers around the house. On smooth floors, add a few dots of puff paint or a commercial sock-stopper on the sole if you want extra grip.
- Machine-wash only if you used superwash or acrylic; otherwise hand-wash and lay flat to dry.
Chomp chomp. Two little sharks, ready to wear.
Disclaimer: This pattern was generated by AI and should be reviewed for accuracy before use. While we strive for quality, AI-generated content may contain errors. Please verify measurements, stitch counts, charts, and instructions before beginning your project. Generated by purlJam.uk
Love this pattern?
Save this pattern to your free PurlJam libraryAccess your pattern anytime
Bookmark this page to access your pattern anytime