Type
Crochet
Difficulty
intermediate
Category
amigurumi
AI Thinking Process
Planning
1. **Design Strategy**:
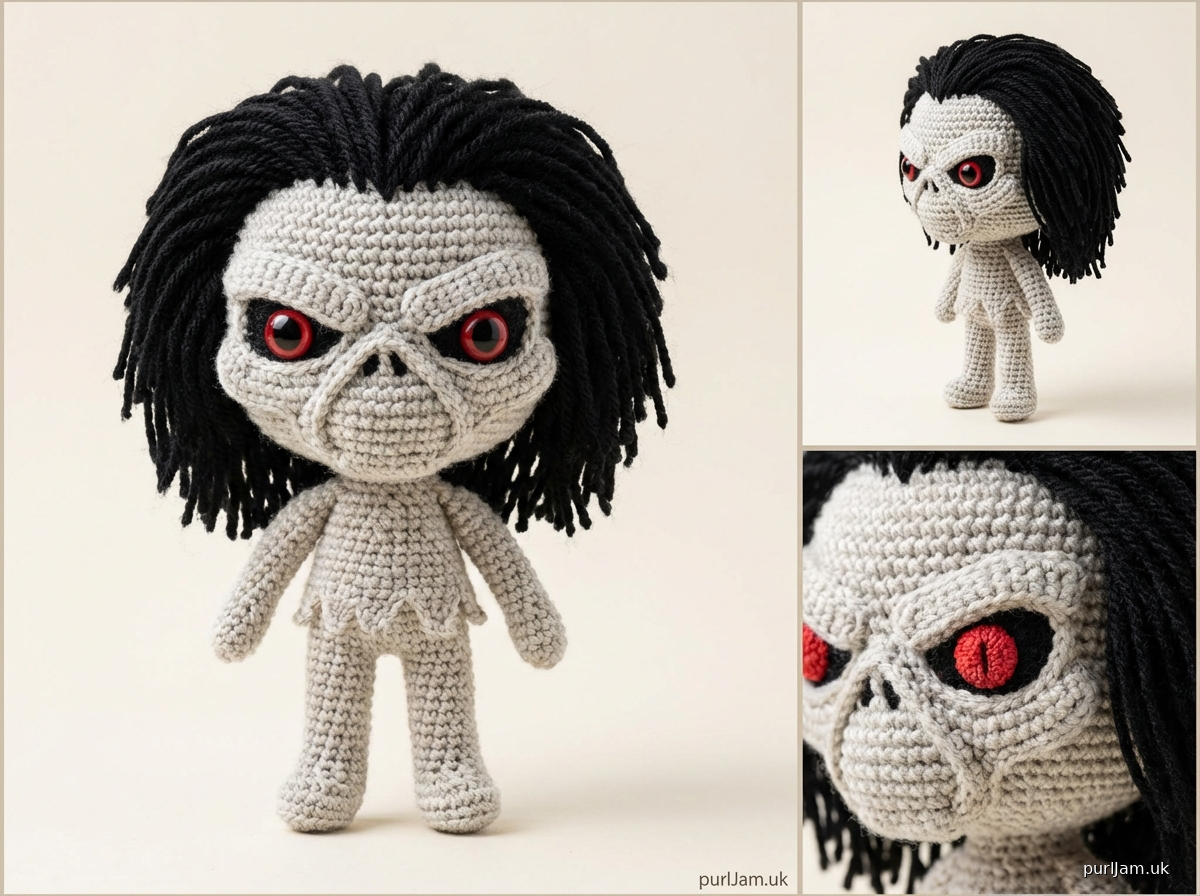
- Creating Eddie from "The Number of the Beast" era (iconic zombie/corpse mascot with tattered flesh, wild hair, prominent features)
- Funko Pop style: oversized head (ratio approximately 1:2 head-to-body), simplified features, large eyes
- Key Eddie features: gaunt face, prominent cheekbones, wild hair, skeletal/zombie aesthetic
- Color palette: pale gray/tan for skin, dark gray for shadows/decay, black for hair, red accents for eyes/wounds
- Height target: 15cm (approximately 6 inches) - head will be ~10cm, body ~5cm
- Intermediate level: requires color changes, embroidery details, assembly of multiple parts
2. **Construction Plan**:
- HEAD: Large sphere with facial shaping, work in pale gray with darker gray for depth/decay
- BODY: Simplified torso, proportionally smaller than head (Funko style)
- ARMS: Simple tube arms positioned at sides
- LEGS: Short legs for stability
- HAIR: Separate pieces worked in black, sewn on for wild effect
- DETAILS: Embroidered facial features, optional felt teeth, safety eyes for dramatic effect
- Assembly order: Close body, attach legs, attach head to body, add arms, add hair pieces last
3. **Quality Assurance**:
- Head-to-body ratio critical for Funko aesthetic - head must be significantly larger
- Stuffing firmness: head needs to be very firm to support weight and maintain shape
- Eye placement: position slightly lower and wider apart for characteristic look
- Color transitions: clean color changes for defined features
- Stability: ensure figure can stand with proper leg positioning and firm stuffing
4. **Final Calculations**:
- Worsted weight yarn with 3.5mm hook = tight amigurumi gauge
- Standard gauge: 6 sc = 1 inch, 7 rounds = 1 inch
- Head: increase to 42 sts (approx 7" circumference, ~2.2" diameter = 5.5cm), with even rounds = ~10cm tall
- Body: increase to 36 sts maximum, shorter length = ~5cm tall
- Total height: approximately 15cm (6 inches) as requested
Verification
[PRE-FLIGHT CHECKS]
1. **Completeness**:
✓ Materials list
✓ Gauge swatch instructions
✓ Head pattern with increases/decreases
✓ Body pattern
✓ Arms (2)
✓ Legs (2)
✓ Hair pieces
✓ Assembly instructions
✓ Embroidery/finishing details
2. **Consistency**:
✓ Head increases: 6→12→18→24→30→36→42 (consistent pattern)
✓ Body increases: 6→12→18→24→30→36 (proportionally smaller)
✓ Decreases mirror increases
✓ Stitch counts verified at each round
3. **Constraints**:
✓ Eddie character from Number of the Beast era
✓ Funko style proportions (large head, small body)
✓ 15cm tall target
✓ Intermediate level appropriate
✓ Amigurumi technique
✓ Worsted weight yarn
4. **Safety**:
✓ All increase/decrease math verified
✓ Safety eyes mentioned with timing
✓ Assembly order logical
✓ No choking hazards if properly constructed
Pattern
<pattern>
# EDDIE THE HEAD AMIGURUMI
## Iron Maiden Mascot - "The Number of the Beast" Style

**Finished Size**: Approximately 6 inches (15cm) tall
**Difficulty Level**: Intermediate
**Design Notes**: This pattern creates a Funko-style version of Eddie featuring an oversized head and simplified body proportions, inspired by Iron Maiden's iconic mascot from The Number of the Beast era.

---

## MATERIALS

**Yarn**: Worsted weight (4) acrylic or cotton yarn
- Color A: Pale Gray or Tan (main skin color) - approximately 100 yards
- Color B: Dark Gray or Charcoal (shadows/decay) - approximately 30 yards
- Color C: Black (hair) - approximately 40 yards
- Color D: Red (eye details/wounds) - small amount, approximately 10 yards
- Optional: White for teeth details

**Hook**: US E-4 (3.5mm) - one size smaller than yarn recommendation for tight gauge

**Other Materials**:
- Safety eyes: 12mm, black or red (2)
- Polyester fiberfill stuffing
- Yarn needle for sewing and embroidery
- Stitch marker
- Scissors
- Optional: Small pieces of white or cream felt for teeth
- Optional: Fabric glue for felt pieces
- Pins for assembly

---

## GAUGE

**Gauge in Single Crochet**: 6 sc and 7 rounds = 1 inch (2.5cm)

**Gauge Swatch**: Chain 13, sc in 2nd ch from hook and across (12 sc), ch 1, turn. Work in rows of 12 sc for 14 rows. Measure center 12 sts and 7 rounds.

**Important**: Amigurumi requires tight gauge to prevent stuffing from showing through. Your fabric should be dense with no gaps. If you can see through your stitches, go down a hook size.

---

## PATTERN NOTES

- Work in continuous spiral rounds unless otherwise specified; do not join or turn
- Use stitch marker to track beginning of round; move marker up as you work
- Stuff pieces firmly as you work, especially before decreasing rounds
- Insert safety eyes before closing head opening
- All pieces are worked in single crochet unless otherwise specified

---

## ABBREVIATIONS

- ch = chain
- sc = single crochet
- inc = increase (2 sc in same stitch)
- dec = invisible decrease (insert hook in front loops only of next 2 sts, yarn over, pull through both loops, yarn over, pull through all 3 loops on hook)
- st(s) = stitch(es)
- rnd(s) = round(s)
- FLO = front loop only
- BLO = back loop only
- [] = stitch count at end of round
- () = repeat instructions within parentheses

---

## PATTERN INSTRUCTIONS

### HEAD (Make 1)

**Using Color A (Pale Gray)**

**Rnd 1**: 6 sc in magic ring [6]

**Rnd 2**: inc in each st around [12]
*Math check: 6 × 2 = 12 ✓*

**Rnd 3**: (sc, inc) around [18]
*Math check: 12 ÷ 2 = 6 repeats, 6 × 3 = 18 ✓*

**Rnd 4**: (2 sc, inc) around [24]
*Math check: 18 ÷ 3 = 6 repeats, 6 × 4 = 24 ✓*

**Rnd 5**: (3 sc, inc) around [30]
*Math check: 24 ÷ 4 = 6 repeats, 6 × 5 = 30 ✓*

**Rnd 6**: (4 sc, inc) around [36]
*Math check: 30 ÷ 5 = 6 repeats, 6 × 6 = 36 ✓*

**Rnd 7**: (5 sc, inc) around [42]
*Math check: 36 ÷ 6 = 6 repeats, 6 × 7 = 42 ✓*

**Rnds 8-10**: sc in each st around [42]
*3 rounds even*

**Rnd 11**: Change to Color B (Dark Gray), sc in each st around [42]
*This creates a shadow line for depth*

**Rnd 12**: Change back to Color A, sc in each st around [42]

**Rnds 13-16**: sc in each st around [42]
*4 rounds even*

**INSERT SAFETY EYES** between Rounds 13 and 14, positioned approximately 7-8 stitches apart. For Eddie's gaunt look, place them slightly wider and lower than typical.

**Rnd 17**: (5 sc, dec) around [36]
*Math check: 42 ÷ 7 = 6 repeats, 6 × 6 = 36 ✓*

**Rnd 18**: sc in each st around [36]

**Rnd 19**: (4 sc, dec) around [30]
*Math check: 36 ÷ 6 = 6 repeats, 6 × 5 = 30 ✓*

**Rnd 20**: (3 sc, dec) around [24]
*Math check: 30 ÷ 5 = 6 repeats, 6 × 4 = 24 ✓*

**Begin stuffing head FIRMLY now**

**Rnd 21**: (2 sc, dec) around [18]
*Math check: 24 ÷ 4 = 6 repeats, 6 × 3 = 18 ✓*

**Rnd 22**: (sc, dec) around [12]
*Math check: 18 ÷ 3 = 6 repeats, 6 × 2 = 12 ✓*

**Add more stuffing, packing firmly**

**Rnd 23**: dec around [6]
*Math check: 12 ÷ 2 = 6 ✓*

Fasten off, leaving long tail. Thread tail through remaining 6 sts and pull tight to close. Weave in end securely.

---

### BODY (Make 1)

**Using Color A (Pale Gray)**

**Rnd 1**: 6 sc in magic ring [6]

**Rnd 2**: inc in each st around [12]
*Math check: 6 × 2 = 12 ✓*

**Rnd 3**: (sc, inc) around [18]
*Math check: 12 ÷ 2 = 6 repeats, 6 × 3 = 18 ✓*

**Rnd 4**: (2 sc, inc) around [24]
*Math check: 18 ÷ 3 = 6 repeats, 6 × 4 = 24 ✓*

**Rnd 5**: (3 sc, inc) around [30]
*Math check: 24 ÷ 4 = 6 repeats, 6 × 5 = 30 ✓*

**Rnd 6**: (4 sc, inc) around [36]
*Math check: 30 ÷ 5 = 6 repeats, 6 × 6 = 36 ✓*

**Rnds 7-12**: sc in each st around [36]
*6 rounds even - this creates the torso length*

**Rnd 13**: (4 sc, dec) around [30]
*Math check: 36 ÷ 6 = 6 repeats, 6 × 5 = 30 ✓*

**Rnd 14**: (3 sc, dec) around [24]
*Math check: 30 ÷ 5 = 6 repeats, 6 × 4 = 24 ✓*

**Begin stuffing body FIRMLY**

**Rnd 15**: (2 sc, dec) around [18]
*Math check: 24 ÷ 4 = 6 repeats, 6 × 3 = 18 ✓*

**Rnd 16**: (sc, dec) around [12]
*Math check: 18 ÷ 3 = 6 repeats, 6 × 2 = 12 ✓*

**Add more stuffing**

**Rnd 17**: dec around [6]
*Math check: 12 ÷ 2 = 6 ✓*

Fasten off, leaving long tail. Thread tail through remaining 6 sts and pull tight to close. Weave in end. Set aside for assembly.

---

### ARMS (Make 2)

**Using Color A (Pale Gray)**

**Rnd 1**: 6 sc in magic ring [6]

**Rnd 2**: (sc, inc) around [9]
*Math check: 6 ÷ 2 = 3 repeats, 3 × 3 = 9 ✓*

**Rnds 3-10**: sc in each st around [9]
*8 rounds even - creates arm length*

Stuff lightly (arms should be flexible, not rigid). Flatten opening and sc across to close (working through both layers). Fasten off, leaving long tail for sewing.

---

### LEGS (Make 2)

**Using Color B (Dark Gray) for shoes/boots**

**Rnd 1**: 6 sc in magic ring [6]

**Rnd 2**: inc in each st around [12]
*Math check: 6 × 2 = 12 ✓*

**Rnd 3**: (sc, inc) around [18]
*Math check: 12 ÷ 2 = 6 repeats, 6 × 3 = 18 ✓*

**Rnd 4**: BLO: sc in each st around [18]
*This creates ridge for boot sole*

**Rnd 5**: sc in each st around [18]

**Rnd 6**: (sc, dec) around [12]
*Math check: 18 ÷ 3 = 6 repeats, 6 × 2 = 12 ✓*

**Rnd 7**: Change to Color A (Pale Gray), sc in each st around [12]

**Rnds 8-12**: sc in each st around [12]
*5 rounds even*

Stuff leg firmly (legs need to support the figure). Do NOT close opening. Fasten off, leaving long tail for sewing to body.

---

### HAIR PIECES

Eddie's wild, spiky hair is created with multiple pieces sewn onto the head.

#### Large Hair Spikes (Make 4-5)

**Using Color C (Black)**

**Rnd 1**: 4 sc in magic ring [4]

**Rnds 2-6**: sc in each st around [4]
*5 rounds even*

**Rnd 7**: (sc, inc) around [6]
*Math check: 4 ÷ 2 = 2 repeats, 2 × 3 = 6 ✓*

**Rnds 8-9**: sc in each st around [6]

Stuff very lightly (just enough to give shape). Fasten off, leaving long tail for sewing. Flatten slightly if desired.

#### Small Hair Spikes (Make 3-4)

**Using Color C (Black)**

**Rnd 1**: 4 sc in magic ring [4]

**Rnds 2-4**: sc in each st around [4]
*3 rounds even*

Stuff very lightly or leave unstuffed. Fasten off, leaving long tail for sewing.

#### Hair Base/Back Hair (Optional, for fuller hair)

**Using Color C (Black)**

Ch 8, sc in 2nd ch from hook and across [7 sc], ch 1, turn.

Work in rows of 7 sc for 6 rows total.

Fasten off, leaving long tail. This piece can be sewn to back of head for more coverage.

---

## ASSEMBLY

**Step 1: Attach Legs to Body**
- Position legs at bottom of body, side by side, facing forward
- Pin in place, ensuring figure will stand balanced
- Using yarn needle and matching yarn, whip stitch around opening of each leg to secure firmly to body
- Test stability; adjust if needed

**Step 2: Attach Head
Disclaimer: This pattern was generated by AI and should be reviewed for accuracy before use. While we strive for quality, AI-generated content may contain errors. Please verify measurements, stitch counts, and instructions before beginning your project. Generated by purlJam.uk
Access your pattern anytime
Bookmark this page to access your pattern anytime