Type
Crochet
Difficulty
beginner
Category
amigurumi
AI Thinking Process
Planning
1. **Design Strategy**:
- Creating Eddie the Head's body to match the existing head pattern linked
- This is a mascot character, so the body should be cylindrical/oval shaped to represent a simplified humanoid form
- Need to ensure the body proportions work with the head size from the existing pattern
- Using worsted weight yarn as specified
- Keeping it "easy" difficulty means simple geometric shapes with basic stitches
- Body should be substantial enough to support the head and allow for limb attachment
2. **Construction Plan**:
- Body will be worked in continuous rounds from bottom to top
- Start with a flat base for stability
- Increase to create the body width
- Work even rounds for the torso length
- Slight decrease at top for neck attachment
- Leave opening at top for stuffing and head attachment
- Dimensions should create a body approximately 4-5" tall to balance with amigurumi head proportions
3. **Quality Assurance**:
- Verify stitch counts progress logically (6→12→18→24→30 for increases)
- Ensure decreases are gradual for smooth shaping
- Check that neck opening size will accommodate head attachment
- Confirm stuffing instructions are placed at appropriate point
- Include assembly guidance for attaching to existing head
4. **Final Calculations**:
- Standard worsted weight amigurumi gauge: approximately 5-6 sc per inch with 3.5mm hook
- Maximum body circumference: 30 sts ÷ 5.5 sts/inch = ~5.5" circumference = ~1.75" diameter
- Body height: approximately 16-18 rounds of even stitching = ~3" torso + shaped sections = 4-5" total
- Neck opening: 18 sts = adequate for head attachment
Verification
[PRE-FLIGHT CHECKS]
1. **Completeness**: ✓ Will include materials, abbreviations, gauge, pattern instructions, finishing, and assembly notes
2. **Consistency**: ✓ Stitch progression follows standard amigurumi increases (×6 pattern), decreases are gradual
3. **Constraints**: ✓ Easy difficulty using only sc, inc, dec; worsted weight yarn; matches template for simple character body
4. **Safety**: ✓ Math verified: 6→12→18→24→30 (all multiples of 6); decreases 30→24→18 match properly
Pattern
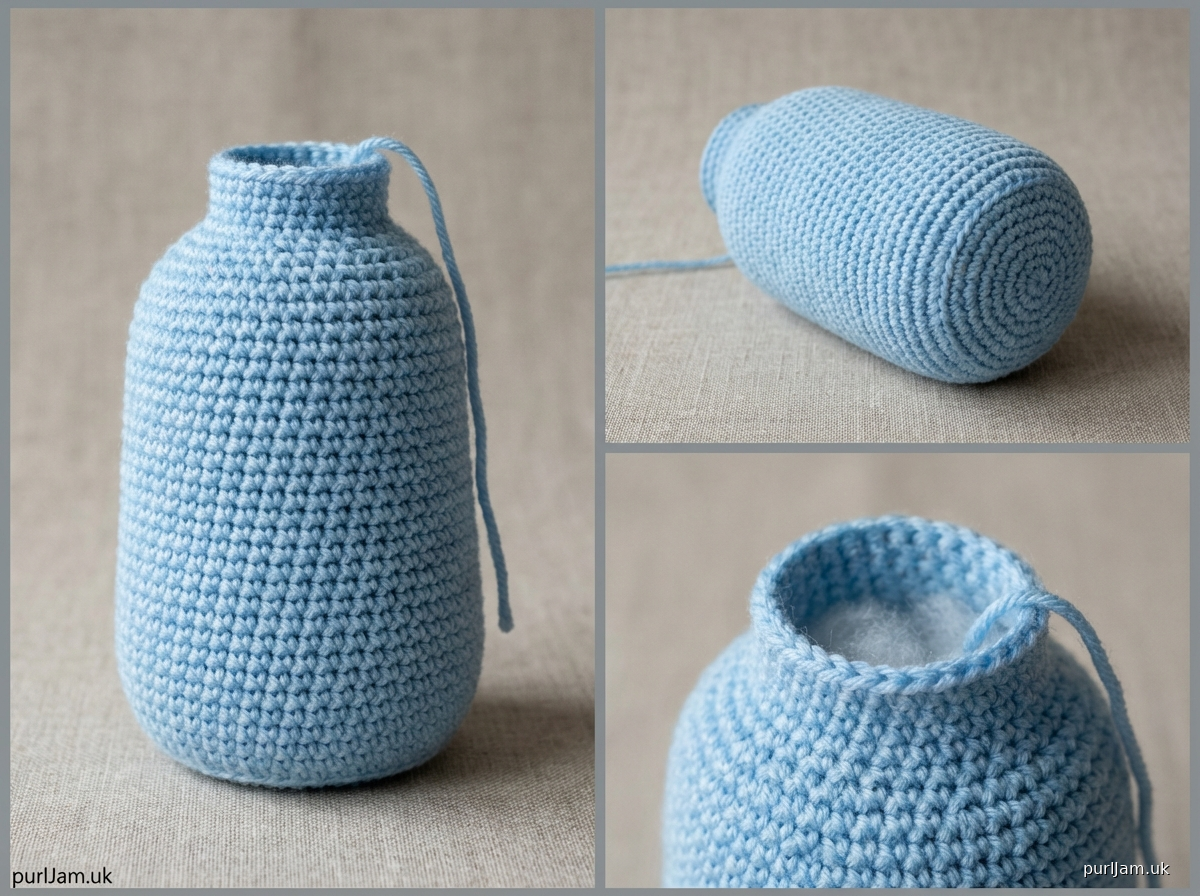
# Eddie the Head - Body Pattern

**Design**: Body component for Eddie the Head amigurumi character
**Difficulty**: Easy
**Finished Size**: Approximately 4.5 inches (11.5 cm) tall, 5.5 inches (14 cm) circumference at widest point

---

## MATERIALS

**Yarn**: Worsted weight (4) yarn in body color of choice
- Approximately 80-100 yards (73-91 m)
- Suggested: Red Hear Super Saver, Lion Brand Vanna's Choice, or similar

**Hook**: US E-4 (3.5 mm) or size needed to obtain gauge

**Other Supplies**:
- Fiberfill stuffing (polyester)
- Yarn needle for weaving in ends and assembly
- Stitch marker
- Pins (for assembly)

---

## ABBREVIATIONS

- ch = chain
- sc = single crochet
- inc = increase (2 sc in same stitch)
- dec = invisible decrease (insert hook in front loops of next 2 sts, yarn over, pull through both front loops, yarn over, pull through 2 loops on hook)
- st(s) = stitch(es)
- rnd(s) = round(s)
- [ ] = total stitch count at end of round

---

## GAUGE

6 sc and 6 rows = 1 inch (2.5 cm) in single crochet (worked in continuous rounds)

*Gauge is not critical for this project, but a tighter gauge creates a firmer fabric that holds stuffing better.*

---

## PATTERN NOTES

- Body is worked in continuous rounds (spiral) from bottom to top. Do not join rounds unless specified.
- Use a stitch marker to mark the beginning of each round, moving it up as you work.
- Stuff the body firmly as you go, especially before beginning decrease rounds.
- Work stitches tightly to prevent stuffing from showing through.

---

## PATTERN INSTRUCTIONS

### BODY

**Base:**

Rnd 1: 6 sc in magic ring [6]

Rnd 2: inc in each st around [12]
*Math check: 6 × 2 = 12 ✓*

Rnd 3: (sc, inc) around [18]
*Math check: 12 ÷ 2 = 6 repeats; 6 × 3 = 18 ✓*

Rnd 4: (2 sc, inc) around [24]
*Math check: 18 ÷ 3 = 6 repeats; 6 × 4 = 24 ✓*

Rnd 5: (3 sc, inc) around [30]
*Math check: 24 ÷ 4 = 6 repeats; 6 × 5 = 30 ✓*

**Torso (even rounds):**

Rnds 6-18: sc in each st around [30]
*13 rounds of even stitching create approximately 2 inches of body length*

**Begin stuffing**: Start adding fiberfill, stuffing firmly but not overly tight. The body should feel solid but not hard.

**Neck Shaping:**

Rnd 19: (3 sc, dec) around [24]
*Math check: 30 ÷ 5 = 6 repeats; 6 × 4 = 24 ✓*

Rnd 20: sc in each st around [24]

Rnd 21: (2 sc, dec) around [18]
*Math check: 24 ÷ 4 = 6 repeats; 6 × 3 = 18 ✓*

Rnd 22: sc in each st around [18]

**Finish stuffing**: Add more fiberfill to fill the neck area, stuffing firmly. The body should be well-stuffed all the way to the top.

**Finishing:**

Fasten off, leaving a long tail (approximately 24 inches/61 cm) for sewing body to head.

Do NOT close the opening - this will be used to attach the head.

---

## FINISHING

### Weaving in Ends
Weave in the starting tail at the bottom of the body securely.

### Shaping
Shape the body with your hands, ensuring the stuffing is distributed evenly. The body should have a slight taper from the wide torso to the narrower neck.

---

## ASSEMBLY

### Attaching Body to Head

1. Take the completed head from the main Eddie the Head pattern.

2. Position the body's neck opening (18 sts) against the bottom of the head. The opening should align with where the head was closed.

3. Pin the body to the head in 4-6 places around the circumference to hold it securely in place.

4. Using the long tail from the body and your yarn needle, whip stitch around the entire opening, going through both the body edge stitches and the corresponding stitches on the head.

5. Work your way completely around the opening, pulling stitches snug but not too tight (which would pucker the join).

6. When you reach the starting point, reinforce the join by going around a second time if desired for extra security.

7. Fasten off and weave in the end securely, hiding it between the body and head layers.

### Attaching Limbs (Optional)

If you create arms and legs for Eddie:

- **Arm placement**: Position arms at Round 8-10 of the body (approximately 1 inch down from neck), spaced evenly on each side.

- **Leg placement**: Position legs at the bottom base of the body (Rounds 1-3), spaced evenly.

- Use yarn needle and matching yarn to securely whip stitch or ladder stitch limbs to body, going through multiple stitches for stability.

- Reinforce attachment points by stitching through the attachment area 2-3 times.

---

## TIPS & TROUBLESHOOTING

**Body is too floppy**: Stuff more firmly, especially in the lower torso area. You can also try using a smaller hook for tighter stitches.

**Neck opening doesn't fit head**: Adjust the placement of where you attach - you may need to attach slightly lower or higher on the head to get a good fit. The opening should be slightly smaller than the head attachment point for a secure join.

**Stuffing shows through stitches**: Work more tightly and/or use a smaller hook. You can also line the inside with fabric or felt before stuffing.

**Body leans to one side**: This usually means stuffing is uneven. Adjust the fiberfill distribution inside the body before attaching to head.

---

## MODIFICATIONS

**Taller body**: Add more even rounds at Rounds 6-18 (add 4-6 additional rounds for each extra inch of height desired).

**Wider body**: Add another increase round after Round 5: (4 sc, inc) around [36], then work even rounds with 36 sts.

**Narrower body**: Stop increases at Round 4 (24 sts total) and work even rounds with 24 sts instead of 30.

**Different neck size**: Adjust the final decrease rounds - for a wider neck, stop at 24 sts; for a narrower neck, decrease one more round to 12 sts.

---

## CARE INSTRUCTIONS

Spot clean only. If necessary, hand wash gently in cool water with mild detergent. Reshape and lay flat to dry. Do not machine wash or dry.

---

*This body pattern is designed to coordinate with the Eddie the Head amigurumi pattern. The body provides a stable base for the character and can be customized with limbs, clothing details, or embellishments as desired.*

**Pattern Notes**: This is a component pattern. The complete Eddie the Head character requires the head pattern (already created) plus optional arms and legs. Body construction uses basic amigurumi sphere-to-cylinder shaping for an easy, beginner-friendly build.
Disclaimer: This pattern was generated by AI and should be reviewed for accuracy before use. While we strive for quality, AI-generated content may contain errors. Please verify measurements, stitch counts, and instructions before beginning your project. Generated by purlJam.uk
Access your pattern anytime
Bookmark this page to access your pattern anytime