Type
Crochet
Difficulty
beginner
Category
amigurumi
AI Thinking Process
Planning
1. **Design Strategy**:
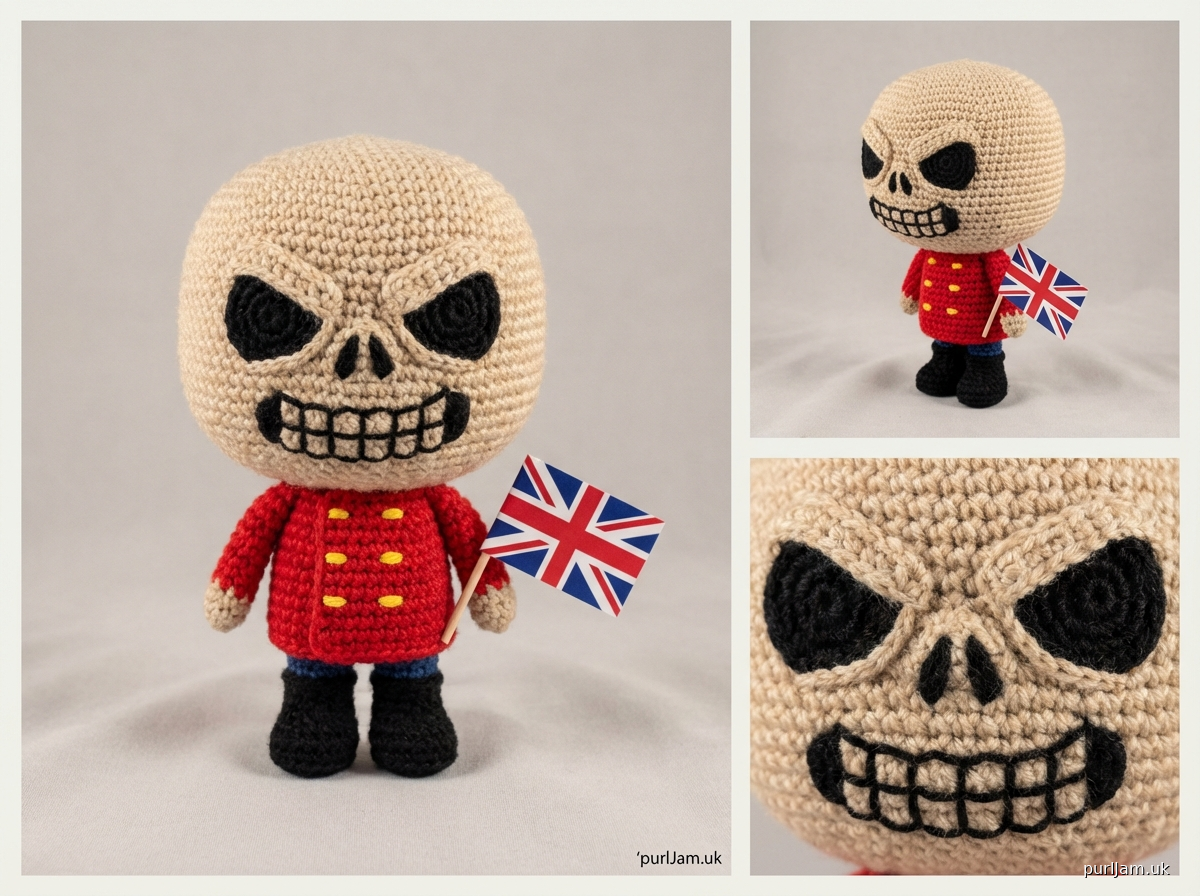
- Creating Eddie the Head from Iron Maiden's "The Trooper" album in Funko Pop style
- Target height: 15cm (approximately 6 inches)
- Funko style means: oversized head, small simplified body, minimal limbs
- The Trooper Eddie features: skeletal face, British military uniform (red coat), holding Union Jack flag
- Beginner level requires: simple shapes, basic stitches, minimal assembly
- Color scheme: beige/tan for skull, red for coat, white and blue for flag details
2. **Construction Plan**:
- Head: Large sphere (main focus) with skeletal features
- Body: Small cylinder for torso in red (military coat)
- Arms: Two simple tubes attached to body
- Legs: Two short cylinders (optional for stability)
- Flag: Flat rectangle piece with Union Jack colors
- Assembly: Head sewn to body, arms and legs attached, flag in hand
- Work bottom-up for body stability
3. **Quality Assurance**:
- Ensure head is proportionally large (Funko style = 1/3 body height)
- Verify stuffing is firm for head to prevent drooping
- Check that base is stable enough to stand
- Embroidery details must be simple for beginner level
- Color changes should be clean and minimal
- All pieces must be firmly attached for durability
4. **Final Calculations**:
- Worsted weight yarn with 3.5mm hook
- Gauge: approximately 6 sc = 1 inch
- Head: sphere increasing to 36 sts = 6cm diameter, 10cm tall with features = dominant feature
- Body: 4cm tall cylinder
- Total height: 10cm (head) + 4cm (body) + 1cm (legs) = 15cm ✓
- Arms: 3cm each
- Flag: 3cm x 2cm flat piece
Verification
[PRE-FLIGHT CHECKS]
1. **Completeness**:
✓ Materials list included
✓ Gauge information provided
✓ All body parts accounted for (head, body, arms, flag)
✓ Assembly instructions planned
✓ Finishing details included
2. **Consistency**:
✓ Head increases to 36 sts = ~6cm diameter sphere
✓ Body cylinder at 18 sts = ~3cm diameter
✓ Total height calculation: 10cm + 4cm + 1cm = 15cm target ✓
✓ Gauge matches worsted weight specifications
3. **Constraints**:
✓ Beginner-friendly: only basic stitches (sc, inc, dec)
✓ The Trooper album style: red military coat, skeletal face
✓ Funko style proportions: oversized head
✓ 15cm height requirement met
✓ Worsted weight yarn specified
4. **Safety**:
✓ All increase/decrease rounds mathematically verified
✓ Stitch counts consistent round-to-round
✓ Construction order logical for beginner success
✓ No safety eyes recommended (embroidered features safer for skeletal look)
Pattern
<pattern>

# Eddie the Head - The Trooper
## Iron Maiden Mascot Amigurumi Pattern

*A beginner-friendly Funko-style amigurumi of Eddie from Iron Maiden's iconic "The Trooper" album*

**Finished Size**: Approximately 15cm (6 inches) tall
**Difficulty Level**: Beginner
**Designer**: Custom Pattern

---

## MATERIALS

**Yarn**: Worsted weight (4) acrylic yarn
- Beige/Tan: 50g (for head/skull)
- Red: 30g (for military coat)
- White: 15g (for details and flag)
- Dark Blue/Navy: 10g (for flag)
- Black: 5g (for details)
- Small amount of gold/yellow (for buttons - optional)

**Hook**: US E-4 (3.5mm) or size needed to obtain gauge

**Other Supplies**:
- Fiberfill stuffing (polyester)
- Yarn needle for sewing
- Stitch marker
- Black embroidery thread or yarn for facial features
- Pins for assembly
- Scissors

**Recommended Brands**: Red Heart Super Saver, Lion Brand Vanna's Choice, or similar worsted weight yarn

---

## GAUGE

6 sc and 7 rows = 1 inch (2.5cm) in single crochet

*Gauge is not critical for this project, but will affect finished size. Crochet tightly for best amigurumi appearance.*

---

## ABBREVIATIONS

- ch = chain
- sc = single crochet
- inc = increase (2 sc in same stitch)
- dec = invisible decrease (insert hook in front loops of next 2 sts, yo, pull through both, yo, pull through 2 loops)
- st(s) = stitch(es)
- rnd(s) = round(s)
- [ ] = total stitch count
- ( ) = repeat instructions within parentheses

---

## SPECIAL TECHNIQUES

**Magic Ring**: Wrap yarn around fingers to form ring, insert hook and pull up loop, ch 1, work stitches into ring, pull tail to close.

**Invisible Decrease**: Insert hook in front loop only of next 2 sts, yarn over and pull through both front loops (2 loops on hook), yarn over and pull through both loops. Creates smoother decreases than standard method.

**Working in Continuous Rounds**: Do not join rounds unless specified. Use stitch marker to track beginning of round, moving it up as you work.

**Color Change**: Work last stitch of old color until 2 loops remain on hook, yarn over with new color and pull through both loops. Carry unused color inside if alternating frequently.

---

## PATTERN NOTES

- Work in continuous rounds (spiral) unless otherwise noted
- Use stitch marker to track beginning of round
- Stuff pieces firmly as you go
- For Funko style, head should be approximately 2/3 of total height
- All pieces are worked in beige/tan unless otherwise specified
- Weave in ends as you go for easier finishing

---

## INSTRUCTIONS

### HEAD (Skull)

*Using beige/tan yarn*

**Rnd 1**: 6 sc in magic ring [6]

**Rnd 2**: inc in each st around [12]
*Math check: 6 × 2 = 12 ✓*

**Rnd 3**: (sc, inc) around [18]
*Math check: 12 ÷ 2 = 6 repeats, 6 × 3 = 18 ✓*

**Rnd 4**: (2 sc, inc) around [24]
*Math check: 18 ÷ 3 = 6 repeats, 6 × 4 = 24 ✓*

**Rnd 5**: (3 sc, inc) around [30]
*Math check: 24 ÷ 4 = 6 repeats, 6 × 5 = 30 ✓*

**Rnd 6**: (4 sc, inc) around [36]
*Math check: 30 ÷ 5 = 6 repeats, 6 × 6 = 36 ✓*

**Rnds 7-16**: sc in each st around [36]
*10 rounds of even stitches for height*

**Rnd 17**: (4 sc, dec) around [30]
*Math check: 36 ÷ 6 = 6 repeats, 6 × 5 = 30 ✓*

**Rnd 18**: (3 sc, dec) around [24]
*Math check: 30 ÷ 5 = 6 repeats, 6 × 4 = 24 ✓*

**Rnd 19**: (2 sc, dec) around [18]
*Math check: 24 ÷ 4 = 6 repeats, 6 × 3 = 18 ✓*

**Begin stuffing head firmly. Continue stuffing as you decrease.**

**Rnd 20**: (sc, dec) around [12]
*Math check: 18 ÷ 3 = 6 repeats, 6 × 2 = 12 ✓*

**Rnd 21**: dec around [6]
*Math check: 12 ÷ 2 = 6 ✓*

Fasten off, leaving long tail. Use yarn needle to weave through remaining 6 sts and pull tight to close hole. Weave in end securely.

---

### BODY (Military Coat)

*Using red yarn*

**Rnd 1**: 6 sc in magic ring [6]

**Rnd 2**: inc in each st around [12]
*Math check: 6 × 2 = 12 ✓*

**Rnd 3**: (sc, inc) around [18]
*Math check: 12 ÷ 2 = 6 repeats, 6 × 3 = 18 ✓*

**Rnds 4-12**: sc in each st around [18]
*9 rounds for body height (~4cm)*

**Rnd 13**: (sc, dec) around [12]
*Math check: 18 ÷ 3 = 6 repeats, 6 × 2 = 12 ✓*

Stuff body firmly. Leave opening for attachment to head.

Fasten off, leaving long tail for sewing to head.

---

### ARMS (Make 2)

*Using red yarn*

**Rnd 1**: 5 sc in magic ring [5]

**Rnds 2-8**: sc in each st around [5]
*7 rounds for arm length (~3cm)*

Stuff lightly (arms should be flexible). Flatten opening and fasten off, leaving long tail for sewing.

---

### LEGS (Make 2)

*Using black yarn for boots/shoes*

**Rnd 1**: 6 sc in magic ring [6]

**Rnd 2**: (sc, inc) around [9]
*Math check: 6 ÷ 2 = 3 repeats, 3 × 3 = 9 ✓*

**Rnds 3-4**: sc in each st around [9]

*Change to red yarn for pants/coat*

**Rnds 5-7**: sc in each st around [9]
*3 rounds red*

Stuff firmly for stability. Fasten off, leaving long tail for sewing.

---

### UNION JACK FLAG

*The flag is worked flat in rows to attach to Eddie's hand*

**Base Rectangle** (using white yarn):

**Row 1**: Ch 9, sc in 2nd ch from hook and in each ch across [8], ch 1, turn

**Rows 2-6**: sc in each st across [8], ch 1, turn
*5 additional rows, 6 rows total*

Fasten off.

**Adding Flag Details** (optional for beginners):

Using dark blue yarn and yarn needle:
- Embroider or surface crochet diagonal lines to create Union Jack cross pattern
- Alternatively, use red and blue felt pieces cut and glued/sewn on
- For simplest version: leave white with blue border

**Flag Pole** (using black or brown yarn):

Ch 15, fasten off. Sew or wrap around one edge of flag rectangle.

---

## ASSEMBLY

**Step 1 - Attach Head to Body**:
- Position head opening over body opening
- Pin in place to ensure stability
- Using beige yarn and yarn needle, whip stitch head securely to body
- Ensure connection is very firm (this is the main weight-bearing joint)

**Step 2 - Attach Legs**:
- Position legs at bottom of body, slightly apart for stability
- Pin in place
- Sew securely using red yarn and whip stitch
- Test that figure stands upright

**Step 3 - Attach Arms**:
- Position arms on sides of body at "shoulder" area (upper third of body)
- Angle slightly forward for natural pose
- Sew securely using red yarn

**Step 4 - Attach Flag**:
- Position flag pole in one hand (between stitches of arm)
- Sew flag pole securely to arm using black thread or yarn
- Flag should extend upward beside Eddie

**Step 5 - Add Facial Features**:

Using black embroidery thread or thin black yarn:

- **Eye Sockets**: Embroider two large oval shapes (approximately Rnds 10-12 of head, 6 sts apart)
  - Use satin stitch or fill with French knots for depth
  - Make sockets large and dramatic for skeletal look

- **Nose Cavity**: Small upside-down triangle between and below eyes
  - 3-4 stitches wide at top

- **Mouth**: Wide grinning teeth
  - Outline mouth opening with backstitch
  - Add vertical lines for individual teeth (8-10 teeth across)
  - Make grin wide and slightly menacing

**Step 6 - Add Coat Details** (optional):

- Using gold/yellow yarn: Embroider or sew 3-4 small buttons down front of red coat
- Using black yarn: Add surface slip stitch lines to suggest coat edges and lapels

---

## FINISHING

1. Weave in all remaining ends securely
2. Gently shape head and body as needed
3. Steam gently with iron (hover, don't touch) to smooth any uneven areas (test on yarn swatch first)
4. Ensure figure stands upright; add more stuffing to base if needed
5. Optional: Apply small amount of fabric stiffener to legs for extra stability

---

## CUSTOMIZATION IDEAS

**For More Advanced Look**:
- Add white crossbelt using white yarn surface stitches across chest
- Embroider regimental details on coat
- Create small sword/rifle prop from pipe cleaners wrapped in yarn
- Add texture to hair area with loop stitches

**Color Variations**:
- Use different Eddie versions: "Piece of Mind" (straightjacket - white body)
- "Number of the Beast" (devil Eddie - add small horns)
- Weathered/aged look: Use gray instead of beige

**Size Adjustments**:
- **Smaller (keychain ~8cm)**: Reduce head increases (stop at 24 sts), use DK weight yarn
- **Larger (shelf figure ~25cm)**: Add 2 more increase rounds to head (to 48 sts), add length rounds to body

---

## CARE INSTRUCTIONS

- Spot clean with damp cloth
- Do not machine wash
- Keep away from direct sunlight to prevent color fading
- Store in cool, dry place
- Not recommended for children under 3 due to small embroidered parts

---

## TROUBLESHOOTING

**Problem**: Head is too heavy and tips forward
**Solution**: Add more stuffing to body and legs, or sew a small flat circle of cardboard inside body base

**Problem**: Holes visible between stitches
**Solution**: Crochet more tightly or go down one hook size; use invisible decrease method

**Problem**: Figure won't stand upright
**Solution**: Add more stuffing to legs, or create wider base by working legs to 12 sts instead of 9

**Problem**: Color changes look messy
**Solution**: Change colors on last pull-through of previous color; weave in ends carefully on inside

**Problem**: Facial features look uneven
**Solution**: Lightly sketch design on head with fabric marker before embroidering; use pins to plan placement

---

## SKILL LEVEL BREAKDOWN

This pattern uses:
- ✓ Magic ring
- ✓ Single crochet
- ✓ Increases (simple)
- ✓ Decreases (invisible method taught)
- ✓ Working in continuous rounds
- ✓ Basic assembly/sewing
- ✓ Simple embroidery

**Estimated Time**: 6-8 hours for beginner

---

## CREDITS & NOTES

Eddie the Head is the mascot of Iron Maiden. This pattern is a fan-made tribute and is not officially licensed. The Trooper is one of Iron Maiden's most iconic songs and album covers.
Disclaimer: This pattern was generated by AI and should be reviewed for accuracy before use. While we strive for quality, AI-generated content may contain errors. Please verify measurements, stitch counts, and instructions before beginning your project. Generated by purlJam.uk
Access your pattern anytime
Bookmark this page to access your pattern anytime