Type
Knitting
Difficulty
intermediate
Category
custom
AI Thinking Process
Planning
Verification
Pattern
Ember the Fire-Breathing Dragon
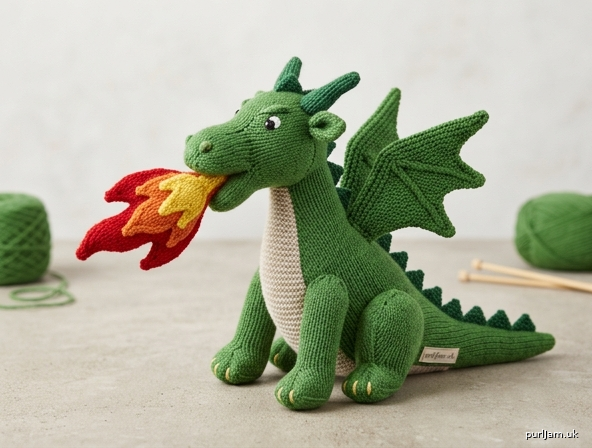
A stuffed toy dragon knit entirely in the flat on two straight needles. Ember has a tapered tail, a long snout, a contrasting belly, pointed garter-stitch wings, a ridge of spikes, small horns, and a three-color flame bursting from the mouth.
Skill level: Intermediate
Finished size: One size — approximately 12½" (32 cm) from snout to tail tip and 6" (15 cm) tall to the wing tips, after stuffing.
Materials
Yarn (worsted weight; shown in a classic green dragon, but any colors work)
- MC (body, head, legs, wings, spikes, horns): 200 yd (183 m)
- CC1 (belly): 35 yd (32 m)
- CC2 Red (outer flame, tongue): 25 yd (23 m)
- CC3 Orange (middle flame): 20 yd (18 m)
- CC4 Yellow (inner flame, optional claws): 15 yd (14 m)
- Black (embroidery): 5 yd (5 m)
- White (eye highlights): 5 yd (5 m)
Needles
- US 6 (4 mm) straight needles
(Use a size that gives a firm fabric. If you meet gauge on US 7 / 4.5 mm and the fabric is still dense, that size is fine. Do not knit loosely — stuffing will show.)
Notions
- Polyester toy stuffing
- Tapestry needle
- Scissors
- 2 stitch markers
- Optional: 9 mm safety eyes (use embroidered eyes instead if the toy is for a child under 3)
Gauge
20 stitches and 28 rows = 4" (10 cm) in stockinette stitch, blocked.
Gauge affects finished size, not fit. A firmer fabric is more important than exact gauge for this project.
Size
One size, as given above. Changing needle size or yarn weight will scale the dragon up or down.
Abbreviations (US)
- BO — bind off
- CC — contrasting color
- CO — cast on
- k — knit
- k2tog — knit 2 together (right-leaning decrease)
- kfb — knit into front and back of the same stitch (1 stitch increased)
- MC — main color
- p — purl
- p2tog — purl 2 together
- pm — place marker
- RS — right side
- sl — slip stitch purlwise with yarn in back
- ssk — slip, slip, knit (left-leaning decrease)
- st(s) — stitch(es)
- St st — stockinette stitch (knit RS rows, purl WS rows)
- WS — wrong side
- wyib — with yarn in back
- psso — pass slipped stitch over
Pattern Notes
- The entire dragon is worked flat on two straight needles. There is no knitting in the round.
- Stockinette curls; that is expected. Seaming and stuffing pull the pieces into shape.
- Knit firmly. If you can see gaps between stitches, go down a needle size.
- On every shaped piece, the increase row is k1, kfb, knit to last 2 sts, kfb, k1 unless a different wording is given. The matching decrease is k1, ssk, knit to last 3 sts, k2tog, k1.
- Stitch counts appear in parentheses at the end of a row. A check mark means the arithmetic has been verified.
- Stuff in small pinches as you sew, especially the tail and snout. Overstuffing stretches seams.
- Mattress stitch on stockinette; whipstitch is fine on garter (wings, spikes).
- The fire is three layered flame pieces stacked yellow / orange / red, with the red flame forked, then sewn into the mouth over a small tongue.
Body (MC)
Worked flat from the tail tip to the neck, then seamed along the underside into a tube.
CO 8 sts.
Tail tip — increase to 16 sts
- Row 1 (RS): K1, kfb, k4, kfb, k1. (10 sts; 8 + 2 = 10 ✓)
- Row 2 and all WS rows in this section: Purl.
- Row 3: K1, kfb, knit to last 2 sts, kfb, k1. (12 sts)
- Row 5: Repeat increase. (14 sts)
- Row 7: Repeat increase. (16 sts; 4 increase rows × 2 sts = 8, 8 + 8 = 16 ✓)
- Rows 8–16: Work 9 rows even in St st, ending after a WS purl row. (16 sts)
Haunches — increase to 36 sts
- Row 17 (RS): K1, kfb, knit to last 2 sts, kfb, k1. (18 sts)
- Row 18: Purl.
- Repeat Rows 17–18 nine more times (10 increase rows total in this section).
(16 + 20 = 36 sts ✓)
Torso — work even
- Work 24 rows even in St st, beginning with a RS knit row. (36 sts)
End after a WS purl row.
Chest and neck — decrease to 20 sts
- Next RS row: K1, ssk, knit to last 3 sts, k2tog, k1. (34 sts)
- Next WS row: Purl.
- Repeat the last 2 rows seven more times (8 decrease rows total).
(36 − 16 = 20 sts ✓) - Work 2 rows even in St st. (20 sts)
BO all 20 sts knitwise. Cut yarn, leaving a 24" (61 cm) tail for seaming.
Head (MC)
Worked flat from the neck edge to the snout, then seamed along the underside. The CO edge is sewn to the body neck.
CO 20 sts.
- Rows 1–4: Work in St st, beginning with a RS knit row. (20 sts)
Widen for the skull
- Row 5 (RS): K1, kfb, knit to last 2 sts, kfb, k1. (22 sts; 20 + 2 = 22 ✓)
- Row 6: Purl.
- Row 7: Repeat increase. (24 sts)
- Row 8: Purl.
- Row 9: Repeat increase. (26 sts)
- Row 10: Purl.
- Row 11: Repeat increase. (28 sts; 4 increase rows × 2 = 8, 20 + 8 = 28 ✓)
- Row 12: Purl.
- Rows 13–16: Work 4 rows even in St st. (28 sts)
Taper toward the muzzle
- Row 17 (RS): K1, ssk, knit to last 3 sts, k2tog, k1. (26 sts)
- Row 18: Purl.
- Row 19: Repeat decrease. (24 sts)
- Row 20: Purl.
- Row 21: Repeat decrease. (22 sts)
- Row 22: Purl.
- Row 23: Repeat decrease. (20 sts; 4 decrease rows × 2 = 8, 28 − 8 = 20 ✓)
- Row 24: Purl.
- Rows 25–26: Work 2 rows even. (20 sts)
Close the snout
- Row 27 (RS): [K2tog] 10 times. (10 sts; 20 ÷ 2 = 10 ✓)
- Row 28 (WS): [P2tog] 5 times. (5 sts)
Cut yarn, leaving a 18" (46 cm) tail. Thread the tail through the remaining 5 sts, pull tight to gather the snout, and fasten off. Do not seam yet.
Belly Patch (CC1)
A separate oval sewn over the body’s underside seam.
CO 6 sts.
- Row 1 (RS): Kfb, k4, kfb. (8 sts)
- Row 2 and all WS rows: Purl.
- Row 3: Kfb, knit to last st, kfb. (10 sts)
- Row 5: Repeat increase. (12 sts)
- Row 7: Repeat increase. (14 sts)
- Row 9: Repeat increase. (16 sts; 5 increase rows × 2 = 10, 6 + 10 = 16 ✓)
- Row 10: Purl.
- Rows 11–30: Work 20 rows even in St st, ending after a WS row. (16 sts)
Decrease
- Row 31 (RS): Ssk, knit to last 2 sts, k2tog. (14 sts)
- Row 32: Purl.
- Repeat Rows 31–32 four more times (5 decrease rows total). (16 − 10 = 6 sts ✓)
BO remaining 6 sts. Cut yarn, leaving an 18" (46 cm) tail for sewing.
Legs (make 4, MC)
Each leg is a small flat rectangle seamed into a tube, gathered at the paw.
CO 14 sts.
- Rows 1–18: Work in St st, beginning with a RS knit row. (14 sts)
- Row 19 (RS): [K2tog] 7 times. (7 sts; 14 ÷ 2 = 7 ✓)
- Row 20: Purl.
- Row 21: K1, [k2tog] 3 times. (4 sts; 1 + 6 = 7 going in, 1 + 3 = 4 ✓)
Cut yarn, leaving a 12" (30 cm) tail. Thread through the remaining 4 sts, pull tight (this is the paw), and fasten off. Seam later.
Wings (make 2, MC)
Garter stitch (knit every row) for stiffness. Each wing is increased to 21 sts, then split into three 7-stitch finger points.
CO 5 sts.
-
Row 1 (RS): K1, kfb, k1, kfb, k1. (7 sts; 5 + 2 = 7 ✓)
-
Row 2: Knit.
-
Row 3: K1, kfb, knit to last 2 sts, kfb, k1. (9 sts)
-
Row 4: Knit.
-
Repeat Rows 3–4 six more times (7 additional increase rows after Row 1).
(7 + 14 = 21 sts ✓)
You now have 16 rows worked and 21 sts on the needle. -
Rows 17–20: Knit 4 rows even. (21 sts)
Finger 1 (right edge, RS facing)
- Next row: K7, turn. Leave the remaining 14 sts on the needle. Working on these 7 sts only:
- F1: K7.
- F2: K7.
- F3: Ssk, k3, k2tog. (5 sts; 7 − 2 = 5 ✓)
- F4: K5.
- F5: Ssk, k1, k2tog. (3 sts)
- F6: K3.
- F7: Sl 1, k2tog, psso. (1 st) Fasten off.
Finger 2 (center) With RS facing, rejoin yarn to the remaining 14 sts.
- K7, turn. Leave the last 7 sts unworked. Work the same 7 finger rows as Finger 1 on these 7 sts. Fasten off.
Finger 3 (left edge) With RS facing, rejoin yarn to the last 7 sts. Work the same 7 finger rows. Fasten off.
Weave in the finger tails on the WS. The straight (CO) edge is the wing root, sewn to the body.
Spikes (make 8, MC)
Garter-stitch triangles for the spinal ridge. Make 8.
CO 9 sts.
- Row 1: Knit.
- Row 2: Ssk, k5, k2tog. (7 sts)
- Row 3: Knit.
- Row 4: Ssk, k3, k2tog. (5 sts)
- Row 5: Knit.
- Row 6: Ssk, k1, k2tog. (3 sts)
- Row 7: Knit.
- Row 8: Sl 1, k2tog, psso. (1 st)
Fasten off. The CO edge is sewn to the body.
Horns (make 2, MC)
CO 10 sts.
- Rows 1–4: Work in St st, beginning with a RS knit row. (10 sts)
- Row 5 (RS): K1, ssk, k4, k2tog, k1. (8 sts; 10 − 2 = 8 ✓)
- Row 6: Purl.
- Row 7: K1, ssk, k2, k2tog, k1. (6 sts)
- Row 8: Purl.
- Row 9: K1, ssk, k2tog, k1. (4 sts)
- Row 10: Purl.
- Row 11: Ssk, k2tog. (2 sts)
- Row 12: P2tog. (1 st)
Fasten off, leaving a 10" (25 cm) tail. Use the tail to seam the side edges into a narrow cone. Stuff very lightly with a pinch of filling before closing the base.
Tongue (CC2 Red)
CO 5 sts.
- Rows 1–10: Work in St st, beginning with a RS knit row. (5 sts)
- Row 11 (RS): K2tog, k1, k2tog. (3 sts)
- Row 12: Purl.
- Row 13: Sl 1, k2tog, psso. (1 st)
Fasten off. Set aside.
Fire
Three flame layers, stacked. All worked in St st. The red (outer) flame is forked.
Inner flame (CC4 Yellow)
CO 3 sts.
- Row 1 (RS): Kfb, k1, kfb. (5 sts; 3 + 2 = 5 ✓)
- Row 2 and all WS rows unless noted: Purl.
- Row 3: Kfb, k3, kfb. (7 sts)
- Row 5: Kfb, k5, kfb. (9 sts; 3 increase rows × 2 = 6, 3 + 6 = 9 ✓)
- Rows 6–8: Work 3 rows even in St st, ending after a WS row.
- Row 9: Ssk, k5, k2tog. (7 sts)
- Row 11: Ssk, k3, k2tog. (5 sts)
- Row 13: Ssk, k1, k2tog. (3 sts)
- Row 14: Purl.
- Row 15 (RS): Sl 1, k2tog, psso. (1 st)
Fasten off.
Middle flame (CC3 Orange)
CO 5 sts.
- Row 1 (RS): Kfb, k3, kfb. (7 sts)
- Row 2 and all WS rows unless noted: Purl.
- Row 3: Kfb, k5, kfb. (9 sts)
- Row 5: Kfb, k7, kfb. (11 sts)
- Row 7: Kfb, k9, kfb. (13 sts; 4 increase rows × 2 = 8, 5 + 8 = 13 ✓)
- Rows 8–12: Work 5 rows even in St st, ending after a WS row.
- Row 13: Ssk, k9, k2tog. (11 sts)
- Row 15: Ssk, k7, k2tog. (9 sts)
- Row 17: Ssk, k5, k2tog. (7 sts)
- Row 19: Ssk, k3, k2tog. (5 sts)
- Row 21: Ssk, k1, k2tog. (3 sts)
- Row 22: Purl.
- Row 23 (RS): Sl 1, k2tog, psso. (1 st)
Fasten off.
Outer flame (CC2 Red), forked
CO 7 sts.
- Row 1 (RS): Kfb, k5, kfb. (9 sts)
- Row 2 and all WS rows of the increase section: Purl.
- Row 3: Kfb, knit to last st, kfb. (11 sts)
- Row 5: Repeat increase. (13 sts)
- Row 7: Repeat increase. (15 sts)
- Row 9: Repeat increase. (17 sts; 5 increase rows × 2 = 10, 7 + 10 = 17 ✓)
- Rows 10–14: Work 5 rows even in St st, ending after a WS row. (17 sts)
Divide for the fork
- Row 15 (RS): K8, BO 1 st, k8. You now have two groups of 8 sts (8 + 1 + 8 = 17 ✓). The bound-off stitch is the notch between the two flame tips. Leave the first group of 8 sts on the needle and work the second group (the sts you just knit) first.
Second tip
- Next WS: P8.
- RS: Ssk, k4, k2tog. (6 sts)
- WS: Purl.
- RS: Ssk, k2, k2tog. (4 sts)
- WS: Purl.
- RS: Ssk, k2tog. (2 sts)
- WS: Purl.
- RS: K2tog. (1 st) Fasten off.
First tip With WS facing, rejoin CC2 to the remaining 8 sts. Work the same decrease sequence as the second tip. Fasten off.
Finishing
1. Body tube
Fold the body in half lengthwise, RS out (the WS will be inside once stuffed, so sew with RS facing you using mattress stitch). Join the two long side edges from the tail tip up to the neck BO, leaving the 20-st neck edge open. Begin stuffing when the seam is about two-thirds closed: stuff the tail firmly and evenly so it tapers, then the body so it is plump but not straining the stitches. Finish the seam up to the neck. The neck stays open.
2. Head
Mattress-stitch the two long side edges of the head from the gathered snout back to the 20-st CO (neck). Stuff as you go: snout firmly so it holds a point, skull firmly but not round like a ball — a slightly elongated head reads as a dragon. Leave the 20-st neck edge open.
3. Join head to body
Match the 20 head-neck stitches to the 20 body-neck stitches. Mattress-stitch all the way around, adding a last pinch of stuffing before closing so the neck does not collapse. (20 to 20 ✓)
4. Belly
Center the belly patch over the underside seam, wide middle on the torso, tapered ends toward chest and tail. Whipstitch or mattress-stitch the patch down. This hides the body seam and adds the contrasting underbelly.
5. Legs
Seam each leg into a tube from paw to CO edge. Stuff firmly but not so full that the leg stands out at 90 degrees — a slight bend looks more alive. Sew the four CO edges to the body: two front legs high on the chest, just behind where the neck join sits, spaced about 1" (2.5 cm) apart; two back legs at the end of the even torso section, same spacing. Make sure all four paws sit level so the dragon can stand.
6. Wings
Pin the CO edge of each wing to the sides of the back, just behind the neck, with the three fingers pointing up and slightly back. The inner (first) finger sits closest to the spine. Sew the CO edge down securely with whipstitch. Tack the lower third of each wing to the body with two or three small stitches so they do not flop forward, leaving the fingers free.
7. Spikes
Sew the CO edge of each spike to the center back, in a line from the crown of the head to the tail:
- Spike 1: top of the head, between the horns (horns go on in step 8)
- Spikes 2–3: neck
- Spikes 4–6: torso
- Spikes 7–8: tail, getting smaller visually as the tail narrows (the spikes are the same size; spacing them slightly closer toward the tip reads as a taper)
Overlap each CO edge a tiny amount onto the next so there is no gap in the ridge.
8. Horns
Sew the open base of each horn to the head, slightly in front of the first spike and about ¾" (2 cm) apart, angled a little outward.
9. Eyes and face
If using safety eyes, install them before the head is fully stuffed, about 1" (2.5 cm) back from the snout tip and ¾" (2 cm) apart.
For embroidered eyes (recommended): with white, satin-stitch a small oval on each side of the snout. With black, stitch a pupil slightly toward the snout (this makes the dragon look forward). Add a tiny white stitch at the upper corner of each pupil for a highlight.
With black, make two small stitches for nostrils on the top of the snout.
10. Mouth, tongue, and fire
At the gathered snout, open a 1¼" (3 cm) horizontal mouth with the tapestry needle if the gathering has fully closed it — you want a small slot, not a hole.
Sew the tongue into the lower half of the slot, point outward.
Stack the flames: yellow centered on orange, orange centered on red, bases aligned, tips fanned so the forked red tips show on the outside and the yellow peeks in the middle. Tack the three bases together with a few stitches in red.
Insert the stacked base into the mouth on top of the tongue so the flames project forward and slightly up. Sew around the base firmly, catching all three layers and the mouth edges. With black, embroider a thin line along the mouth opening on either side of the fire so it reads as lips.
11. Optional claws
With CC4 yellow (or CC1), embroider three short straight stitches at the gathered end of each paw.
12. Weave in remaining ends. Do not block the stuffed body. If the wings curl, steam them very lightly from the WS, hovering the iron — do not press the stuffed dragon.
Your dragon is ready to stand guard (and breathe fire).
Disclaimer: This pattern was generated by AI and should be reviewed for accuracy before use. While we strive for quality, AI-generated content may contain errors. Please verify measurements, stitch counts, charts, and instructions before beginning your project. Generated by purlJam.uk
Love this pattern?
Save this pattern to your free PurlJam libraryAccess your pattern anytime
Bookmark this page to access your pattern anytime