Type
Knitting
Difficulty
intermediate
Category
amigurumi
AI Thinking Process
Planning
Verification
Pattern
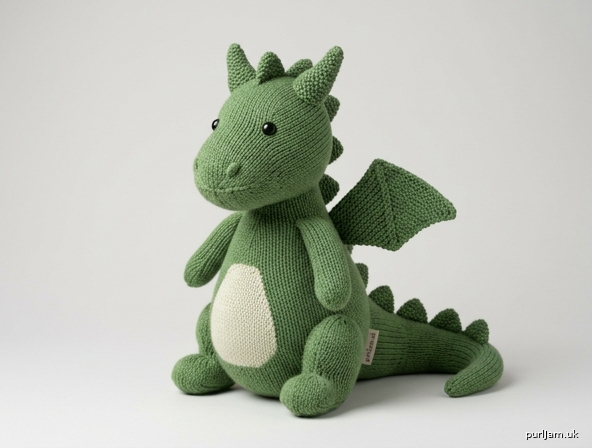
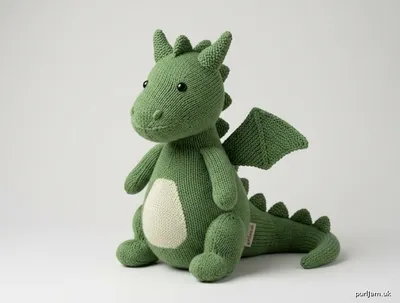
Sparkbelly the Dragon — Beginner Knitted Amigurumi
A friendly, pot-bellied dragon with stubby legs, a long tapering tail, a pair of garter-stitch wings, twin horns, and a row of back spikes. Worked entirely in the round in stockinette (plus a little flat garter stitch for the wings and spikes), this is an ideal first amigurumi project.
Finished size: Approximately 9–10 in (23–25 cm) nose to tail tip, 5 in (13 cm) tall at the shoulder.
Materials
- Worsted weight yarn, approx. 150 yd (140 m) in Main Color (MC – green, for head/body/legs/tail/wings/horns/spikes)
- Worsted weight yarn, small amount (approx. 20 yd / 18 m) in Contrast Color (CC – cream or yellow, optional for belly patch or spike tips)
- US 6 (4.0 mm) DPNs (set of 4 or 5) or a 24 in (60 cm) circular needle for Magic Loop
- Polyester fiberfill stuffing — approx. 6–7 oz (170–200 g)
- 2 safety eyes, 8–9 mm (or embroidery floss + tapestry needle for embroidered eyes)
- Tapestry needle
- Stitch marker
- Scissors
Gauge note: Deliberately go down a needle size or two from what the yarn label suggests. A tight, dense fabric is more important than an exact stitch count here — it keeps stuffing from peeking through.
Gauge: 20 sts and 28 rows = 4 in (10 cm) in stockinette stitch, worked in the round, on US 6 (4.0 mm) needles.
Abbreviations
- k – knit
- kfb – knit into front and back of same stitch (increase 1 st)
- k2tog – knit 2 stitches together (decrease 1 st)
- rnd(s) – round(s)
- st(s) – stitch(es)
- rep – repeat
- BO – bind off
- CO – cast on
- RS – right side
Special Techniques
Starting a small round: Cast on stitches, leaving a long tail (12+ in). Distribute stitches across DPNs (or onto one needle for Magic Loop) and join, being careful not to twist. The small starting hole will be closed later using the cast-on tail — this is normal.
Cinching an end closed: When instructed to "cinch," cut yarn leaving a 6 in tail, thread onto tapestry needle, pass through remaining live stitches, pull tight to close the hole, and fasten off on the inside.
I-cord (for horns): Cast on stitches to a DPN. *Knit all stitches; without turning work, slide stitches back to the opposite end of the needle, pulling yarn firmly across the back; repeat from * for the number of rows given. A narrow tube forms automatically.
Mattress stitch (assembly): With the two pieces to be joined placed right-sides out and edges touching, use a tapestry needle to pick up a small bar between stitches on each piece alternately, pulling snug every few stitches so the seam disappears into the fabric.
HEAD (make 1)
CO 6 sts. Join in the round, place marker for start of round.
- Rnd 1: kfb in every st around (6 → 12 sts)
- Rnd 2: *k1, kfb; rep from * around (12 → 18 sts)
- Rnd 3: *k2, kfb; rep from * around (18 → 24 sts)
- Rnd 4: *k3, kfb; rep from * around (24 → 30 sts)
- Rnd 5: *k4, kfb; rep from * around (30 → 36 sts)
(6 increases every round → 6, 12, 18, 24, 30, 36 ✓)
-
Rnds 6–14: Knit even (9 rounds). Insert safety eyes now, between rounds 10 and 11, spaced about 8 sts apart, centered on the front of the head.
-
Rnd 15: *k4, k2tog; rep from * around (36 → 30 sts)
-
Rnd 16: Knit even
-
Rnd 17: *k3, k2tog; rep from * around (30 → 24 sts)
-
Rnd 18: Knit even
-
Rnd 19: *k2, k2tog; rep from * around (24 → 18 sts)
-
Rnd 20: *k1, k2tog; rep from * around (18 → 12 sts)
-
Rnd 21: *k2tog; rep from * around (12 → 6 sts)
(6 decreases every round → 36, 30, 24, 18, 12, 6 ✓)
Stuff head firmly, shaping it into a round ball, packing extra into the snout area at the start. Cinch closed 6 sts. Weave in ends inside the head. Head measures approx. 3 in (7.5 cm) tall.
BODY (make 1)
CO 6 sts. Join in the round.
- Rnd 1: kfb around (6 → 12)
- Rnd 2: k1, kfb around (12 → 18)
- Rnd 3: k2, kfb around (18 → 24)
- Rnd 4: k3, kfb around (24 → 30)
- Rnd 5: k4, kfb around (30 → 36)
- Rnd 6: k5, kfb around (36 → 42)
(6 increases every round → 6, 12, 18, 24, 30, 36, 42 ✓)
-
Rnds 7–22: Knit even (16 rounds) — this is the belly section.
-
Rnd 23: k5, k2tog around (42 → 36)
-
Rnd 24: Knit even
-
Rnd 25: k4, k2tog around (36 → 30)
-
Rnd 26: Knit even
-
Rnd 27: k3, k2tog around (30 → 24)
-
Rnd 28: k2, k2tog around (24 → 18)
-
Rnd 29: k1, k2tog around (18 → 12)
-
Rnd 30: k2tog around (12 → 6)
(6 decreases every round → 42, 36, 30, 24, 18, 12, 6 ✓)
Stuff firmly. Cinch closed 6 sts. Weave in ends. Body measures approx. 4.3 in (11 cm) tall, with the round formed by Rnd 6 (42 sts) as the widest "belly" point.
LEGS (make 4)
CO 12 sts. Join in the round. Leave the CO edge open (this end attaches to the body — do not cinch it).
- Rnds 1–10: Knit even (10 rounds).
- Rnd 11: *k2tog; rep from * around (12 → 6 sts)
(6 decreases → 12, 6 ✓)
Stuff lightly. Cinch closed the 6 remaining sts (this is the foot tip). Weave in the cinch end only; leave the long CO tail for sewing to the body. Leg measures approx. 1.5 in (3.8 cm) long.
TAIL (make 1)
CO 6 sts. Join in the round. Leave the CO edge open (attaches to body).
- Rnd 1: kfb around (6 → 12 sts)
(6 increases ✓)
- Rnds 2–21: Knit even (20 rounds).
- Rnd 22: *k2tog; rep from * around (12 → 6 sts)
(6 decreases ✓)
Stuff lightly, tapering the stuffing so it is fuller near the body end and lighter near the tip. Cinch closed the 6 remaining sts. Tail measures approx. 3 in (7.5 cm), tapering to a point.
WINGS (make 2, worked flat in garter stitch — every row knit)
CO 3 sts, leaving a long tail for seaming.
- Row 1 (RS): Knit.
- Row 2: kfb, k to last st, kfb (3 → 5 sts)
- Row 3: kfb, k to last st, kfb (5 → 7 sts)
- Row 4: kfb, k to last st, kfb (7 → 9 sts)
- Row 5: kfb, k to last st, kfb (9 → 11 sts)
- Row 6: kfb, k to last st, kfb (11 → 13 sts)
- Row 7: kfb, k to last st, kfb (13 → 15 sts)
(2 increases per row × 6 rows = 12; 3 + 12 = 15 ✓)
- Rows 8–9: Knit even.
- BO all 15 sts knitwise.
No stuffing needed — wings stay flat. Weave in ends, leaving the CO-edge tail long for seaming. Wing measures approx. 2.5 in (6.5 cm) across.
HORNS (make 2, I-cord)
Using 2 DPNs, CO 3 sts.
Work I-cord for 8 rows: *k3, do not turn — slide sts to opposite end of needle, pull yarn snug across back; rep from *.
Cut yarn, thread through 3 live sts, cinch closed and fasten off, leaving both tails for seaming. Horn measures approx. 1 in (2.5 cm).
SPIKES (make 5, worked flat)
CO 1 st.
- Row 1: kfb (1 → 2 sts)
- Row 2: kfb, k1 (2 → 3 sts)
- Row 3: kfb, k2 (3 → 4 sts)
- Row 4: k2tog, k2 (4 → 3 sts)
- Row 5: k2tog, k1 (3 → 2 sts)
- Row 6: k2tog (2 → 1 st)
(Increases to 4 sts then decreases back to 1 st — a small triangle ✓)
Fasten off, leaving a tail for seaming. Each spike measures approx. 0.75 in (2 cm).
Assembly & Finishing
Work in this order so the dragon stays symmetrical and well-balanced:
-
Head to body: Position the cinched-closed point of the head against the cinched-closed top point of the body. Mattress-stitch (or whip-stitch) around the seam where they meet, forming a short neck. Weave in ends inside the body.
-
Legs: Pin the two front legs to the upper sides of the body, roughly level with rounds 8–10 counting up from the base, one on each side, evenly matched. Pin the two back legs lower on the body, roughly level with rounds 3–5 from the base. Sew the open CO edge of each leg to the body using mattress stitch, checking front-to-back and left-to-right symmetry before sewing all four in place.
-
Tail: Sew the open CO edge of the tail to the center back of the body, opposite the head/neck seam, at the base of the body.
-
Wings: Fold each wing's cast-on edge slightly and sew it to the upper back of the body, one on each side of the neck seam, angled slightly upward and matching left to right.
-
Horns: Sew the two horns to the top of the head, spaced about 1 in (2.5 cm) apart, tilted slightly backward.
-
Spikes: Sew the 5 spikes in a row down the center back, from just behind the horns to the base of the tail, points facing up, evenly spaced.
-
Face details (optional): If not using safety eyes, embroider eyes with contrast floss using small satin stitches. Add two tiny straight-stitch nostrils at the front of the head and a simple curved backstitch smile if desired.
-
Weave in every remaining end securely on the inside of the body or head before trimming.
Enjoy your finished dragon! Every piece can be stuffed a little firmer for a stiffer toy, or a little softer for extra cuddliness — just keep the fabric dense enough that stuffing never peeks through.
Disclaimer: This pattern was generated by AI and should be reviewed for accuracy before use. While we strive for quality, AI-generated content may contain errors. Please verify measurements, stitch counts, and instructions before beginning your project. Generated by purlJam.uk
Love this pattern?
Save this pattern to your free PurlJam libraryAccess your pattern anytime
Bookmark this page to access your pattern anytime